Vasa - 1:65 DeAgostini [COMPLETED BUILD]

Au contraire! (Pardon my French...) You can keep your sanity if you deal with one line at a time. If you first choose one specific type of line at a time, you rig it in an organized fashion thus:

1) Learn the name of the line and what its function is. For example, say you are looking install a fore topmast stay line.
2) Determine the routing path of the line. Refer to the paragraph in RC Anderson that talks about that specific line, for the ship from your country (if available). If Wasa, use any reference to Wasa mentioned or use Dutch style rigging for that line. This affects shape of crows feet and their position of blocks for stays, and attachment points of intervening blocks.

For our example stay, the upper end of the line loops around the masthead and that loop contains a mouse, and the other end probably has a crows foot containing blocks in a certain pattern that connects it to the bowsprit, with the bitter end sometimes belayed somewhere on the beakshead or forecastle railing. Below are foreign (non-English) examples.
View attachment 270315
3) Highlight that paragraph if using an e-book on the computer screen or place a bookmark in your cheaply bought hardcopy from Amazon. You will come back to this spot a few times in this process to re-read it.
4) Lay the drawing out and attempt to locate the line in question, and try to match the connection end points, especially if you have source material that shows a belaying point on the lowest end of the line.
5) compare the attachment points of the drawing to the book reference, noting differences. Look at choices in block locations, direction of routing the line, as well as end attachment points such as belaying point locations.
6) Among the differences, if any, choose the one that seems to be the most credible. If you have a belaying plan, you are in luck. If not, you may have to choose a belaying point on the rails, kevel, cleat, or belaying pin based on typical belaying plans used on other ships of similar size, time period and nationality.
7) For standing rigging, choose the end that has the worst access and tie the end of the line at that point first, then route the line, tension the line to the appropriate tension, and tie off the opposite end of the line. Apply dilute PVA to knots.
8) For running rigging lines, rig the line, starting at the lowest belaying point because it's very crowded for fingers/tools, and route the line through intervening blocks until you get to the end point. Pull the line to the proper tension. Sometimes slack lines that droop are more realistic, so look at paintings for examples. Attach the end of the line at the endpoint on yards or masts. Apply dilute PVA to knots.
9) PROFIT. :DThumbsup
Very good advise on rigging, sounds like you have done more than your share.
 
Doc you said which comes first, is the old "chicken or the egg" issue, but from many books I have seen the shroud lines are below the stays, when you look how the layers are stacked around a mast.
 
The dental folks have all the good tools to use, those not up to quality any longer for patient use.

I would love to find one of the old articulating band driven dental drills for use, good control and slow speed are available from them.

I was Medical Supply, when in Air Force, and we used to get the dental lab all the nice stuff to use.
 
I used to work in a dental lab. Send me the impressions, and I'll make you some dentures!!! ;)
There are several people on this forum who were once lab technicians - must be an affinity for hand work. I'm an orthodontist so we mostly take digital impressions nowadays - but I've taken my share of PVS impressions and the like...
 
Dear friend, unfortunately the system of The site's computer did not send me updates on your blog from page 79.
So in the last hour I was privileged to complete the information on the impressive progress. I must admit that you are doing a beautiful job and the result is very impressive and accurate. Well done
 
Very good advise on rigging, sounds like you have done more than your share.
HAH! Just ONE SHIP, albeit a complex man of war. You learn a LOT really fast working on a ship on that level. The fear of tackling rigging is positively paralyzing. When faced with your first ship having complicated 17th century rigging, you have to start somewhere like Paul said earlier. You spend days thinking before making your first move. Since the Corel instructions for my ship had several sheets of rigging drawings that you performed in order, the approach on which lines are rigged when was mostly evident. After you're done thinking and devising an order, you start rigging.
 
Last edited:
We used to have a local ship building group in Oklahoma City, but they got moved and I lost track.

The wiser and older gentleman who lead the group was always full of good sage advise when I asked what or how to do things.

Now, I only have my memories and the great advise and info from this forum to help me along.
 
For the the main mast, John Harland pointed out that in this period it was quite common to lower the main yards in really bad weather, and the parrels need to pass easily over the wooldings. Fred mentioned that he believes there should be wooden hoops above and below the wooldings for this purpose, he would like to check, but the modern wooldings are unfortunately in the way.
Also worth to note that there are recesses in the mast for the wooldings.
Regarding belaying plan, I was told there is a new belaying plan in Vasa II, that the old 80s plans are not quite right and there are outright belaying furniture errors on the 1/10 model.
While developing the new belaying plan, the captains of Kalmar Nyckel were also involved, for input into what works.
Fred would of course be the best first source of information, perhaps try : https://warshipvasa.freeforums.net/
Second, Eva-Marie Stolt's drawings, if failing that and given a choice between Dutch and English practice, I'd pick Dutch.
Fred particularly warned against Monfeld. His book on Vasa apparently contains on average 2.5 errors per page.
When referring to Anderson, I'd take into consideration what he mentions with respect to the Danish ivory model due the possible relevance from common Scottish rigging influence.

Cheers,
Peter
 
Last edited:
As I understand it Margareta was more comfortable at home managing the family estates...
Possibly, -but with her husband passed away, the contracts had to be fulfilled.. She was no shipbuilder, so Captain Söfring Hansson(of Danish origin) took over the shipbuilding part of the yard management.( with Hein Jakobsson as master shipbuilder)
He was also the captain of the Vasa at the time of sinking.
 
Last edited:
For the the main mast, John Harland pointed out that in this period it was quite common to lower the main yards in really bad weather, and the parrels need to pass easily over the wooldings. Fred mentioned that he believes there should be wooden hoops above and below the wooldings for this purpose, he would like to check, but the modern wooldings are unfortunately in the way.
Also worth to note that there are recesses in the masts for the wooldings.
Regarding belaying plan, I was told there is a new belaying plan in Vasa II, that the old 80s plans are not quite right and there are outright belaying furniture errors on the 1/10 model.
While developing the new belaying plan, the captains of Kalmar Nyckel were also involved, for input into what works.
Fred would of course be the best first source of information, perhaps try : https://warshipvasa.freeforums.net/
Second, Eva-Marie Stolt's drawings, if failing that and given a choice between Dutch and English practice, I'd pick Dutch.
Fred particularly warned against Monfeld. His book on Vasa apparently contains on average 2.5 errors per page.
When referring to Anderson, I'd take into consideration what he mentions with respect to the Danish ivory model due the possible relevance from common Scottish rigging influence.

Cheers,
Peter
Thank you very much Peter. Very helpful information. I have already made the decision to forgo the pin rails (other than on the beakhead) so hopefully I'll at least get the belay furniture right...
 
First of all, those deadeyes look really good - nice shaping. I also like the PE strops and chainplates. The most important aspect of setting up those strops is ensuring that the angle of the strop corresponds with the angle of the shroud. I want you to know, Paul, that I share your fear of rigging. I am so worried that an already slow process will grind to a halt, as I am compelled to throw away one attempt at something or other, after another. As do you, I look at the rigging efforts of other builders, here, and I just marvel at the perfectly scaled and tensioned, and served, and sometimes even wormed and parceled lines, and I think - WTF! Can we talk about the process of creating a "mouse" for the forward main stay? Some guys really take it to the Nth degree, and it really is a marvel, at scale.

But, throw away I will, and labor to understand and develop better technique, I will. Eventually, I'll develop those skills, and so will you. You're already on your way!
 
Thank you very much Peter. Very helpful information. I have already made the decision to forgo the pin rails (other than on the beakhead) so hopefully I'll at least get the belay furniture right...
Yes, the pinrail on the bulwark between the main and the mizzen is an erroneous reconstruction.
It was removed from the real ship in 2006 I think.
According to Fred, most of Vasa's belaying is through belaying pins, but with the only real pinrail being in the beakhead, the rest of the belaying pins mainly placed in holes drilled directly into the caprail.
 
Hello Friends,

Just the smallest of updates. Today I took my first shot at installing the lower deadeyes on one of the forward channels. Here is the goal:

View attachment 270059

Photoetched strops (HiS) that I have modified to fit the deadeyes I selected:

View attachment 270060

Photoetched chainplates FROM THE KIT (!). They are too long but I have been trying to drill holes through brass with limited success so I went with these for now.

View attachment 270061

Aftermarket deadeyes (from Falkonet - I will use 5mm, 4mm, and 3mm deadeyes depending on the location):

View attachment 270062

Put together (the one on the left is 4mm):

View attachment 270063

And now installed (provisionally):

View attachment 270064

View attachment 270065

I am moving into parts of my build where I am less comfortable (it's all new - but some elements are newer than others) and I find myself increasingly hesitant to 'give it a go.' I feel like I am at risk for ruining what is otherwise turning out to be a nice ship model. I think I need to dial it back and start taking this a bit less seriously. I guess I am feeling overwhelmed as well - the scope of work that remains is mind-numbing. I think I understand for the first time why folks often put a build on the shelf and begin a new project...

I say it often but I really do mean it: I am blown away that you would take the time to visit. There are some really special builds out there and the fact that you stop by now and again is pretty cool.
Looks great!
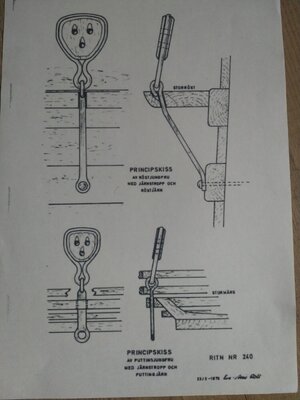
You have seen this by Eva-Marie Stolt?
IMG_20211120_120616.jpg
 
Yes, the pinrail on the bulwark between the main and the mizzen is an erroneous reconstruction.
It was removed from the real ship in 2006 I think.
According to Fred, most of Vasa's belaying is through belaying pins, but with the only real pinrail being in the beakhead, the rest of the belaying pins mainly placed in holes drilled directly into the caprail.
Perfect Peter. That is my plan as well.
 
First of all, those deadeyes look really good - nice shaping. I also like the PE strops and chainplates. The most important aspect of setting up those strops is ensuring that the angle of the strop corresponds with the angle of the shroud. I want you to know, Paul, that I share your fear of rigging. I am so worried that an already slow process will grind to a halt, as I am compelled to throw away one attempt at something or other, after another. As do you, I look at the rigging efforts of other builders, here, and I just marvel at the perfectly scaled and tensioned, and served, and sometimes even wormed and parceled lines, and I think - WTF! Can we talk about the process of creating a "mouse" for the forward main stay? Some guys really take it to the Nth degree, and it really is a marvel, at scale.

But, throw away I will, and labor to understand and develop better technique, I will. Eventually, I'll develop those skills, and so will you. You're already on your way!
Thanks Marc. Yes, I too am excellent at throwing away. And I know for certain that surfing the build logs contributes to my... well, whatever it is that has me 'concerned.' But I have also received heaps of help from my friends on this forum and I am already starting to see the way forward. I still have a lot of pre-rigging work to do (and I still have metal adornments to paint) but this will give me time for some study... Oh, and mast caps, and yards, and....
 
Looks great!
You have seen this by Eva-Marie Stolt?
View attachment 270398

Yes, I have. The tricky part for me will be to run the strop through the very thin (narrow) rail on my top.
Indeed. Scaled down, it's quite small.
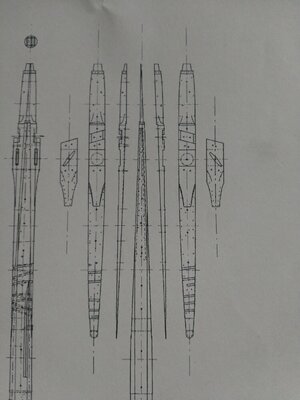
Also found this, in regards to earlier discussions regarding hounds.
Note that the actual mast tapers away towards the cap with the hounds timbers pretty much taking over..IMG_20211120_122341.jpg
 
Last edited:
Indeed. Scaled down, it's quite small.
Also found this, in regards to earlier discussions regarding hounds.
Note that the actual mast tapers away pretty much at the cap with the hounds timbers pretty much taking over..View attachment 270399
EISHo_O. @Heinrich would know that expression (an SA term for wonder and fear) .Paul and all the contributors to this discussion you guys have put the Eish into me. Brilliant thread - well done.
 
Back
Top