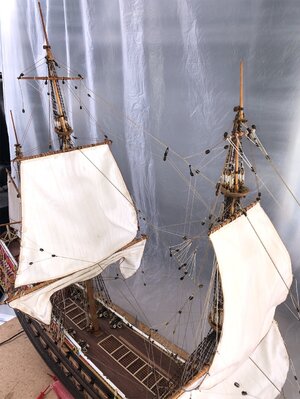
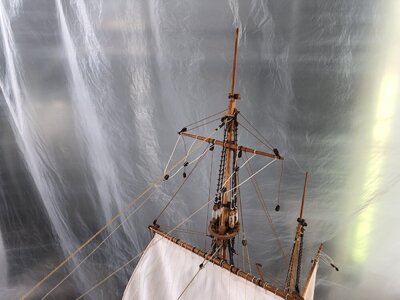
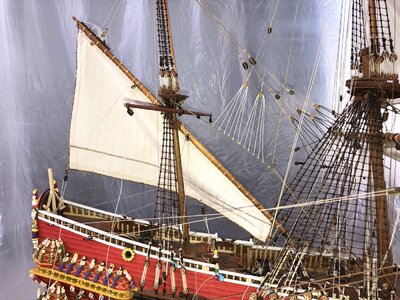
Vasa Build Log - Billing Boats - Scale 1/75 [COMPLETED BUILD]

Yes, Paul I am too. Until recently, other than making rope, I have not allowed myself to think much about actual rigging. Now I am forced to start planning it and I'm hitting the wall in several aspects. So not one day at a time but one rigging line at a time. Billings is making me guess what size blocking to use over the majority of the ship. Or I am really missing a huge key somewhere???
If I am not mistaken, read somewhere, larger blocks on the lower, smaller up top
 
Grant,

Thank you for the post - Our property (call it a farm if you like), is in the southeast corner of New South Wales near a small town (of about 2,800 people) called Jindabyne. We are at the foot of Australia's Snowy Mountains, and yes, in winter we do get snow, with great skiing!! My ship build area is an annex to a shed where we keep all our farming equipment (tractors, workshop, mowers etc). Much of my time is taken up by looking after cattle, horses and using the horses to muster the cattle both on our property and the surrounding region. so, it's very varied and takes a lot of time I would rather be ship building, but it's a great and relaxing semi-retirement lifestyle!!

Thanks also to Daniel, Paul, Bryian and Heinrich. Your comments are valued and I assure you, any support to keep the motivation up is absolutely welcome. It is not that I am lacking motivation, I thoroughly enjoy my shipbuilding time, it is just the juggling of chores, and work with the hobby that is so difficult (as I am sure you can all appreciate).

Daniel, as regards block sizes, Billings leave you with a bit of a dilemma with this. In my Manifest, it shows 180 x 5mm single blocks, 20 x 5mm double blocks, 14 x 7mm single blocks and 13 x 7mm double blocks. I have already ordered about another 120 x 4mm blocks as I am finding that the blocks supplied are overall too large in size - Good for ease of modelling but a bit big in terms scaled blocks. There are additionally a number of 'blocks' which are laser cut from included plywood sheets and I have found these unappealing as you can see the layers of the plywood sheeting when in the rigging and exposed.

All my blocks which have been supplied, I have individually reworked. They are in the kit looking like the picture below, which is the commercial, high-production form of blocks for modelling:

1641594298831.png

To me they are the starting point for blocks I want on my ship. I could buy commercial blocks from say Syren, but supply from the US at the moment is fraught by delays and import difficulties. So, to every kit block supplied, I have:

- Redrilled a second hole to simulate a 'sheave' within the block
- Individually examine each block and further round the corners with manual sandpaper and filing
- Use a rotary 'sandpaper-lined' bin which I rotate with a drill and some pebbles, to round the corners (there is a commercial one you can buy)
- Dip into a black/brown water-based stain which then leaves them a nice weathered colour
- Re-examine each block to ensure they are not 'hairy' as some seem to be left with minor timber 'furring' that has to be fine sandpapered off.

The final product is acceptable, but I am then left with the question of size. I think the 5mm are OK, once they go through the above processing, but the 7mm is only acceptable for blocks such as halyard blocks, lifts and clewlines, and even then the above processing has brought their size down to about 5-6 mm. The 5mm initial start size has reduced to about 4mm, so acceptable.

In my build, I have found that there are also required additional blocks, such a euphroe blocks, violin blocks etc etc and these are NOT supplied by Billings and so I have resorted to making these (using Tasmanian Huon Pine - the most amazing, fragrant and tight grained timber, but pearwood and other modelling equivalent timbers could be used).

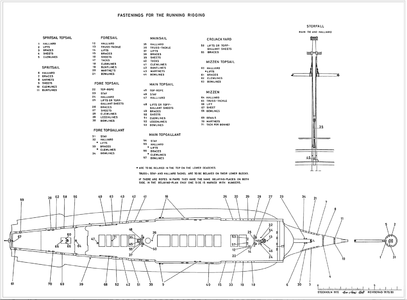
As regards, rigging plans, the Billings Plans are clearly an adaptation of those printed by the Vasamuseet in the late 1970s with later revisions. These plans are what I am primarily using but with considerable variation. For example, on the Billing plans and the museum plans, there are no buntline belay points for the Main Topsail (see picture below). I think the ship would definately have had them, as they are critical to furling. Interestingly however, the museum's published belaying diagram also does not include a location at deck level or higher of a point for buntline belaying of the Main Topsail.

Another item are parrel ropes and where they go at deck level. Similarly, Top Ropes which we know (from comments from Fred Hocker's research) were on the ship (and are listed on the Belay Plan), but not included on the Billing Plans. Such things, require that we, as builders, make decisions and allowance for in your rigging.

1641595769214.png

Hope all this helps (or does it confuse?),

Regards,

PeterG
 
Grant,

Thank you for the post - Our property (call it a farm if you like), is in the southeast corner of New South Wales near a small town (of about 2,800 people) called Jindabyne. We are at the foot of Australia's Snowy Mountains, and yes, in winter we do get snow, with great skiing!! My ship build area is an annex to a shed where we keep all our farming equipment (tractors, workshop, mowers etc). Much of my time is taken up by looking after cattle, horses and using the horses to muster the cattle both on our property and the surrounding region. so, it's very varied and takes a lot of time I would rather be ship building, but it's a great and relaxing semi-retirement lifestyle!!

Thanks also to Daniel, Paul, Bryian and Heinrich. Your comments are valued and I assure you, any support to keep the motivation up is absolutely welcome. It is not that I am lacking motivation, I thoroughly enjoy my shipbuilding time, it is just the juggling of chores, and work with the hobby that is so difficult (as I am sure you can all appreciate).

Daniel, as regards block sizes, Billings leave you with a bit of a dilemma with this. In my Manifest, it shows 180 x 5mm single blocks, 20 x 5mm double blocks, 14 x 7mm single blocks and 13 x 7mm double blocks. I have already ordered about another 120 x 4mm blocks as I am finding that the blocks supplied are overall too large in size - Good for ease of modelling but a bit big in terms scaled blocks. There are additionally a number of 'blocks' which are laser cut from included plywood sheets and I have found these unappealing as you can see the layers of the plywood sheeting when in the rigging and exposed.

All my blocks which have been supplied, I have individually reworked. They are in the kit looking like the picture below, which is the commercial, high-production form of blocks for modelling:

View attachment 281212

To me they are the starting point for blocks I want on my ship. I could buy commercial blocks from say Syren, but supply from the US at the moment is fraught by delays and import difficulties. So, to every kit block supplied, I have:

- Redrilled a second hole to simulate a 'sheave' within the block
- Individually examine each block and further round the corners with manual sandpaper and filing
- Use a rotary 'sandpaper-lined' bin which I rotate with a drill and some pebbles, to round the corners (there is a commercial one you can buy)
- Dip into a black/brown water-based stain which then leaves them a nice weathered colour
- Re-examine each block to ensure they are not 'hairy' as some seem to be left with minor timber 'furring' that has to be fine sandpapered off.

The final product is acceptable, but I am then left with the question of size. I think the 5mm are OK, once they go through the above processing, but the 7mm is only acceptable for blocks such as halyard blocks, lifts and clewlines, and even then the above processing has brought their size down to about 5-6 mm. The 5mm initial start size has reduced to about 4mm, so acceptable.

In my build, I have found that there are also required additional blocks, such a euphroe blocks, violin blocks etc etc and these are NOT supplied by Billings and so I have resorted to making these (using Tasmanian Huon Pine - the most amazing, fragrant and tight grained timber, but pearwood and other modelling equivalent timbers could be used).

As regards, rigging plans, the Billings Plans are clearly an adaptation of those printed by the Vasamuseet in the late 1970s with later revisions. These plans are what I am primarily using but with considerable variation. For example, on the Billing plans and the museum plans, there are no buntline belay points for the Main Topsail (see picture below). I think the ship would definately have had them, as they are critical to furling. Interestingly however, the museum's published belaying diagram also does not include a location at deck level or higher of a point for buntline belaying of the Main Topsail.

Another item are parrel ropes and where they go at deck level. Similarly, Top Ropes which we know (from comments from Fred Hocker's research) were on the ship (and are listed on the Belay Plan), but not included on the Billing Plans. Such things, require that we, as builders, make decisions and allowance for in your rigging.

View attachment 281213

Hope all this helps (or does it confuse?),

Regards,

PeterG
Thank you, Peter, for your comprehensive review of Bilings blocks. Due to the low quantity of 7mm blocks, I suppose it should not be too hard place them with the larger diam. rigging. At least the plywood block's locations are called out so that leaves all the rest as 5mm blocks. I have purchased enough aftermarket pearwood blocks to replace the kit supplied ones fortunately I have a quantity of 4mm aftermarket pear blocks to use where the 5mm 'appear' to be too large. I suppose that would be the blocking on the upper spars or where small dia. lines are used. I believe violin blocks are used out on the ends of the spars for pitch control so I will order some of those as well. In the meantime, I'll sit and stew on this for a day or two then when the time comes, I'll jump into it. Thanks again Peter you have been a tremendous help.
 
My pleasure Daniel. I haven’t visited your log recently which I am embarrassed to admit, so I am not sure where you are up to. I’ll have a look and make comments.

Again, thanks to all for their comments.

PeterG
 
It's because guys who are building the Vasa have been humbled over and over and over again.
Nice guys @Heinrich .... for sure...but we forgot about @dockattner Aka PaulROTFROTFROTF. Peter my brother lives in Waikerie North of Adelaide Also small town- loves it. Something to be said for Australian small town/farming lifestyleThumbsup. Great feedback on your blocks.
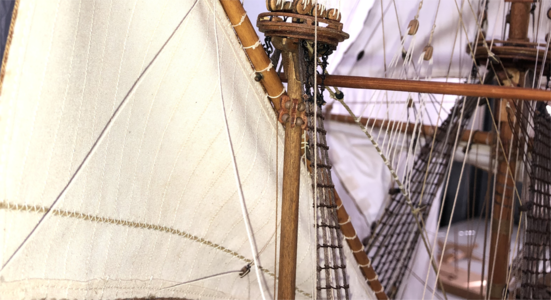
 
Peter,
As you can see from the many likes that I have caught up to you log. Your sails, rigging, yard details all came out superbly well done indeed. Glad to have been of some help with the parrel details - looks really good.

Cheers,
 
Many thanks for all the Likes and feedback on the rigging - Unfortunately money-making work has impacted on my ship progress so not a lot to report, however I have run into a snag (question/dilemma/decision ????), which anybody with some insight would be welcome to comment.

I have just mounted the Foresail, after completing most of the Mainmast sails and running rigging. No problems with the mounting - parrels/trucks/dividers worked fine, all line pre-rigged and halyards holding the yard in place well. However, I then came to rig the two (port and starboard) Tacks of the Foresail, which run from the lower corners of the sail to belay points forward of the sail/mast. I know from the Belaying Point plans that the Foresail Tacks belay at the kevels mounted on the forward railing which runs across the deck at the bows of the ship (refer to Post #322 above where you can see that Point 17 (listed as the Foresail Tack belay point, are these kevels). The question that arises however, is how are the Tack lines rigged to get to these points?

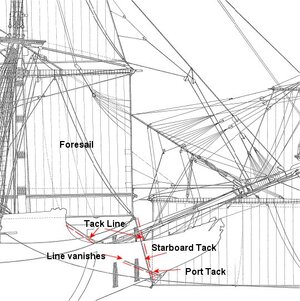
Referencing my plans available, (from the Museum and from Billings, see below), I label the plans routing of these lines. In both plans, the lines appear to go from the Foresail Sheet/Clew/Tack lower corner join of the sail, forward to a holed plate, mounted beneath the cutwater of the beakhead. There are two relatively large holes in this plate and the plans show the starboard Tack line going though the aft of the two holes and the port Tack line through the forward hole. As the lines exit the holes (on the opposite side of the ship now), where do they go? Well in the Vasamuseet plans, they just vanish (but with the clear intention that they have been located in-board - presumably through the slotted woodwork of the beakhead (at around the forward heads)). See the diagram of the museum plans below where I have marked the Tack lines with red-doted line. Importantly however, a line of rope is ALSO drawn rising from the upper coving of the beakhead to then extend to deck level (refer diagram). This would place it near the forward kevel belay points.

Tack_Museum.jpg

In the Billing Plans, there is a little bit more information. The Billing plan is below (albeit a poor picture):

Tack_Forward_1.jpg

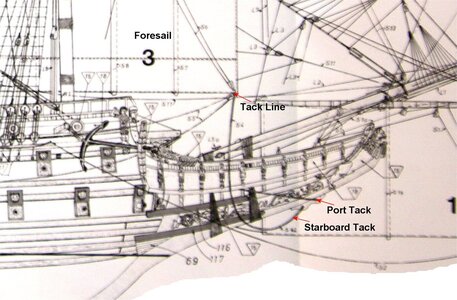
In this plan, you can clearly see the Tack line being fed into the beakhead, just above the lower sculptures and behind the front gammoning. In this plan, you cannot see any indication that the Tack continues to the forward kevels.

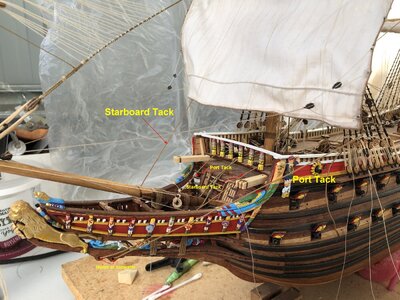
So, this is how I have rigged the Tack as shown in the picture below. Again I have labelled the Tacks for both sides of the ship.

Img_8886a.jpg

So, where the Tacks emerge in the beakhead, you can see the lines then travel up to the forward railing kevels. While this rigging arrangement works, there are two things that worry me:

1. From a sailing perspective, the Starboard Tack is now on the Port side and the Port Tack on the Starboard side - Very confusing to crew, as I am not aware of any other single sailing line, where one side controls the opposite part of a sail or yard etc. Is this likely, just not sure (perhaps a question for Fred Hocker)?

2. The Tack lines would be required to run internally across the beakhead, across the forward steps, and just generally be 'in the way'. At a couple of points too, these lines would be rubbing on decks, and parts of the ship - something that in general is avoided on all ships.

So, I guess this is a solution and it is 'by the plans', but it does seem to have some issues in terms of its practicality and actual likelihood. What do others think?

Regards,

PeterG
 
Many thanks for all the Likes and feedback on the rigging - Unfortunately money-making work has impacted on my ship progress so not a lot to report, however I have run into a snag (question/dilemma/decision ????), which anybody with some insight would be welcome to comment.

I have just mounted the Foresail, after completing most of the Mainmast sails and running rigging. No problems with the mounting - parrels/trucks/dividers worked fine, all line pre-rigged and halyards holding the yard in place well. However, I then came to rig the two (port and starboard) Tacks of the Foresail, which run from the lower corners of the sail to belay points forward of the sail/mast. I know from the Belaying Point plans that the Foresail Tacks belay at the kevels mounted on the forward railing which runs across the deck at the bows of the ship (refer to Post #322 above where you can see that Point 17 (listed as the Foresail Tack belay point, are these kevels). The question that arises however, is how are the Tack lines rigged to get to these points?

Referencing my plans available, (from the Museum and from Billings, see below), I label the plans routing of these lines. In both plans, the lines appear to go from the Foresail Sheet/Clew/Tack lower corner join of the sail, forward to a holed plate, mounted beneath the cutwater of the beakhead. There are two relatively large holes in this plate and the plans show the starboard Tack line going though the aft of the two holes and the port Tack line through the forward hole. As the lines exit the holes (on the opposite side of the ship now), where do they go? Well in the Vasamuseet plans, they just vanish (but with the clear intention that they have been located in-board - presumably through the slotted woodwork of the beakhead (at around the forward heads)). See the diagram of the museum plans below where I have marked the Tack lines with red-doted line. Importantly however, a line of rope is ALSO drawn rising from the upper coving of the beakhead to then extend to deck level (refer diagram). This would place it near the forward kevel belay points.

View attachment 285160

In the Billing Plans, there is a little bit more information. The Billing plan is below (albeit a poor picture):

View attachment 285161

In this plan, you can clearly see the Tack line being fed into the beakhead, just above the lower sculptures and behind the front gammoning. In this plan, you cannot see any indication that the Tack continues to the forward kevels.

So, this is how I have rigged the Tack as shown in the picture below. Again I have labelled the Tacks for both sides of the ship.

View attachment 285162

So, where the Tacks emerge in the beakhead, you can see the lines then travel up to the forward railing kevels. While this rigging arrangement works, there are two things that worry me:

1. From a sailing perspective, the Starboard Tack is now on the Port side and the Port Tack on the Starboard side - Very confusing to crew, as I am not aware of any other single sailing line, where one side controls the opposite part of a sail or yard etc. Is this likely, just not sure (perhaps a question for Fred Hocker)?

2. The Tack lines would be required to run internally across the beakhead, across the forward steps, and just generally be 'in the way'. At a couple of points too, these lines would be rubbing on decks, and parts of the ship - something that in general is avoided on all ships.

So, I guess this is a solution and it is 'by the plans', but it does seem to have some issues in terms of its practicality and actual likelihood. What do others think?

Regards,

PeterG
No wonder it sank!
 
By the 1660’s, for example, I know that the starboard tack for the foremast would run through that holed block beneath the beakhead, around the outside of the head structure, through a single block lashed to the forward end of the fore channels, and then in-board through the port chesstree, which also accepts the port tack of the mainsail. The same happens, in reverse for the port tack of the foresail.

While you still have the same reverse orientation problem for line handlers of the foresail, the issue of the sail being “in the way” of other beakhead structures is resolved.

I can’t say with any certainty what was done in 1628, though.
For the Vasa, the lines would go through the beakhead grating and made fast somewhere on the beakhead bulkhead railing, probably the lower beam. Not via the fore channels.
Rigging is coming along great!

Peter
 
Hi guys, and many thanks for all the positive comments and suggestions. I have finalised the forward lines as suggest (passing though the holed block beneath the beakhead, and then pass through the gratings to be secured on kevels along the deck beakhead railing (as per the Belaying Plan)). This seems like the most likely solution although the line for the port tack ends up on the starboard side and vice versa. Oh to be a sailor in those days - It must have been such an incredibly hard life - although of course, the Vasa sailors never even left the harbour!!

My apologies for the VERY slow updates to the build. The running rigging has caused so many questions/decisions about where to run lines, thicknesses, colour of rope to use etc etc etc. So, current status:

- I have now got all the intended (four) sails rigged and placed on the ship with nearly all lines attached. I have included the fifth sail (mainsail which is furled on the yard). As I have discussed before, this arrangement is as per the ship set sail in the harbour before her demise (as per the published documents and videos etc).

- I have placed and rigged the topgallant spars on the foremast and mainmast. These yards did not have the sails furled or set, so I have placed and attached these but this then raises the question of how the lines which would normally be attached directly to the sail (eg bowlines, with their attachment points around the vertical edges of the sails) have been rigged with no sail. I have opted to have the yards raised (which I know is not strictly correct, as for a ship with no sail hanked on to the yard, the yard would be lowered, ready for the sail to be attached. In the case of a topgallant yard (of say, the foremast), it would rest just above the foremast topsail yard etc. I have raised the yards as that is how they are shown in the picture review I have made of the various videos and pictures describing the ship's sinking.

So, in the photo below, you can see the bowlines running forward for the main and foremast topsails. These are a series of three block coming from reinforced attachment points along the lower sail leech edges. The lines then run forward to provide 'bellowing' of the sails in light winds. While that's fine for a sail that is set, in the same photo, the topgallant yards have no sail, but they did have bowlines - so, how were these rigged? Well, what I have decided to do is to rig them, with their three-point sail attachment lines and secure these around the topgallant spars. This has been done for both the fore and mainmast topgallants, but it will be similar for the mizzen topsail as well (which again, does not have a sail attached.

IMG_8981.JPG

Another photo showing the mainmast topgallant bowlines rigged to the spar is below:


IMG_8975.JPG

MIZZEN SAIL

- I have also added the mizzen sail. On the Vasa this sail is triangular in shape but has a 'bonnet' beneath a reefing line parallel with the lower luff. I have used parrels (trucks and partitions), to secure the mizzen to the mizzen mast (as I have for all yards, except the cro'jack yard) and below is a close up of this:

1647824961834.png

My method of securing the parrel and the rigging associated is described well by R.C. Anderson and the parrel tensioning line can be seen just abaft of the mizzen mast. The Cro'jack (Crossjack) yard is mounted forward and just above the mizzen yard. It get quite congested below the tree on the mizzen with all the blocks and ropes requiring a free run to the deck so they don't fowl other lines or spars.

IMG_8979.JPG

Now, my dilemma for the mizzen is, I have mounted it on the port side of the mizzen mast. Anderson talks about the mizzen sail being able to be walked aft of the mast and then transferred to the starboard side to have the leeward side up against the strength of the mast. To me, having rigged the brace, clew and sheets associated with the mizzen sail, I cannot understand how it could physically have been moved from one side of the ship to the other without pulling the sail up to the yard (using the leech and buntlines), and then lowering the yard, moving it aft of the mast and then sliding it around - It would have been an insurmountable job in rough weather. My thinking is that the mizzen sail would have stayed largely on one side of the ship, but to move it to the other side would mean the sail would be blown onto the mast itself - that can't be right!!

Thinking it through, I just don't understand how the shift from port to starboard (or back again depending on the tack of the ship and the wind direction) of this large and awkward sail could be achieved!! Another dilemma.

However, we are moving forward - Not too long to go now....

Hours to date: About 2450 hours (I think). I haven't been too diligent with my diary/log of hours lately.

Regards,

PeterG
 
Last edited:
Peter I can only look at this in awe. This is simply an incredible job that you have done. Your attention to detail is brilliant as is your quest for finding the "correct" way in which the VASA was rigged. What you say about the mizzen sail surely makes a lot of sense, but unfortunately I am not in a position to offer any advice (lack of knowledge :)). I do however, have full faith in you to find a final layout that will not only look glorious but also makes sense.
 
It looks like a lateen sail with a squared off forward end. I’ve also read that they would often furl the sail, tip the top upward , and move the spar to the other side of the mast for tacking purposes. Otherwise, the sail would get beat up on the mizzenmast.
 
It looks like a lateen sail with a squared off forward end. I’ve also read that they would often furl the sail, tip the top upward , and move the spar to the other side of the mast for tacking purposes. Otherwise, the sail would get beat up on the mizzenmast.
.....maybe it is the reason why the Vasa, commissioned by King Gustav II Adolf (who I believe was slightly mad) sank only 2nautical miles into her maiden voyage....;);). The lanteen sail got stuck on the Mizzen.Redface

Rob brilliant build- the Vasa modelers set the standard here.Thumbsup
 
Hi guys, and many thanks for all the positive comments and suggestions. I have finalised the forward lines as suggest (passing though the holed block beneath the beakhead, and then pass through the gratings to be secured on kevels along the deck beakhead railing (as per the Belaying Plan)). This seems like the most likely solution although the line for the port tack ends up on the starboard side and vice versa. Oh to be a sailor in those days - It must have been such an incredibly hard life - although of course, the Vasa sailors never even left the harbour!!

My apologies for the VERY slow updates to the build. The running rigging has caused so many questions/decisions about where to run lines, thicknesses, colour of rope to use etc etc etc. So, current status:

- I have now got all the intended (four) sails rigged and placed on the ship with nearly all lines attached. I have included the fifth sail (mainsail which is furled on the yard). As I have discussed before, this arrangement is as per the ship set sail in the harbour before her demise (as per the published documents and videos etc).

- I have placed and rigged the topgallant spars on the foremast and mainmast. These yards did not have the sails furled or set, so I have placed and attached these but this then raises the question of how the lines which would normally be attached directly to the sail (eg bowlines, with their attachment points around the vertical edges of the sails) have been rigged with no sail. I have opted to have the yards raised (which I know is not strictly correct, as for a ship with no sail hanked on to the yard, the yard would be lowered, ready for the sail to be attached. In the case of a topgallant yard (of say, the foremast), it would rest just above the foremast topsail yard etc. I have raised the yards as that is how they are shown in the picture review I have made of the various videos and pictures describing the ship's sinking.

So, in the photo below, you can see the bowlines running forward for the main and foremast topsails. These are a series of three block coming from reinforced attachment points along the lower sail leech edges. The lines then run forward to provide 'bellowing' of the sails in light winds. While that's fine for a sail that is set, in the same photo, the topgallant yards have no sail, but they did have bowlines - so, how were these rigged? Well, what I have decided to do is to rig them, with their three-point sail attachment lines and secure these around the topgallant spars. This has been done for both the fore and mainmast topgallants, but it will be similar for the mizzen topsail as well (which again, does not have a sail attached.

View attachment 297270

Another photo showing the mainmast topgallant bowlines rigged to the spar is below:


View attachment 297276

MIZZEN SAIL

- I have also added the mizzen sail. On the Vasa this sail is triangular in shape but has a 'bonnet' beneath a reefing line parallel with the lower luff. I have used parrels (trucks and partitions), to secure the mizzen to the mizzen mast (as I have for all yards, except the cro'jack yard) and below is a close up of this:

View attachment 297277

My method of securing the parrel and the rigging associated is described well by R.C. Anderson and the parrel tensioning line can be seen just abaft of the mizzen mast. The Cro'jack (Crossjack) yard is mounted forward and just above the mizzen yard. It get quite congested below the tree on the mizzen with all the blocks and ropes requiring a free run to the deck so they don't fowl other lines or spars.

View attachment 297278

Now, my dilemma for the mizzen is, I have mounted it on the port side of the mizzen mast. Anderson talks about the mizzen sail being able to be walked aft of the mast and then transferred to the starboard side to have the leeward side up against the strength of the mast. To me, having rigged the brace, clew and sheets associated with the mizzen sail, I cannot understand how it could physically have been moved from one side of the ship to the other without pulling the sail up to the yard (using the leech and buntlines), and then lowering the yard, moving it aft of the mast and then sliding it around - It would have been an insurmountable job in rough weather. My thinking is that the mizzen sail would have stayed largely on one side of the ship, but to move it to the other side would mean the sail would be blown onto the mast itself - that can't be right!!

Thinking it through, I just don't understand how the shift from port to starboard (or back again depending on the tack of the ship and the wind direction) of this large and awkward sail could be achieved!! Another dilemma.

However, we are moving forward - Not too long to go now....

Hours to date: About 2450 hours (I think). I haven't been too diligent with my diary/log of hours lately.

Regards,

PeterG
Peter, as a Vasa builder I cannot thank you enough for your leadership, commentary, and talent in sharing your build of this magnificent ship. I have such a long ways to go and am so uncertain at this point as what to do on mine (with the running rigging), but I take comfort in being able to reference your build.
 
Back
Top