-

Win a Free Custom Engraved Brass Coin!!!
As a way to introduce our brass coins to the community, we will raffle off a free coin during the month of August. Follow link ABOVE for instructions for entering.
-

PRE-ORDER SHIPS IN SCALE TODAY!
The beloved Ships in Scale Magazine is back and charting a new course for 2026!
Discover new skills, new techniques, and new inspirations in every issue.
NOTE THAT OUR FIRST ISSUE WILL BE JAN/FEB 2026
You are using an out of date browser. It may not display this or other websites correctly.
You should upgrade or use an alternative browser.
You should upgrade or use an alternative browser.
VOC SPIEGELRETOURSCHIP BATAVIA 1628 - KOLDERSTOK 1:72
- Thread starter Heinrich
- Start date
- Watchers 64
-
- Tags
- batavia kolderstok
- Joined
- Jan 9, 2020
- Messages
- 10,566
- Points
- 938

Hello Everyone
In my previous post I mentioned that the bulwark bracing has to go in next. To help explain that I used the following photograph:
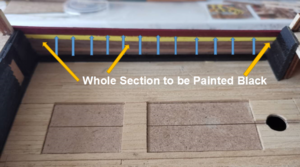
The idea now is to glue 2mm x 3mm strips (indicated by the blue arrows) on top of the waterway and against the inner sides of the wales to act as bracing and as a start for finishing off the interior part of the wales. I say "start" because these slats will have a horizontal 4mm plank glued on top of them with more vertical bracing on top of that. Finally, the whole assembly will be finished off with another horizontal plank on top of that. Finally the sides will be painted black on the inside.
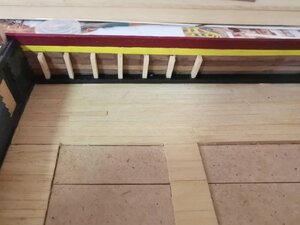
So the whole process was started. On the drawings these slates are supposed to be installed approximately 5mm apart, but I stretched the distance to 1 cm in case I decide to place the cannons here. 5mm would just have been too close for that.
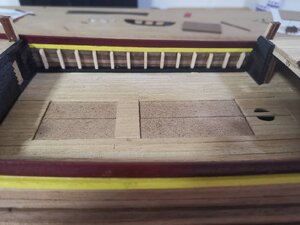
Port side completed.
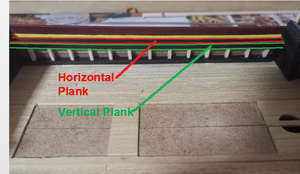
This picture indicates the horizontal plank laid on top of the bracing slats (in red) and the horizontal plank (in green) that gets placed just below that.
And without any coloured lines to spoil the picture, that is what it looks like at this stage. The starboard side was also done and then it was time for some deck planking and finishing.
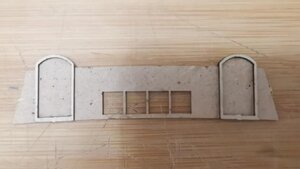
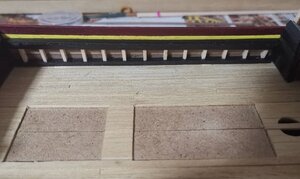
This picture shows the start of construction of the half deck wall with door sills in place. As the windows are not covered and one is able to see through them quite easily, the area behind the wall had to receive attention. Left as it is, it would give an unfinished look so I made the following plan:
A piece of bamboo sheeting was cut to size, folded and inserted into the area behind where the half deck wall would go. No more unsightly areas ...
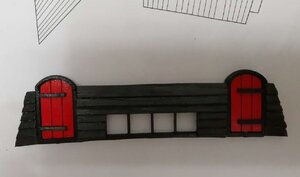
The finished half deck wall. I am still going to mount handles for the doors but am looking for the right sized rings. Everything I could find until now is simply too big.
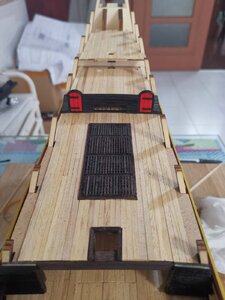
The finished (except for the waterways) half deck with wall in place. Behind the half deck, the planked poop deck is also visible.
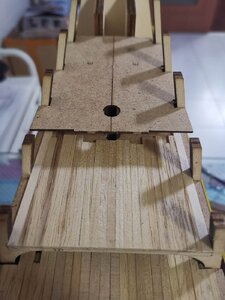
Close-up of the planked spar or helmsman deck.
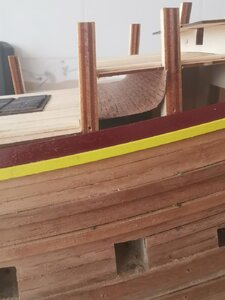
The following pictures show the sequence of assembly of the wall for this deck.
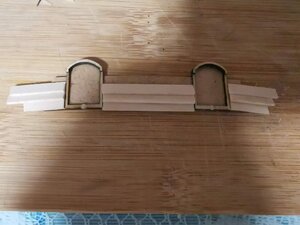
Half-assembled - the overlapping planks can clearly be seen.
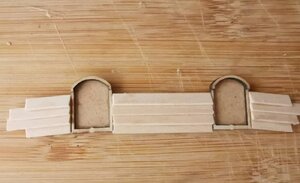
Assembled, before trimming.
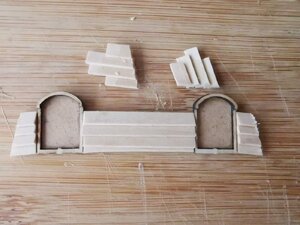
Trimmed. Ready to be sanded and painted.
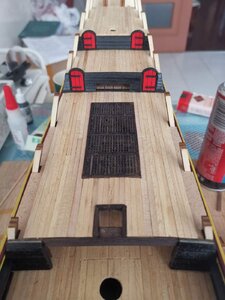
Wall in place on the spar deck (second wall from the front). The poop deck (furthermost to the rear) has also been planked.
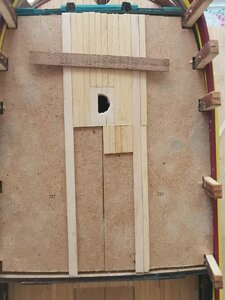
And then work on the forecastle started. Note the mildew that has formed on the MDF due to the extreme humidity during summer on the East Coast in China.
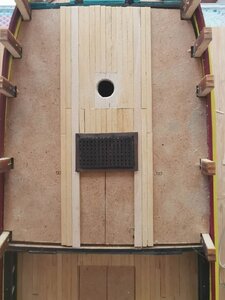
Grating installed in forecastle. Kolderstok's plans for the Batavia do not indicate ant grating - just a closed hatch. As I will be making use of closed hatched on the deck area, I wanted something different here built the grating according to the exact size of the hatch.
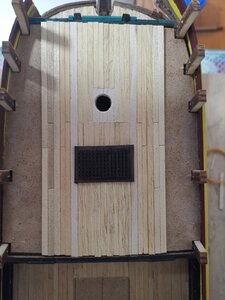
And this is where we are at close of business today.
Just to make sure that everything is still straight and true ...
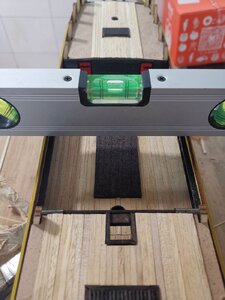
Thank you all for watching and for following. As always your comments and input are greatly appreciated.
Stay safe, keep healthy and take care.
Warm greetings - Heinrich
In my previous post I mentioned that the bulwark bracing has to go in next. To help explain that I used the following photograph:

The idea now is to glue 2mm x 3mm strips (indicated by the blue arrows) on top of the waterway and against the inner sides of the wales to act as bracing and as a start for finishing off the interior part of the wales. I say "start" because these slats will have a horizontal 4mm plank glued on top of them with more vertical bracing on top of that. Finally, the whole assembly will be finished off with another horizontal plank on top of that. Finally the sides will be painted black on the inside.

So the whole process was started. On the drawings these slates are supposed to be installed approximately 5mm apart, but I stretched the distance to 1 cm in case I decide to place the cannons here. 5mm would just have been too close for that.

Port side completed.

This picture indicates the horizontal plank laid on top of the bracing slats (in red) and the horizontal plank (in green) that gets placed just below that.

And without any coloured lines to spoil the picture, that is what it looks like at this stage. The starboard side was also done and then it was time for some deck planking and finishing.

This picture shows the start of construction of the half deck wall with door sills in place. As the windows are not covered and one is able to see through them quite easily, the area behind the wall had to receive attention. Left as it is, it would give an unfinished look so I made the following plan:

A piece of bamboo sheeting was cut to size, folded and inserted into the area behind where the half deck wall would go. No more unsightly areas ...

The finished half deck wall. I am still going to mount handles for the doors but am looking for the right sized rings. Everything I could find until now is simply too big.

The finished (except for the waterways) half deck with wall in place. Behind the half deck, the planked poop deck is also visible.

Close-up of the planked spar or helmsman deck.
The following pictures show the sequence of assembly of the wall for this deck.

Half-assembled - the overlapping planks can clearly be seen.

Assembled, before trimming.

Trimmed. Ready to be sanded and painted.

Wall in place on the spar deck (second wall from the front). The poop deck (furthermost to the rear) has also been planked.

And then work on the forecastle started. Note the mildew that has formed on the MDF due to the extreme humidity during summer on the East Coast in China.

Grating installed in forecastle. Kolderstok's plans for the Batavia do not indicate ant grating - just a closed hatch. As I will be making use of closed hatched on the deck area, I wanted something different here built the grating according to the exact size of the hatch.

And this is where we are at close of business today.
Just to make sure that everything is still straight and true ...

Thank you all for watching and for following. As always your comments and input are greatly appreciated.
Stay safe, keep healthy and take care.
Warm greetings - Heinrich
- Joined
- Jul 9, 2019
- Messages
- 497
- Points
- 323

You're making some serious progress. And it looks great, Heinrich!
Absolutely great work.
Jan
Jan
- Joined
- Jan 9, 2020
- Messages
- 10,566
- Points
- 938

@Brewbrarian Thank you for the kind words, Eric. I am very happy with the progress so far. The bulwark bracings, overlapping planks, and gratings take some time, but are well worth the effort. I forgot to mention how solid the bulwarks are with those braces in place.
- Joined
- Jan 9, 2020
- Messages
- 10,566
- Points
- 938

@Pathfinder65 Thank you Jan. I think she looks much more of a ship now. The forecastle deck planks still need to be trimmed - I included those pics as an example of work in progress ...
Very concise, informative and beautiful work, as usual.
Hi Heinrich,Hello Everyone
In my previous post I mentioned that the bulwark bracing has to go in next. To help explain that I used the following photograph:
View attachment 163662
The idea now is to glue 2mm x 3mm strips (indicated by the blue arrows) on top of the waterway and against the inner sides of the wales to act as bracing and as a start for finishing off the interior part of the wales. I say "start" because these slats will have a horizontal 4mm plank glued on top of them with more vertical bracing on top of that. Finally, the whole assembly will be finished off with another horizontal plank on top of that. Finally the sides will be painted black on the inside.
View attachment 163663
So the whole process was started. On the drawings these slates are supposed to be installed approximately 5mm apart, but I stretched the distance to 1 cm in case I decide to place the cannons here. 5mm would just have been too close for that.
View attachment 163669
Port side completed.
View attachment 163665
This picture indicates the horizontal plank laid on top of the bracing slats (in red) and the horizontal plank (in green) that gets placed just below that.
View attachment 163670
And without any coloured lines to spoil the picture, that is what it looks like at this stage. The starboard side was also done and then it was time for some deck planking and finishing.
View attachment 163672
This picture shows the start of construction of the half deck wall with door sills in place. As the windows are not covered and one is able to see through them quite easily, the area behind the wall had to receive attention. Left as it is, it would give an unfinished look so I made the following plan:
View attachment 163673
A piece of bamboo sheeting was cut to size, folded and inserted into the area behind where the half deck wall would go. No more unsightly areas ...
View attachment 163674
The finished half deck wall. I am still going to mount handles for the doors but am looking for the right sized rings. Everything I could find until now is simply too big.
View attachment 163676
The finished (except for the waterways) half deck with wall in place. Behind the half deck, the planked poop deck is also visible.
View attachment 163677
Close-up of the planked spar or helmsman deck.
The following pictures show the sequence of assembly of the wall for this deck.
View attachment 163678
Half-assembled - the overlapping planks can clearly be seen.
View attachment 163679
Assembled, before trimming.
View attachment 163680
Trimmed. Ready to be sanded and painted.
View attachment 163681
Wall in place on the spar deck (second wall from the front). The poop deck (furthermost to the rear) has also been planked.
View attachment 163688
And then work on the forecastle started. Note the mildew that has formed on the MDF due to the extreme humidity during summer on the East Coast in China.
View attachment 163689
Grating installed in forecastle. Kolderstok's plans for the Batavia do not indicate ant grating - just a closed hatch. As I will be making use of closed hatched on the deck area, I wanted something different here built the grating according to the exact size of the hatch.
View attachment 163690
And this is where we are at close of business today.
Just to make sure that everything is still straight and true ...
View attachment 163691
Thank you all for watching and for following. As always your comments and input are greatly appreciated.
Stay safe, keep healthy and take care.
Warm greetings - Heinrich
Great progress.
Behind the bulkhead with the lower window frames the deck is lower than the main deck. Here the whipstaf is situated, therefore the low placed windows to comunicate with the half deck. I would remove the bamboe and place it vertically to the next frame to simulate the next inner bulkhead.
Last edited:
- Joined
- Jan 9, 2020
- Messages
- 10,566
- Points
- 938

@Maarten Thank you for the advice, Maarten. Once again I learnt something new today. Of course it now makes perfect sense why the windows are placed so low. I don't know if there is much I can do as the space is extremely limited and there is not much bulkhead to work with, but you can bet your bottom dollar that I will give it a try! 

- Joined
- Jan 9, 2020
- Messages
- 10,566
- Points
- 938

Hello Dear Friends
And so we continue. You will recall from my last post that I had started planking the forecastle - so work on that continued. First on the agenda was to shape the two waterways. These 4mm wide Abachi planks were soaked and then shaped using the full-sized Kolderstok plans.
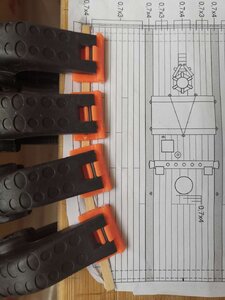
Such is the accuracy of the plans that afterwards the planks fit perfectly in their position.
As can be seen from the plans (above) and the picture (below), I did not follow Kolderstok's planking arrangement at the waterways. I wanted to try "nibbing" the deck planks into the waterways (as per some of the better builds on SOS) and see what that would look like.
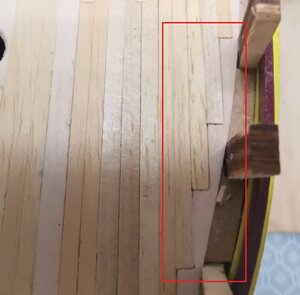
"Nibbing" completed.
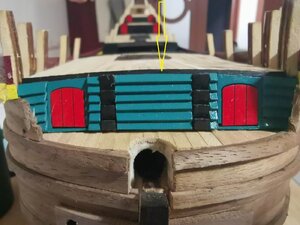
A 1mm strip (see yellow arrow) was inserted between the luizenplecht (front wall) and the forecastle deck to finish things off nicely.
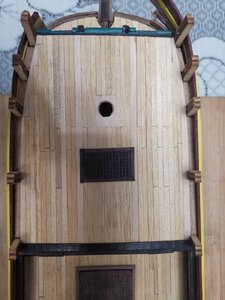
And this then is what the finished forecastle deck looks like.
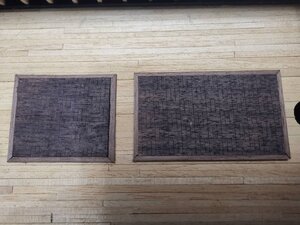
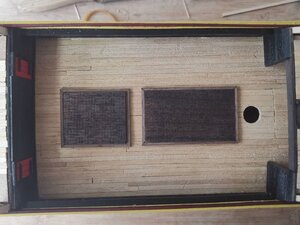 When it came to the closed hatches on the main deck area, I once more strayed from the straight and narrow Kolderstok path. The Lelystadt replica has its hatches covered by red-coloured canvas which are tied to the deck courtesy of ropes and hooks. As the red colour would clash with the maroon, I chose a different path. I covered the closed hatches with bamboo sheeting which was then stained and finished off with a 45-degree mitred border. (Above and below).
Next, I made the window for the Spiegel (stern) area.
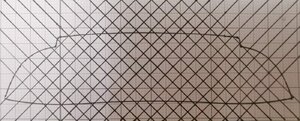
This is the supplied graph paper on which I have traced the outline of the window and placed the transparent foil (kit supplied) which will simulate the glass. I then highlighted the pattern that I wanted for the lead in the glass and placed the foil over that. In a nerve-racking exercise, the foil is then scored with a knife according to your chosen pattern. In the end, I needed not have fretted as the foil is far stronger than what one might think.
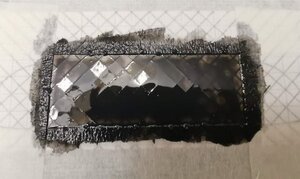
The foil was then painted with black ink (or Indian ink) with the paint flowing into the scored lines. After a few minutes, the foil is wiped clean and then looks like this:
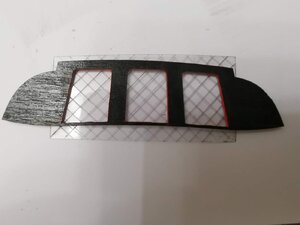
And after everything has been trimmed, brought to sixe and attached to the window frame, we have "leaded windows"!
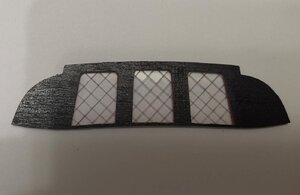
I am very happy with the final outcome. I have purposely not chosen a finer pattern as that would seemed too "busy" for my liking. At the same time I also like the subtlety of the "lead" effect - sometimes when too coarsely or aggressively applied, it can look like prison bars!
That is all for now so until the next update, please take care and happy building!
Kind regards - Heinrich
And so we continue. You will recall from my last post that I had started planking the forecastle - so work on that continued. First on the agenda was to shape the two waterways. These 4mm wide Abachi planks were soaked and then shaped using the full-sized Kolderstok plans.

Such is the accuracy of the plans that afterwards the planks fit perfectly in their position.
As can be seen from the plans (above) and the picture (below), I did not follow Kolderstok's planking arrangement at the waterways. I wanted to try "nibbing" the deck planks into the waterways (as per some of the better builds on SOS) and see what that would look like.

"Nibbing" completed.

A 1mm strip (see yellow arrow) was inserted between the luizenplecht (front wall) and the forecastle deck to finish things off nicely.

And this then is what the finished forecastle deck looks like.
 When it came to the closed hatches on the main deck area, I once more strayed from the straight and narrow Kolderstok path. The Lelystadt replica has its hatches covered by red-coloured canvas which are tied to the deck courtesy of ropes and hooks. As the red colour would clash with the maroon, I chose a different path. I covered the closed hatches with bamboo sheeting which was then stained and finished off with a 45-degree mitred border. (Above and below).
Next, I made the window for the Spiegel (stern) area.

This is the supplied graph paper on which I have traced the outline of the window and placed the transparent foil (kit supplied) which will simulate the glass. I then highlighted the pattern that I wanted for the lead in the glass and placed the foil over that. In a nerve-racking exercise, the foil is then scored with a knife according to your chosen pattern. In the end, I needed not have fretted as the foil is far stronger than what one might think.

The foil was then painted with black ink (or Indian ink) with the paint flowing into the scored lines. After a few minutes, the foil is wiped clean and then looks like this:

And after everything has been trimmed, brought to sixe and attached to the window frame, we have "leaded windows"!

I am very happy with the final outcome. I have purposely not chosen a finer pattern as that would seemed too "busy" for my liking. At the same time I also like the subtlety of the "lead" effect - sometimes when too coarsely or aggressively applied, it can look like prison bars!
That is all for now so until the next update, please take care and happy building!
Kind regards - Heinrich
Love your lead windows, excellent idea Heinrich
Super job, I like your deviations.
Jan
Jan
- Joined
- Jan 9, 2020
- Messages
- 10,566
- Points
- 938

@Pathfinder65 Hi Jan. Your comments and support are always hugely appreciated.
All great work, the nibbing gives a beaut finish. The "foil" treatment is also very concise.
- Joined
- Jan 9, 2020
- Messages
- 10,566
- Points
- 938

An American builder noticed me about the word foil - this is normally used for thin metal sheet. In the new manual I am writing I will replace the word "foil" for "cleer plastic sheet".The "foil" treatment
Sometimes my english is a bit Dunglish....
- Joined
- Jan 9, 2020
- Messages
- 10,566
- Points
- 938

@Kolderstok Hans, to me the terminology is not important. The big question is whether it works or not - and yes, it does! 
- Joined
- Jan 9, 2020
- Messages
- 10,566
- Points
- 938

Hello Friends
So during my two off days, I made some progress. First up was to continue planking the hull below the water level and to prepare for closing the hull.
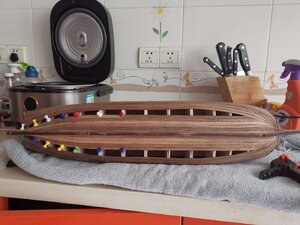
As I need more working space than my little work table affords me, the working surface in the kitchen was called for. Luckily the admiral is fully supportive of the build, so no problems there.
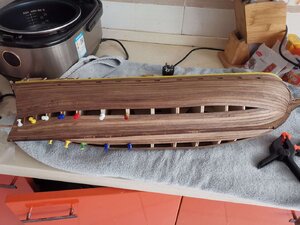
The closer I get to the end the more tricky it gets to anticipate how the final planking when pan out (no little pieces of graph paper meticulously marked out where each plank should go for me). So far there are no dropped strakes - (I might probably end up using one or either side), but it has required some forceful "manipulation" of the planks at time.
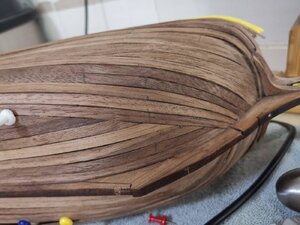
Will all those who reckon that a double-planked hull gives better results, please stand up! (Bear in mind that no sanding - whatsoever - has yet taken place).
While waiting for the glue to dry I have embarked on building a long boat for the Haarlem. Historically, the Haarlem's long boat played a huge role in the Dutch gathering information of the Cape and in their general day-to-day-survival. I ordered the Kolderstok long boat which at a length of 120mm is perfectly in scale.
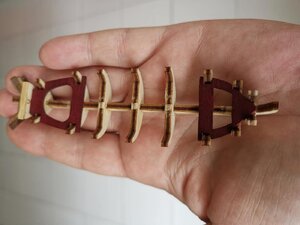
Don't be fooled. It is small ... Keel, bulkheads and front and rear compartments.
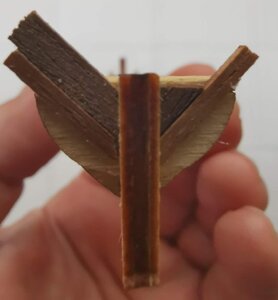
The stern is planked with walnut strips which are glued at an angle of 45 degrees.
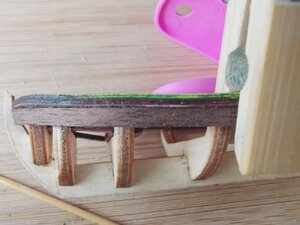
The first plank goes on ...
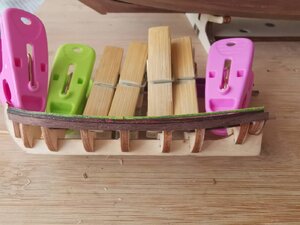
With a plethora of clamps.
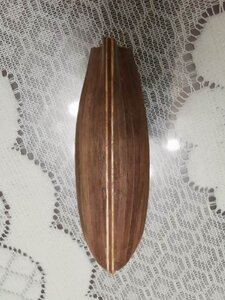
Planking done.
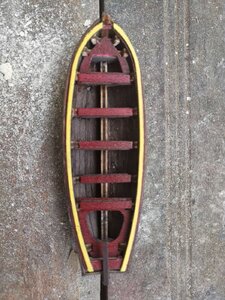
And finished.
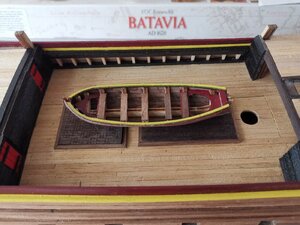
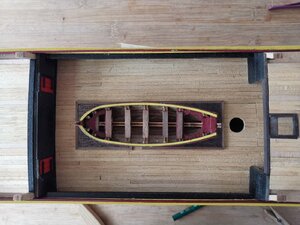
And the final verdict? I don't like it. There is absolutely nothing wrong with the model for what it is, but - to me - it just lacks the WOW factor.
Tonight, I will order a long boat from one of our Russian friends and see how that goes.
Well, that is all for now. Until next time, keep safe and enjoy your building.
Kind regards - Heinrich
So during my two off days, I made some progress. First up was to continue planking the hull below the water level and to prepare for closing the hull.

As I need more working space than my little work table affords me, the working surface in the kitchen was called for. Luckily the admiral is fully supportive of the build, so no problems there.

The closer I get to the end the more tricky it gets to anticipate how the final planking when pan out (no little pieces of graph paper meticulously marked out where each plank should go for me). So far there are no dropped strakes - (I might probably end up using one or either side), but it has required some forceful "manipulation" of the planks at time.

Will all those who reckon that a double-planked hull gives better results, please stand up!
While waiting for the glue to dry I have embarked on building a long boat for the Haarlem. Historically, the Haarlem's long boat played a huge role in the Dutch gathering information of the Cape and in their general day-to-day-survival. I ordered the Kolderstok long boat which at a length of 120mm is perfectly in scale.

Don't be fooled. It is small ... Keel, bulkheads and front and rear compartments.

The stern is planked with walnut strips which are glued at an angle of 45 degrees.

The first plank goes on ...

With a plethora of clamps.

Planking done.

And finished.


And the final verdict? I don't like it. There is absolutely nothing wrong with the model for what it is, but - to me - it just lacks the WOW factor.
Tonight, I will order a long boat from one of our Russian friends and see how that goes.
Well, that is all for now. Until next time, keep safe and enjoy your building.
Kind regards - Heinrich


