-

Win a Free Custom Engraved Brass Coin!!!
As a way to introduce our brass coins to the community, we will raffle off a free coin during the month of August. Follow link ABOVE for instructions for entering.
-

PRE-ORDER SHIPS IN SCALE TODAY!
The beloved Ships in Scale Magazine is back and charting a new course for 2026!
Discover new skills, new techniques, and new inspirations in every issue.
NOTE THAT OUR FIRST ISSUE WILL BE JAN/FEB 2026
You are using an out of date browser. It may not display this or other websites correctly.
You should upgrade or use an alternative browser.
You should upgrade or use an alternative browser.
VOC SPIEGELRETOURSCHIP BATAVIA 1628 - KOLDERSTOK 1:72
- Thread starter Heinrich
- Start date
- Watchers 64
-
- Tags
- batavia kolderstok
Heinrich,
Those pictures are absolutely splendid. Your attention to detail is incredible, I admire your patience. I look forward to your next engineering step placing the four cannons and small  .
.
Jan
Those pictures are absolutely splendid. Your attention to detail is incredible, I admire your patience. I look forward to your next engineering step placing the four cannons and small
Jan
- Joined
- Jan 9, 2020
- Messages
- 10,566
- Points
- 938

@Pathfinder65 Thank you Jan. You and I already come a long way on the forum so your comments are always much appreciated. I suppose that patience is the one thing that is indispensable when you are a teacher! 

Indeed, patience is an art in its self.@Pathfinder65 Thank you Jan. You and I already come a long way on the forum so your comments are always much appreciated. I suppose that patience is the one thing that is indispensable when you are a teacher!
Jan
Heinrich,
Is the rigging on your version the same as on the Batavia?
Jan
Is the rigging on your version the same as on the Batavia?
Jan
Heinrich,Jan I am not 100% sure of that, but I would assume so. I will at least follow the Batavia's rigging.
Are you adding sails or just going with the standing rigging?
- Joined
- Jan 9, 2020
- Messages
- 10,566
- Points
- 938

I have the sail set as well so I am ready to complete everything. Brave words indeed! Jan, to tell you the truth, I don't know. I am still very far from that so I will probably make final calls closer to the time.
Heinrich,I have the sail set as well so I am ready to complete everything. Brave words indeed! Jan, to tell you the truth, I don't know. I am still very far from that so I will probably make final calls closer to the time.
I fully understand what your thoughts are. I spent a long time rigging and placing the sails on my Enterprise build. I was apprehensive at first, but the more I worked on the blocks and lines, the more I studied the rigging plans and when I finally got to placing the sails, well... the model on the cover of the kit box finally emerged. Looking back at the build I have to say that was my favorite part.
Jan
- Joined
- Jan 9, 2020
- Messages
- 10,566
- Points
- 938

@Pathfinder65 Dear Jan
The reason why I say closer to the time is because I am busy researching a major - at least to me - project at the moment which is taking up a lot of my time. But it is great to hear that the rigging was your favourite part - I must say I thoroughly enjoy working with wood and if I get involved in a future build (other than the Leudo) it will probably be an Admiralty-style build.
The reason why I say closer to the time is because I am busy researching a major - at least to me - project at the moment which is taking up a lot of my time. But it is great to hear that the rigging was your favourite part - I must say I thoroughly enjoy working with wood and if I get involved in a future build (other than the Leudo) it will probably be an Admiralty-style build.
Hi Heinrich, she sure looks great. Are you looking for an additional challenge? Some nice painted clouds on the blue potdeksel on the sides.
- Joined
- Jan 9, 2020
- Messages
- 10,566
- Points
- 938

@Hello Maarten. Thank you for the compliment!. Once the cannons have been placed in the kuil, I will look at all other challenges, but now you have me confused with the "blue potdeksel"??? Blue is the one colour that ain't on this ship ....
I see its green, was tjis afternoon with the sun on my screen@Hello Maarten. Thank you for the compliment!. Once the cannons have been placed in the kuil, I will look at all other challenges, but now you have me confused with the "blue potdeksel"??? Blue is the one colour that ain't on this ship ....
- Joined
- Jan 9, 2020
- Messages
- 10,566
- Points
- 938

@Maarten Now I know that the shade of green on the ship is right!!!  Apparently, in real life, the green appears to have a "blue" tint under certain light conditions !!!
Then about the "challenge": Luckily for me, the Batavia did not have any clouds painted on the potdeksel (just the small "red doors/windows and a clown climbing through one of them) . The Haarlem was apparently even an even more austere and less colourful version. So I will have to decline your challenge based on "historical background". Phew ...
 Apparently, in real life, the green appears to have a "blue" tint under certain light conditions !!!
Then about the "challenge": Luckily for me, the Batavia did not have any clouds painted on the potdeksel (just the small "red doors/windows and a clown climbing through one of them) . The Haarlem was apparently even an even more austere and less colourful version. So I will have to decline your challenge based on "historical background".
 Phew ...
- Joined
- Jan 9, 2020
- Messages
- 10,566
- Points
- 938

Dear Friends
A little while ago I acquired the Falkonet Longboat Kit (the 20-oar version), because I wanted a more detailed longboat for the Haarlem . My posts about this created widespread interest. Among those who responded was Ab Hoving, well-known authority on Dutch ships, who pointed out that the Falkonet would not be historically correct for the Haarlem. As a result, Ab sent me the detailed plans and drawings for the Dutch “Chaloup” longboat as it would have been used on Dutch ships of the seventeeth century - like the Haarlem. These plans are currently being reworked and brought to scale, so more about that when they are ready.
As you all know I intend to install 6 cannons on the deck of the Haarlem which will require quite a bit of reworking the wales and organising the deck space available. As the longboat is also housed on this section of the deck, I thought that it a good idea to construct that first to see exactly what space I have available for the cannons.
Whereas a number of forum members are very familiar with the Falkonet and Master Korabel longboats having built them before, to me it was first time around. At this point I have to mention that SOS member @TKAM has been invaluable in this build. He has just finished the Falkonet longboat for his superb Rattlesnake and very graciously and kindly offered me his help. Thanks TKAM - it is much appreciated!
So, with the pre-amble out of the way, let’s make some sawdust as I will explain the build step-by-step.
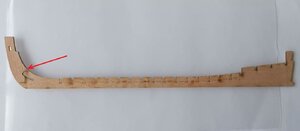
The false keel assembly comes in two parts - the false keel itself to which the separate bow section is glued. Note the dotted line at the bottom of the keel. I will discuss its function later.
Next up are the two pieces of rising wood which have to be bevelled before they can be attcahed to the keel. Falkonet actually supplies 4 of these pieces - two as spares. The pieces are clearly marked with a line up to where it meeds to be bevelled, so this can be done with great accuracy. I used a jeweller’s diamond file for this and it went very quickly.
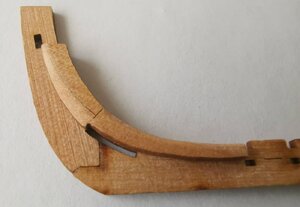
Port Side
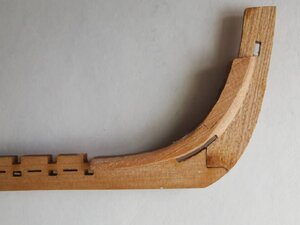
Starboard Side.
There are also two pieces of deadwood that are shaped and placed at the stern, but of that I have unfortunately omitted to take pictures. Apologies!
For the onstruction of the frame a jig and “guide” (for want of a better word) are supplied.
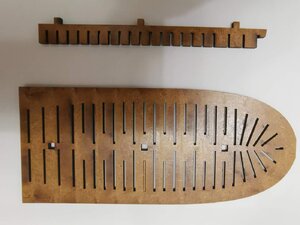
The guide has three tabs which are glued into the corresponding holes in the jig. No guesswork is required here as the guide can only fit in one possible way.
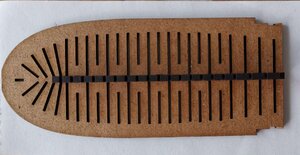
The guide is glued into the jig.
The 24 x bulkheads are clearly marked and are inserted upside down into the jig. NB!!! DO NOT GLUE THE BULKHEADS TO THE JIG !!!
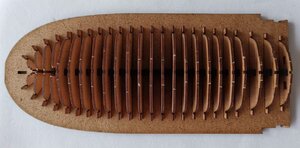
This little exercise was a revelation to me as absolutely NO SANDING, FILING or TAMPERING of any kind was required to ensure the proper fitment of the bulkheads into the jig.
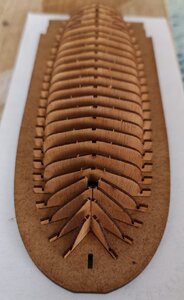
As you can see, the slots in which the false keel needs to inserted are perfectly aligned. Given the way in which the bulkheads fitted into the jig, I was expecting this, but it was nevertheless great to see it pan out in the flesh! Kudos Falkonet!
The next step shows the false keel inserted into the bulkhead slots while the bow section of the keel fits into its own slot at the bow-end of the jig.
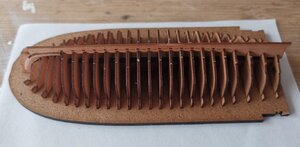
The instructions stipulate that the false keel should only be glued to the last four bulkheads (at the stern), but following TKAM's advice, I glued all bulkheads to the false keel.
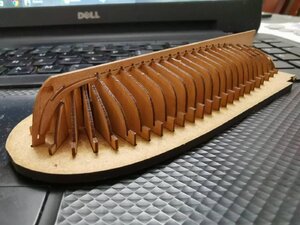
As you can see, the keel is arrow-straight and 100% warp free.
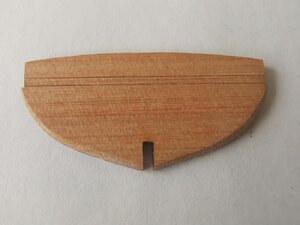
The last piece of the frame that needs to be fitted is the rear transom which also needs to be faired up to the line inscribed on it. This will obviously facilitate ease of planking later.
That concludes the first phase of the construction. The next step is the gluing of the ribs to the bulkheads and then the planking of the hull can start.
Take care everyone - stay safe and enjoy your shipbuilding.
Kind regards - Heinrich
A little while ago I acquired the Falkonet Longboat Kit (the 20-oar version), because I wanted a more detailed longboat for the Haarlem . My posts about this created widespread interest. Among those who responded was Ab Hoving, well-known authority on Dutch ships, who pointed out that the Falkonet would not be historically correct for the Haarlem. As a result, Ab sent me the detailed plans and drawings for the Dutch “Chaloup” longboat as it would have been used on Dutch ships of the seventeeth century - like the Haarlem. These plans are currently being reworked and brought to scale, so more about that when they are ready.
As you all know I intend to install 6 cannons on the deck of the Haarlem which will require quite a bit of reworking the wales and organising the deck space available. As the longboat is also housed on this section of the deck, I thought that it a good idea to construct that first to see exactly what space I have available for the cannons.
Whereas a number of forum members are very familiar with the Falkonet and Master Korabel longboats having built them before, to me it was first time around. At this point I have to mention that SOS member @TKAM has been invaluable in this build. He has just finished the Falkonet longboat for his superb Rattlesnake and very graciously and kindly offered me his help. Thanks TKAM - it is much appreciated!
So, with the pre-amble out of the way, let’s make some sawdust as I will explain the build step-by-step.

The false keel assembly comes in two parts - the false keel itself to which the separate bow section is glued. Note the dotted line at the bottom of the keel. I will discuss its function later.
Next up are the two pieces of rising wood which have to be bevelled before they can be attcahed to the keel. Falkonet actually supplies 4 of these pieces - two as spares. The pieces are clearly marked with a line up to where it meeds to be bevelled, so this can be done with great accuracy. I used a jeweller’s diamond file for this and it went very quickly.

Port Side

Starboard Side.
There are also two pieces of deadwood that are shaped and placed at the stern, but of that I have unfortunately omitted to take pictures. Apologies!
For the onstruction of the frame a jig and “guide” (for want of a better word) are supplied.

The guide has three tabs which are glued into the corresponding holes in the jig. No guesswork is required here as the guide can only fit in one possible way.

The guide is glued into the jig.
The 24 x bulkheads are clearly marked and are inserted upside down into the jig. NB!!! DO NOT GLUE THE BULKHEADS TO THE JIG !!!

This little exercise was a revelation to me as absolutely NO SANDING, FILING or TAMPERING of any kind was required to ensure the proper fitment of the bulkheads into the jig.

As you can see, the slots in which the false keel needs to inserted are perfectly aligned. Given the way in which the bulkheads fitted into the jig, I was expecting this, but it was nevertheless great to see it pan out in the flesh! Kudos Falkonet!
The next step shows the false keel inserted into the bulkhead slots while the bow section of the keel fits into its own slot at the bow-end of the jig.

The instructions stipulate that the false keel should only be glued to the last four bulkheads (at the stern), but following TKAM's advice, I glued all bulkheads to the false keel.

As you can see, the keel is arrow-straight and 100% warp free.
The last piece of the frame that needs to be fitted is the rear transom which also needs to be faired up to the line inscribed on it. This will obviously facilitate ease of planking later.

That concludes the first phase of the construction. The next step is the gluing of the ribs to the bulkheads and then the planking of the hull can start.
Take care everyone - stay safe and enjoy your shipbuilding.
Kind regards - Heinrich
Heinrich,
Wow, excellent tutorial on your latest effort. The pictures showing your progress are awesome.
Jan
Wow, excellent tutorial on your latest effort. The pictures showing your progress are awesome.
Jan
- Joined
- Jan 9, 2020
- Messages
- 10,566
- Points
- 938

@Pathfinder65 Hi Jan. I am almost finished with the longboat. There are still a couple of things left to do and I will post as I go along. Expect the next update very soon! 
Excellent tutorial, Thanks
- Joined
- Jan 9, 2020
- Messages
- 10,566
- Points
- 938

@DonRobinson Thank you Don. This is an amazing kit and I am sure that once builders get to know the Falkonet kits and see the quality, more and more of them will start building these longboats. Unfortunately, the instructions are all Russian, so the reason for me taking my time with it, is to provide as much helpful information as I can in the areas that were unclear to me.


