That looks like a really superb kit you are building Heinrich.
-

Win a Free Custom Engraved Brass Coin!!!
As a way to introduce our brass coins to the community, we will raffle off a free coin during the month of August. Follow link ABOVE for instructions for entering.
-

PRE-ORDER SHIPS IN SCALE TODAY!
The beloved Ships in Scale Magazine is back and charting a new course for 2026!
Discover new skills, new techniques, and new inspirations in every issue.
NOTE THAT OUR FIRST ISSUE WILL BE JAN/FEB 2026
You are using an out of date browser. It may not display this or other websites correctly.
You should upgrade or use an alternative browser.
You should upgrade or use an alternative browser.
VOC SPIEGELRETOURSCHIP BATAVIA 1628 - KOLDERSTOK 1:72
- Thread starter Heinrich
- Start date
- Watchers 64
-
- Tags
- batavia kolderstok
- Joined
- Jan 9, 2020
- Messages
- 10,566
- Points
- 938

Hello Dear Shipbuilding Friends
So as promised, now it was time for installing the ribs. This is at best a "VERY CAREFUL" exercise as the ribs are minute and very fragile.
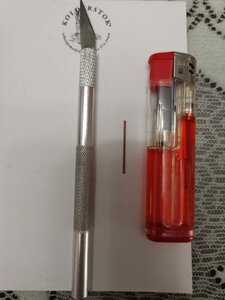
Size comparison to an X-Acto Knife and lighter.
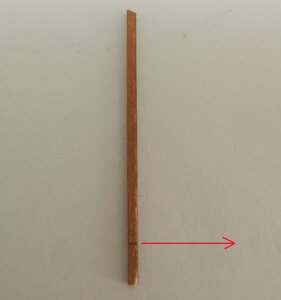
A closer look at the rib indicates a very feint line (indicated by the red arrow). These lines must be visible at all times (i.e. the other side should be glued to the bulkhead) and indicates the point up to where the ribs should slot into the little grooves where the bulkheads meet the jig. (See the next picture).
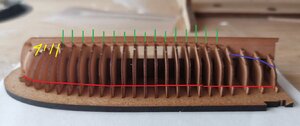
This picture shows how the ribs need to be glued to the bulkheads. Starting from the stern with the 4 x most aft bulkheads, they are glued up to the point as indicated by the blue line. This will be determined by the length of the ribs. From that point onwards, the bulkheads still follow the red line at the “bottom” of the jig, but the other ends are inserted into the slots provided (by the green arrows). At the bow, the ribs once more follow the red line but are now glued against the two shaped pieces of rising wood as indicated by the yellow lines.
With all the ribs installed, it was time to start the planking. Here I used my own technique born out of my aversion to CA glue. First, PVA glue was applied to the bulkheads after which the plank was held underneath the cold tap for about three seconds. The wet plank is then placed into position and “ironed” to the bulkheads with the flat side of the pre-heated plank bender. As the heat dries the wood it also dries the glue, resulting in an almost immediate bond - yet allowing sufficient time to make any necessary adjustments.
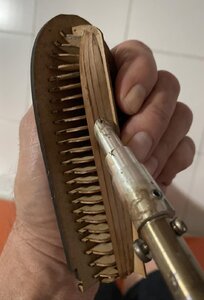
Here you can see the planks being ironed onto the bulkheads.
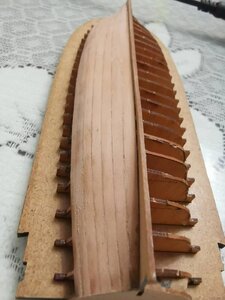
With no need to wait for the glue to dry one side was almost completed in a single session - except for the last two planks closest to the wale end of the hull.
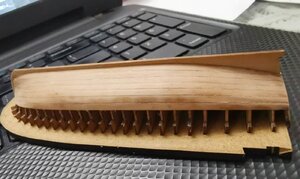
I know that popular belief dictates to plank starboard and port side simultaneously to prevent keel warping, but in this case that was never going to happen. The whole assembly is very sturdy (the jig plays an important part in this) while the planks are very thin. The force that the planks thus exert on the hull are absolutely negligible.
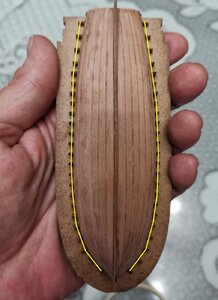
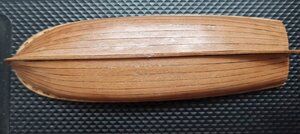
With both sides planked to the same level, it was now time to cut off the little “feet” which house the grooves. I did this because I could not get the plank bender to lie flat against the jig with those feet in place.
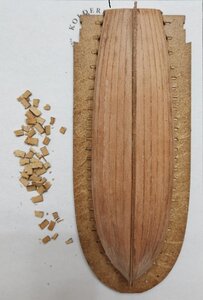
Here you can see the little feet removed. With the X-Acto knife this goes very quickly.
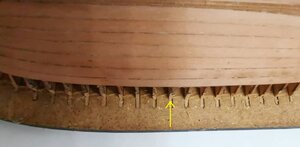
Close up of the jig with the bulkheads’ feet removed.
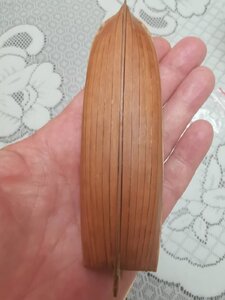
The last step in Phase 2 is the heartstopping part where the hull needs to be extracted from the jig. Some careful prodding with the edge of a small metal ruler, perfectly released from the hull from the jig without anything breaking. Phew!!!
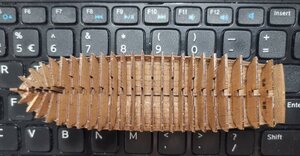
And that - my dear friends - conclude Phase 2. Stay tuned for more.
As usual all the likes, critique and comments are always appreciated and most valued!. Stay safe and take care.
Kind regards - Heinrich
So as promised, now it was time for installing the ribs. This is at best a "VERY CAREFUL" exercise as the ribs are minute and very fragile.

Size comparison to an X-Acto Knife and lighter.

A closer look at the rib indicates a very feint line (indicated by the red arrow). These lines must be visible at all times (i.e. the other side should be glued to the bulkhead) and indicates the point up to where the ribs should slot into the little grooves where the bulkheads meet the jig. (See the next picture).

This picture shows how the ribs need to be glued to the bulkheads. Starting from the stern with the 4 x most aft bulkheads, they are glued up to the point as indicated by the blue line. This will be determined by the length of the ribs. From that point onwards, the bulkheads still follow the red line at the “bottom” of the jig, but the other ends are inserted into the slots provided (by the green arrows). At the bow, the ribs once more follow the red line but are now glued against the two shaped pieces of rising wood as indicated by the yellow lines.
With all the ribs installed, it was time to start the planking. Here I used my own technique born out of my aversion to CA glue. First, PVA glue was applied to the bulkheads after which the plank was held underneath the cold tap for about three seconds. The wet plank is then placed into position and “ironed” to the bulkheads with the flat side of the pre-heated plank bender. As the heat dries the wood it also dries the glue, resulting in an almost immediate bond - yet allowing sufficient time to make any necessary adjustments.

Here you can see the planks being ironed onto the bulkheads.

With no need to wait for the glue to dry one side was almost completed in a single session - except for the last two planks closest to the wale end of the hull.

I know that popular belief dictates to plank starboard and port side simultaneously to prevent keel warping, but in this case that was never going to happen. The whole assembly is very sturdy (the jig plays an important part in this) while the planks are very thin. The force that the planks thus exert on the hull are absolutely negligible.

With both sides planked to the same level, it was now time to cut off the little “feet” which house the grooves. I did this because I could not get the plank bender to lie flat against the jig with those feet in place.

Here you can see the little feet removed. With the X-Acto knife this goes very quickly.

Close up of the jig with the bulkheads’ feet removed.
The last step in Phase 2 is the heartstopping part where the hull needs to be extracted from the jig. Some careful prodding with the edge of a small metal ruler, perfectly released from the hull from the jig without anything breaking. Phew!!!

And that - my dear friends - conclude Phase 2. Stay tuned for more.
As usual all the likes, critique and comments are always appreciated and most valued!. Stay safe and take care.
Kind regards - Heinrich
Heinrich,
Very nicely done. Interesting to see how the little boat comes together.
Jan
Very nicely done. Interesting to see how the little boat comes together.
Jan
- Joined
- Jan 9, 2020
- Messages
- 10,566
- Points
- 938

@shota70 Thank you for your kind words my friend. The kit is a great option to anyone who needs to build a longboat for their ships - or those who simply want it as a stand-alone model. The photographic instructions are good but to anyone not versed in Russian, the beginning stages of the build can be quite challenging. Another challenge of course, is the scale - 1:100!
Heinrich,
superb planking!
superb planking!
- Joined
- Jan 9, 2020
- Messages
- 10,566
- Points
- 938

Hello Dear Friends
So let's finish the Falkonet longboat!
But first comes that second and real heart-stopping moment where all the bulkheads need to be broken free from the hull. And "breaking" them out is exactly what is required. Armed with a pair of long-nosed pliers this was accomplished in no time and WITHOUT any damage to the hull or ribs.
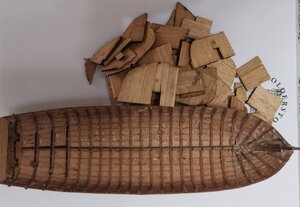
All bulkheads have been removed and now was the time to clean out all excess glue.
Thereafter, the instructions are crystal clear and easy to follow.
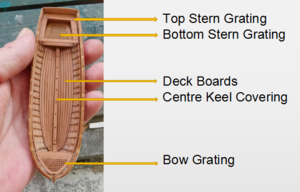
Here, most of the excess glue has been removed, the Top and Bottom Stern Gratings added, the Deck Boards and Centre Keel Covering installed and the Bow Grating put in place.
Thereafter the hull received a quick sanding and the first coat of undiluted Tung Oil diluted with Mineral Turpentine. (30% Tung Oil; 70% Mineral Turpentine).
Very very happy!
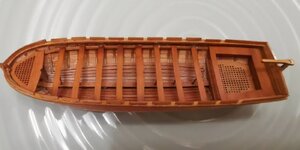
Rudder added and interior coated with the Tung Oil and Mineral Turpentine mixture.
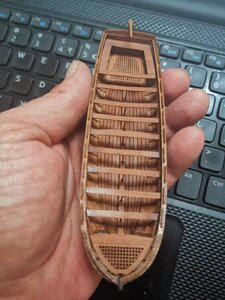
And outside in natural light.
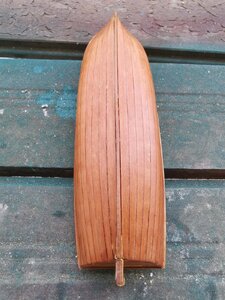
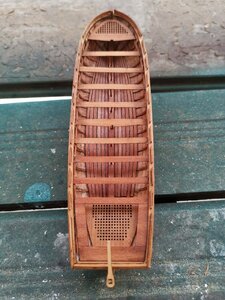
The last picture is of the longboat on the Haarlem. The stern is just loosely placed on a cannon carriage for support.
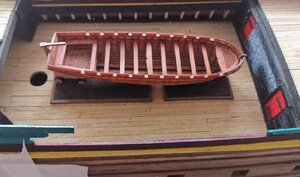
And that concludes this longboat build. It is an amazingly well-engineered kit which I believe set high standards. Whether or not it fits on the Haarlem, I leave to you decide. Please let me know your thoughts.
That is all for now; take care, stay safe and happy shipbuilding!
Kind regards - Heinrich
So let's finish the Falkonet longboat!
But first comes that second and real heart-stopping moment where all the bulkheads need to be broken free from the hull. And "breaking" them out is exactly what is required. Armed with a pair of long-nosed pliers this was accomplished in no time and WITHOUT any damage to the hull or ribs.

All bulkheads have been removed and now was the time to clean out all excess glue.
Thereafter, the instructions are crystal clear and easy to follow.

Here, most of the excess glue has been removed, the Top and Bottom Stern Gratings added, the Deck Boards and Centre Keel Covering installed and the Bow Grating put in place.
Thereafter the hull received a quick sanding and the first coat of undiluted Tung Oil diluted with Mineral Turpentine. (30% Tung Oil; 70% Mineral Turpentine).

Very very happy!

Rudder added and interior coated with the Tung Oil and Mineral Turpentine mixture.


And outside in natural light.


The last picture is of the longboat on the Haarlem. The stern is just loosely placed on a cannon carriage for support.

And that concludes this longboat build. It is an amazingly well-engineered kit which I believe set high standards. Whether or not it fits on the Haarlem, I leave to you decide. Please let me know your thoughts.
That is all for now; take care, stay safe and happy shipbuilding!
Kind regards - Heinrich
Fantastic little boat and a fine job of building it Heinrich. I have spent the last hour and two cups of coffee trying to understand this build and I finally have it figured out, I think. The part that puzzles me is the stern and the short planks that are installed there. I can see that parts of the bulkheads remain attached and the short planks come up to this point. What confuses me is if those short planks are glued to the bulkheads how did they not break off when you removed the upper part of the bulkhead.
In your last picture you can clearly see how thin those planks really are!!
Thanks again for this extremely helpful tutorial.
In your last picture you can clearly see how thin those planks really are!!
Thanks again for this extremely helpful tutorial.
Heinrich,
Nicely done, the oil finish adds a lot, as to the fit on the deck, I for one think it’s perfect. The lifeboat I built for my tug is a few millimeters larger than what was specified on the kits plans. But then I’m the only one who know that .
.
Jan
Nicely done, the oil finish adds a lot, as to the fit on the deck, I for one think it’s perfect. The lifeboat I built for my tug is a few millimeters larger than what was specified on the kits plans. But then I’m the only one who know that
Jan
I forgot to mention the boat looks great on your ship 
- Joined
- Jan 9, 2020
- Messages
- 10,566
- Points
- 938

@DonRobinson Thank you very much for the kind words, Don. You are right. The last four bulkheads (those closest to the stern) are scored at the bottom to facilitate them breaking off easily. But what got me as well was that the other bulkheads are not - so even after I have done it, I am still not sure how they broke so cleanly away from the ribs. You are right - the short planks extend to where the portions of the bulkheads remain.
It is indeed a great kit - very accurate and very precise. But man -oh-man - that scale of 1:100 proved to be a real challenge for me.
It is indeed a great kit - very accurate and very precise. But man -oh-man - that scale of 1:100 proved to be a real challenge for me.
- Joined
- Jan 9, 2020
- Messages
- 10,566
- Points
- 938

@Pathfinder65 Hi Jan. Yes, I am very happy with how the boat looks like on the ship. The Pear Wood and Tung Oil combination gives the effect that I was looking for. However, the build itself was not good enough - I got heavily criticized on the Dutch forum for not managing to remove all excess glue. So - believe it or not - I will build it again. Now for the time being at least, I know there is enough space for the cannons and the lifeboat on that portion of the hull.
- Joined
- Jan 9, 2020
- Messages
- 10,566
- Points
- 938

@DonRobinson I also think it fits the ship - however, I know that it is not historically correct. Decisions ... decisions ...
Heinrich,@Pathfinder65 Hi Jan. Yes, I am very happy with how the boat looks like on the ship. The Pear Wood and Tung Oil combination gives the effect that I was looking for. However, the build itself was not good enough - I got heavily criticized on the Dutch forum for not managing to remove all excess glue. So - believe it or not - I will build it again. Now for the time being at least, I know there is enough space for the cannons and the lifeboat on that portion of the hull.
Oh no, no criticism from here, I think it looks great.
Jan
- Joined
- Jan 9, 2020
- Messages
- 10,566
- Points
- 938

@Pathfinder65 Thank you my friend - much appreciated. 

- Joined
- Jan 9, 2020
- Messages
- 10,566
- Points
- 938

@WarrLight Thank you very much for the kind words, Reggie. It is much appreciated and you are most welcome.
HEINRICH LET ME ADD TO WHAT EVERYONE ELSE SAID, IT IS A GREAT BUILD, AND YOUR EXPLANATIONS ARE TOP NOTCH, I DISLIKE MAKING A SUGESTION TO SO FINE A MODELER BUT HERE GOES I TO HAVE HAD A TERRIBLE TIME REMOVING EXCESS GLUE, ESPECIALLY ON THE INTERIOR OF LONGBOATS, A SUGESTION FROM MIKE SHANKS I HOPE WILL PUT THAT TO BED, HE SUGESTED TO USE WELL BOND GLUEE (GOT MINE FROM AMOZON) IT TAKES OFF THE GLUE WIT 99% ALCHOL (RUBBING), AM USING THIS IN THE NEXT COUPLE OF DAYS ON MY LONGBOAT, WILL LET YOU KNOW HOW IT COMES OUT. GOD BLESS YOU AND YOURS DON


