-

Win a Free Custom Engraved Brass Coin!!!
As a way to introduce our brass coins to the community, we will raffle off a free coin during the month of August. Follow link ABOVE for instructions for entering.
-

PRE-ORDER SHIPS IN SCALE TODAY!
The beloved Ships in Scale Magazine is back and charting a new course for 2026!
Discover new skills, new techniques, and new inspirations in every issue.
NOTE THAT OUR FIRST ISSUE WILL BE JAN/FEB 2026
You are using an out of date browser. It may not display this or other websites correctly.
You should upgrade or use an alternative browser.
You should upgrade or use an alternative browser.
VOC SPIEGELRETOURSCHIP BATAVIA 1628 - KOLDERSTOK 1:72
- Thread starter Heinrich
- Start date
- Watchers 64
-
- Tags
- batavia kolderstok
Use Ca and wood glue at the same timeHi Jan
Painstaking and s-l-o-w! Lay one little plank and wait at least 4 hours for the glue to dry, but well worth it.
Kind regards - Heinrich
- Joined
- Jan 9, 2020
- Messages
- 10,566
- Points
- 938

Thanks for the tip Zoly, but I have an absolute aversion to CA. So far in this build I have not touched the stuff. I know I will have to at some stage, but I try to stay as far away as possible.
Kind regards-Heinrich
Kind regards-Heinrich
Greetings Heinrich. I am very glad that you went into this adjustment, adhering to the principles of building a real ship makes the model real.
 Fire
Fire
 Construction time is not important, the result is important..

 Fire
Fire
 Construction time is not important, the result is important..
- Joined
- Jan 9, 2020
- Messages
- 10,566
- Points
- 938

I'm also glad if someone advises me in time !!@Ondras71 Dear Ondras. Thank you for the very kind words. Your work is a great inspiration to me and I am honoured to follow such good advice. You are so right about construction time and the final result.
Kind regards-Heinrich

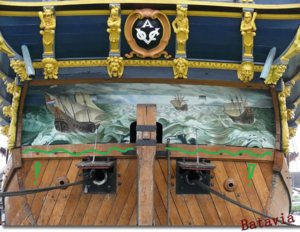
Do not forget this thick board ..

- Joined
- Jan 9, 2020
- Messages
- 10,566
- Points
- 938

Hello my dear shipbuilding friends
I trust that you are all in good health and exercising the necessary care to stay safe - trust me, these measures work. We are now for all practical purposes back to normal in China.
With the stern prepared for planking (the fairing still needs to be done), it was time to move my attention to the bow to fit the filler blocks. The instructions indicate that strips of balsa (15mm x 10mm) be used for this, but here I deviated. Reminiscent of @Ab Hoving who said that "balsa and boxwood are not real wood", I chose to use the 15mm x 10mm strip of basswood (supplied in the kit) for this. This of course does mean that I will have to order another strip from Hans, but seeing that I have to order extra cannons and carriages in any case, this did not bother too much. As it turned out, there was another part that I would have to include in my order list (this time unplanned!) but more about that later.
For the placement of the filler blocks it was simply a case of following the excellent build log of Danny Mulders on the Dutch modelbouwforum site. He had photographed exactly how the filler blocks needed to cut and glued into position to the front of bulkhead #1. After I had done that, I sent Hans a few pictures just to make sure I was on the right track and after that it was time to make wood dust.
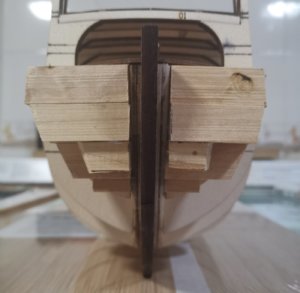
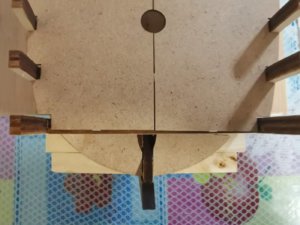
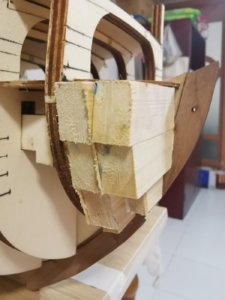
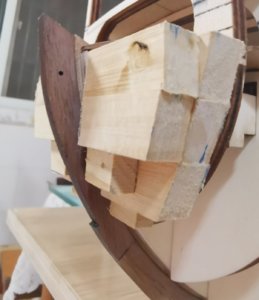
And then there was sanding ... sanding and more sanding. My 180 grit sandpaper (the coarsest I could get at my local toolshop) made very little impression on the basswood. At one stage I even considered sending Hans a message asking him whether he puts his wood on steroids! After two days of diligent sanding I had completed the port side and was reasonably happy with the results. (See picture below)
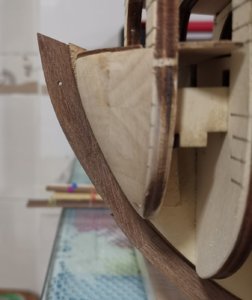
It was only after I had downloaded the pictures that I had taken on my PC, that I found - to my utter dismay - that I have sanded half of the uppermost portion of the keel away in the process.
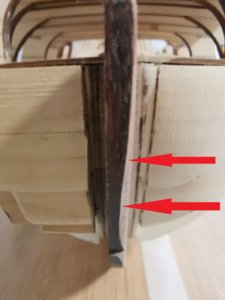
Words cannot even begin to describe how I felt. There are simply no excuses for this - it was simply a case of negligence and stupidity at its best!
Hans - ever the diplomat and gentleman that he is - tried to soften the blow, but I knew that I wouldn’t be happy with any “fix” to solve the problem. There was only one thing to do - that portion of the keel had to come out. Luckily my Xacto made small work of that and I didn’t mess that up as well. So, other than including a new upper part for the front keel in my order list to Hans, there was nothing else that I could do. Luckily my 80-grit sandpaper that I had ordered on Taobao, arrived in the meantime so I could start with the starboard side.

I really thought that the sanding would be much easier with the coarse 80-grit sandpaper. I was wrong.
This went a little easier, but only very little. The basswood still put up a formidable fight. After five days of off-and on-sanding - with some well-needed breaks in between - I was finished.
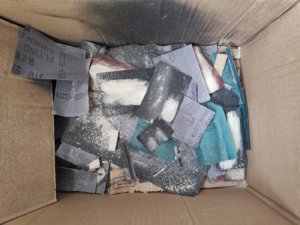
The aftermath of the sanding battle.
With that now done, it was time to build up the foredeck as I indicated in an earlier post.
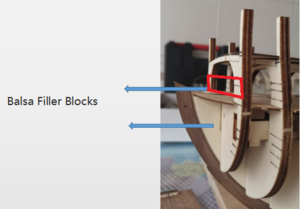
The idea is that the section marked in red is built up with balsa blocks and then ultimately planked to form the foremost part of the deck. At the same time, it also has to be shaped to accommodate the bowsprit. This time, I didn't second-guess the instructions and went straight for the balsa!
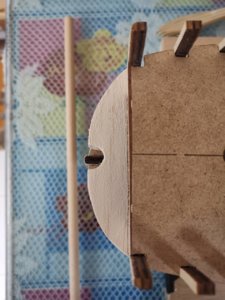
Forepart of the deck shaped and hole made at the correct angle for the bowsprit. With the balsa, the work was only a pleasure and took me all of 20 minutes to do.
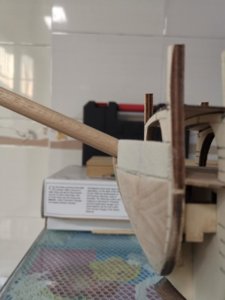
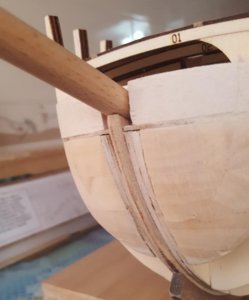
The completed bow assembly ready for planking.
In retrospect, I am happy that I went for the basswood, even though it gave me a hell of a time. I now have a bow assembly that redefines Fort Knox in strength and I can really attach the planking aggressively to the bow without worrying about that balsawood giving way or being too soft. At the same time the removal of the keel, may actually be a blessing in disguise. Now I can do the planking first - a process which will be much simpler as I can simply butt-up the planks against the false keel. When done, it will also make sanding so much easier after which the new keel can simply be retro-fitted.
Now it is time for fairing the hull and painting the gunports black, but that is for another day.
As usual, thank you for following and for the reading the build log of the Haarlem. Your comments and inputs are greatly appreciated.
Kind regards - Heinrich
I trust that you are all in good health and exercising the necessary care to stay safe - trust me, these measures work. We are now for all practical purposes back to normal in China.
With the stern prepared for planking (the fairing still needs to be done), it was time to move my attention to the bow to fit the filler blocks. The instructions indicate that strips of balsa (15mm x 10mm) be used for this, but here I deviated. Reminiscent of @Ab Hoving who said that "balsa and boxwood are not real wood", I chose to use the 15mm x 10mm strip of basswood (supplied in the kit) for this. This of course does mean that I will have to order another strip from Hans, but seeing that I have to order extra cannons and carriages in any case, this did not bother too much. As it turned out, there was another part that I would have to include in my order list (this time unplanned!) but more about that later.
For the placement of the filler blocks it was simply a case of following the excellent build log of Danny Mulders on the Dutch modelbouwforum site. He had photographed exactly how the filler blocks needed to cut and glued into position to the front of bulkhead #1. After I had done that, I sent Hans a few pictures just to make sure I was on the right track and after that it was time to make wood dust.


And then there was sanding ... sanding and more sanding. My 180 grit sandpaper (the coarsest I could get at my local toolshop) made very little impression on the basswood. At one stage I even considered sending Hans a message asking him whether he puts his wood on steroids! After two days of diligent sanding I had completed the port side and was reasonably happy with the results. (See picture below)

It was only after I had downloaded the pictures that I had taken on my PC, that I found - to my utter dismay - that I have sanded half of the uppermost portion of the keel away in the process.

Words cannot even begin to describe how I felt. There are simply no excuses for this - it was simply a case of negligence and stupidity at its best!
Hans - ever the diplomat and gentleman that he is - tried to soften the blow, but I knew that I wouldn’t be happy with any “fix” to solve the problem. There was only one thing to do - that portion of the keel had to come out. Luckily my Xacto made small work of that and I didn’t mess that up as well. So, other than including a new upper part for the front keel in my order list to Hans, there was nothing else that I could do. Luckily my 80-grit sandpaper that I had ordered on Taobao, arrived in the meantime so I could start with the starboard side.

I really thought that the sanding would be much easier with the coarse 80-grit sandpaper. I was wrong.
This went a little easier, but only very little. The basswood still put up a formidable fight. After five days of off-and on-sanding - with some well-needed breaks in between - I was finished.

The aftermath of the sanding battle.
With that now done, it was time to build up the foredeck as I indicated in an earlier post.

The idea is that the section marked in red is built up with balsa blocks and then ultimately planked to form the foremost part of the deck. At the same time, it also has to be shaped to accommodate the bowsprit. This time, I didn't second-guess the instructions and went straight for the balsa!

Forepart of the deck shaped and hole made at the correct angle for the bowsprit. With the balsa, the work was only a pleasure and took me all of 20 minutes to do.


The completed bow assembly ready for planking.
In retrospect, I am happy that I went for the basswood, even though it gave me a hell of a time. I now have a bow assembly that redefines Fort Knox in strength and I can really attach the planking aggressively to the bow without worrying about that balsawood giving way or being too soft. At the same time the removal of the keel, may actually be a blessing in disguise. Now I can do the planking first - a process which will be much simpler as I can simply butt-up the planks against the false keel. When done, it will also make sanding so much easier after which the new keel can simply be retro-fitted.
Now it is time for fairing the hull and painting the gunports black, but that is for another day.
As usual, thank you for following and for the reading the build log of the Haarlem. Your comments and inputs are greatly appreciated.
Kind regards - Heinrich
Pffff! Now you can hit an iceberg with your ship - and the iceberg will sink! 
A lot of work - but it turned out quite well! (Except for the walnut keel part).
In the planking proces two options are possible in this stage:
1: Bend en mount the planking in a way it is a little bit too long so it goes a few mm over the false keel. Then - when your new keel part has arrived, use this as a template to draw the outlines (width) of the walnut keel onto the planks and cut away the ends of the planks so the keel fits exactly in between it.
2: or sand the planks nice flush in the rounding of the hull and cut out the thickness of the planks out of the new-to-arrive keel part so it fits over it.
And Ab Hoving is right when he says that balsa is no wood. In fact it is wood, but it is no real construction wood. It does not really add strenght or whatsoever to the hull. It merely gives you a good indication of how your planking should go and how the lines of the bow part go.
The bow of Dutch 17th century ships was quitte blunt (I don't know if this is the correct word for it), but I mean that the bow is very round shaped and therefore rather difficult to form. Once you have experienced the bending and gluing of the first planks you will appreciate the extra wood in front.
Hans
- Joined
- Jan 9, 2020
- Messages
- 10,566
- Points
- 938

Hello Hans
Thank you for your response. Yes it has turned out quite well (certainly no Titanic here!) and the damaged walnut keel may be a small sacrifice in the end.
Your advice on both options is excellent. (Now I have a spare keel on which I can practice Option 2! ). "Blunt" is the perfect word and believe me, I already appreciate the extra wood as it makes the line to follow so much clearer.
Thank you for your excellent customer service, Hans - also with regards to the ordering of the extra parts. What a pleasure to have a "hotline" to the manufacturer of such a wonderful product!
Kind regards - Heinrich
Thank you for your response. Yes it has turned out quite well (certainly no Titanic here!) and the damaged walnut keel may be a small sacrifice in the end.
Your advice on both options is excellent. (Now I have a spare keel on which I can practice Option 2!
Thank you for your excellent customer service, Hans - also with regards to the ordering of the extra parts. What a pleasure to have a "hotline" to the manufacturer of such a wonderful product!
Kind regards - Heinrich
Hello. Here is a discussion about the boards on the bow of Dutch ships in our Czech forum. Maybe you'll find something interesting here..
Sanding around finished wood is dangerous, I use temporary cladding with a board or paper tape. Even grooves against the summer can not be removed ..

I keep my fingers crossed for your progress. Ondras
Sanding around finished wood is dangerous, I use temporary cladding with a board or paper tape. Even grooves against the summer can not be removed ..

I keep my fingers crossed for your progress. Ondras
- Joined
- Jan 9, 2020
- Messages
- 10,566
- Points
- 938

Hello Ondras. Thank you for the link. I will certainly have a look and am sure to learn something. Yes ... now I know to be extra careful when sanding around finished wood parts and will certainly cover those parts well in future.
Thank you for your kind wishes.
Kind regards - Heinrich
Thank you for your kind wishes.
Kind regards - Heinrich
Heinrich,
That appears be a lot of work but the end result will be well worth it.
Jan
That appears be a lot of work but the end result will be well worth it.
Jan
Ouch! But you fixed it really well. Looking great.Hello my dear shipbuilding friends
I trust that you are all in good health and exercising the necessary care to stay safe - trust me, these measures work. We are now for all practical purposes back to normal in China.
With the stern prepared for planking (the fairing still needs to be done), it was time to move my attention to the bow to fit the filler blocks. The instructions indicate that strips of balsa (15mm x 10mm) be used for this, but here I deviated. Reminiscent of @Ab Hoving who said that "balsa and boxwood are not real wood", I chose to use the 15mm x 10mm strip of basswood (supplied in the kit) for this. This of course does mean that I will have to order another strip from Hans, but seeing that I have to order extra cannons and carriages in any case, this did not bother too much. As it turned out, there was another part that I would have to include in my order list (this time unplanned!) but more about that later.
For the placement of the filler blocks it was simply a case of following the excellent build log of Danny Mulders on the Dutch modelbouwforum site. He had photographed exactly how the filler blocks needed to cut and glued into position to the front of bulkhead #1. After I had done that, I sent Hans a few pictures just to make sure I was on the right track and after that it was time to make wood dust.
View attachment 143621
View attachment 143622
View attachment 143623
View attachment 143624
And then there was sanding ... sanding and more sanding. My 180 grit sandpaper (the coarsest I could get at my local toolshop) made very little impression on the basswood. At one stage I even considered sending Hans a message asking him whether he puts his wood on steroids! After two days of diligent sanding I had completed the port side and was reasonably happy with the results. (See picture below)
View attachment 143625
It was only after I had downloaded the pictures that I had taken on my PC, that I found - to my utter dismay - that I have sanded half of the uppermost portion of the keel away in the process.
View attachment 143626
Words cannot even begin to describe how I felt. There are simply no excuses for this - it was simply a case of negligence and stupidity at its best!
Hans - ever the diplomat and gentleman that he is - tried to soften the blow, but I knew that I wouldn’t be happy with any “fix” to solve the problem. There was only one thing to do - that portion of the keel had to come out. Luckily my Xacto made small work of that and I didn’t mess that up as well. So, other than including a new upper part for the front keel in my order list to Hans, there was nothing else that I could do. Luckily my 80-grit sandpaper that I had ordered on Taobao, arrived in the meantime so I could start with the starboard side.
View attachment 143628
I really thought that the sanding would be much easier with the coarse 80-grit sandpaper. I was wrong.
This went a little easier, but only very little. The basswood still put up a formidable fight. After five days of off-and on-sanding - with some well-needed breaks in between - I was finished.
View attachment 143629
The aftermath of the sanding battle.
With that now done, it was time to build up the foredeck as I indicated in an earlier post.
View attachment 143630
The idea is that the section marked in red is built up with balsa blocks and then ultimately planked to form the foremost part of the deck. At the same time, it also has to be shaped to accommodate the bowsprit. This time, I didn't second-guess the instructions and went straight for the balsa!
View attachment 143633
Forepart of the deck shaped and hole made at the correct angle for the bowsprit. With the balsa, the work was only a pleasure and took me all of 20 minutes to do.
View attachment 143634
View attachment 143635
The completed bow assembly ready for planking.
In retrospect, I am happy that I went for the basswood, even though it gave me a hell of a time. I now have a bow assembly that redefines Fort Knox in strength and I can really attach the planking aggressively to the bow without worrying about that balsawood giving way or being too soft. At the same time the removal of the keel, may actually be a blessing in disguise. Now I can do the planking first - a process which will be much simpler as I can simply butt-up the planks against the false keel. When done, it will also make sanding so much easier after which the new keel can simply be retro-fitted.
Now it is time for fairing the hull and painting the gunports black, but that is for another day.
As usual, thank you for following and for the reading the build log of the Haarlem. Your comments and inputs are greatly appreciated.
Kind regards - Heinrich
- Joined
- Jan 9, 2020
- Messages
- 10,566
- Points
- 938

Dear Friends
This is just a very quick and tiny update. Everything has now been done prior to and in preparation for planking
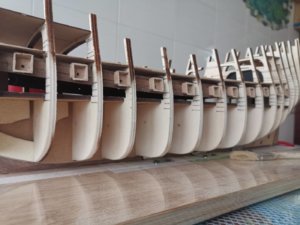
The first step was to sand the gunports flush with the sides of the hull. I am happy to say that all gunports are still intact! Actually, there was very little sanding required for this.
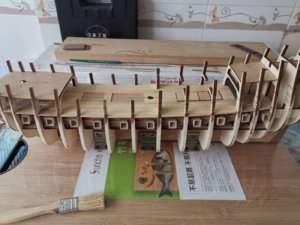
The hull was provisionally faired. I took great care not to sand away too much at this stage and will make the necessary adjustments as I progress. It is interesting to note how much more prominent the gunports seem now that they have been made flush with the hull.
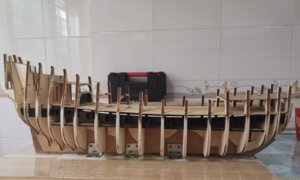
The instructions state that only the inside of the gunports needed to be painted black. This, of course, makes perfect sense but seeing that I was busy painting, I also made the backing strips black for good measure .
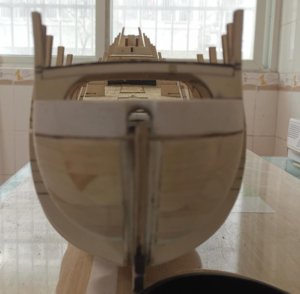
As I have never done anything of the sort before, the whole "planking thing" is a massive challenge to me - and none more than the bow.
So ... if any of the planking experts here, want to take a quick trip to China to come and assist, I offer free lodging, great food, an almost rural atmosphere plus the safest environment in the world!
Thank you all for following - your comments and inputs are greatly appreciated.
Kind regards - Heinrich
This is just a very quick and tiny update. Everything has now been done prior to and in preparation for planking

The first step was to sand the gunports flush with the sides of the hull. I am happy to say that all gunports are still intact! Actually, there was very little sanding required for this.

The hull was provisionally faired. I took great care not to sand away too much at this stage and will make the necessary adjustments as I progress. It is interesting to note how much more prominent the gunports seem now that they have been made flush with the hull.

The instructions state that only the inside of the gunports needed to be painted black. This, of course, makes perfect sense but seeing that I was busy painting, I also made the backing strips black for good measure .

As I have never done anything of the sort before, the whole "planking thing" is a massive challenge to me - and none more than the bow.
So ... if any of the planking experts here, want to take a quick trip to China to come and assist, I offer free lodging, great food, an almost rural atmosphere plus the safest environment in the world!
Thank you all for following - your comments and inputs are greatly appreciated.
Kind regards - Heinrich
Heinrich,
Your build so far looks great. I found my first planking experience a “DISASTER”. I researched and read everything I could find on the subject. After many false starts, re-order of materials, trial and error, I finished the hull I was working on.
I queried my Admiral about taking several days to come help you. She was quite adamant that given the current situation all my travel is restricted to the mailbox at the end of the driveway. Even after that foray I have to get “sanitized “ before I’m let back into the house.
So I’m off to go “sulk” in my little boat shop.
Jan
- Joined
- Jan 9, 2020
- Messages
- 10,566
- Points
- 938

@Pathfinder65 Dear Jan. Thank you as always for the great comments. Tell the admiral, I understand her position perfectly. In any case, every single person (even including Chinese citizens) who come from abroad, are quarantined for 14 days. Enjoy your time in the boat shop and don't sulk too much. I have laid the first plank and that took me about the whole day!
Warmest greetings - Heinrich
Warmest greetings - Heinrich
Hello Heinrich, If the kit designed as double-plank construction, you will have a chance to learn.  But treat the fist layer as the only one. There are many books and methods you can employ for you model, but first, look for the kit's recommendation as I am sure the planking was tested on the pilot models before production. Make sure to fair the bulkheads, this is the most important step often time neglected and underestimated by us. Don't be scared, as we say in Russia: "the eye's are afraid -but hand are do!
If you have any question, I am sure there we will help you. Good luck! Let's it planking begins!!!
If you have any question, I am sure there we will help you. Good luck! Let's it planking begins!!!


