Willem Barentsz by Kolderstok AD 1596

Okie Dokie. Before I start beating up on my little hull to cut in the gun ports I’d like some information on the “How To”. My first experience with that in a build was several years ago and it wasn’t a pretty picture.

Some of the Methods.

”Mark out the gun ports, drill a series of holes inside the marked lines and file the drilled out portion into the gun port shape”Question-Mark

”Mark out the gun ports, use a sharp blade to cut inside the marked lines, remove the material and file the opening into the gun port shape” Question-Mark

“Mark out the gun ports, use a chisel to cut out the gun port shape and file the opening into the gun port
shape” Question-Mark

I’m curious, what do the Masters doQuestion-Mark
 
OK - small tutorial about the gunports.

First thing to remember - as already said: a 2D drawing is rather difficult to project on a 3D object. And the other way round: making a 2D drawing from an 3D object is also a bit of a thing (I know from experience).

Second: the drawing is first of all ment to give a guideline where the ports should come.

Third: How were ports cut in a ships hull? I wasn't there around 1595, but I presume (guess might be a better word) it was done in the following way.

The frames of the hull were all vertical in a 90 degree angle with the waterline. So the vertical sides of the ports were cut out as first. You simply had to cut in between the frames.
View attachment 328238

Second step is to cut out the upper joint - perpendicular to the vertical joints.

View attachment 328239

At this point the hinges could be mounted, so the lid would not fall out, and then the lower cut could be made.

View attachment 328240

This lower joint did not have to be perpendicular to the other joints. The port would also open if it was under an angle:

View attachment 328242

If the upper joint is cut in an angle with the vertical joints, remember that the hinges must be under this angle as wel, otherwise the ports can't be opened.

This works:

View attachment 328243

This certainly not!:

View attachment 328244

The easiest way to project the ports is to cut a square in the right dimensions, pin it on the right spot on the hull and mark the outlines. Eventually you can follow the lines of the wales, but be aware how to place the hinges in this case.

Edit: the thinner lines in the sketches should be seen as joints instead of the thicker horizontal lines.

Hans
Good evening, for information, for the size and position of the gunboats there are texts
 
Okie Dokie. Before I start beating up on my little hull to cut in the gun ports I’d like some information on the “How To”. My first experience with that in a build was several years ago and it wasn’t a pretty picture.

Some of the Methods.

”Mark out the gun ports, drill a series of holes inside the marked lines and file the drilled out portion into the gun port shape”Question-Mark

”Mark out the gun ports, use a sharp blade to cut inside the marked lines, remove the material and file the opening into the gun port shape” Question-Mark

“Mark out the gun ports, use a chisel to cut out the gun port shape and file the opening into the gun port
shape” Question-Mark

I’m curious, what do the Masters doQuestion-Mark
Good evening Jan- No comment....not a master...yet ;) . Good luck with this it is nerve wracking for sure. Cheers Grant
 
Hello Jan. I have no idea how the masters do it, but I will still offer my two cents. My short answer is that it is a combination of everything you have mentioned. On WB#1, I have used new blades to cut against a steel ruler just inside the scribed lines. This was made possible by the fine grain and relative softness of the walnut. The advantage of this method is that if you are successful, you can keep the cut-outs and use them to cover up the ports which will remain closed.

On WB#2, I drilled holes in the corners of the port and cut from corner hole to corner hole. This was necessitated by the coarse grain and hardness of the oak. Once a proper and definitive cutting line was established, I then used my X-Acto as a chisel in combination with a hammer. The key here is to position the blade so that the blunt back always faces the corners. That way you ensure that you do not cut beyond the marked lines.

For both woods, a triangular file with smooth sides was used to file the port to the correct size. You can then use a sanding stick of the exact size of the port to finish off the hole.

Good luck my friend!
 
Just back from the local Apple store. My new laptop decided it didn’t want to communicate with me or anything or anyone. It’s now on its way to the Apple experts.

Back to the gun port exercise. I think I’m going to cobble together some of the left over Walnut planking, mark out some gun ports, and try to find a method that will work for me. I‘m not worried about finishing the final port as I am of destroying my little hull by playing wack-a-mole.
 
Good evening, for information, for the size and position of the gunboats there are texts
Thank you for the reply. I’ve been looking at other ship building forums, etc. Lots of information available. There seem to all kinds of techniques. It takes time to absorb all that information..
 
The first of the three methodes works wel, but you loose the cut out part and have to make new ones. If you want to be authentic this is with this method not fully possible - but it is also authentical if a lid was exchanged for a new one when the old one was f.i. shot.
When doing it this way, try to find wood which comes as close as possible to the original one, and try to copy the lay-out of the original hull planking.

The second method comes close to the original method, but do not carve inside the lines, but on the lines. Use a sharp knife and a hammer, and gently tap the knife through the wood. Try not to do it in one stroke, but in more steps. This method needs practicing, and oak is the tougher wood for this method.
But: very authentical, and if you have learned the skill you can use (almost) every cut-out as a gunport lid.
I did it this way back in the days.

The third method: use the biggest chisel you can find, and afterwards use the crushed hull as a firelighter for your stove.
I think you need a very small and fine chisel to get this method properly done and in my opinion this one is the least advisable.

Hans
 
Just back from the local Apple store. My new laptop decided it didn’t want to communicate with me or anything or anyone. It’s now on its way to the Apple experts
Wow, just sitting here and having my afternoon coffee while browsing the forum and SURPRISE, SURPRISE, FEDEX just dropped off my repaired laptop. I dropped the laptop off at the Apple store @10:30 AM on 09/14/ 2022 for repair and it was delivered @2:30 PM on 09/16/2022 to my house. So the laptop traveled from the Apple store to their repair facility and back to my house. THAT IS GREAT SERVICE, eh!
 
Good evening Pathfinder65, I did not mention the processing technique but of position and size rules
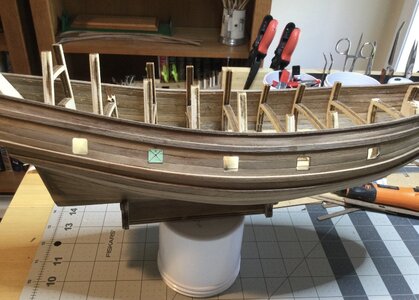
Well I took the plunge. Scary to think about, but I had to start sometime.

A1D56A08-ABD5-4B5C-B17D-129300403899.jpeg

The last gunport to rear is done, the other three are works in progress.

B9EB7D68-7161-4BA2-99B0-6217E1F47B1B.jpeg

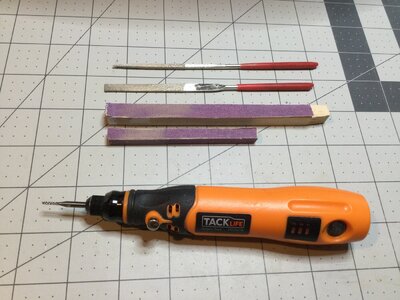
The tools. The bit in the mini drill was a suggestion by a friend at the local Hardware store. Its a combination drill and router bit. The files are from Kolderstok and the wooden sanding blocks are DIY tools. The biggest sanding block is just the right size for the gun port as measured from the detailed plans.
 
Last edited:
Hello Jan. The positioning of the gun ports looks perfect to me (I can't see the one closest to the bow) and you have cut them out very neatly. Just make sure that the corners are absolutely sharp and not rounded. It may well be the picture angle but the gunport closest to the stern (the finished one) looks to have slightly rounded corners. The only way to get those corners absolutely sharp is to use a triangular file with smooth sides.
 
OK - small tutorial about the gunports.
........
The frames of the hull were all vertical in a 90 degree angle with the waterline. So the vertical sides of the ports were cut out as first. You simply had to cut in between the frames.
View attachment 328238
Why should the sides of the ports be vertical? Why not perpendicular to the deck on which the gun is mounted, at that point? And of course, the horizontal lines would then not necessarily be horizontal, but perpendicular to the sides. It would seem to me that provides the most consistent opening for each gun, as far as vertical and horizontal movement or clearance, and to some (me) might look better being more parallel to the outer planking and structure (I say /more/ parallel, as I realize that in many/most areas the outer planking is not really parallel to the decks) than all vertical. The ports are not in a horizontal line on most ships, as they follow the deck to be the correct height above the deck. Seems to me they should also be perpendicular to the deck. But then that's me. :)
 
Why should the sides of the ports be vertical? Why not perpendicular to the deck on which the gun is mounted, at that point? And of course, the horizontal lines would then not necessarily be horizontal, but perpendicular to the sides. It would seem to me that provides the most consistent opening for each gun, as far as vertical and horizontal movement or clearance, and to some (me) might look better being more parallel to the outer planking and structure (I say /more/ parallel, as I realize that in many/most areas the outer planking is not really parallel to the decks) than all vertical. The ports are not in a horizontal line on most ships, as they follow the deck to be the correct height above the deck. Seems to me they should also be perpendicular to the deck. But then that's me. :)
Hello, to remove any doubts about gunboats I recommend this text which is the bible of French naval construction "Du Monceau. Original"
 
Why should the sides of the ports be vertical? Why not perpendicular to the deck on which the gun is mounted, at that point? And of course, the horizontal lines would then not necessarily be horizontal, but perpendicular to the sides. It would seem to me that provides the most consistent opening for each gun, as far as vertical and horizontal movement or clearance, and to some (me) might look better being more parallel to the outer planking and structure (I say /more/ parallel, as I realize that in many/most areas the outer planking is not really parallel to the decks) than all vertical. The ports are not in a horizontal line on most ships, as they follow the deck to be the correct height above the deck. Seems to me they should also be perpendicular to the deck. But then that's me. :)
image.jpg
What you describe seems reasonable, but ships were not build only to look good.
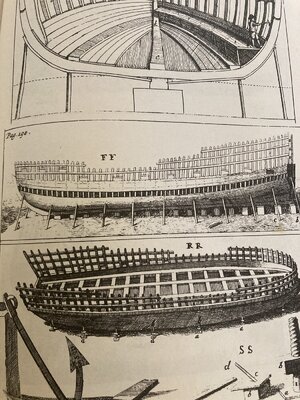
This is a picture from the book Nicolaes Witsen wrote at the end of the 17th century. As you can see in this picture the frames of the ship are standing perpendicular to the ground/water, and there are many of them. When cutting out a gunport it was much easier not to cut in a frame because of the thickness of it. If you would do this you had to chop away a lot of wood, all by hand. This costed time and thus money. The Dutch builded several hundred ships per year so they could not afford (or allow) a time consuming job like cutting out gun ports other then in between the frames and thus vertical.
 
View attachment 328845
What you describe seems reasonable, but ships were not build only to look good.
This is a picture from the book Nicolaes Witsen wrote at the end of the 17th century. As you can see in this picture the frames of the ship are standing perpendicular to the ground/water, and there are many of them. When cutting out a gunport it was much easier not to cut in a frame because of the thickness of it. If you would do this you had to chop away a lot of wood, all by hand. This costed time and thus money. The Dutch builded several hundred ships per year so they could not afford (or allow) a time consuming job like cutting out gun ports other then in between the frames and thus vertical.
Excellent Hans!
 
What you describe seems reasonable, but ships were not build only to look good.
This is a picture from the book Nicolaes Witsen wrote at the end of the 17th century. As you can see in this picture the frames of the ship are standing perpendicular to the ground/water, and there are many of them. When cutting out a gunport it was much easier not to cut in a frame because of the thickness of it. If you would do this you had to chop away a lot of wood, all by hand. This costed time and thus money. The Dutch builded several hundred ships per year so they could not afford (or allow) a time consuming job like cutting out gun ports other then in between the frames and thus vertical.
I had momentarily forgotten about the effect the frames had on the gun ports, and was looking at it from a modeling and logical standpoint instead. Thank you for correcting me and providing the logic behind it.
 
View attachment 328845
What you describe seems reasonable, but ships were not build only to look good.
This is a picture from the book Nicolaes Witsen wrote at the end of the 17th century. As you can see in this picture the frames of the ship are standing perpendicular to the ground/water, and there are many of them. When cutting out a gunport it was much easier not to cut in a frame because of the thickness of it. If you would do this you had to chop away a lot of wood, all by hand. This costed time and thus money. The Dutch builded several hundred ships per year so they could not afford (or allow) a time consuming job like cutting out gun ports other then in between the frames and thus vertical.
This does make a lot of sense; no unnecessary cutting of frames. Besides, it does give you at least one reference plane to work with. On top of that, cutting main structural elements require reinforcements to maintain integrity.
 
@Kolderstok, Hans I have a dumb question. What formula determined the location and spacing of the gun ports. Especially a merchant type ship. Weight of guns? Length of the Hull? Stability of the ship?
This is surely no dumb question, but something you have to keep in mind when building a ship. I had to look up the answer myself too. :)
The barrels of the guns could be very heavy, and - although being a merchant ship - each East Indiaman had quite a few on board. The lenght of the ship surely did determine the number of canons, the stability was a less important thing. But the whole "formula" was in fact rather simple.
The book of Witsen which I mentioned in my reply to signet does give a clou about the ports, but it is rather difficult to understand.
Fortunately Ab Hoving made a thorough study of the Witsen book and made a clear explanation of it in modern Dutch. His book was first printed in 1997. I quote from his version (translation to English by myself):

Hoving: While placing the upper frames, the struts, the builder had already figured out where the gunports should come. It was common to place these in between the futtocks (these are the lower vertical frames in the hull), so there would be as less as possible wood loss. (..) The height of the hull between the decks was diveded in three equal parts. The middle part would be the height of the gun port. Width of the gun port would be a little more then the height, Witsen mentions an extra 2 Inches.

Then comes the interesting part:

Hoving: In the 17th century there are no books which mention specific formulas or rules for the size of the gunports related to the size of the actual used guns, nor are there any rules which determine what the distance between the gun ports should be (..).
Surely there must have been a certain minimum distance, based on practial grounds, but Witsen is quite carefree in his calculations. The distances for the ship he describes (a pinas) vary between 9 feet and 12,5 feet, without having any relation to the caliber of the guns placed on this ship. Also van Yk (another famous author in the 17th century) does not give any other rule for the place and distance of the gunports other then the quote that practice should determine this.


So - how difficult should we think when the solution is just as simple as: how much room do we have, and how many canons would fit here without having the risk we cannot use them anymore.
It is in fact exactly the same when you want to buy a new kitchen table. You look at the size of your kitchen, how much room you need to open the cupboards, how much space you need to be a good cook, and with this information buy the table.

Then about the stability of the hull. Due to the shallow waters in Holland the hull of a Dutch ship was very flat at the bottom, rather wide, and it had a sharp transition to the upgoing sides. With the amount of ballast which could be put in the ship it became very stable, and the weight of the canons just had little effect on the stability.
 
@Kolderstok, What a great piece of information. Thank you. Too bad so much ship building history has been lost to the ages. I got curious about a sailing ships stability (Ballast, crew, rations, cargo, cannons, etc). There was a discussion here on the forum about ships requiring added ballast after a long spell at sea because the crew had consumed a lot of their rations (food, water, "rum"). So I got thinking about the weight, the placement and the number of cannons, where and how they would be placed.
 
Back
Top