Oh wow that set of instructions is a head spinner.
Jan
 |
As a way to introduce our brass coins to the community, we will raffle off a free coin during the month of August. Follow link ABOVE for instructions for entering. |
 |
 |
The beloved Ships in Scale Magazine is back and charting a new course for 2026! Discover new skills, new techniques, and new inspirations in every issue. NOTE THAT OUR FIRST ISSUE WILL BE JAN/FEB 2026 |
 |
Oh wow that set of instructions is a head spinner.
The theoretical man knows 'Why', the practical man knows 'How', the wise man has to know 'why' and how'Oh wow that set of instructions is a head spinner.
Typical num skull me. If had thought to look in the “vast” library I’ve collected over the past few years I would have found the answer in “zu Monfelds” book. Ah, 20/20 hindsight is a wonderful thing.Hi, Jan. Those parts of the mast are called Bolsters. Here are some images
View attachment 419966
View attachment 419967
Seems I don’t have to answer anymore@Kolderstok
View attachment 419960
The small piece above the cross tree (arrow) is that part of the build?
Jan

Wonderful Jan! She surely is a beautiful little ship! Now for all the finishing details!A milestone.
View attachment 420598
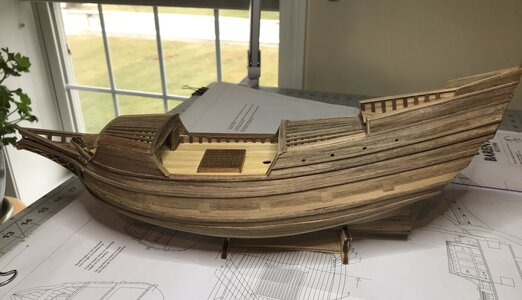
The hull is finish sanded and ready for the first coat of Danish oil. All the pin rails are done, the windlass is done, the knightheads are done, the rudder is shaped and the 28 triangle deadeyes are done. I'm really excited to get the first coat of oil done. Unfortunately the 3 foot high Tsunami event caused several weeks of extra work, the repairs came out well. I'm looking forward to adding all the little bits and pieces to finish the hull build.
Jan
First start with annealing the brass strip. Heat it up until it is dark red glowing and let it cool down. Otherwise it will snap immediately when you try to bend it. After bending it in the correct shape, mark the holes with a little center point so your drill tip will not “walk” away when drilling. Drill the holes (by hand, or with a small electric drilling tool). You can use a scrap piece of 8 mm walnut to shape the brass in the right width. Eventually you can anneal it more times.But I have another question for you. The rudder hinges
View attachment 420592
How does one work with the brass, ie. bending and drilling the nail holes.
Jan
Now that sounds interesting. I haven’t done anything like that. A new skill to learn.First start with annealing the brass strip. Heat it up until it is dark red glowing and let it cool down. Otherwise it will snap immediately when you try to bend it. After bending it in the correct shape, mark the holes with a little center point so your drill tip will not “walk” away when drilling. Drill the holes (by hand, or with a small electric drilling tool). You can use a scrap piece of 8 mm walnut to shape the brass in the right width. Eventually you can anneal it more times.
I’m looking forward to starting the rigging. I think I will have many many questions. The only rigging I have done was on my first build the Constructo Enterprise.Your "Little Ship "is looking great Jan, i wish you a lot of fun with the masts and rigging
True story.Oh wow that set of instructions is a head spinner.
Jan
Good afternoon Jan. Magic! Cheers GrantA milestone.
View attachment 420598
The hull is finish sanded and ready for the first coat of Danish oil. All the pin rails are done, the windlass is done, the knightheads are done, the rudder is shaped and the 28 triangle deadeyes are done. I'm really excited to get the first coat of oil done. Unfortunately the 3 foot high Tsunami event caused several weeks of extra work, the repairs came out well. I'm looking forward to adding all the little bits and pieces to finish the hull build.
Jan
Congratulations with this milestone, Jan.A milestone.
View attachment 420598
The hull is finish sanded and ready for the first coat of Danish oil. All the pin rails are done, the windlass is done, the knightheads are done, the rudder is shaped and the 28 triangle deadeyes are done. I'm really excited to get the first coat of oil done. Unfortunately the 3 foot high Tsunami event caused several weeks of extra work, the repairs came out well. I'm looking forward to adding all the little bits and pieces to finish the hull build.
Jan
Good afternoon Jan. You are absolutely correct. Many a discussion was had regarding the uses of this door with Heinrich…..I need to to do a little more finish work the stern but had to take time out and post this picture.
"THE DOOR"
View attachment 421197
If I remember right this petite door caused quite a bit of discussion on @Heinrich's Willem Barentsz log.
Jan
Lookin good Jan. Now open “THE DOOR” and see if Heinrich is hiding inside.I need to to do a little more finish work the stern but had to take time out and post this picture.
"THE DOOR"
View attachment 421197
If I remember right this petite door caused quite a bit of discussion on @Heinrich's Willem Barentsz log.
Jan
The weather update.P.S. How’s your weather today?
