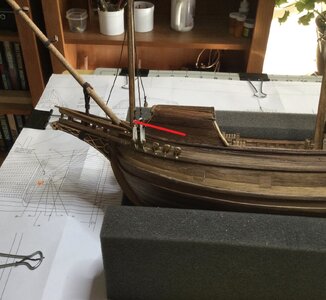
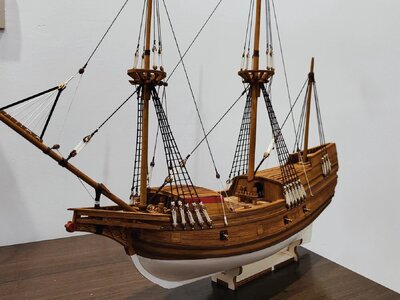
Willem Barentsz by Kolderstok AD 1596

I think I’m on the right track. I’ve diddled around with this for a week or more trying different versions of tying off the deadeyes and then trying to rig them.

View attachment 434788
Wrapping the deadeyes to be inserted into the hull.

Plan A, use the 0.7mm wire supplied in the kit.
Plan B, use the 0.5 mm rope in the kit
Plan C, use a more flexible 0.5 mm brass wire

Plan A. Twist the 0.7mm wire around twenty eight deadeyes, insert deadeyes into hull (14 to a side) and fix them in place with a nail. That build step went very well, no problems there. The start of rigging presented the first problem. The deadeyes were flush to the hull and had to be “adjusted /bent“ out be able to thread the rigging rope and then “adjusted/bent” back in to tension the rigging rope. A nip here and tuck there tensioning the assembly and the deadeye attached to the shroud popped out and disappeared forever in the carpet. So it was onto Plan B.

Plan B, follow Heinrich’s method and redo all twenty eight deadeyes using the thread method, place them in the hull and fasten with a nail. Unfortunately trying to rig them was a worse disaster than Plan A. My poor attempt at wrapping the deadeyes with the cord allowed a quite a bit of flexibility and looked terrible. On to Plan C.

Plan C. Wrap the deadeyes in 0.5mm brass wire. Place enough deadeyes in the hull to rig the foremast shrouds ( note: I’ve gotten smarter after Plan A and B) start the rigging.

View attachment 434793
SUCCESS

The softer and smaller diameter wire is more flexible and easier to work with.

Woo, woo, I think I’ve finally got a working plan.

Jan
Indeed, size does matters! The deadeyes are looking very nice, Jan.
Regards, Peter
 
Jan I am glad to see that you found a plan that works for you. Just a suggestion. Because you are using the white rope (as I have done) on the shrouds, it makes the line that the upper deadeyes follow very visible. Try to get the distance between the deadeyes equal so that there is a nice declining line as I have tried to indicate on the picture. Your second deadeye sits too high in my opinion. This advice comes directly from the Admiral.

4C37BF92-DE4E-4790-9651-36326B830B6E (1).jpg
 
Try to get the distance between the deadeyes equal so that there is a nice declining line as I have tried to indicate on the picture. Your second deadeye sits too high in my opinion. This advice comes directly from the Admiral.
Thanks for the comments. You're right avout the deadeyes, they are still a work in progress. I'm finding that poor vision(like Paul, I'm currently working with one eye, while the other is being treated) and 80+ year old fingers combine to make the fiddly work a PITA. But Teutonic stubberness will prevail. Does the color of the lines matter. The white seems to be to bright in contrast to the color of the hull. I think a darker color would be better.

Jan
 
Indeed, size does matters! The deadeyes are looking very nice, Jan.
Regards, Peter
Thank you for looking in. I'm still not charmed with my progress with rigging those pesky deadeyes. I'm satisfied with the attachment to the hull, but haven't gotten the hang of laying out the shroud deadeyes yet. Lot's more fiddling and diddling required.

Jan
 
Last edited:
Thanks for the comments. You're right avout the deadeyes, they are still a work in progress. I'm finding that poor vision(like Paul, I'm currently working with one eye, while the other is being treated) and 80+ year old fingers combine to make the fiddly work a PITA. But Teutonic stubberness will prevail. Does the color of the lines matter. The white seems to be to bright in contrast to the color of the hull. I think a darker color would be better.

Jan
Good evening Jan. Quite a story….rocking chairs, hoovers, deadeyes,stropes etc.? Wishing your “deadeye “ a speedy recovery. I remember with my Victory I made a jig and rigged the shroud to the deadeyes in the jig so they all lined up - rigged the lanyard after all the deadeyes where attached to each shroud to finally tension. Cheers Grant
 
Good evening Jan. Quite a story….rocking chairs, hoovers, deadeyes,stropes etc.? Wishing your “deadeye “ a speedy recovery. I remember with my Victory I made a jig and rigged the shroud to the deadeyes in the jig so they all lined up - rigged the lanyard after all the deadeyes where attached to each shroud to finally tension. Cheers Grant
Yup, we are having a :mad::mad::mad: time. Just like the old Timex ads, "we keep on ticking". I'm looking to make a jig to place the deadeyes equidistant on the hull as well as aligning them on the shrouds. It's a matter of fiddling around and liking the outcome.

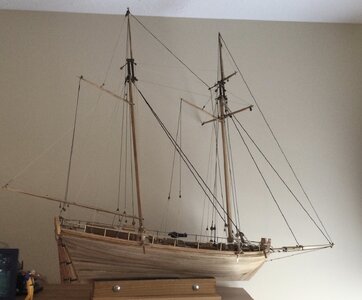
I got spoiled rigging my Alert.

IMG_3050.jpeg

Only a couple of deadeyes per side and no ratlines.


Jan
 
Yup, we are having a :mad::mad::mad: time. Just like the old Timex ads, "we keep on ticking". I'm looking to make a jig to place the deadeyes equidistant on the hull as well as aligning them on the shrouds. It's a matter of fiddling around and liking the outcome.

I got spoiled rigging my Alert.

View attachment 434833

Only a couple of deadeyes per side and no ratlines.


Jan
True story. Loved my Xebec standing rigging- no dead eyes no ratlines- just blocks and weird configurations- bliss :D ROTF .
 
Jan I am glad to see that you found a plan that works for you. Just a suggestion. Because you are using the white rope (as I have done) on the shrouds, it makes the line that the upper deadeyes follow very visible. Try to get the distance between the deadeyes equal so that there is a nice declining line as I have tried to indicate on the picture. Your second deadeye sits too high in my opinion. This advice comes directly from the Admiral.

View attachment 434818
If you want to have the rope more in colour with the rest of the ship, just brew some extra coffee and leave a few feet of the white rope in the coffee for some time (an hour or so). In this way it will get a more natural colour.

Hans
 
Thanks for the comments. You're right avout the deadeyes, they are still a work in progress. I'm finding that poor vision(like Paul, I'm currently working with one eye, while the other is being treated) and 80+ year old fingers combine to make the fiddly work a PITA. But Teutonic stubberness will prevail. Does the color of the lines matter. The white seems to be to bright in contrast to the color of the hull. I think a darker color would be better.

Jan
Jan, personally, I love the white rope on the deadeyes. What I meant was that because they are white, they stand out, placing more focus on the line that the deadeyes follow. I have looked at the way that all the experts advised on how to get the deadeyes to be an equal distance from each other, but honestly, my Admiral did it in a far easier way. The only caveat is that it will require your Admiral to lend a helping eye during the process. If you guys are interested, I can elaborate further, later on, but now I am getting ready for school.
 
my Admiral did it in a far easier way. The only caveat is that it will require your Admiral to lend a helping eye during the process. If you guys are interested, I can elaborate further, later on
I for one would be interested since I'm having a wee bit of a problem with this build step.

Jan
If you want to have the rope more in colour with the rest of the ship, just brew some extra coffee and leave a few feet of the white rope in the coffee for some time (an hour or so). In this way it will get a more natural colour.

Hans
What a novel idea. I'm will try that and let you know how it turns out.

Jan
 
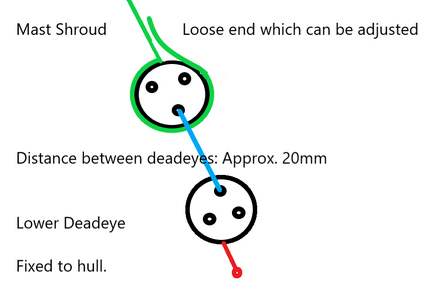
Hi Jan. Apologies for my attempt at an illustration, but here goes:

Illustration.png

The lower deadeye is fixed to the hull via whichever method you prefer. I install all the deadeyes first before I start the rigging. That way I have a better idea of the run of the deadeyes. On the WB all the deadeyes are fixed to a wale so if you make sure that you drill the fixing holes in the middle of the wale, the deadeyes should follow a natural declining line from bow to stern. I am of course only referring to the foremast deadeyes.

Now the mast shroud is wrapped around the upper deadeye with a loose end that allows for lower or higher adjustment of the deadeye. This is where the Admiral's eye comes into play. Determine a distance between the two deadeyes that look right to you, make a pinch mark on the shroud at the top of the upper deadeye, apply glue to the deadeye, wrap the shroud fully and finally around the deadeye and use a clip to hold the two ends together until the PVA dries. Seize the rope around the upper deadeye to make sure the fitting is secure and proceed with the rigging. Now you can rig first and finally without any adjustment needed. Repeat step for the next deadeyes.
 
Hi Jan. Apologies for my attempt at an illustration, but here goes:

View attachment 434900

The lower deadeye is fixed to the hull via whichever method you prefer. I install all the deadeyes first before I start the rigging. That way I have a better idea of the run of the deadeyes. On the WB all the deadeyes are fixed to a wale so if you make sure that you drill the fixing holes in the middle of the wale, the deadeyes should follow a natural declining line from bow to stern. I am of course only referring to the foremast deadeyes.

Now the mast shroud is wrapped around the upper deadeye with a loose end that allows for lower or higher adjustment of the deadeye. This is where the Admiral's eye comes into play. Determine a distance between the two deadeyes that look right to you, make a pinch mark on the shroud at the top of the upper deadeye, apply glue to the deadeye, wrap the shroud fully and finally around the deadeye and use a clip to hold the two ends together until the PVA dries. Seize the rope around the upper deadeye to make sure the fitting is secure and proceed with the rigging. Now you can rig first and finally without any adjustment needed. Repeat step for the next deadeyes.
That is an excellent description of your rigging method. I’ll have to sweet talk/ bribe the Admiral, she does have a critical eye.

Jan
 
Hi Jan. Apologies for my attempt at an illustration, but here goes:

View attachment 434900

The lower deadeye is fixed to the hull via whichever method you prefer. I install all the deadeyes first before I start the rigging. That way I have a better idea of the run of the deadeyes. On the WB all the deadeyes are fixed to a wale so if you make sure that you drill the fixing holes in the middle of the wale, the deadeyes should follow a natural declining line from bow to stern. I am of course only referring to the foremast deadeyes.

Now the mast shroud is wrapped around the upper deadeye with a loose end that allows for lower or higher adjustment of the deadeye. This is where the Admiral's eye comes into play. Determine a distance between the two deadeyes that look right to you, make a pinch mark on the shroud at the top of the upper deadeye, apply glue to the deadeye, wrap the shroud fully and finally around the deadeye and use a clip to hold the two ends together until the PVA dries. Seize the rope around the upper deadeye to make sure the fitting is secure and proceed with the rigging. Now you can rig first and finally without any adjustment needed. Repeat step for the next deadeyes.
Sorry that I have to interfere here

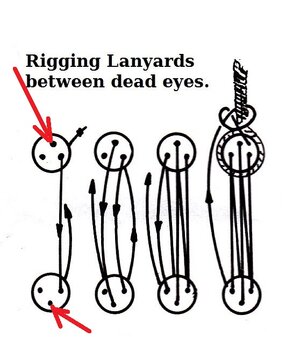
One mistake is shown in your skecth Heinrich - and this should be mentioned, not that somebody is exactly doing it like this

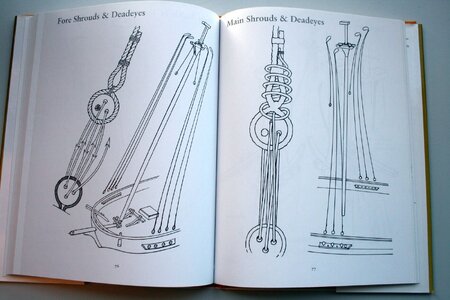
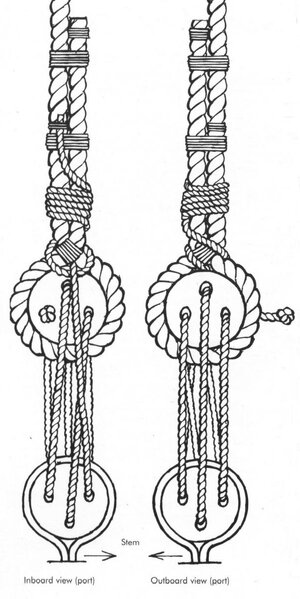
it is related to the location of the holes of the deadeyes
one single hole on the top at the upper deadeyey and one single hole at the botoom of the lower deadeye
28f4a587542388d859c1a36fcc2a45db.jpg

IMG_0246_1_41.jpg IMG_19351.jpg

shrouds deadeyes.jpg
 
Sorry that I have to interfere here

One mistake is shown in your skecth Heinrich - and this should be mentioned, not that somebody is exactly doing it like this

it is related to the location of the holes of the deadeyes
one single hole on the top at the upper deadeyey and one single hole at the botoom of the lower deadeye
View attachment 434954

View attachment 434955 View attachment 434956

View attachment 434957
One hundred percent correct, Uwe. I do apologize for that slip. I did the drawing in a big hurry (copying and pasting the bottom deadeye for the top one as well instead of turning it 180 degrees). I promise you on the ship they are correct! :)

微信图片_20230212172556 - 副本.jpg
 
One hundred percent correct, Uwe. I do apologize for that slip. I did the drawing in a big hurry (copying and pasting the bottom deadeye for the top one as well instead of turning it 180 degrees). I promise you on the ship they are correct! :)

View attachment 434966
No worries from me. I appreciate the effort you made to show how you accomplished rigging your WB.

Jan
 
Back
Top