HI DANIEL, THERE IS A SELLER ON EBAY I THINK SHE IS A MEMBER OF SOS JIGAN? DO NOT KNOW HOW TO SPELL IT GOES BY GLORIA, CROWN MODELS I THINK SHE HAS A VARIETY OF CHINEESE BOATS PLEASURE CRAFT ETC. CHEK HER OUT ALSO GREAT SERVICE AND RELIABLE ALSO. GOD BLESS STAY SAFE ALL. DON
-

Win a Free Custom Engraved Brass Coin!!!
As a way to introduce our brass coins to the community, we will raffle off a free coin during the month of August. Follow link ABOVE for instructions for entering.
-

PRE-ORDER SHIPS IN SCALE TODAY!
The beloved Ships in Scale Magazine is back and charting a new course for 2026!
Discover new skills, new techniques, and new inspirations in every issue.
NOTE THAT OUR FIRST ISSUE WILL BE JAN/FEB 2026
You are using an out of date browser. It may not display this or other websites correctly.
You should upgrade or use an alternative browser.
You should upgrade or use an alternative browser.
YANGTZE RIVER HIGH-NET FISHING SAMPAN [COMPLETED BUILD]
- Thread starter Heinrich
- Start date
- Watchers 29
-
- Tags
- completed build
- Joined
- Jan 9, 2020
- Messages
- 10,566
- Points
- 938

@Dematosdg / @donfarr Hi Daniel and Don. Thank you for the kind words. I think can get the kit for approximately 370 RMB which equates to 57 USD. (excluding shipping of course). If you are interested, let me know via PM.
- Joined
- Jan 9, 2020
- Messages
- 10,566
- Points
- 938

@Dematosdg I see that I have only answered your question partly. Apologies - I am still waking up  ! Chinese manufacturers sell their kits on Taobao and Jidong - very few of them have actual websites. In theory, I can thus get any kit that is made in China and sold on Taobao or Jidong.
It is interesting architecturally and structurally that the tall pagodas were very able to absorb seismic 3-dimensional shock waves in series as the "Lincoln like log" construction members were able to move and absorb as well as dampen the horizontal and vertical energy waves. I would think that possibly a like-wise ability to flex and move would relieve structural stress in the framing members of a sampan allowing to move "with the waves' and not fight them. Viking long ships did the same thing. Rich@PT-2 Thank you very much for the beautiful sentiments Rich!Your word choice of describing the keel stringers as lace and the construction as sleigh-like are beyond apt. And --- surprisingly --- for all its delicacies it is one of the sturdiest and hardiest watercraft known to man.
- Joined
- Jan 9, 2020
- Messages
- 10,566
- Points
- 938

@PT-2 Again ... you are spot on Rich. It is exactly that flexibility that gave the sampan its strength. I am getting to the point where I will - in a short time from now - install the "torsion bars" for lack of better terminology. These 4 bars (installed at the bow and stern) not only gave the sampan its distinct upswept look at the front and rear, but were also instrumental in the ability of the hull assembly to flex. The Chinese shipwrights, of course, knew exactly how much tension was needed and their way of inducing it, remains a closely-guarded secret until today. The challenge is for the model builder who has to try to emulate that same tension - not so much for the purpose of strength, but for aesthetic appearance.
- Joined
- Feb 15, 2021
- Messages
- 97
- Points
- 143

Super interesting story;
unfortunately, contempt for those who live differently is not uncommon. Remember how the British classified the Inuit at the time of Franklin's Arctic mission with EREBUS and TERROR; also the American Indians... We Europeans have been killing ourselves for centuries behind religious flags.
Interesting construction, I will be following it closely.
- Joined
- Jan 9, 2020
- Messages
- 10,566
- Points
- 938

@Michiel de Ruyter A very warm welcome to the sampan build log. You are so right in what you say - and the worst is that in many cases - the contempt is simply another way in which fear of the unknown is manifested. As far as the construction goes, it gets even more "interesting" soon.
Did I miss it, what is the description of “High-Net” fishing?
Jan
Jan
- Joined
- Jan 9, 2020
- Messages
- 10,566
- Points
- 938

@Pathfinder65 Hi Jan. No you haven't missed anything - I still need to explain that part.  I will do so a little later at the hand of some Vietnamese photographs.
- Joined
- Jan 9, 2020
- Messages
- 10,566
- Points
- 938

Hello all. First I want to thank everyone who has had a look at the log and for all the wonderful comments that I have received. It is really heartening that so many of you also find the historical background interesting - that is exactly the reason why I was attracted to this subject in the first place. So with the hull having had 24 hours to "rest" and for the glue to cure properly, it was time to move forward.
The instructions now called for some of the floor planking to be done – between Bulkheads #4 and #5 at the stern and bulkheads #11 and #12 towards the bow. These will respectively form the cooking area or kitchen and the storage compartments for ropes and other miscellaneous items. Obviously, the rationale behind planking these floor-sections at this point is to aid in some form of structural rigidity to the hull assembly which, at this point, is flimsy to say the least.
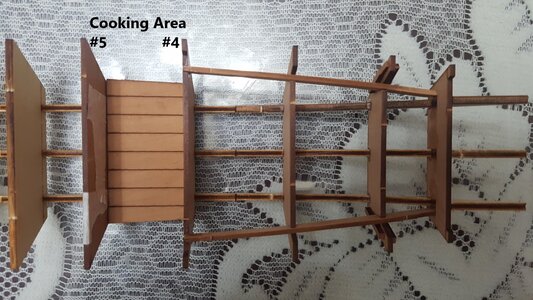
Floor planking for the cooking area (between Bulkheads #4 and #5.
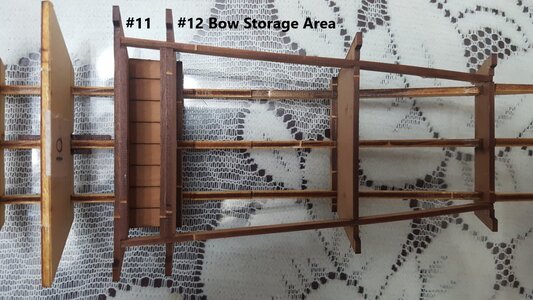
Floor planking done for the storage area between Bulkheads #11 and #12,
Interestingly, the model resembles exactly the way that the original Sampans were constructed - three bulkheads (forming four compartments), two half-bulkheads and four frames.
With that done came the crucial part of the whole hull construction – and it may indeed be the crucial part of the whole build – the bow and stern torsion bars. These bars (3mm x 4mm) have to be bent both laterally (sideways) and vertically (downwards) to slot into no fewer than 4 (for each bar) predetermined cut-out slots. Ominously (but purposely), they are also approximately 2mm too short. These bars create the tension that “forces” the Sampan hull into its distinct upswept curvature at the stern and bow. Get this wrong (only slightly) and you will end up with uneven tension, warping the whole hull assembly.
At this point the hull-assembly sits completely flat on the table and viewed from the side, basically looks like this (please forgive the amateurish drawings.)
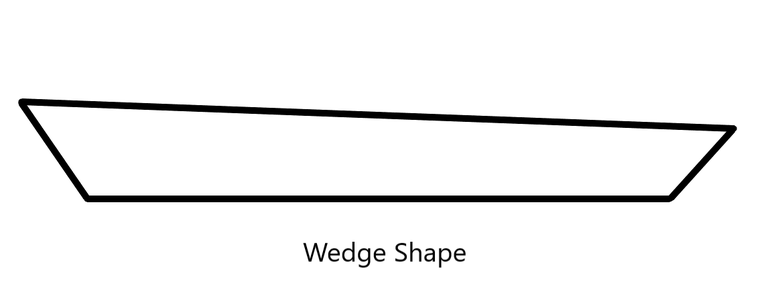
As it stands now the shape can best be described as a “wedge”. We need to get the hull into a shape so that it looks like on the picture below.

So now comes the difficult part. Yes, with plenty of soaking in water and then using my plank bender I could potentially pre-shape those torsion bars more or less into a workable position and with copious amounts of filing and sanding, I could get it to fit pretty decently into those slots. But … then they would serve no purpose other than a cosmetic one and they would simply be filling up the slots.
No … the whole idea is that they should be “forced into those slots and into the two apertures of the rearmost bulkhead so that they could twist and strain the hull into position. However, just how much strain and stress were required? How do I “balance” the torsion between port and starboard sides? And … assuming that I got it right at the stern, this whole exercise has to be repeated at the bow end. Having fun yet?
Well to cut a long story short and as my dear friend @pingu57 Peter said on the Dutch Modelbouwforum, I finally got it done with “water, vuur, en een hakbijl” (water, fire and an axe).
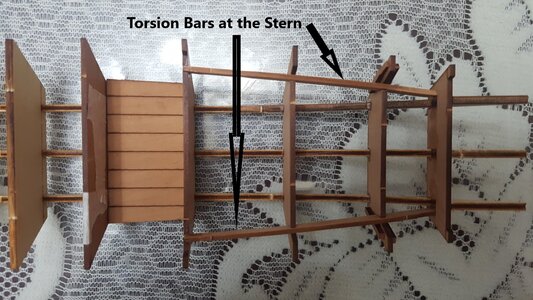
Torsion bars installed at the stern. These two were a real mission to get into position.
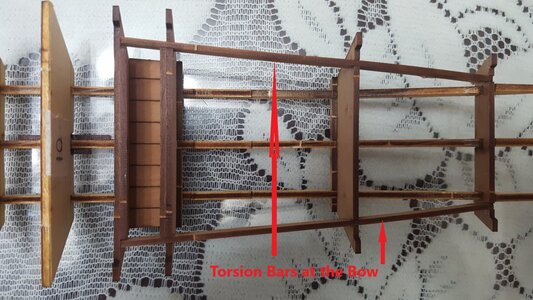
Torsion bars at the bow installed.
After the torsion bars were installed, I was happy to see that there was no warping of the hull, but I still had no idea whether my upswept curves at the stern and bow “swept up” enough or too much. That would only be possible to tell once the next stages of assembly have been completed.
Thank you very much for all your comments and for following or for just taking a look or giving a thumbs-up. It is all sincerely appreciated - and if there are critical comments, please do not be shy of posting them either!
Till next time! - Heinrich
The instructions now called for some of the floor planking to be done – between Bulkheads #4 and #5 at the stern and bulkheads #11 and #12 towards the bow. These will respectively form the cooking area or kitchen and the storage compartments for ropes and other miscellaneous items. Obviously, the rationale behind planking these floor-sections at this point is to aid in some form of structural rigidity to the hull assembly which, at this point, is flimsy to say the least.

Floor planking for the cooking area (between Bulkheads #4 and #5.

Floor planking done for the storage area between Bulkheads #11 and #12,
Interestingly, the model resembles exactly the way that the original Sampans were constructed - three bulkheads (forming four compartments), two half-bulkheads and four frames.
With that done came the crucial part of the whole hull construction – and it may indeed be the crucial part of the whole build – the bow and stern torsion bars. These bars (3mm x 4mm) have to be bent both laterally (sideways) and vertically (downwards) to slot into no fewer than 4 (for each bar) predetermined cut-out slots. Ominously (but purposely), they are also approximately 2mm too short. These bars create the tension that “forces” the Sampan hull into its distinct upswept curvature at the stern and bow. Get this wrong (only slightly) and you will end up with uneven tension, warping the whole hull assembly.
At this point the hull-assembly sits completely flat on the table and viewed from the side, basically looks like this (please forgive the amateurish drawings.)

As it stands now the shape can best be described as a “wedge”. We need to get the hull into a shape so that it looks like on the picture below.

So now comes the difficult part. Yes, with plenty of soaking in water and then using my plank bender I could potentially pre-shape those torsion bars more or less into a workable position and with copious amounts of filing and sanding, I could get it to fit pretty decently into those slots. But … then they would serve no purpose other than a cosmetic one and they would simply be filling up the slots.
No … the whole idea is that they should be “forced into those slots and into the two apertures of the rearmost bulkhead so that they could twist and strain the hull into position. However, just how much strain and stress were required? How do I “balance” the torsion between port and starboard sides? And … assuming that I got it right at the stern, this whole exercise has to be repeated at the bow end. Having fun yet?
Well to cut a long story short and as my dear friend @pingu57 Peter said on the Dutch Modelbouwforum, I finally got it done with “water, vuur, en een hakbijl” (water, fire and an axe).

Torsion bars installed at the stern. These two were a real mission to get into position.

Torsion bars at the bow installed.
After the torsion bars were installed, I was happy to see that there was no warping of the hull, but I still had no idea whether my upswept curves at the stern and bow “swept up” enough or too much. That would only be possible to tell once the next stages of assembly have been completed.
Thank you very much for all your comments and for following or for just taking a look or giving a thumbs-up. It is all sincerely appreciated - and if there are critical comments, please do not be shy of posting them either!
Till next time! - Heinrich
Wow, what excellent description of your Herculean task for that part of your build. Patience, perseverance and down right stubbornness must have been the order of the day.
All that said, the result looks pretty good from my side of the world.
Jan
All that said, the result looks pretty good from my side of the world.
Jan
Heinrich, I went back to your first pictures and it can be seen that the bottom already have the shape you mentioned. So I am lost in translation  (like the movie).
You meant that you have to curve more the bottom than the curvature seen on page 1 pictures?
What is the size of the model ?
The hull planks are pre-cut with the correct shape ?
Looking great!!!!
Daniel
You meant that you have to curve more the bottom than the curvature seen on page 1 pictures?
What is the size of the model ?
The hull planks are pre-cut with the correct shape ?
Looking great!!!!
Daniel
- Joined
- Jan 9, 2020
- Messages
- 10,566
- Points
- 938

@Pathfinder65 Thank you for the kind comments, Jan! I think "stubbornness" is the imperative word - both from my side and also from those bars - especially the ones at the stern! 
- Joined
- Jan 9, 2020
- Messages
- 10,566
- Points
- 938

@Dematosdg Hi Daniel - good questions, thank you for them. You are right - because the stringers form a natural curvature, once the bulkheads are assembled to the stringers, the hull does indeed have a natural curvature, but not enough. That is why the bars at the stern are shorter than what they are supposed to be. Once they are glued into position, the hull is pulled into more of a "vertical" curvature which actually makes the length of the hull shorter. Maybe this picture will explain it a bit better.
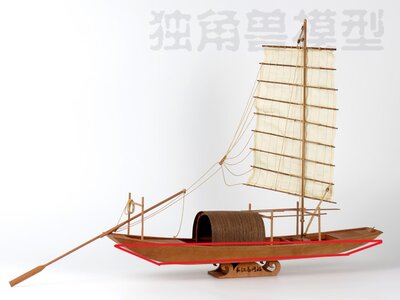
The red outline would suggest the hull shape without the torsion bars. Obviously the drawing is exaggerated with sharp and angled curves which are not correct, but it does hopefully give you some idea of what I am trying to explain.
Yes, the planks for the hull (there are four on each side) are pre-shaped, which means that unless you get that hull shape correct, they simply won't fit. That is why attempt No 1 ended up in the dustbin!
@Dematosdg Hi Daniel - good questions, thank you for them. You are right - because the stringers form a natural curvature, once the bulkheads are assembled to the stringers, the hull does indeed have a natural curvature, but not enough. That is why the bars at the stern are shorter than what they are supposed to be. Once they are glued into position, the hull is pulled into more of a "vertical" curvature which actually makes the length of the hull shorter. Maybe this picture will explain it a bit better.
View attachment 243042
The red outline would suggest the hull shape without the torsion bars. Obviously the drawing is exaggerated with sharp and angled curves which are not correct, but it does hopefully give you some idea of what I am trying to explain.
Yes, the planks for the hull (there are four on each side) are pre-shaped, which means that unless you get that hull shape correct, they simply won't fit. That is why attempt No 1 ended up in the dustbin!
Thank you for the explanation. This one will go fine !!!!
I hope you saved the pear wood of the first one. I save every piece.
I will keep my fingers crossed. !!!!
Cheers
Daniel
- Joined
- Jan 9, 2020
- Messages
- 10,566
- Points
- 938

@Dematosdg NOTHING but NOTHING of the first one remained after I took my frustrations out on it! Sampan 1 - Heinrich 0 !

Heinrich.... I hope I don't bother you too much. But you left me thinking.
If you place rubber band(s) or rope(s) from the Stern to the bow ( one for each false keel) and you create the correct curvature before gluing the bars. Will that work ?
In my bench my solution would be that one. To create the curvature, as mentioned using the hull planks as templates for the curvature. When the hull planks fit, glue the bars and the planks. The curvature tension is kept in place by the ropes or rubber bands.
Too crazy or stupid ?
Daniel
Other idea could be to place it upside down and with 2 pieces of wood press the hull from bow and Stern. Get the plank curvature. Glue 1 on more. Then you turn it and glue the tensors. But for you the tensors now were the planks.
Crazy ?????
Crazy ?????
- Joined
- Jan 9, 2020
- Messages
- 10,566
- Points
- 938

@Dematosdg Crazy or stupid??? Never. Both are viable options worthy of consideration. I think the rubber band option would have been a real challenge for two main reasons: firstly, the flimsiness of the whole hull construction at that point and secondly, finding a way to keep those rubber bands in place. The upside-down option with two pieces of wood squeezing the two ends together, may very well have worked. But this is exactly the value of a build log. Instead of my blood and thunder method, prospective builders now have two further options! absolutely great!!! 


