Great outcome Heinrich! What is the saying? If at first you don't succeed, try again!So earlier you may recall that I said to @Dean62 Dean that the success of this build will stand or fall by the planking. My first effort "fell" right at this hurdle and this time I was hoping I could be more successful.
After the first plank on starboard side had been laid down (a process which involved push pins, nails, clamps, rubber bands and everything that I could remotely make work), the hull looked like a male dog with its one hind leg in the air taking a leak – “warped” did not even begin to describe it.
View attachment 244498
That is what the hull looked like after the first starboard plank had been laid down. I gave it one look and thought - "oh boy, here we go again"!
With not much hope, I put down the first plank on port side plank and to my relief it pulled the hull back to some form of sanity and into alignment. And that was the name of the game. Until the next and equal plank on the port side was laid down, the hull was as warped as warped could be. The 8-hour, self-imposed waiting period between each plank (luckily it is extremely hot in Nantong at the moment and the glue dries very quickly) turned out to be a test of nerves – would the hull be pulled straight by the next port-side plank? With the planking completed, the hull was left to rest overnight. Lo and behold … the next morning it was as straight as an arrow.
However, I was not in the clear just yet. Now all the bulkheads and the Paulina wood-inserts had to be “removed” (the sophisticated word for broken-, cut-, filed-out and chiseled into oblivion) – all this while the hull planking remained intact.
I first removed all the extras from that notorious centre section (which was an easy job to do) and when that looked good, immediately planked the floor. The idea was that the seam between the floor boards and the hull planking would provide something extra to which the hull planks could be bound. With that successfully completed, I moved onto the stern area. Here I chiseled away all the extra supporting material to a level which would remain as high as possible, but would simultaneously be just low enough to allow for installation of the stern deck planking. All the deck planking comprises of individual pear wood strips - each which has to be filed and sanded to ensure a precise fit.
I do apologize profusely for not taking pictures during this part of the build – but truth be told – I just had my hands too full with the build.
View attachment 244499
This is where I am tonight. Even though the supporting section at the bow still needs to be removed and the deck planking done at the bow, I am satisfied that the entire hull structure is now sufficiently solid and even though there is still a lot of work ahead, I do have a successfully planked sampan to work on!
This was the crucial part of the build and even though I will probably still have my fair share of challenges, I feel like I have accomplished what I had set out to achieve. Sampan #2 is safe and sound inside the Nantong household. Outside it is pelting with rain - typical of Nantong summer weather - while the garbage bin remains empty ...
Until next time, take care, stay safe and happy modeling!
Warmest regards - Heinrich
-

Win a Free Custom Engraved Brass Coin!!!
As a way to introduce our brass coins to the community, we will raffle off a free coin during the month of August. Follow link ABOVE for instructions for entering.
-

PRE-ORDER SHIPS IN SCALE TODAY!
The beloved Ships in Scale Magazine is back and charting a new course for 2026!
Discover new skills, new techniques, and new inspirations in every issue.
NOTE THAT OUR FIRST ISSUE WILL BE JAN/FEB 2026
You are using an out of date browser. It may not display this or other websites correctly.
You should upgrade or use an alternative browser.
You should upgrade or use an alternative browser.
YANGTZE RIVER HIGH-NET FISHING SAMPAN [COMPLETED BUILD]
- Thread starter Heinrich
- Start date
- Watchers 29
-
- Tags
- completed build
Wowzers, I could feel the pain in your opening paragraph. Glad to see the “finished product “.
Jan
Jan
I can sympathize with you how success and failure live close to each other. I like the way you evaluate and deal with your work. Your success with Sampan No. 2 proves you right. It is very beautiful and draws me fully into your work.
This is looking very nice. Good work. RichSo earlier you may recall that I said to @Dean62 Dean that the success of this build will stand or fall by the planking. My first effort "fell" right at this hurdle and this time I was hoping I could be more successful.
After the first plank on starboard side had been laid down (a process which involved push pins, nails, clamps, rubber bands and everything that I could remotely make work), the hull looked like a male dog with its one hind leg in the air taking a leak – “warped” did not even begin to describe it.
View attachment 244498
That is what the hull looked like after the first starboard plank had been laid down. I gave it one look and thought - "oh boy, here we go again"!
With not much hope, I put down the first plank on port side plank and to my relief it pulled the hull back to some form of sanity and into alignment. And that was the name of the game. Until the next and equal plank on the port side was laid down, the hull was as warped as warped could be. The 8-hour, self-imposed waiting period between each plank (luckily it is extremely hot in Nantong at the moment and the glue dries very quickly) turned out to be a test of nerves – would the hull be pulled straight by the next port-side plank? With the planking completed, the hull was left to rest overnight. Lo and behold … the next morning it was as straight as an arrow.
However, I was not in the clear just yet. Now all the bulkheads and the Paulina wood-inserts had to be “removed” (the sophisticated word for broken-, cut-, filed-out and chiseled into oblivion) – all this while the hull planking remained intact.
I first removed all the extras from that notorious centre section (which was an easy job to do) and when that looked good, immediately planked the floor. The idea was that the seam between the floor boards and the hull planking would provide something extra to which the hull planks could be bound. With that successfully completed, I moved onto the stern area. Here I chiseled away all the extra supporting material to a level which would remain as high as possible, but would simultaneously be just low enough to allow for installation of the stern deck planking. All the deck planking comprises of individual pear wood strips - each which has to be filed and sanded to ensure a precise fit.
I do apologize profusely for not taking pictures during this part of the build – but truth be told – I just had my hands too full with the build.
View attachment 244499
This is where I am tonight. Even though the supporting section at the bow still needs to be removed and the deck planking done at the bow, I am satisfied that the entire hull structure is now sufficiently solid and even though there is still a lot of work ahead, I do have a successfully planked sampan to work on!
This was the crucial part of the build and even though I will probably still have my fair share of challenges, I feel like I have accomplished what I had set out to achieve. Sampan #2 is safe and sound inside the Nantong household. Outside it is pelting with rain - typical of Nantong summer weather - while the garbage bin remains empty ...
Until next time, take care, stay safe and happy modeling!
Warmest regards - Heinrich
- Joined
- Jan 9, 2020
- Messages
- 10,566
- Points
- 938

@Pathfinder65 Hello Jan. I suppose the sentiments of the first build was a case of being disappointed with myself. However, it does clearly show just how much of a difference one year has made in terms of experience. If it wasn't for all the sharing and interaction of forum members, and the great tuition provided by my fellow modelers - experienced or not, this outcome would not have been possible. For that I thank all of you! 

- Joined
- Jan 9, 2020
- Messages
- 10,566
- Points
- 938

@pianoforte Thank you very much for your beautiful sentiments Adi. It makes me think of Eisner who said that the worst part of failure is "that it kills all possibilities" - thereby preventing us from doing the things that we really care about! I am very happy that you are here and that you are enjoying the build!
Heinrich, there is no doubt that you are a good modeler, but I think you deserve a Pulitzer Award for your writing. 
Cheers
Daniel

 en.m.wikipedia.org
Cheers
Daniel

Pulitzer Prize - Wikipedia
- Joined
- Jan 9, 2020
- Messages
- 10,566
- Points
- 938

@Dematosdg Hello my friend !!! I have just discovered a problem with SOS's website - I can't "double-love" your post !!!  Hey, first and foremost, I'm a teacher and "historian", so I will take a Pulitzer any time - Thank you!
 Hey, first and foremost, I'm a teacher and "historian", so I will take a Pulitzer any time - Thank you!
- Joined
- Jan 9, 2020
- Messages
- 10,566
- Points
- 938

Good evening everyone. With half a day at my disposal, I was back in the Nantong Shipyard - and please note that the term "shipyard" is very loosely applied - very much like the "shipyards" of the Tanka people.
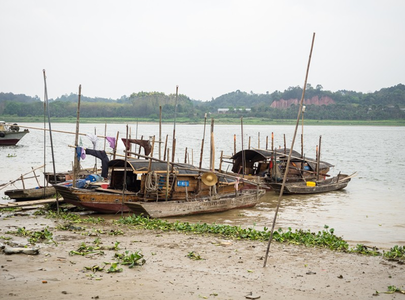
I start this post by touching on the belief-structure of the Tanka people and for a very good reason - the reason of which will become obvious towards the end of the post.
As the Tanka is bound to water, it is no surprise that they originally believed in Totemism – in particular, they showed respect to the snake deities, as this was a common water creature in the area around Lingnan. Subsequently, their believes turned from Totemism to multiple deities. This might well be due to the many dangers at sea and on the water which were daily occurrences to the Tanka. It was believed that these deities would grant them more power to withstand these perils. One of these deities was Long Mu.
Before she became the Mother of Dragons, Long Mu, (born Wen Long Ji溫龍姬 circa 290 BCE), was a young girl who was orphaned after her parents had died in a great flood. Cared for by a poor family in southern China, she went to the Xi River, a tributary of the Pearl River, daily to fish, bathe and do laundry. One day, she found an exquisite white stone and brought it home.
The stone turned out to be an egg: five little water snakes hatched from it. Long Mu treated them as if they were her own children. Although her family was poor, she saved the best food for the snakes and fed them by hand. They, in turn, became very devoted to her, too, traveling to the river with her and helping her fish.

The snakes kept growing and it soon became apparent that they were not snakes at all but dragons. Their devotion to their adopted mother did not diminish. When the area was hit by drought, the dragons summoned rain. Grateful villagers in awe of the familial relationship between woman and snakes began calling her Long Mu: Mother of Dragons. After her death, she was subsequently deified. Long Mu remains a very popular goddess.
She is venerated as the goddess of motherhood, parenthood, fertility, and filial piety invoked to instill feelings of loyalty and responsibility between those who love each other, whether related by blood or even of the same species.
She was also regarded as the Tanka’s deity who has the power for controlling the water environment, and provide them a safe life (Chen, 1946: 164). The belief of Tanka is attested in some of the decoration of Tanka boats, Tanka people usually place the spirit tablets for the water deities at the stern cabin.
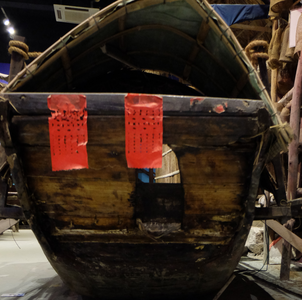
An example of two spirit tablets for the water deities at the stern cabin.
Long Mu is enshrined in two temples in China:
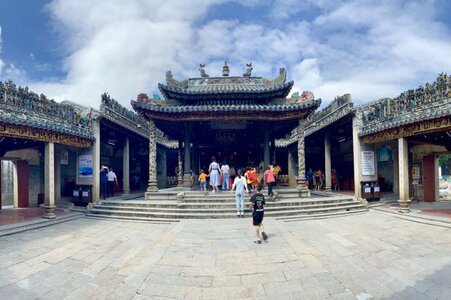
The Long Mu Ancestral Temple in Yuecheng
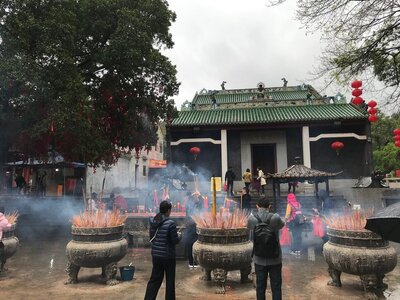
and the Baisha Temple in Zhaoqing.
Back to the Sampan
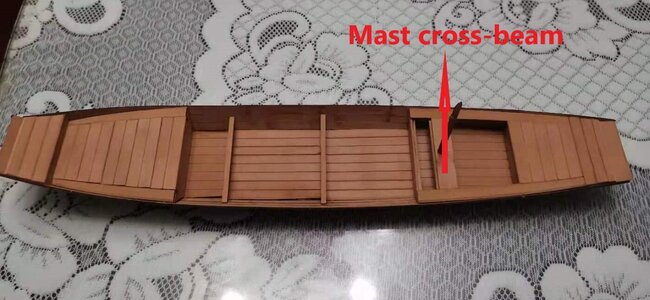
The front supporting structure had been removed and the bow deck area has been planked. As mentioned before, the deck planking consists of individual pear wood strips - each which has to be shaped individually for a perfect fit. On the sides where the deck planking has to follow the curvature of the hull, it gets quite tricky as it is not a completely straight line, but an ever-so-slightly curved one. The mast-supporting cross-beam has also been installed while the mast stub was used to ensure perfect alignment.
Now came the final and acid test of whether the hull was straight and whether the roundings were correct - the fitment of the top-railings onto the wales. Simply put, if the curvature of the hull was not correct, the railings would not fit properly.
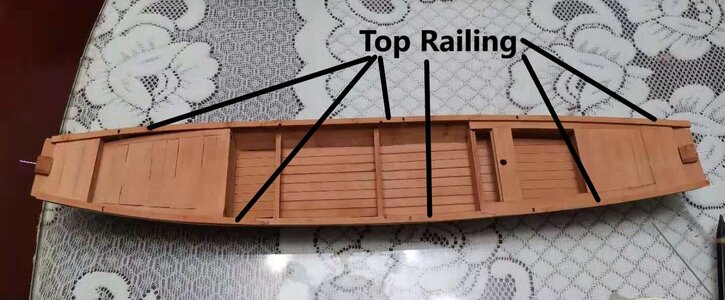
But … fit they did and they did so beautifully! Finally, it looked as if Long-Mu smiling on this build.
Until next time, take care, stay safe and happy modeling!
Warmest greetings - Heinrich

I start this post by touching on the belief-structure of the Tanka people and for a very good reason - the reason of which will become obvious towards the end of the post.
As the Tanka is bound to water, it is no surprise that they originally believed in Totemism – in particular, they showed respect to the snake deities, as this was a common water creature in the area around Lingnan. Subsequently, their believes turned from Totemism to multiple deities. This might well be due to the many dangers at sea and on the water which were daily occurrences to the Tanka. It was believed that these deities would grant them more power to withstand these perils. One of these deities was Long Mu.
Before she became the Mother of Dragons, Long Mu, (born Wen Long Ji溫龍姬 circa 290 BCE), was a young girl who was orphaned after her parents had died in a great flood. Cared for by a poor family in southern China, she went to the Xi River, a tributary of the Pearl River, daily to fish, bathe and do laundry. One day, she found an exquisite white stone and brought it home.
The stone turned out to be an egg: five little water snakes hatched from it. Long Mu treated them as if they were her own children. Although her family was poor, she saved the best food for the snakes and fed them by hand. They, in turn, became very devoted to her, too, traveling to the river with her and helping her fish.

The snakes kept growing and it soon became apparent that they were not snakes at all but dragons. Their devotion to their adopted mother did not diminish. When the area was hit by drought, the dragons summoned rain. Grateful villagers in awe of the familial relationship between woman and snakes began calling her Long Mu: Mother of Dragons. After her death, she was subsequently deified. Long Mu remains a very popular goddess.
She is venerated as the goddess of motherhood, parenthood, fertility, and filial piety invoked to instill feelings of loyalty and responsibility between those who love each other, whether related by blood or even of the same species.
She was also regarded as the Tanka’s deity who has the power for controlling the water environment, and provide them a safe life (Chen, 1946: 164). The belief of Tanka is attested in some of the decoration of Tanka boats, Tanka people usually place the spirit tablets for the water deities at the stern cabin.

An example of two spirit tablets for the water deities at the stern cabin.
Long Mu is enshrined in two temples in China:

The Long Mu Ancestral Temple in Yuecheng

and the Baisha Temple in Zhaoqing.
Back to the Sampan

The front supporting structure had been removed and the bow deck area has been planked. As mentioned before, the deck planking consists of individual pear wood strips - each which has to be shaped individually for a perfect fit. On the sides where the deck planking has to follow the curvature of the hull, it gets quite tricky as it is not a completely straight line, but an ever-so-slightly curved one. The mast-supporting cross-beam has also been installed while the mast stub was used to ensure perfect alignment.
Now came the final and acid test of whether the hull was straight and whether the roundings were correct - the fitment of the top-railings onto the wales. Simply put, if the curvature of the hull was not correct, the railings would not fit properly.

But … fit they did and they did so beautifully! Finally, it looked as if Long-Mu smiling on this build.
Until next time, take care, stay safe and happy modeling!
Warmest greetings - Heinrich
Exzellent Heinrich, extremely informative, very enriching. Great Model. Many thanks.
- Joined
- Jan 9, 2020
- Messages
- 10,566
- Points
- 938

@pianoforte Thank you so much Adi! I am very happy - or should I say relieved - with how the build is turning out so far! This the raw assembly so far - no sanding or finishing of any kind has taken place so I have high hopes 
I very much appreciate your wholistic presentation of the sampan and the cultural/historical background. It is apparent that you are enjoying this project and the fine model that is coming forth. Rich@pianoforte Thank you so much Adi! I am very happy - or should I say relieved - with how the build is turning out so far! This the raw assembly so far - no sanding or finishing of any kind has taken place so I have high hopes
Heinrich..... I am starting to have a problem with this building log.
The issue is that I am starting to be more interested in all what you write about the Tanka people than in your Sampan built. HAHAHA
Lovely built and magnificent thread !!!!!
Cheers
Daniel
The issue is that I am starting to be more interested in all what you write about the Tanka people than in your Sampan built. HAHAHA
Lovely built and magnificent thread !!!!!
Cheers
Daniel
Last edited:
- Joined
- Jan 9, 2020
- Messages
- 10,566
- Points
- 938

@PT-2 Thank you so much for the very kind comments, Rich! I am so glad to see that what I am trying to do, is reflected in your interpretation of the build. I think the fundamental difference between the Tanka sampan and any other watercraft for that matter, resides in the function of the sampan. Nations build frigates, man-o-wars, brigantines and the like so that they can go to war or defend themselves. We build whalers and fishing vessels for obvious purposes, in Bluenose and the like's case, we build schooners to go racing etc. etc. The Sampan was built for life itself - it became birthplace, home, school, kitchen, school, workplace, hospital and burial ground. In all, it encompassed the every fibre of the Tanka's existence.
- Joined
- Jan 9, 2020
- Messages
- 10,566
- Points
- 938

@Dematosdg Daniel - your opening sentence encompasses a HUGE compliment! Thank you! If you are more interested in the Tanka people than the actual build, I want to shout HOOOORAAAYYYY ! That is exactly what I am trying to achieve with this log. Sure, I want to share the build with you - but the primary purpose is not to showcase my building "talents" or lack thereof, but to create awareness of these extraordinary people and their very humble, but equally extraordinary sampan.
- Joined
- Jan 9, 2020
- Messages
- 10,566
- Points
- 938

Hello Everyone
After the bow deck planks had been installed, the end pieces for the Yuloh (rowing and steering oar) were added to both the bow and stern. The flexibility of the sampan is that it can be steered from both ends which makes it extremely maneuverable.
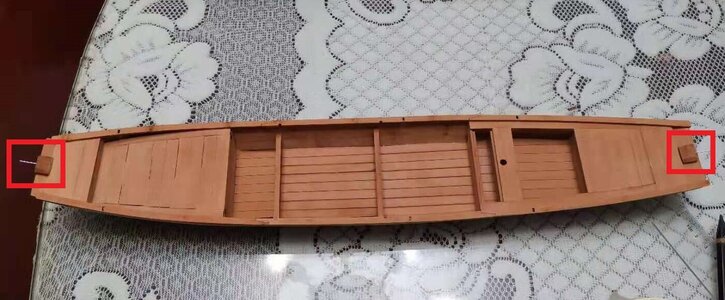
The red squares indicate the two platforms for the Yuloh (the steering and sculling oar). The construction of the Yuloh and its mode of operation will be discussed a little later.
PREPPING THE HULL
I could now turn my attention to sanding the hull. You will have noticed that I have not mentioned anything about that up to this point as I first wanted to make sure that the structural rigidity of the hull was good enough. With the deck planking completed and the floor in place though, the hull was as strong and rigid as anyone could wish for.
Now for interest’s sake – when I plank the hull, I do not bevel the edges of planks as they butt-up against adjoining partners. Lazy? I probably am, but that’s not the reason for not doing it.. Without beveling or chamfering, a little "lip" is created when two planks are butted-up against each other. That little “lip” that remains, provides (to me at least) the perfect angle (when viewed from the top) at which I need to sand the hull. I start by sanding cross-grain at an approximate angle of 45 degrees using "heavy artillery" 80-grit sandpaper. The Pear Wood is resilient and the 2mm thickness, meant that lots of sanding was required to remove the "lips". Once that was done, I moved down to 120-grit sandpaper and started sanding longitudinally and following the grain of the wood. Finally 360-grit was used to complete the process. The whole process was straightforward and there was nothing untoward.
YULOH
In his excellent book, "The Junks and Sampans of the Yangtze". G.R.G. Worcester wrote:
"Propulsion is by means of a single “yuloh”, or “lu”, an original and extremely efficient implement; 13 feet in length, it is scarfed in three pieces, thus forming a gentle curve. When in operation, the blade is kept very deep in the water, that is to say, 3 1/2 feet, or more than one-third of its length being below the surface, and as the face of the blade is 6 inches in width, this combination gives much increased leverage and power.
The yuloh pivots on a 3-inch bearing-pin* which ends in a knob. This pin is situated on the transom, and the loom is held in place by a coir lanyard, 5 1/2 feet long, attached to a ring-bolt in the stern deck. The hand holding the yuloh is held at head level and rather behind, while the hand on the lanyard works across the breast. It is interesting to record that the sculler can average 41 strokes to the minute under favourable weather conditions, yielding the satisfactory speed of 8
"li" (knots) per hour!
While most sampans share the exact same basic characteristics, they do, nevertheless, fall into two definite categories, known as “pang”, or groups. These are the Ning-pang, or group manned by Ningpo men, and the Soo-pang, or group manned by either Soochow men, men of Shanghai, or men from Kiangyin, a small town some 80 miles up the Yangtze.
The distinguishing feature is that in the Ningpo-owned craft the bearing-pin for the yuloh is situated on the port side, which necessitates the sculler using his left hand on the oar; while in the boats operated by Soochow, Shanghai, and Kiangyin men, the bearing-pin is on the starboard side and the sculler operates the yuloh with his right hand. The exponents of both methods maintain that theirs is the only reasonable mode of propulsion. My sampan is built according to the latter option.
*Bearing-pin: This might be confusing as it does not refer to a device which facilitates rotation, but actually means "load-bearing". In other words, it "Bears" or "carries" the Yuloh - hence me changing it the name to "load-carrying platform" and "load-carrying pin".
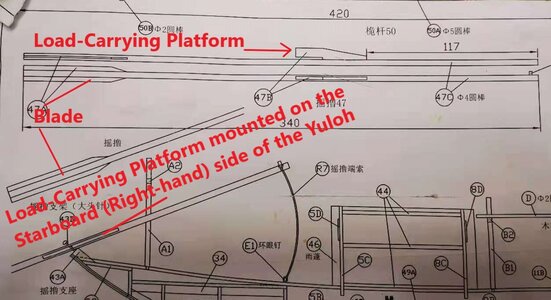
How the instruction manual shows assembly of the Yuloh.
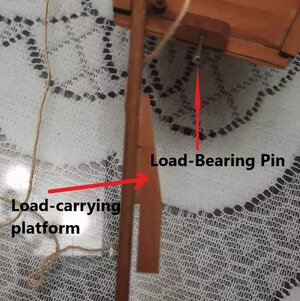
The actual "load-carrying pin" and- "platform" as constructed on the model. Getting that platform to blend it seamlessly with the oar required patience. The slot provides the opening for sliding the platform over the pin.
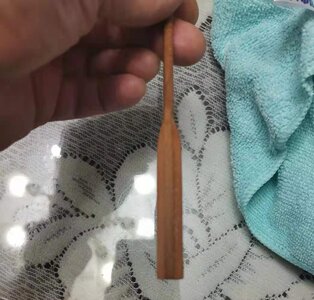
The blade is constructed by pre-shaping two pieces of pear wood to the correct size and shape and then gluing them to either side of the oar. Interestingly, the blade and the load-carrying platform are at 90 degrees to reach other. So ... if the load-bearing platform is completely level on a horizontal plane, the blade has a 90-degree vertical angle.
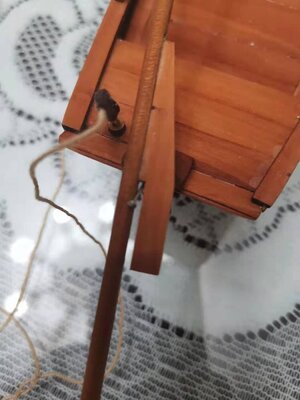
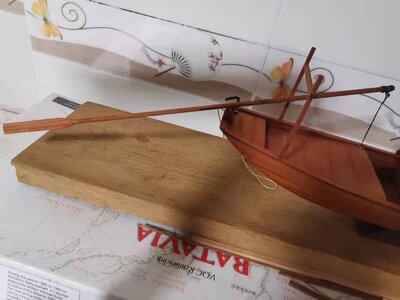
The assembly on the model. In real model-life, that Yuloh is 35 cm long and the overall model length is 69 cm - so you can see that it is a substantial oar.
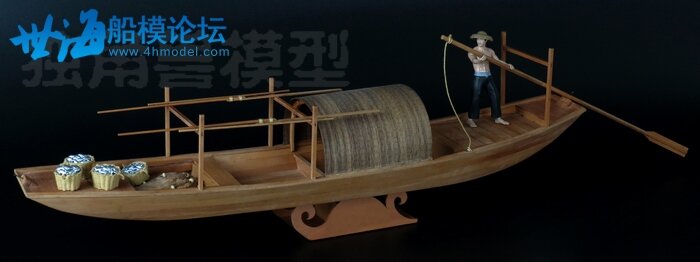
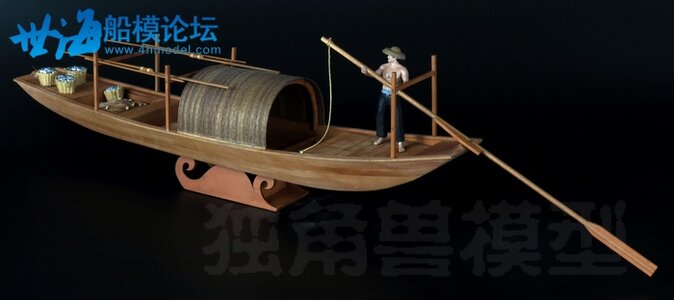
The picture below taken from one of Unicorn's test builds on the 4h forum clearly show the "operation" of the Yuloh and that this model was built according to the "Soochow" (Suzhou) / Shanghai style with the load-bearing platform on the starboard side of the oar and the right-hand higher up on the Yuloh - thus in the dominant position.
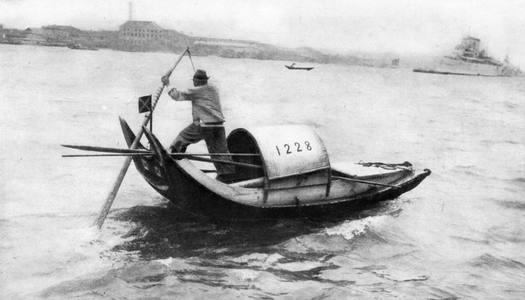
One of the smaller "Water-Taxi" sampans being "Yulohed" in Shanghai.
When I return for the next posting, it will be to show you the assembly and installation of the bamboo canopy.
Thank you all so much for looking, commenting, liking or just browsing.
Best regards - Heinrich
After the bow deck planks had been installed, the end pieces for the Yuloh (rowing and steering oar) were added to both the bow and stern. The flexibility of the sampan is that it can be steered from both ends which makes it extremely maneuverable.

The red squares indicate the two platforms for the Yuloh (the steering and sculling oar). The construction of the Yuloh and its mode of operation will be discussed a little later.
PREPPING THE HULL
I could now turn my attention to sanding the hull. You will have noticed that I have not mentioned anything about that up to this point as I first wanted to make sure that the structural rigidity of the hull was good enough. With the deck planking completed and the floor in place though, the hull was as strong and rigid as anyone could wish for.
Now for interest’s sake – when I plank the hull, I do not bevel the edges of planks as they butt-up against adjoining partners. Lazy? I probably am, but that’s not the reason for not doing it.. Without beveling or chamfering, a little "lip" is created when two planks are butted-up against each other. That little “lip” that remains, provides (to me at least) the perfect angle (when viewed from the top) at which I need to sand the hull. I start by sanding cross-grain at an approximate angle of 45 degrees using "heavy artillery" 80-grit sandpaper. The Pear Wood is resilient and the 2mm thickness, meant that lots of sanding was required to remove the "lips". Once that was done, I moved down to 120-grit sandpaper and started sanding longitudinally and following the grain of the wood. Finally 360-grit was used to complete the process. The whole process was straightforward and there was nothing untoward.
YULOH
In his excellent book, "The Junks and Sampans of the Yangtze". G.R.G. Worcester wrote:
"Propulsion is by means of a single “yuloh”, or “lu”, an original and extremely efficient implement; 13 feet in length, it is scarfed in three pieces, thus forming a gentle curve. When in operation, the blade is kept very deep in the water, that is to say, 3 1/2 feet, or more than one-third of its length being below the surface, and as the face of the blade is 6 inches in width, this combination gives much increased leverage and power.
The yuloh pivots on a 3-inch bearing-pin* which ends in a knob. This pin is situated on the transom, and the loom is held in place by a coir lanyard, 5 1/2 feet long, attached to a ring-bolt in the stern deck. The hand holding the yuloh is held at head level and rather behind, while the hand on the lanyard works across the breast. It is interesting to record that the sculler can average 41 strokes to the minute under favourable weather conditions, yielding the satisfactory speed of 8
"li" (knots) per hour!
While most sampans share the exact same basic characteristics, they do, nevertheless, fall into two definite categories, known as “pang”, or groups. These are the Ning-pang, or group manned by Ningpo men, and the Soo-pang, or group manned by either Soochow men, men of Shanghai, or men from Kiangyin, a small town some 80 miles up the Yangtze.
The distinguishing feature is that in the Ningpo-owned craft the bearing-pin for the yuloh is situated on the port side, which necessitates the sculler using his left hand on the oar; while in the boats operated by Soochow, Shanghai, and Kiangyin men, the bearing-pin is on the starboard side and the sculler operates the yuloh with his right hand. The exponents of both methods maintain that theirs is the only reasonable mode of propulsion. My sampan is built according to the latter option.
*Bearing-pin: This might be confusing as it does not refer to a device which facilitates rotation, but actually means "load-bearing". In other words, it "Bears" or "carries" the Yuloh - hence me changing it the name to "load-carrying platform" and "load-carrying pin".

How the instruction manual shows assembly of the Yuloh.

The actual "load-carrying pin" and- "platform" as constructed on the model. Getting that platform to blend it seamlessly with the oar required patience. The slot provides the opening for sliding the platform over the pin.

The blade is constructed by pre-shaping two pieces of pear wood to the correct size and shape and then gluing them to either side of the oar. Interestingly, the blade and the load-carrying platform are at 90 degrees to reach other. So ... if the load-bearing platform is completely level on a horizontal plane, the blade has a 90-degree vertical angle.


The assembly on the model. In real model-life, that Yuloh is 35 cm long and the overall model length is 69 cm - so you can see that it is a substantial oar.
The picture below taken from one of Unicorn's test builds on the 4h forum clearly show the "operation" of the Yuloh and that this model was built according to the "Soochow" (Suzhou) / Shanghai style with the load-bearing platform on the starboard side of the oar and the right-hand higher up on the Yuloh - thus in the dominant position.


One of the smaller "Water-Taxi" sampans being "Yulohed" in Shanghai.
When I return for the next posting, it will be to show you the assembly and installation of the bamboo canopy.
Thank you all so much for looking, commenting, liking or just browsing.
Best regards - Heinrich
Just catching up on your build log Heinrich. Its certainly an unusual subject to build, well done. 


