Thanks, I will keep; looking under What's New for your updates. Rich@PT-2 Hi Rich. Nope - there is no Group Build of a Sampan - it's just this one.I welcomed Dean to my build log.
-

Win a Free Custom Engraved Brass Coin!!!
As a way to introduce our brass coins to the community, we will raffle off a free coin during the month of August. Follow link ABOVE for instructions for entering.
-

PRE-ORDER SHIPS IN SCALE TODAY!
The beloved Ships in Scale Magazine is back and charting a new course for 2026!
Discover new skills, new techniques, and new inspirations in every issue.
NOTE THAT OUR FIRST ISSUE WILL BE JAN/FEB 2026
You are using an out of date browser. It may not display this or other websites correctly.
You should upgrade or use an alternative browser.
You should upgrade or use an alternative browser.
YANGTZE RIVER HIGH-NET FISHING SAMPAN [COMPLETED BUILD]
- Thread starter Heinrich
- Start date
- Watchers 29
-
- Tags
- completed build
- Joined
- Jan 9, 2020
- Messages
- 10,566
- Points
- 938

@STGCS Thank you so much, Charlie! Those are fascinating pictures of a China which is very different to the one that we are used to today. It seems to me that the majority of foreigners who did service in China or served in the one or other official capacity was very happy during their stay here. I have been here now for four years and still have another 7 years to go before I am deemed too old to work in China (there are plans afoot of extending that limit by another 5 years, but that is what it is now) and I am already dreading that moment.
- Joined
- Jan 9, 2020
- Messages
- 10,566
- Points
- 938

@Dean62 Dean, you know, it is case of horses for courses. I have rethought my whole way of thinking about models. To me, building models that I have absolutely no association with or doesn't add anything of historical value, is a no-no from now on. This model - if approved - will find its ultimate resting place in the Shatian Water Exhibition Cultural Hall in Guangdong. That excites me - to know that I am doing something that actually matters.
The other thing is repetition. The one reason why I am so slow with the Haarlem, is that I simply hate mindless repetition. If I can rig one cannon, tie one ratline and make one gunport cover, I bore myself to death repeating that goodness-knows-how-many-times! Ok, I know that is a senseless thing to say, but that is what I feel like.
From previous experience with this particular kit, it is intense. The focus is on the construction of the hull, the planking and the finishing and I know that the whole build will stand or fall by the planking. To me, that is a challenge - everything builds up to that point, and if successful, afterwards you can relax adding the finishing touches. The whole process shouldn't take longer than a month or month-and-a-half.
So a long, prelude to say "why don't you ! "
- Joined
- Jan 9, 2020
- Messages
- 10,566
- Points
- 938

Now here is an excellent example of co-operation on SOS which can make an actual difference in how we preserve history.
Earlier I mentioned that I will introduce you to a special lady. She is a Chinese student at Southampton University in the UK who is busy doing her Masters Dissertation - Technical Choice and Social Practice of Sampan Boats: A Case Study of Tanka Sampan and the Dweller in Ethnoarchaeology.
Part of her studies included recording a specific sampan which was on display for some time in the UK.
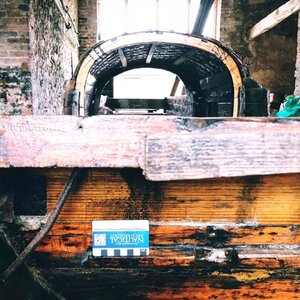
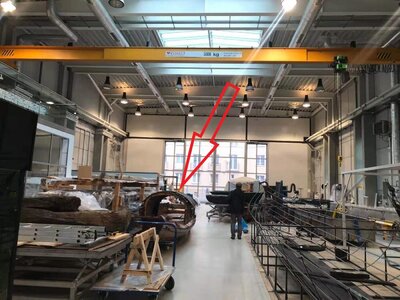
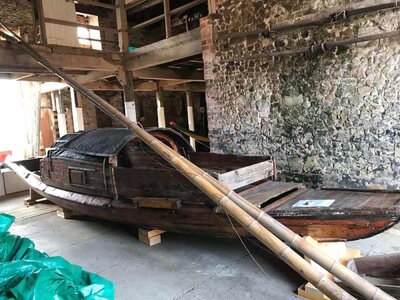
These pictures were all taken while the sampan in question was on loan to the UK.
The problem was that she only had time to do a partial recording of the boat, before the loan to the UK expired and the boat moved onto its next destination., As no one seemed to have any idea where the sampan went to next, she lost track of it and that was that - all she had was a partial recording that was basically useless unless it could be completed.
Now this is where SOS comes in. In steps @Pathfinder65 Jan who - completely unaware of all of the above - sends me a link which he thinks I will find interesting.
https://sketchfab.com/3d-models/sampan-fishing-boat-2d2ca42f71624795a19a39f03eab9e96
And would you know it - the sampan featured in the 3D link of the National Maritime Museum in Gdańsk (Poland) is the exact same sampan that had gone missing! How is that for co-incidence/ destiny!!! Once our student has made contact with the museum, I am sure that they can come to sort of agreement whereby she can obtain the missing information and complete her research on this particular Dongting Hu sampan.
THANK YOU JAN !!!
Earlier I mentioned that I will introduce you to a special lady. She is a Chinese student at Southampton University in the UK who is busy doing her Masters Dissertation - Technical Choice and Social Practice of Sampan Boats: A Case Study of Tanka Sampan and the Dweller in Ethnoarchaeology.
Part of her studies included recording a specific sampan which was on display for some time in the UK.


These pictures were all taken while the sampan in question was on loan to the UK.
The problem was that she only had time to do a partial recording of the boat, before the loan to the UK expired and the boat moved onto its next destination., As no one seemed to have any idea where the sampan went to next, she lost track of it and that was that - all she had was a partial recording that was basically useless unless it could be completed.
Now this is where SOS comes in. In steps @Pathfinder65 Jan who - completely unaware of all of the above - sends me a link which he thinks I will find interesting.
https://sketchfab.com/3d-models/sampan-fishing-boat-2d2ca42f71624795a19a39f03eab9e96
And would you know it - the sampan featured in the 3D link of the National Maritime Museum in Gdańsk (Poland) is the exact same sampan that had gone missing!
THANK YOU JAN !!!

- Joined
- Jan 9, 2020
- Messages
- 10,566
- Points
- 938

Hi Daniel - yes the turns of life are amazing. That is why exchange is so valuable - even if you say or contribute something that you may not think is of particular importance, it may have far-reaching effects!
As to the weathering - to some or other agree, they all look like that, yes. The Dongting Hu though in the posting is so named because it was mostly used on Lake Dongting - one of the two biggest lakes in the Yangtze river. As such, it is also not a real Tanka sampan as the Tanka people used their vessels both in-and offshore. Their wales and freeboard are higher to cope with the waves, while the inland sampans were flatter.
I won't be able to get myself so far as to weather this one - the Pear Wood is simply too exquisite for that - but for the next build, I will cedar wood (as in the real MccCoy) and then we can go to town with the weathering! Promise!
This coincidental link for the woman's research paper is amazing and an example of how there are "treasures" around us but not known. Excellent SoS support in a manner not realized when it was first posted. It required a knowlegable interlocutor to complete the loop. Well done. RichHi Daniel - yes the turns of life are amazing. That is why exchange is so valuable - even if you say or contribute something that you may not think is of particular importance, it may have far-reaching effects!
As to the weathering - to some or other agree, they all look like that, yes. The Dongting Hu though in the posting is so named because it was mostly used on Lake Dongting - one of the two biggest lakes in the Yangtze river. As such, it is also not a real Tanka sampan as the Tanka people used their vessels both in-and offshore. Their wales and freeboard are higher to cope with the waves, while the inland sampans were flatter.
I won't be able to get myself so far as to weather this one - the Pear Wood is simply too exquisite for that - but for the next build, I will cedar wood (as in the real MccCoy) and then we can go to town with the weathering! Promise!
- Joined
- Jan 9, 2020
- Messages
- 10,566
- Points
- 938

After all the excitement of @Pathfinder65 Jan's great detective work this morning, it was time to to make the most of my day off.
That meant that it was all about planking the bottom and then some. The actual bottom planking is done in Pear Wood and consists of 6 pre-cut planks while the two end pieces are planked with diagonal strips of Pear Wood (also pre-cut). Unfortunately, I neglected to take pictures of that, (I have far more important pictures to share with you ) so I have to rely on the photographs from the instruction manual. You will see now what I mean by the “grainy” quality of the instruction manual pictures.
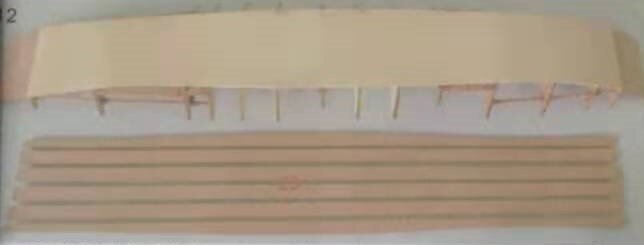
Here you can see the the six pre-cut pieces of Pear wood that will make up the bottom planking.
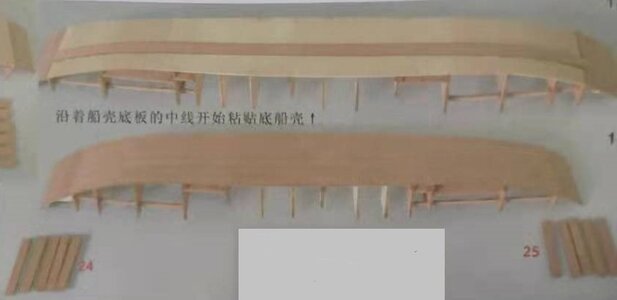
Note the two sections of 5 shorter planks that will make up the planking for the two end pieces at the bow and stern respectively. These will be planked diagonally.
The planking process itself was very straightforward. The pre-cut planks were a perfect fit and because the area to be planked was smooth and flat, it went quickly. The same applied to the diagonal pieces on the two ends. All in all – eazy-peazy!
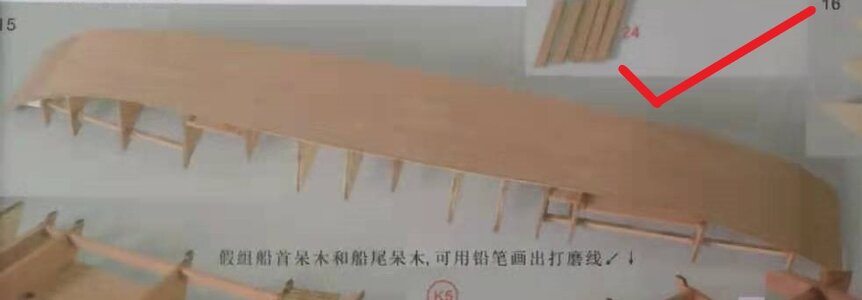
The bottom planking completed. The big, red tick means that my planking looks exactly this (for now you will have to trust me! )
)
So now the time has come for planking the hull, This was where I screwed up big-time with my first build and which was the reason why the model was relegated to a dustbin. Now let me say that since then, I really enjoy planking. I am confident with it and have had very good results, but this was different. Let me explain the challenge.
Bear in mind that 90% of the four plywood bulkheads (marked with red arrows) will be removed – thus I could not use them to glue the hull planking to. Also bear in mind that the top halves of Bulkheads #5 and #6 (50% of their total area) - marked with green arrows - are also to be removed – thus no glue! This means that for the entire centre section of the hull (the section in the blue block), the planking would be unsupported.
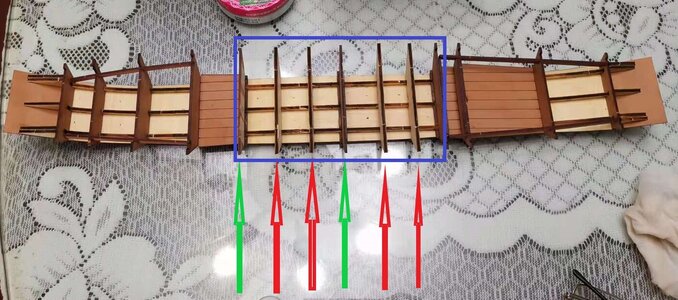
And then the clincher! The pear wood planking strips are 2mm thick while the bulkheads are only 1.5mm thick! Don’t get me wrong … I love the idea of the extremely solid and high-quality planking strips, but how … oh how does Unicorn envisage one to plank them on paper-thin bulkheads of which you can only use half?

But ... if you think long and hard enough, drink coffee and smoke enough Yuxi (my Chinese brand) cigarettes, you may just find a potential solution. Remember, this is my second build and I was fully prepared this time.
The "solution" (at this stage I don't know if it is a solution yet or just vain hope)? A message to @yqmodel Xiuli of YuanQing saw five 11mm x 11mm strips of Pauwlina wood (the Chinese equivalent of Balsa) delivered to me FREE OF CHARGE! Thanks, Xiuli! Then it was a case of meticulously shaping each piece to the exact size and inserting them into every conceivable nook and cranny that I could find.
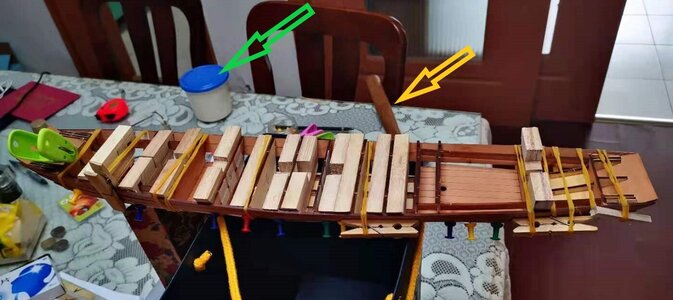
Plank on Bulkhead construction? To me it looked more like a “Bread and Butter” build! (The hammer and Chinese glue) are vital parts of any build of mine.
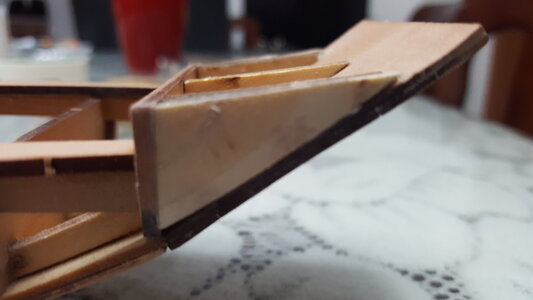
Then it was a case of gluing the filler pieces into the deadwood areas at the bow and the stern, shaping them to size, and now the hull planking could begin! Wish me luck!
Until next time, take care, stay safe and happy modeling!
Warmest regards - Heinrich
That meant that it was all about planking the bottom and then some. The actual bottom planking is done in Pear Wood and consists of 6 pre-cut planks while the two end pieces are planked with diagonal strips of Pear Wood (also pre-cut). Unfortunately, I neglected to take pictures of that, (I have far more important pictures to share with you

Here you can see the the six pre-cut pieces of Pear wood that will make up the bottom planking.

Note the two sections of 5 shorter planks that will make up the planking for the two end pieces at the bow and stern respectively. These will be planked diagonally.
The planking process itself was very straightforward. The pre-cut planks were a perfect fit and because the area to be planked was smooth and flat, it went quickly. The same applied to the diagonal pieces on the two ends. All in all – eazy-peazy!

The bottom planking completed. The big, red tick means that my planking looks exactly this (for now you will have to trust me!
So now the time has come for planking the hull, This was where I screwed up big-time with my first build and which was the reason why the model was relegated to a dustbin. Now let me say that since then, I really enjoy planking. I am confident with it and have had very good results, but this was different. Let me explain the challenge.
Bear in mind that 90% of the four plywood bulkheads (marked with red arrows) will be removed – thus I could not use them to glue the hull planking to. Also bear in mind that the top halves of Bulkheads #5 and #6 (50% of their total area) - marked with green arrows - are also to be removed – thus no glue! This means that for the entire centre section of the hull (the section in the blue block), the planking would be unsupported.

And then the clincher! The pear wood planking strips are 2mm thick while the bulkheads are only 1.5mm thick! Don’t get me wrong … I love the idea of the extremely solid and high-quality planking strips, but how … oh how does Unicorn envisage one to plank them on paper-thin bulkheads of which you can only use half?

But ... if you think long and hard enough, drink coffee and smoke enough Yuxi (my Chinese brand) cigarettes, you may just find a potential solution. Remember, this is my second build and I was fully prepared this time.
The "solution" (at this stage I don't know if it is a solution yet or just vain hope)? A message to @yqmodel Xiuli of YuanQing saw five 11mm x 11mm strips of Pauwlina wood (the Chinese equivalent of Balsa) delivered to me FREE OF CHARGE! Thanks, Xiuli! Then it was a case of meticulously shaping each piece to the exact size and inserting them into every conceivable nook and cranny that I could find.

Plank on Bulkhead construction? To me it looked more like a “Bread and Butter” build! (The hammer and Chinese glue) are vital parts of any build of mine.

Then it was a case of gluing the filler pieces into the deadwood areas at the bow and the stern, shaping them to size, and now the hull planking could begin! Wish me luck!
Until next time, take care, stay safe and happy modeling!
Warmest regards - Heinrich
Looks like a good plan!After all the excitement of @Pathfinder65 Jan's great detective work this morning, it was time to to make the most of my day off.
That meant that it was all about planking the bottom and then some. The actual bottom planking is done in Pear Wood and consists of 6 pre-cut planks while the two end pieces are planked with diagonal strips of Pear Wood (also pre-cut). Unfortunately, I neglected to take pictures of that, (I have far more important pictures to share with you) so I have to rely on the photographs from the instruction manual. You will see now what I mean by the “grainy” quality of the instruction manual pictures.
View attachment 243698
Here you can see the the six pre-cut pieces of Pear wood that will make up the bottom planking.
View attachment 243699
Note the two sections of 5 shorter planks that will make up the planking for the two end pieces at the bow and stern respectively. These will be planked diagonally.
The planking process itself was very straightforward. The pre-cut planks were a perfect fit and because the area to be planked was smooth and flat, it went quickly. The same applied to the diagonal pieces on the two ends. All in all – eazy-peazy!
View attachment 243700
The bottom planking completed. The big, red tick means that my planking looks exactly this (for now you will have to trust me!)
So now the time has come for planking the hull, This was where I screwed up big-time with my first build and which was the reason why the model was relegated to a dustbin. Now let me say that since then, I really enjoy planking. I am confident with it and have had very good results, but this was different. Let me explain the challenge.
Bear in mind that 90% of the four plywood bulkheads (marked with red arrows) will be removed – thus I could not use them to glue the hull planking to. Also bear in mind that the top halves of Bulkheads #5 and #6 (50% of their total area) - marked with green arrows - are also to be removed – thus no glue! This means that for the entire centre section of the hull (the section in the blue block), the planking would be unsupported.
View attachment 243701
And then the clincher! The pear wood planking strips are 2mm thick while the bulkheads are only 1.5mm thick! Don’t get me wrong … I love the idea of the extremely solid and high-quality planking strips, but how … oh how does Unicorn envisage one to plank them on paper-thin bulkheads of which you can only use half?
View attachment 243702
But ... if you think long and hard enough, drink coffee and smoke enough Yuxi (my Chinese brand) cigarettes, you may just find a potential solution. Remember, this is my second build and I was fully prepared this time.
The "solution" (at this stage I don't know if it is a solution yet or just vain hope)? A message to @yqmodel Xiuli of YuanQing saw five 11mm x 11mm strips of Pauwlina wood (the Chinese equivalent of Balsa) delivered to me FREE OF CHARGE! Thanks, Xiuli! Then it was a case of meticulously shaping each piece to the exact size and inserting them into every conceivable nook and cranny that I could find.
View attachment 243703
Plank on Bulkhead construction? To me it looked more like a “Bread and Butter” build! (The hammer and Chinese glue) are vital parts of any build of mine.
View attachment 243704
Then it was a case of gluing the filler pieces into the deadwood areas at the bow and the stern, shaping them to size, and now the hull planking could begin! Wish me luck!
Until next time, take care, stay safe and happy modeling!
Warmest regards - Heinrich
Heinrich,
Just another small hurdle to overcome. Patience, perseverance and blind luck (even coffee and a good smoke) work every time.
Jan
Just another small hurdle to overcome. Patience, perseverance and blind luck (even coffee and a good smoke) work every time.
Jan
- Joined
- Jan 9, 2020
- Messages
- 10,566
- Points
- 938

@Pathfinder65 Thank you Jan! At this point I need all the help I can get - be it from patience, coffee or cigarettes  !
!
 !
!From looking at you progress there seem to be some very different challenges and needs in this Sampan model. It looks very carefully done so far. Good fishing!!! Rich@Pathfinder65 Thank you Jan! At this point I need all the help I can get - be it from patience, coffee or cigarettes!
- Joined
- Jan 9, 2020
- Messages
- 10,566
- Points
- 938

@PT-2 Hello Rich. You are right - and that is exactly why I enjoy it so much. I mentioned earlier to @Pathfinder65 Jan (who has been monumental in his support of this build) that I have never enjoyed so much working on a model. So far everything has been new and different and has brought with it its own set of challenges (big or small). Someone of greater ability might wonder what the fuss is all about, but to me it is challenging. 
Different River and Sampans in this 1949 video. Sorry that it is YouTube.@PT-2 Hello Rich. You are right - and that is exactly why I enjoy it so much. I mentioned earlier to @Pathfinder65 Jan (who has been monumental in his support of this build) that I have never enjoyed so much working on a model. So far everything has been new and different and has brought with it its own set of challenges (big or small). Someone of greater ability might wonder what the fuss is all about, but to me it is challenging.
Sampan Family (1949)
Presents through the daily activities of the Ling family, who navigate the Min River in Fukien Province, the story of Chinese families who live and make a living aboard the sampans. Shows the daily fishing that earns the family's livelihood, life aboard a small boat, and the ways the family...
It covers the water lives of these families and shows a lot of different types on the river and in the harbor in 1949.@PT-2 Thank you Rich. No problem about it being YouTube - I can't watch it, but if one person watches it and finds it even mildly interesting, it is one person more than in the past. Mission accomplished!
Yes, it was. Possibly there are other routes to find this old documentary movie for you to see. Just a challenge that may not be feasible. Rich@PT-2 That is great Rich! The section pertaining to their live on the water - in particular - must have been fascinating to watch!
- Joined
- Jan 9, 2020
- Messages
- 10,566
- Points
- 938

So earlier you may recall that I said to @Dean62 Dean that the success of this build will stand or fall by the planking. My first effort "fell" right at this hurdle and this time I was hoping I could be more successful.
After the first plank on starboard side had been laid down (a process which involved push pins, nails, clamps, rubber bands and everything that I could remotely make work), the hull looked like a male dog with its one hind leg in the air taking a leak – “warped” did not even begin to describe it.

That is what the hull looked like after the first starboard plank had been laid down. I gave it one look and thought - "oh boy, here we go again"!
With not much hope, I put down the first plank on port side plank and to my relief it pulled the hull back to some form of sanity and into alignment. And that was the name of the game. Until the next and equal plank on the port side was laid down, the hull was as warped as warped could be. The 8-hour, self-imposed waiting period between each plank (luckily it is extremely hot in Nantong at the moment and the glue dries very quickly) turned out to be a test of nerves – would the hull be pulled straight by the next port-side plank? With the planking completed, the hull was left to rest overnight. Lo and behold … the next morning it was as straight as an arrow.
However, I was not in the clear just yet. Now all the bulkheads and the Paulina wood-inserts had to be “removed” (the sophisticated word for broken-, cut-, filed-out and chiseled into oblivion) – all this while the hull planking remained intact.
I first removed all the extras from that notorious centre section (which was an easy job to do) and when that looked good, immediately planked the floor. The idea was that the seam between the floor boards and the hull planking would provide something extra to which the hull planks could be bound. With that successfully completed, I moved onto the stern area. Here I chiseled away all the extra supporting material to a level which would remain as high as possible, but would simultaneously be just low enough to allow for installation of the stern deck planking. All the deck planking comprises of individual pear wood strips - each which has to be filed and sanded to ensure a precise fit.
I do apologize profusely for not taking pictures during this part of the build – but truth be told – I just had my hands too full with the build.
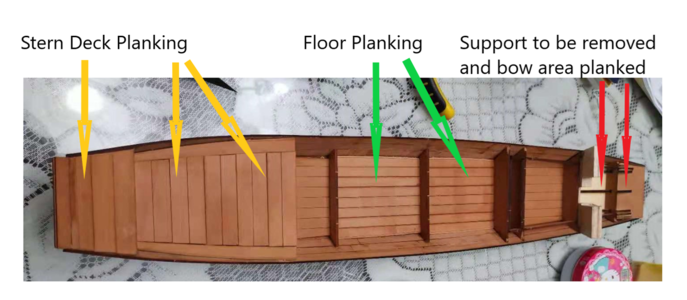
This is where I am tonight. Even though the supporting section at the bow still needs to be removed and the deck planking done at the bow, I am satisfied that the entire hull structure is now sufficiently solid and even though there is still a lot of work ahead, I do have a successfully planked sampan to work on!
This was the crucial part of the build and even though I will probably still have my fair share of challenges, I feel like I have accomplished what I had set out to achieve. Sampan #2 is safe and sound inside the Nantong household. Outside it is pelting with rain - typical of Nantong summer weather - while the garbage bin remains empty ...
Until next time, take care, stay safe and happy modeling!
Warmest regards - Heinrich
After the first plank on starboard side had been laid down (a process which involved push pins, nails, clamps, rubber bands and everything that I could remotely make work), the hull looked like a male dog with its one hind leg in the air taking a leak – “warped” did not even begin to describe it.

That is what the hull looked like after the first starboard plank had been laid down. I gave it one look and thought - "oh boy, here we go again"!
With not much hope, I put down the first plank on port side plank and to my relief it pulled the hull back to some form of sanity and into alignment. And that was the name of the game. Until the next and equal plank on the port side was laid down, the hull was as warped as warped could be. The 8-hour, self-imposed waiting period between each plank (luckily it is extremely hot in Nantong at the moment and the glue dries very quickly) turned out to be a test of nerves – would the hull be pulled straight by the next port-side plank? With the planking completed, the hull was left to rest overnight. Lo and behold … the next morning it was as straight as an arrow.
However, I was not in the clear just yet. Now all the bulkheads and the Paulina wood-inserts had to be “removed” (the sophisticated word for broken-, cut-, filed-out and chiseled into oblivion) – all this while the hull planking remained intact.
I first removed all the extras from that notorious centre section (which was an easy job to do) and when that looked good, immediately planked the floor. The idea was that the seam between the floor boards and the hull planking would provide something extra to which the hull planks could be bound. With that successfully completed, I moved onto the stern area. Here I chiseled away all the extra supporting material to a level which would remain as high as possible, but would simultaneously be just low enough to allow for installation of the stern deck planking. All the deck planking comprises of individual pear wood strips - each which has to be filed and sanded to ensure a precise fit.
I do apologize profusely for not taking pictures during this part of the build – but truth be told – I just had my hands too full with the build.

This is where I am tonight. Even though the supporting section at the bow still needs to be removed and the deck planking done at the bow, I am satisfied that the entire hull structure is now sufficiently solid and even though there is still a lot of work ahead, I do have a successfully planked sampan to work on!
This was the crucial part of the build and even though I will probably still have my fair share of challenges, I feel like I have accomplished what I had set out to achieve. Sampan #2 is safe and sound inside the Nantong household. Outside it is pelting with rain - typical of Nantong summer weather - while the garbage bin remains empty ...
Until next time, take care, stay safe and happy modeling!
Warmest regards - Heinrich


