YQ Bluenose by Johan [COMPLETED BUILD]

The masts are looking very good, Johan. Your comments coupled to those of @GrantTyler Grant's made me think. My mentor in life was a South African racing driver, Willie Hepburn. He never had big sponsorships or money behind him and as such he had to make do what he had - and oh boy, did he do that brilliantly. One day, while we were both in a pensive mood, we looked at Sarel van der Merwe's latest racing steed being offloaded - all state-of-the-art with the latest goodies and then some. I saw him look rather bemusedly at the car and asked him whether he never had the desire to race something like that. His answer: "I would probably not know how to drive it." Now of course he could drive it, but he believed he could only race a car if he had built it himself and knew it like the back of his hand. I am afraid that even if I got given a lathe, I would probably also not know how to "race" it!

Well done to you for accepting the challenge and completing the learner's course so successfully.
Thanks for your kind words, Heinrich, they are appreciated.

During this build I experience a stubborness (which I admittedly already possessed, based on my ex-coworkers comments) to push myself beyond building a standard kit. Hence the lights, the custom build companionway, aft cabin, wheel house, etc.
From the beginning I was not happy with the spars, ropes and blocks as supplied with the kit, meaning I had to reduce the diameters of the spars, resulting in having to master the use of a lathe. For me it's beginning to be an experience of broadening my knowledge, experience and capabilities, a very entertaining journey; my inventiveness on new swear words is amazing, so is the filling ratio of my swear jars...

Yesterday I trimmed down the diameters of the fore and main masts; they were still a tad too large.
After just a little tweaking the masts lid down and the hand-filed notches at the bottom of the masts engaged with the mast feet in the keel without a glitch. Even the mast angles appear to be correct.
This is wonderful and is greatly satisfying, Johan!
 
Thanks for your kind words, Heinrich, they are appreciated.

During this build I experience a stubborness (which I admittedly already possessed, based on my ex-coworkers comments) to push myself beyond building a standard kit. Hence the lights, the custom build companionway, aft cabin, wheel house, etc.
From the beginning I was not happy with the spars, ropes and blocks as supplied with the kit, meaning I had to reduce the diameters of the spars, resulting in having to master the use of a lathe. For me it's beginning to be an experience of broadening my knowledge, experience and capabilities, a very entertaining journey; my inventiveness on new swear words is amazing, so is the filling ratio of my swear jars...

Yesterday I trimmed down the diameters of the fore and main masts; they were still a tad too large.
After just a little tweaking the masts lid down and the hand-filed notches at the bottom of the masts engaged with the mast feet in the keel without a glitch. Even the mast angles appear to be correct.
I actually used a hand drill. I put the mast in the drill with tape around it, where it was chucked, to protect the wood. Then I used sandpaper and moved along the length while rotating. Of course you have to use a finer grade sandpaper to prevent radial grooves and then sand along the length afterwards to ensure you remove any fine radial scratches. And finally, the sandpaper gets hot really fast! :p
So a mini lathe is indeed a valuable tool. ;)
The hand drill was my first, but not my preferred option. Luckily Peter lend me his Proxxon lathe.
 
All spars have been worked down to the required diameters, thus back to completing the decks and prepare for all the standing and running rigging.
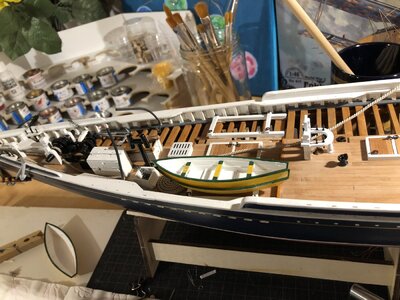
Normally I would opt to install anchors, dories and such as late as possible, but now I assume it's appropriate to install some of that equipment earlier rather than later, since accessibility will decrease once mast, gaffs, booms and rigging get installed.
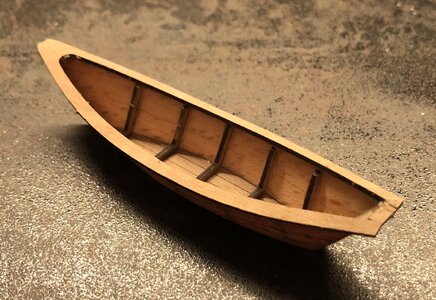
First was to assemble the two dories, which came with the kit.
I was able to put them togheter, but my efforts didn't pass quality inspection. The supplied materials are very thin and prone to breaking, plus my fingers and hands are just too large to be able to handle those fragile parts. I went as far as painting both dories, but in all honesty, I hate their appearance; I used too much adhesive, parts are not positioned properly and to make matters worse, I feel the dories are somewhat off scale. I don't have hard evidence, but it's the proportions which were bugging me.
Not being happy meant it was time looking for plan B: my old man's Bluenose in 1:72 had four dories, plastic, injection moulded. The length and width of those dories closely matches the YQ dories, but have a less pronounced sheer of the rail. The rail of the BB dories is also much more subtle.
So I ordered two sets of dories...

One of the two YQ-DORIES, unpainted:
55B0E5F6-1977-4FED-979F-2432E1F0825F.jpeg
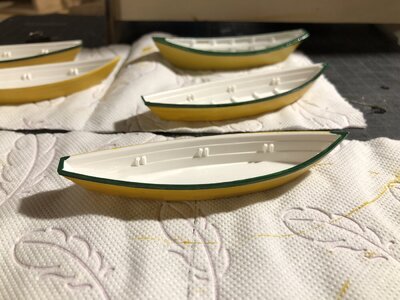
The BB dories being processed, one of the two YQ-dories in the background. I used it to test my paintscheme on.
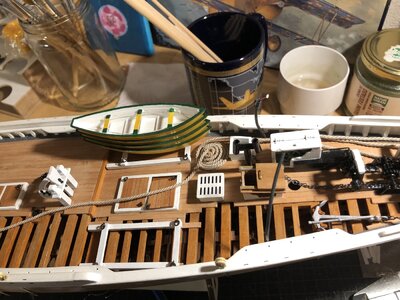
The dory in the middle saw minor customizations, since this one is designated to sit on top of the stack. It has some indications of frames and bow- and stern reinforcements:
9923FA39-9555-4C9E-A49A-09D3B339C076.jpeg
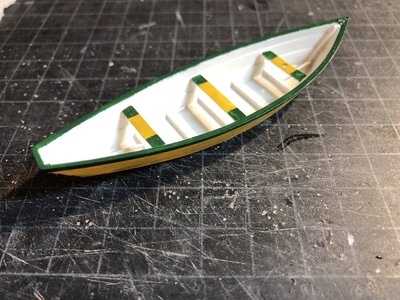
A close-up of the top dory, the added parts clearly visible:
513C5836-19E6-4375-B847-EEFC89E8C098.jpeg
Dry fit of two of the dories:
DDB26D48-4F42-4EBB-8F47-3B585570205A.jpeg
This photo, not mine, was the inspiration for the colors I used. I only went for a white inside of the dory:
BAD40EFD-AD7A-4083-97EF-F572DA5B9F8D.jpeg

Another subject I touched was anchors.
Not done yet but it's progressing.
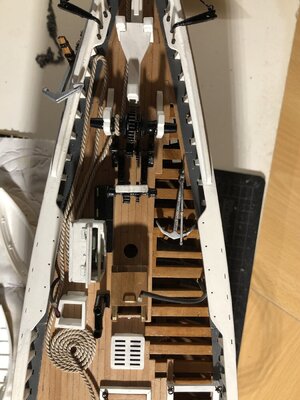
I used all three anchors supplied by YQ, I broke two out of three by applying just too much pressure. Luckily @Henk Liebre gave me a 3D printed anchor, meaning I still have two anchors to work with.
One anchor, on the starboard side, will be stored on deck, with a chain attached, which is stored in the chain box on the port side.
The second anchor is hanging on the bulwarks and has an anchor cable attached to it, which is stored on deck.
Installation is provisional and more work is required to iron out all details, but it gives an idea of how it will look once done.
The anchor cable of the anchor on the port side, running back and forth and coiled just aft of the chain box, the anchor on starboard side can be seen in its stowed position:
9F8B6B8A-65E2-4251-A32E-E70A096E4520.jpeg
A view of the port anchor, still hanging free, but with cable attached:
A6F20C16-DF2A-4927-8D7F-7C4C5323B607.jpeg
 
All spars have been worked down to the required diameters, thus back to completing the decks and prepare for all the standing and running rigging.
Normally I would opt to install anchors, dories and such as late as possible, but now I assume it's appropriate to install some of that equipment earlier rather than later, since accessibility will decrease once mast, gaffs, booms and rigging get installed.
First was to assemble the two dories, which came with the kit.
I was able to put them togheter, but my efforts didn't pass quality inspection. The supplied materials are very thin and prone to breaking, plus my fingers and hands are just too large to be able to handle those fragile parts. I went as far as painting both dories, but in all honesty, I hate their appearance; I used too much adhesive, parts are not positioned properly and to make matters worse, I feel the dories are somewhat off scale. I don't have hard evidence, but it's the proportions which were bugging me.
Not being happy meant it was time looking for plan B: my old man's Bluenose in 1:72 had four dories, plastic, injection moulded. The length and width of those dories closely matches the YQ dories, but have a less pronounced sheer of the rail. The rail of the BB dories is also much more subtle.
So I ordered two sets of dories...

One of the two YQ-DORIES, unpainted:
View attachment 353498
The BB dories being processed, one of the two YQ-dories in the background. I used it to test my paintscheme on.
The dory in the middle saw minor customizations, since this one is designated to sit on top of the stack. It has some indications of frames and bow- and stern reinforcements:
View attachment 353499
A close-up of the top dory, the added parts clearly visible:
View attachment 353500
Dry fit of two of the dories:
View attachment 353501
This photo, not mine, was the inspiration for the colors I used. I only went for a white inside of the dory:
View attachment 353502

Another subject I touched was anchors.
Not done yet but it's progressing.
I used all three anchors supplied by YQ, I broke two out of three by applying just too much pressure. Luckily @Henk Liebre gave me a 3D printed anchor, meaning I still have two anchors to work with.
One anchor, on the starboard side, will be stored on deck, with a chain attached, which is stored in the chain box on the port side.
The second anchor is hanging on the bulwarks and has an anchor cable attached to it, which is stored on deck.
Installation is provisional and more work is required to iron out all details, but it gives an idea of how it will look once done.
The anchor cable of the anchor on the port side, running back and forth and coiled just aft of the chain box, the anchor on starboard side can be seen in its stowed position:
View attachment 353504
A view of the port anchor, still hanging free, but with cable attached:
View attachment 353505
A lot of time consuming preparation for some fine parts, Johan. It is filling the front of your BN more and more. It’s going to look more and more a working vessel.
Regards, Peter
 
A lot of time consuming preparation for some fine parts, Johan. It is filling the front of your BN more and more. It’s going to look more and more a working vessel.
Regards, Peter
I think the dory turned out nice. To my eye the scale is spot on!
Thanks for your supportive feedback, @Peter Voogt and @dockattner , it's appreciated.
What struck me, again, was that there's a lot of trail and error involved. One would say: you have the drawings, the build instructions and the parts, no problem, build it, paint it, install it and you're done, no sweat. And still, I build the dories according to plan, granted, with some deviations from the plans, but still looking like the drawings suggest, but my build quality was way too low and the proportions were off, at least, to me. No matter how much effort I put in trying to overlook what I saw, there's no escaping; it ain't right if it doesn't look right. And then it has to go, as simple as that.
And, oh yes, with every addition the model becomes more and more appealing,aluve. In that respect the YQ-kit really gives you value for money.
 
All spars have been worked down to the required diameters, thus back to completing the decks and prepare for all the standing and running rigging.
Normally I would opt to install anchors, dories and such as late as possible, but now I assume it's appropriate to install some of that equipment earlier rather than later, since accessibility will decrease once mast, gaffs, booms and rigging get installed.
First was to assemble the two dories, which came with the kit.
I was able to put them togheter, but my efforts didn't pass quality inspection. The supplied materials are very thin and prone to breaking, plus my fingers and hands are just too large to be able to handle those fragile parts. I went as far as painting both dories, but in all honesty, I hate their appearance; I used too much adhesive, parts are not positioned properly and to make matters worse, I feel the dories are somewhat off scale. I don't have hard evidence, but it's the proportions which were bugging me.
Not being happy meant it was time looking for plan B: my old man's Bluenose in 1:72 had four dories, plastic, injection moulded. The length and width of those dories closely matches the YQ dories, but have a less pronounced sheer of the rail. The rail of the BB dories is also much more subtle.
So I ordered two sets of dories...

One of the two YQ-DORIES, unpainted:
View attachment 353498
The BB dories being processed, one of the two YQ-dories in the background. I used it to test my paintscheme on.
The dory in the middle saw minor customizations, since this one is designated to sit on top of the stack. It has some indications of frames and bow- and stern reinforcements:
View attachment 353499
A close-up of the top dory, the added parts clearly visible:
View attachment 353500
Dry fit of two of the dories:
View attachment 353501
This photo, not mine, was the inspiration for the colors I used. I only went for a white inside of the dory:
View attachment 353502

Another subject I touched was anchors.
Not done yet but it's progressing.
I used all three anchors supplied by YQ, I broke two out of three by applying just too much pressure. Luckily @Henk Liebre gave me a 3D printed anchor, meaning I still have two anchors to work with.
One anchor, on the starboard side, will be stored on deck, with a chain attached, which is stored in the chain box on the port side.
The second anchor is hanging on the bulwarks and has an anchor cable attached to it, which is stored on deck.
Installation is provisional and more work is required to iron out all details, but it gives an idea of how it will look once done.
The anchor cable of the anchor on the port side, running back and forth and coiled just aft of the chain box, the anchor on starboard side can be seen in its stowed position:
View attachment 353504
A view of the port anchor, still hanging free, but with cable attached:
View attachment 353505
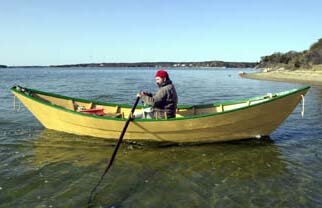
Hello Johan, Your YQ-Bluenose sure dose look great along with the great job you have did on your dory's. The off yellow color was used for greater visibility by the mother ship.
Regards Lawrence
 
A lot of time consuming preparation for some fine parts, Johan. It is filling the front of your BN more and more. It’s going to look more and more a working vessel.
Regards, Peter
I think the dory turned out nice. To my eye the scale is spot on!
Thanks for your supportive feedback, @Peter Voogt and @dockattner , it's appreciated.
What struck me, again, was that there's a lot of trail and error involved. One would say: you have the drawings, the build instructions and the parts, no problem, build it, paint it, install it and you're done, no sweat. And still, I build the dories according to plan, granted, with some deviations from the plans, but still looking like the drawings suggest, but my build quality was way too low and the proportions were off, at least, to me. No matter how much effort I put in trying to overlook what I saw, there's no escaping; it ain't right if it doesn't look right. And then it has to go, as simple as that.
And, oh yes, with every addition the model becomes more and more appealing,aluve. In that respect the YQ-kit really gives you value for money.
 
Hello Johan, Your YQ-Bluenose sure dose look great along with the great job you have did on your dory's. The off yellow color was used for greater visibility by the mother ship.
Regards Lawrence
Hey Lawrence, thanks for your compliments!
I read that the yellow color was indeed meant for better visibility at sea and that the green color enhanced visibility in foggy conditions.
Searching the internet for the appropriate colors of Grand Banks dories learned that almost any color goes; there wasn't an exact standard for painting dories.
Regards, Johan
Hello Johan, Yes you are correct in the off yellow for your dories. A few years ago when I was building one of my Great Grand Fathers fishing schooners that he commanded in the early 1900's the schooner Annie M Parker I tracked down the color from a Nova Scotia dory builder and was referred to a Newfoundland paint company. To make a story short they would not send paint by mail in the little bit that I needed for 10 or 12 dories but they did mail me a color chart that I took to the hardware store and they gave me a a 250 ml can for free. It is very much the same that you choose.
Regards Lawrence
PS I still have 4 of these dories that I built, unpainted but to large for my YQ-Bluenose as they ate at the 1:48 scale
 
All spars have been worked down to the required diameters, thus back to completing the decks and prepare for all the standing and running rigging.
Normally I would opt to install anchors, dories and such as late as possible, but now I assume it's appropriate to install some of that equipment earlier rather than later, since accessibility will decrease once mast, gaffs, booms and rigging get installed.
First was to assemble the two dories, which came with the kit.
I was able to put them togheter, but my efforts didn't pass quality inspection. The supplied materials are very thin and prone to breaking, plus my fingers and hands are just too large to be able to handle those fragile parts. I went as far as painting both dories, but in all honesty, I hate their appearance; I used too much adhesive, parts are not positioned properly and to make matters worse, I feel the dories are somewhat off scale. I don't have hard evidence, but it's the proportions which were bugging me.
Not being happy meant it was time looking for plan B: my old man's Bluenose in 1:72 had four dories, plastic, injection moulded. The length and width of those dories closely matches the YQ dories, but have a less pronounced sheer of the rail. The rail of the BB dories is also much more subtle.
So I ordered two sets of dories...

One of the two YQ-DORIES, unpainted:
View attachment 353498
The BB dories being processed, one of the two YQ-dories in the background. I used it to test my paintscheme on.
The dory in the middle saw minor customizations, since this one is designated to sit on top of the stack. It has some indications of frames and bow- and stern reinforcements:
View attachment 353499
A close-up of the top dory, the added parts clearly visible:
View attachment 353500
Dry fit of two of the dories:
View attachment 353501
This photo, not mine, was the inspiration for the colors I used. I only went for a white inside of the dory:
View attachment 353502

Another subject I touched was anchors.
Not done yet but it's progressing.
I used all three anchors supplied by YQ, I broke two out of three by applying just too much pressure. Luckily @Henk Liebre gave me a 3D printed anchor, meaning I still have two anchors to work with.
One anchor, on the starboard side, will be stored on deck, with a chain attached, which is stored in the chain box on the port side.
The second anchor is hanging on the bulwarks and has an anchor cable attached to it, which is stored on deck.
Installation is provisional and more work is required to iron out all details, but it gives an idea of how it will look once done.
The anchor cable of the anchor on the port side, running back and forth and coiled just aft of the chain box, the anchor on starboard side can be seen in its stowed position:
View attachment 353504
A view of the port anchor, still hanging free, but with cable attached:
View attachment 353505
Good morning Johan. ….and your dories have a yellow racing strip. :D . I like the colours and design you painted them. The one you showed on your BN really adds to the model- nice!
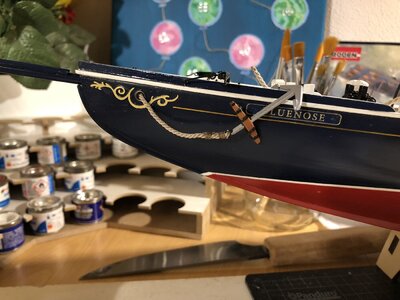
The BN nose bow is a busy place no doubt, (Btw your Anchor rope is so good) and you have built an outstanding representation of this. You can be proud of this. Cheers Grant
Thanks Grant!
That bow area must have been a death trap; too much equipment, too many moving and rotating gears, chains, cables, no room to move. Add heavy seas to the mix and this area is as deathly as they come, terrifying...
It definitely is a challenging, yet satisfying build and yes, too frequently I encounter the infamous re-do's, but slowly but surely she's becoming a real beauty.
 
Back
Top