- Joined
- Sep 3, 2021
- Messages
- 5,197
- Points
- 738

Thanks so much for your brutally honest opinion.it looks more like a chest of drawers for storing nautical charts rather than access doors ....
Do you by chance have a constructive observation to add?
 |
As a way to introduce our brass coins to the community, we will raffle off a free coin during the month of August. Follow link ABOVE for instructions for entering. |
 |
 |
The beloved Ships in Scale Magazine is back and charting a new course for 2026! Discover new skills, new techniques, and new inspirations in every issue. NOTE THAT OUR FIRST ISSUE WILL BE JAN/FEB 2026 |
 |

Thanks so much for your brutally honest opinion.it looks more like a chest of drawers for storing nautical charts rather than access doors ....
Good afternoon Johan.My two cents: The doors are good however to me they sort of detract from the style of the work around them. The white also makes them central focus. I think Peter is spot on with his advice and views. On my Victory as you know I did so many things “Grants way” and my litmus test - if it keeps bugging me, only then I change it. Cheers Grant, different aft cabin entry configuration. Now I need to let it soak and see if I like it sufficiently to let it stay...
View attachment 349287

Go for the sliding doors as per my previous suggestion.
P
Good afternoon Johan.My two cents: The doors are good however to me they sort of detract from the style of the work around them. The white also makes them central focus. I think Peter is spot on with his advice and views. On my Victory as you know I did so many things “Grants way” and my litmus test - if it keeps bugging me, only then I change it. Cheers Grant
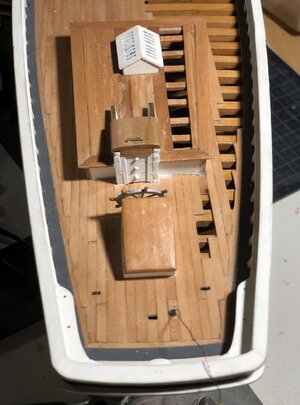
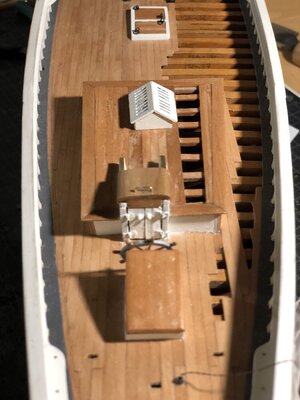
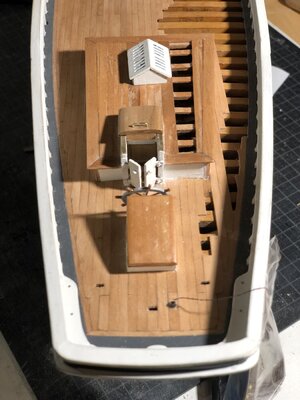

So do I!I like that last set-up with the cover slid back and the doors set ajar.
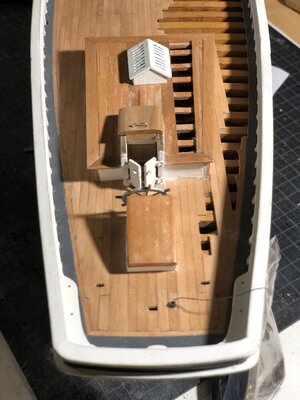
Persevere! Everything opens a bit so you can look into the stairwell. Well done, Johan.I promised myself to let the new aft cabin entry soak for a while, but whenever I took a look, I was dissatisfied with what I saw. Y'all know what that means, don't you? Redo time!
Luckily I didn't throw the two hinged doors plus hinges into the dustbin, meaning that after cleaning up, I was able to use these parts again.
After a rather tedious exercise; dry fitting, sanding, more dry fitting and more sanding I again bonded the hinged doors to the door coaming. But, instead of bonding the hinges separately from the door and afterward installing the doors, I now bonded the hinges with the doors, using the latter as a jig of sorts.
After allowing the adhesive ample time to dry, it was time to try the doors and lo' and behold, they work!
Again I'll allow myself some time to see if I'm really happy with the current results.
The picture below shows the configuration with the sliding planks, working, but not so much for looks.
View attachment 350252
The pictures below show the latest hinged doors installation, both closed and open.
I still have like a plan "Z" as a backup, but that's an absolutely last resort and I have no intention to go there.
View attachment 350251
View attachment 350250
View attachment 350253
Good morning Johan. Ahh...now we are talking. I like the doors and sliding doors open. Cheers GrantI promised myself to let the new aft cabin entry soak for a while, but whenever I took a look, I was dissatisfied with what I saw. Y'all know what that means, don't you? Redo time!
Luckily I didn't throw the two hinged doors plus hinges into the dustbin, meaning that after cleaning up, I was able to use these parts again.
After a rather tedious exercise; dry fitting, sanding, more dry fitting and more sanding I again bonded the hinged doors to the door coaming. But, instead of bonding the hinges separately from the door and afterward installing the doors, I now bonded the hinges with the doors, using the latter as a jig of sorts.
After allowing the adhesive ample time to dry, it was time to try the doors and lo' and behold, they work!
Again I'll allow myself some time to see if I'm really happy with the current results.
The picture below shows the configuration with the sliding planks, working, but not so much for looks.
View attachment 350252
The pictures below show the latest hinged doors installation, both closed and open.
I still have like a plan "Z" as a backup, but that's an absolutely last resort and I have no intention to go there.
View attachment 350251
View attachment 350250
View attachment 350253

I know I might have disappointed some people (@Heinrich?), but you're apparently not one of them!Good morning Johan. Ahh...now we are talking. I like the doors and sliding doors open. Cheers Grant

Thanks Peter, the hatch slid fwd and the doors ajar is indeed more convincing than everything closed.Persevere! Everything opens a bit so you can look into the stairwell. Well done, Johan.
Regards, Peter


I promised myself to let the new aft cabin entry soak for a while, but whenever I took a look, I was dissatisfied with what I saw. Y'all know what that means, don't you? Redo time!
Luckily I didn't throw the two hinged doors plus hinges into the dustbin, meaning that after cleaning up, I was able to use these parts again.
After a rather tedious exercise; dry fitting, sanding, more dry fitting and more sanding I again bonded the hinged doors to the door coaming. But, instead of bonding the hinges separately from the door and afterward installing the doors, I now bonded the hinges with the doors, using the latter as a jig of sorts.
After allowing the adhesive ample time to dry, it was time to try the doors and lo' and behold, they work!
Again I'll allow myself some time to see if I'm really happy with the current results.
The picture below shows the configuration with the sliding planks, working, but not so much for looks.
View attachment 350252
The pictures below show the latest hinged doors installation, both closed and open.
I still have like a plan "Z" as a backup, but that's an absolutely last resort and I have no intention to go there.
View attachment 350251
View attachment 350250
View attachment 350253


You are a fast learner, Johan.Slowly but surely I find myself transitioning from hull to masts, booms, gaffs and standing and running rigging. There are still some leftover jobs for deck equipment (dories, amongst others) and simultaneously I started preparing spars.
I will not rehash previous discussions on this topic, but I do use the information @Peter Voogt collected in a spreadsheet on the (deemed) correct spar diameters.
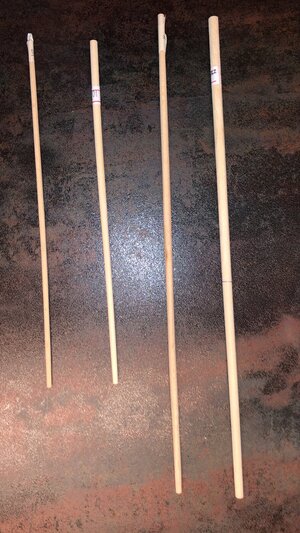
Also, Peter offered to lend me his Proxxon lathe and after a Voogt Special Workshop, preceded by two failed attempts to use the lathe, I was able to either rework the YQ gaffs and booms or make new ones.
Next the lower- and top masts.
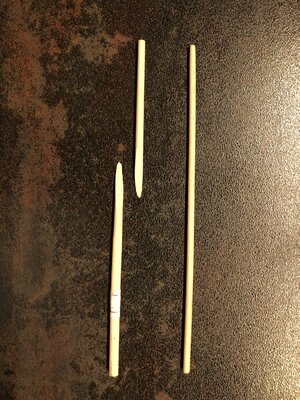
Oops: a) constricted and b) snapped...
The right part is a handmade replacement boom, prior to understanding how to use the lathe.
View attachment 352152
Main gaff and boom, both made from excess stock from a certain fellow modeler. I'm really pleased with the results; this is IMHO way more realistic:
View attachment 352153
Hello Johan, Sorry for your mist have on the lower main boom, but you did come out all the better and even with a much nicer looking wood.Slowly but surely I find myself transitioning from hull to masts, booms, gaffs and standing and running rigging. There are still some leftover jobs for deck equipment (dories, amongst others) and simultaneously I started preparing spars.
I will not rehash previous discussions on this topic, but I do use the information @Peter Voogt collected in a spreadsheet on the (deemed) correct spar diameters.
Also, Peter offered to lend me his Proxxon lathe and after a Voogt Special Workshop, preceded by two failed attempts to use the lathe, I was able to either rework the YQ gaffs and booms or make new ones.
Next the lower- and top masts.
Oops: a) constricted and b) snapped...
The right part is a handmade replacement boom, prior to understanding how to use the lathe.
View attachment 352152
Main gaff and boom, both made from excess stock from a certain fellow modeler. I'm really pleased with the results; this is IMHO way more realistic:
View attachment 352153
Good morning Johan. The final product is looking spot on. The use of a mini lathe. When Justin got me one for Xmas I thought I can now make things like Peter…I found out there is plenty skill and patience require to use a lathe and I’m still not getting my test work very good.Slowly but surely I find myself transitioning from hull to masts, booms, gaffs and standing and running rigging. There are still some leftover jobs for deck equipment (dories, amongst others) and simultaneously I started preparing spars.
I will not rehash previous discussions on this topic, but I do use the information @Peter Voogt collected in a spreadsheet on the (deemed) correct spar diameters.
Also, Peter offered to lend me his Proxxon lathe and after a Voogt Special Workshop, preceded by two failed attempts to use the lathe, I was able to either rework the YQ gaffs and booms or make new ones.
Next the lower- and top masts.
Oops: a) constricted and b) snapped...
The right part is a handmade replacement boom, prior to understanding how to use the lathe.
View attachment 352152
Main gaff and boom, both made from excess stock from a certain fellow modeler. I'm really pleased with the results; this is IMHO way more realistic:
View attachment 352153


You are a fast learner, Johan.But technology is no stranger to you.
Regards, Peter
Great results Johan. I also have no idea how to use a lathe - if I ever do get one, I will come and take classes. Your masts and spars look excellent!
Hello Johan, Sorry for your mist have on the lower main boom, but you did come out all the better and even with a much nicer looking wood.
Regards Lawrence
As I said, I received an individual workshop on how to use a wood lathe to make custom spars, plus, while I attended school I did some metal work; turning, machining, welding, etc, so I'm not a total newbie on using machinery.Good morning Johan. The final product is looking spot on. The use of a mini lathe. When Justin got me one for Xmas I thought I can now make things like Peter…I found out there is plenty skill and patience require to use a lathe and I’m still not getting my test work very good.

