YQ Bluenose by Johan [COMPLETED BUILD]

Very neat and tidy Johan, well done. Now you've reached the highest point in your build I hope the rest is all downhill, as in easy cruising and plain sailing :)
Not sure it's all smooth sailing from here on; sails to be made, plus an awful lot of standing and running rigging to be done. Not out of the woods yet...
Thanks for your compliments though.
 
Congratulations on installing the masts Johan! When that happens, it is indicative that you have come an awful long way in this build as your earlier photo shows. I look forward to see what you do with the rest of the rigging.
 
Congratulations on installing the masts Johan! When that happens, it is indicative that you have come an awful long way in this build as your earlier photo shows. I look forward to see what you do with the rest of the rigging.
Thanks Heinrich.
I highly appreciate you took some precious time to respond to my efforts.
 
Hi Johan. I love the specials you did with your BN. Great log and great ship. With Peter V. as a guide is a gift from above. :cool:
Thanks Peter, this build has become quite the journey and an enjoyable one to boot.
Having the PV build as a leading example is both a blessing and a curse; a blessing, because there are so many details worth considering for one's build; a curse, because most of the time I just lack the capabilities to build to the level of detail and accuracy PV does.
 
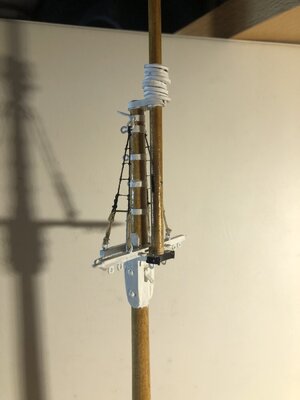
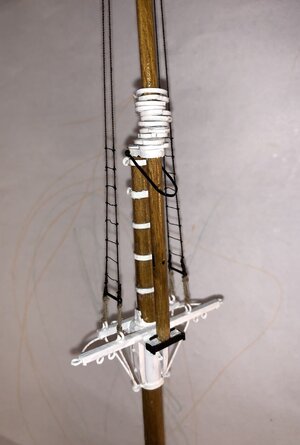
Another small step; the main topmast shrouds are in place, complete with the dreaded ratlines.
Using the very thin serafil thread (0,015mm?) for ratlines poses a challenge; one doesn't feel the thread anymore when holding it and tweezers have to be handled with care, otherwise the serafil slips away.
The effect of using a more appropriate rope thickness is incredible; it really changes one's perspective of the scale of the model.

Some tidying up is still necessary, but I am quite pleased with the results so far.

6E91E60F-7B81-4A49-B86F-F8F2EE5B78AE.jpeg
 
Another small step; the main topmast shrouds are in place, complete with the dreaded ratlines.
Using the very thin serafil thread (0,015mm?) for ratlines poses a challenge; one doesn't feel the thread anymore when holding it and tweezers have to be handled with care, otherwise the serafil slips away.
The effect of using a more appropriate rope thickness is incredible; it really changes one's perspective of the scale of the model.

Some tidying up is still necessary, but I am quite pleased with the results so far.

View attachment 371019
Your main mast is coming alive, Johan. Nice work!
Regards, Peter
 
Looks good and beautiful to
watch As Friday live, and exchange some experiences
Regards
Henk
Your main mast is coming alive, Johan. Nice work!
Regards, Peter
Slowly, a masterpiece emerges...
Dear friends, thanks for your words of encouragement, it's highly appreciated.
My current plan is to first complete the masts, booms and gaffs as much as possible.
Simultaneously I also want to add a couple of stays and shrouds in order to have the masts properly aligned and secured. I'll refrain from installing all shrouds yet, because I want to have some access to the masts for sail attachment. Whether or not this is a sound plan remains to be seen.
Once I have complete the spars, I will put them in the approximately correct position, upon which I'll dry fit some dummy (paper) sails, to check my drawing. But that's in the distant future.
But for now I enjoy the feeling of being pleased with how the masts emerged from all the individual bits and pieces.
 
Another small step; the main topmast shrouds are in place, complete with the dreaded ratlines.
Using the very thin serafil thread (0,015mm?) for ratlines poses a challenge; one doesn't feel the thread anymore when holding it and tweezers have to be handled with care, otherwise the serafil slips away.
The effect of using a more appropriate rope thickness is incredible; it really changes one's perspective of the scale of the model.

Some tidying up is still necessary, but I am quite pleased with the results so far.

View attachment 371019
Hello Johan, Your cross trees sure do look great, Well Done. I am taking your advice as to drawing up my sails just yet as as in looking things over just a bit more I discovered just too many variables to get a proper fit. Yester day I spent the day building pear wood shavings mast hoops, still need a light sanding and a coating of Tung Oil. Today I will start building the mane mast cross tree, looks like a job in it's self.
Regards Lawrence
 
Good morning Johan. I think you can view your entire BN with that same pleased feeling. Cheers Grant
Actually, you making me think of it, I do enjoy looking at my BN, reflecting on the anxiety I felt before starting this endeavor. And now I am looking at something I didn't think I could accomplish...
 
Hello Johan, Your cross trees sure do look great, Well Done. I am taking your advice as to drawing up my sails just yet as as in looking things over just a bit more I discovered just too many variables to get a proper fit. Yester day I spent the day building pear wood shavings mast hoops, still need a light sanding and a coating of Tung Oil. Today I will start building the mane mast cross tree, looks like a job in it's self.
Regards Lawrence
Thank you so much Lawrence, the cross trees are indeed little projects of their own, but once completed, it gives you something else to look at.
Like you, I find you can't rely on the drawings; you'll have to take quite a few dimensions from the actual model. It also leads to a rather slow build process...
 
I am now entering the stage where I need to start stopping the blocks. Having seen quite a few examples of modelers producing believable stropped blocks, I wanted to give it a try as well.

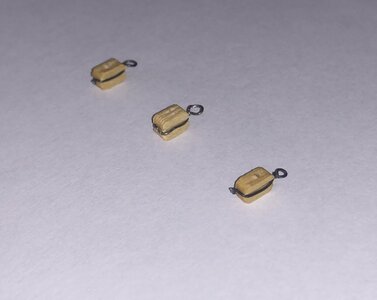
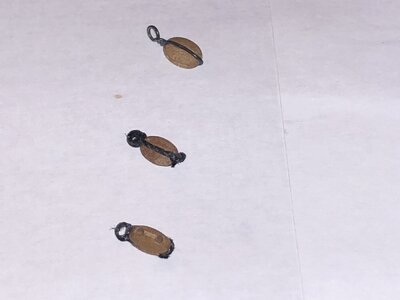
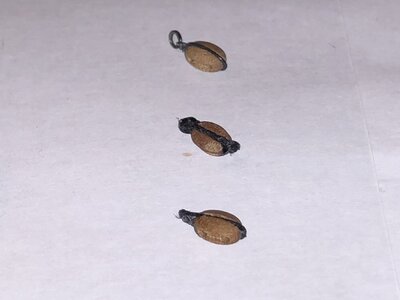
Below three tests with some old blocks I still had lying around. Not easy to get a satisfactory result.
EE6DD44C-E3DC-4B33-98F6-D17AE0536B11.jpeg

The main gaff requires the installation of a few stropped block, so I decided to start manufacturing the blocks for the main gaff. The results were discouraging.
The two pictures below are from the same three blocks, the lower block being slightly different, I repositioned mentioned block to clearly show it's looks.

The top block shows the iron wire strop. This material requires an awfull lot of patience and manipulating the block and strop simultaneously is a real pain.
The mid block is stropped with 0,6mm rope; way too thick and clumsy looking.
The lower strop is made from 0,3mm rope; more convincing, compact, but also more "fuzzy" than the iron wire.
The rope strops are rather easy to fabricate and a drop of CA helps tremendously to maintain the shape of the strop. I'm afraid I'll need a couple of days to decide upon my next step w.r.t the stropping...

6E68F4FF-49B8-4F4D-BA47-62B827CBAB67.jpegD84B06F1-B17F-4B6B-B548-18FA8D9210BE.jpeg
 
Back
Top