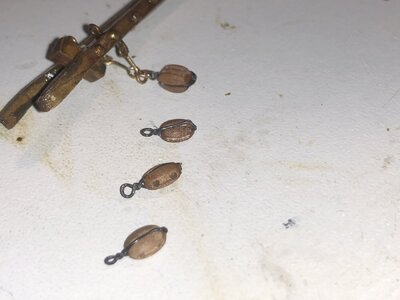
Hi Johan, naturally the hardest block to make is the best looking one (to me) with the wire strop.
-

Win a Free Custom Engraved Brass Coin!!!
As a way to introduce our brass coins to the community, we will raffle off a free coin during the month of August. Follow link ABOVE for instructions for entering.
-

PRE-ORDER SHIPS IN SCALE TODAY!
The beloved Ships in Scale Magazine is back and charting a new course for 2026!
Discover new skills, new techniques, and new inspirations in every issue.
NOTE THAT OUR FIRST ISSUE WILL BE JAN/FEB 2026
- Home
- Forums
- Ships of Scale Group Builds and Projects
- Bluenose PoF Group Build
- Bluenose Group Build Logs
You are using an out of date browser. It may not display this or other websites correctly.
You should upgrade or use an alternative browser.
You should upgrade or use an alternative browser.
- Joined
- Sep 3, 2021
- Messages
- 5,197
- Points
- 738

I should have known...Hi Johan, naturally the hardest block to make is the best looking one (to me) with the wire strop.
Those block’s are so tiny, those fingers are so big, the wire is so unwilling, the tools are mostly so of position ……. It’s hard to manage all to a satisfying result. But you will succeed, Johan. You will!I am now entering the stage where I need to start stopping the blocks. Having seen quite a few examples of modelers producing believable stropped blocks, I wanted to give it a try as well.
Below three tests with some old blocks I still had lying around. Not easy to get a satisfactory result.
View attachment 372674
The main gaff requires the installation of a few stropped block, so I decided to start manufacturing the blocks for the main gaff. The results were discouraging.
The two pictures below are from the same three blocks, the lower block being slightly different, I repositioned mentioned block to clearly show it's looks.
The top block shows the iron wire strop. This material requires an awfull lot of patience and manipulating the block and strop simultaneously is a real pain.
The mid block is stropped with 0,6mm rope; way too thick and clumsy looking.
The lower strop is made from 0,3mm rope; more convincing, compact, but also more "fuzzy" than the iron wire.
The rope strops are rather easy to fabricate and a drop of CA helps tremendously to maintain the shape of the strop. I'm afraid I'll need a couple of days to decide upon my next step w.r.t the stropping...
View attachment 372671View attachment 372672
Regards, Peter
Have you annealed (softened) the wire? That should make it easier to work with...
- Joined
- Sep 3, 2021
- Messages
- 5,197
- Points
- 738

I'm not sure. In itself the wire is rather easily to form, but forming it around a 3mm block, or 5mm for that matter, is a nightmare. As Peter (@Peter Voogt ) mentioned; too big fingers, too small blocks, tools hard to keep in position... I also tried copper, slightly larger in diameter and stiffer, thus harder to form around those blocks.Have you annealed (softened) the wire? That should make it easier to work with...
It will be a very shallow learning curve. Will report back early next year or so.
Good morning Johan. Have you checked out HisModels? He has pre-made strops for blocks in black or brass. They really look good. If it didn’t take a year to get to me I would buy some? Cheers GrantA bit earlier than next year...
Ran a small batch of 5mm blocks. As yet I can't convince myself of the esthetics; functional, yes, but esthetically so wrong:
View attachment 372870
Still considering using rope instead... To be continued.
- Joined
- Sep 3, 2021
- Messages
- 5,197
- Points
- 738

Thanks for the tip, I'll check it out.Good morning Johan. Have you checked out HisModels? He has pre-made strops for blocks in black or brass. They really look good. If it didn’t take a year to get to me I would buy some? Cheers Grant
Last edited:
- Joined
- Sep 3, 2021
- Messages
- 5,197
- Points
- 738

Ordered a few pre-made strops for trials. If successful, the rest of the blocks will follow suit.Good morning Johan. Have you checked out HisModels? He has pre-made strops for blocks in black or brass. They really look good. If it didn’t take a year to get to me I would buy some? Cheers Grant
Delivey time is about four working days, so that's not too bad.
I guess anything getting shipped to SA goes by canoe, hence the year lead time...

Transport to the Netherlands: they chuck it into the Danube and fish the package out of the Rhine, once near.
Good afternoon Johan. That is such a wonderful description of the truth. . Let me know how they go because if good I may just order a whole pile and wait….and wait . Cheers GrantOrdered a few pre-made strops for trials. If successful, the rest of the blocks will follow suit.
Delivey time is about four working days, so that's not too bad.
I guess anything getting shipped to SA goes by canoe, hence the year lead time...
Transport to the Netherlands: they chuck it into the Danube and fish the package out of the Rhine, once near.
- Joined
- Sep 3, 2021
- Messages
- 5,197
- Points
- 738

I will most definitely share my experiences with these strops.Good afternoon Johan. That is such a wonderful description of the truth. . Let me know how they go because if good I may just order a whole pile and wait….and wait . Cheers Grant
- Joined
- Sep 3, 2021
- Messages
- 5,197
- Points
- 738

While waiting for the first (experimental) set of strops from His Models (the shipment is underway, delivery pending the Danube flow towards the Rhine), I had some time considering the build sequence. Initially, as I mentioned a few posts back, I wanted to do some of the running rigging and sail installation, before installing the shrouds and stays. Evaluating this sequence, I had to adjust my ideas for the following reason: installing the stays and shrouds first gives a rigged and steady base to start the running riggin and the sail-install. Postponing the standing rigging to a later stage of the build may very well cause the masts to be misaligned. A second reason is the accessibility of the shrouds at the tresseltrees. The more running rigging is installed, the more the accessibility to the shrouds is obscured. My fingers being the size they are, that's not something I'm looking forward to.
So I found myself starting the installation of stays and shrouds. Right now I have three stays in place; two stays between fore- and main mast and one stay from the bowsprit to the top of the lower fore mast. In order to be able to install the stays between the fore- and main masts had to install the top mast shrouds, at least at the top of both top masts. (Still following?) According to the Model Shipways drawings, the stays between the masts are positioned on top of the top mast shrouds.
For the top mast shrouds I used the "swifter" method, as described and used by @Peter Voogt .
Stay from bowsprit to top lower fore mast:
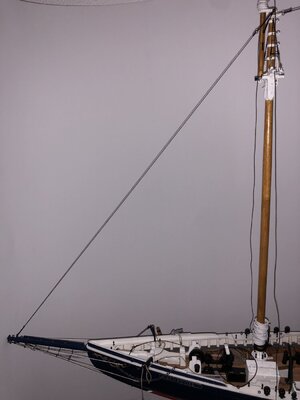
Two of the three (top) mast stays in place:
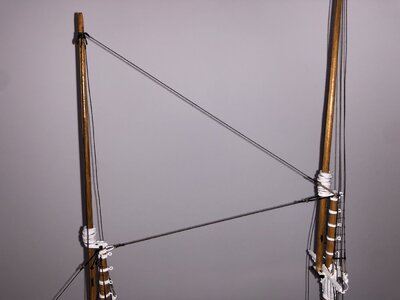
Detail of the main top mast, with the topmast shrouds in place; the shroud, running from the top of the npmast to the railing is not yet tensioner. The swifter configuration is hardly discernable, too bad it was quite a tedious job:
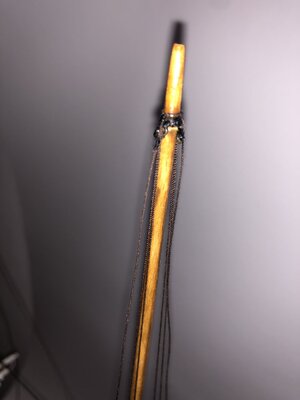
So I found myself starting the installation of stays and shrouds. Right now I have three stays in place; two stays between fore- and main mast and one stay from the bowsprit to the top of the lower fore mast. In order to be able to install the stays between the fore- and main masts had to install the top mast shrouds, at least at the top of both top masts. (Still following?) According to the Model Shipways drawings, the stays between the masts are positioned on top of the top mast shrouds.
For the top mast shrouds I used the "swifter" method, as described and used by @Peter Voogt .
Stay from bowsprit to top lower fore mast:

Two of the three (top) mast stays in place:

Detail of the main top mast, with the topmast shrouds in place; the shroud, running from the top of the npmast to the railing is not yet tensioner. The swifter configuration is hardly discernable, too bad it was quite a tedious job:

Last edited:
The delicate rigging has started! Nice job, Johan. Good to see you have chosen a sequence that fits to you. Every one has it’s pros and cons.While waiting for the first (experimental) set of strops from His Models (the shipment is underway, delivery pending the Danube flow towards the Rhine), I had some time considering the build sequence. Initially, as I mentioned a few posts back, I wanted to do some of the running rigging and sail installation, before installing the shrouds and stays. Evaluating this sequence, I had to adjust my ideas for the following reason: installing the stays and shrouds first gives a rigged and steady base to start the running riggin and the sail-install. Postponing the standing rigging to a later stage of the build may very well cause the masts to be misaligned. A second reason is the accessibility of the shrouds at the tresseltrees. The more running rigging is installed, the more the accessibility to the shrouds is obscured. My fingers being the size they are, that's not something I'm looking forward to.
So I found myself starting the installation of stays and shrouds. Right now I have three stays in place; two stays between fore- and main mast and one stay from the bowsprit to the top of the lower fore mast. In order to be able to install the stays between the fore- and main masts had to install the top mast shrouds, at least at the top of both top masts. (Still following?) According to the Model Shipways drawings, the stays between the masts are positioned on top of the top mast shrouds.
For the top mast shrouds I used the "swifter" method, as described and used by @Peter Voogt .
Stay from bowsprit to top lower fore mast:
View attachment 373593
Two of the three (top) mast stays in place:
View attachment 373594
Detail of the main top mast, with the topmast shrouds in place; the shroud, running from the top of the npmast to the railing is not yet tensioner. The swifter configuration is hardly discernable, too bad it was quite a tedious job:
View attachment 373595
Regards, Peter
- Joined
- Sep 3, 2021
- Messages
- 5,197
- Points
- 738

That's a true statement!Good to see you have chosen a sequence that fits to you. Every one has it’s pros and cons.
In this case I opted for a stable and robust mast setup and alignment. The rest will have to follow suit.
- Joined
- Oct 28, 2018
- Messages
- 760
- Points
- 403

Certainly nice work Johan

I don't understand that yet, but we'll save it for laterEvery one has it’s pros and cons
- Joined
- Sep 3, 2021
- Messages
- 5,197
- Points
- 738

For sure it's a work of love, otherwise one wouldn't last a day with this build (and many, many others like this...)Certainly nice work Johan
I don't understand that yet, but we'll save it for later
I'll try and explain: first I thought to apply the running rigging and most of the sails before installing the stays and the shrouds. That way the shrouds and stays are not in your way when installing the running rigging and (optionally) the sails. It's what I encountered with the rebuild of my other Bluenose.
But... Not installing the shrouds and stays means that the masts are solely depending on the holes in the decks and the mastfeet in the keel for proper and robust alignment and positioning (angles, relative to the decks...) of the masts. Minute deviations of these alignment features result in larger deviations higher up the masts. The only features you have, controlling just that, are the stays and the shrouds. So my idea not first installing the shrouds, etc, has the disadvantage of poor mast alignment and masts still being able to move about a little, especially when one tightens the running rigging left and right.
Summarizing, postponing shrouds- and stays installation gives better acces for sails and running rigging (pro), but does not provide a stable and robust mast orientation (con).
On the other hand, starting with the shrouds- and stays installation gives a positive and robust mast orientation (pro), but limits accessibility during sail- and running rigging installation (con).
I went with prioritozing a properly trimmed mast installation, accepting the limited access later on.
When we meet face-to-face again, we'll discuss this in more detail.
I agree with standing rigging first, shrouds and stays. In addition, you need the stays for your jib sails. 
Good morning Johan. Looking very good. ….and now the fun starts…While waiting for the first (experimental) set of strops from His Models (the shipment is underway, delivery pending the Danube flow towards the Rhine), I had some time considering the build sequence. Initially, as I mentioned a few posts back, I wanted to do some of the running rigging and sail installation, before installing the shrouds and stays. Evaluating this sequence, I had to adjust my ideas for the following reason: installing the stays and shrouds first gives a rigged and steady base to start the running riggin and the sail-install. Postponing the standing rigging to a later stage of the build may very well cause the masts to be misaligned. A second reason is the accessibility of the shrouds at the tresseltrees. The more running rigging is installed, the more the accessibility to the shrouds is obscured. My fingers being the size they are, that's not something I'm looking forward to.
So I found myself starting the installation of stays and shrouds. Right now I have three stays in place; two stays between fore- and main mast and one stay from the bowsprit to the top of the lower fore mast. In order to be able to install the stays between the fore- and main masts had to install the top mast shrouds, at least at the top of both top masts. (Still following?) According to the Model Shipways drawings, the stays between the masts are positioned on top of the top mast shrouds.
For the top mast shrouds I used the "swifter" method, as described and used by @Peter Voogt .
Stay from bowsprit to top lower fore mast:
View attachment 373593
Two of the three (top) mast stays in place:
View attachment 373594
Detail of the main top mast, with the topmast shrouds in place; the shroud, running from the top of the npmast to the railing is not yet tensioner. The swifter configuration is hardly discernable, too bad it was quite a tedious job:
View attachment 373595
- Joined
- Sep 3, 2021
- Messages
- 5,197
- Points
- 738

Agreed, although installation of the three jib's are not the biggest issue in this case. Routing the hallyards and sheeves of the jibs and belaying them is another issue.In addition, you need the stays for your jib sails.
- Joined
- Sep 3, 2021
- Messages
- 5,197
- Points
- 738

Today I was able to complete the installation of the three jib stays.
Sounds easy enough, but in order to be able to install the jumbo jib stay, I had to first install the fore mast shrouds, since the jumbo jib stay bridle sits on top of the shrouds.
Detail of the jumbo jib stay with the bridle installation. The bridle runs around the lower foremast and the top foremast and is joined bij a shackle in front of the foremast. In this case a simple ring was used. The jumbo jib stay is then attached to the bridle:
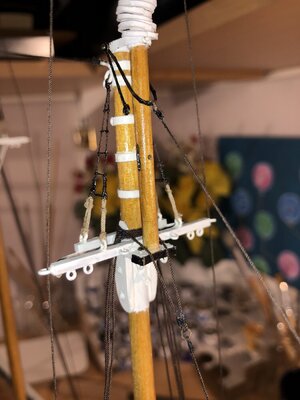
Detail of the lower jumbo jib stay attachment:
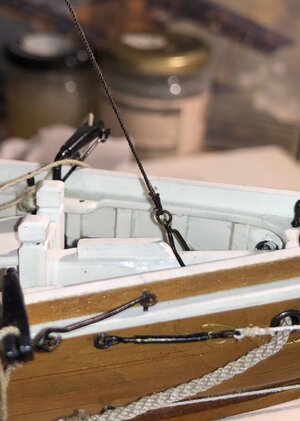
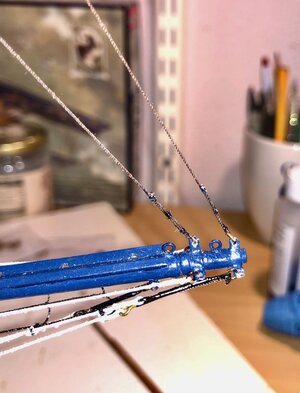
Detail of the jib- and outer jib stay attachment to the bowsprit. Clean-up and touch-up still required, but that's for later. The very dark blue became a lot lighter, due to using a flashlight;
Sounds easy enough, but in order to be able to install the jumbo jib stay, I had to first install the fore mast shrouds, since the jumbo jib stay bridle sits on top of the shrouds.
Detail of the jumbo jib stay with the bridle installation. The bridle runs around the lower foremast and the top foremast and is joined bij a shackle in front of the foremast. In this case a simple ring was used. The jumbo jib stay is then attached to the bridle:

Detail of the lower jumbo jib stay attachment:

Detail of the jib- and outer jib stay attachment to the bowsprit. Clean-up and touch-up still required, but that's for later. The very dark blue became a lot lighter, due to using a flashlight;


