YQ Bluenose by Johan [COMPLETED BUILD]

That looks great Johan!
I was quite apprehensive about the sails; I had to assume gaff- and boom lengths and positions, based on the MS drawings and the research Peter did, plus I had to work with the YQ hardware. Still, I think I redid the drawings of the sails about four times...
The sail is looking very nice, Johan. Very promising for the others.
Regards, Peter
Well, if this sail is an omen, it'll be smooth sailing (pun intended) from here on. But good old Murphy is always lurking in the corner, ready to strike when you least expect it.
The foresail looks great Johan. I remember thinking (when I built my Sharpie Schooner a few years ago) how interesting it was to actually use the sheet lines to hold the sail in place while fastening the hoops to it.
The sails on the other Bluenose I have were set differently, I started the same by attaching the fore- and main sails to the gaffs and booms, then attaching the luffs to the mast hoops. It simply didn't work out that way, having the sail properly set gives me a better indication of where to attach the luff to the hoops.
 
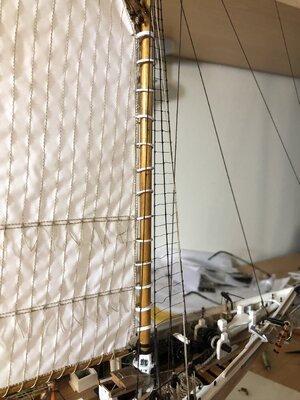
Today saw the first sail being set; the fore sail was carefully put in place.
First I attached the boom and gaff to the sail. Pretty straight forward but boy, either my fingers are way too big or the scale is too freaking small. (Don't think I mentioned this before?)
First plan of attack was to attach the sail assembly to the mast hoops. After the first three hoops I came to the conclusion that this was not a very good idea. Although temporarily attaching boom and gaff to the mast, it was all way too flimsy. So change of plans: first installed the sheet of the throat of the gaff, followed by the sheet for the aft end of the gaff. Then the clew sheet was attached, followed by the tack to the mast.
The remainder of the mast hoops still have to be done, apart from being patient, the work is not difficult, just needs doing.
And this is how she looks after a few hours messing around, oh and by the way, all sheets still have to be belayed.
View attachment 388723
Good morning Johan. Very well done indeed. The detail is impressive however it is the overall look and feel and how it works so well with the rest of the ship which grabs me. Nice one! Cheers Grant
 
Good morning Johan. Very well done indeed. The detail is impressive however it is the overall look and feel and how it works so well with the rest of the ship which grabs me. Nice one! Cheers Grant
Thanks, Grant
Now, with the first sail set, it's all starting to come together and starts her true beauty to shine through. I wrote it before, no offense intended to anyone with another opinion, the Bluenose really starts appearing once her sails are added; the true power behind her.
 
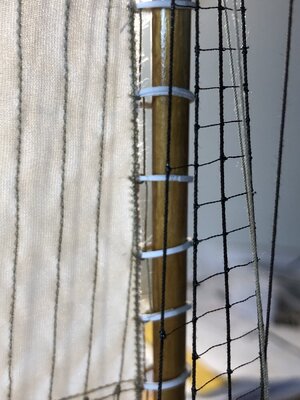
The fore sail was connected to the mast trough the earlier made and installed masthoops. I added a double hoop at the top, not conforming to history, but given the high stresses at the top, the extra hoop is justified and if not; AL-FI time!

An overview of the luff-to-mast installation:
IMG_0551.jpeg

A detail of the luff/masthoops attachment:
IMG_0550.jpeg

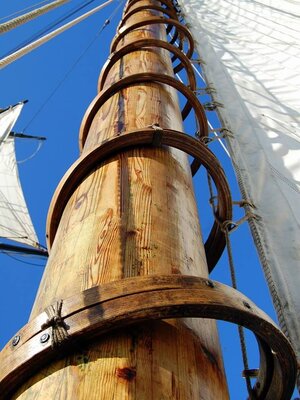
As inspiration for the sail attachment I used this picture as a guide, not the Bluenose, but to me a plausible configuration. I could not replicate this, but in appearance it is quite similar:
IMG_0008.jpeg
 
Very nice Johan. Hoop attachment in the previous picture is very helpful.
Hey Dan,
As far as the hoops go, there is very little detailed information. I checked with Jenson's; preciously little details. The picture was the only very clear reference I found.

PS A small rewrite of my earlier response; my brains suffered from a bad connection between reading- and processing functions...
 
Last edited:
The fore sail was connected to the mast trough the earlier made and installed masthoops. I added a double hoop at the top, not conforming to history, but given the high stresses at the top, the extra hoop is justified and if not; AL-FI time!

An overview of the luff-to-mast installation:
View attachment 388914

A detail of the luff/masthoops attachment:
View attachment 388915

As inspiration for the sail attachment I used this picture as a guide, not the Bluenose, but to me a plausible configuration. I could not replicate this, but in appearance it is quite similar:
View attachment 388916
The sail is nicely attached to the sail, Johan.
Ps: everything to scale 1:72 …… AL-FI is alright.
Regards, Peter
 
The sail is nicely attached to the sail, Johan.
Ps: everything to scale 1:72 …… AL-FI is alright.
Regards, Peter
Quite regularly I consult your build log, but it appears you are much more proficient in dealing with this scale than I am. On the positive side; the ratlines taught me to ty knots with tweezers only and at the current stage of the build it's one of my most frequently used tools.
 
On the positive side; the ratlines taught me to ty knots with tweezers only
Yes sir, if I could not use tweezers, I would have to give up this hobby. If you have a pair in each hand and get into a groove it can be poetry in motion. I own more sets of tweezers differing lengths different tips than I care to admit.
 
The sail is nicely attached to the sail, Johan.
Ps: everything to scale 1:72 …… AL-FI is alright.
Regards, Peter
Quite regularly I consult your build log, but it appears you are much more proficient in dealing with this scale than I am. On the positive side; the ratlines taught me to ty knots with tweezers only and at the current stage of the build it's one of my most frequently used tools.
 
The fore sail was connected to the mast trough the earlier made and installed masthoops. I added a double hoop at the top, not conforming to history, but given the high stresses at the top, the extra hoop is justified and if not; AL-FI time!

An overview of the luff-to-mast installation:
View attachment 388914

A detail of the luff/masthoops attachment:
View attachment 388915

As inspiration for the sail attachment I used this picture as a guide, not the Bluenose, but to me a plausible configuration. I could not replicate this, but in appearance it is quite similar:
View attachment 388916
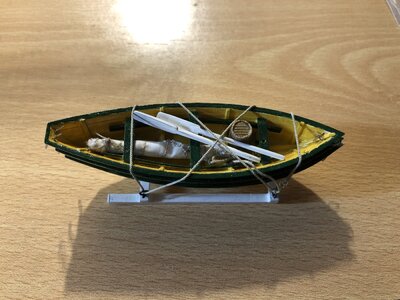
Now we are talking!! You are owning this Johan. I love all the little details in the dory as well. Cheers Grant
 
Wow Johan. Your first sail looks wonderful. What it does is to add real depth to the hull and create a far better impression of the scale you are working at. And mentioning scale - the level of detail that you and other bluenose builders are managing to squeeze in at this scale is simply astounding. This is far beyond the call of YuanQing had ever conceived for this model.
 
Now we are talking!! You are owning this Johan. I love all the little details in the dory as well. Cheers Grant
It's fun to add small, seamingly insignificant details. It also takes away the monotony of adding reef lines to the main sail...
Wow Johan. Your first sail looks wonderful. What it does is to add real depth to the hull and create a far better impression of the scale you are working at. And mentioning scale - the level of detail that you and other bluenose builders are managing to squeeze in at this scale is simply astounding. This is far beyond the call of YuanQing had ever conceived for this model.
The initial reason I started on YuanQing's kit was and still is the beauty of the POF build method. Although I do have a few misgivings about the kit, it's a fun to build kit, with a big plus being the possibility to customize one's build.
That's what I have to give SOS (amongst others) credit for: one can find numerous examples of beautiful customizations, with which you can feed your own imagination.
The scale is indeed a factor of importance; personally I am up to my limits, most of the time. I am baffled by those being able to build guns in 1:100 in great detail.
Although I have departed quite severely from the kit and it's drawings and instructions, I applaud YuanQing for developing this kit; I would buy it again in a heartbeat (and no, I don't have YQ-shares).
Most importantly though is the help I received on numerous occasions from fellow builders, when I was close to throwing the towel, either by, sometimes brutally, honest comments, but also with freely given advice and hardware. Without them I wouldn't have progressed this far.
 
Back
Top