YQ Bluenose by Johan [COMPLETED BUILD]

I'm glad I got on the bike last month to (almost unannounced ;)) drop by. Listening to your organ lessons (you not capable to read my app ;)), catching up with Ellen during that lesson without you there ;), a little later chatting about it was good that you did not know I was there :), talking about a lot of BN details....... all while enjoying a nice cup of coffee.
For sure: that are very nice moments!
Yes: that’s the advantage of our small Dutch country! And the possibility to start the D.B.B.S. Almost like what Shota @shota70 shared some time ago in his build-log.
That’s why I am also looking forward to the September meeting in A’dam. ONE WHOLE DAY chatting and looking just about nothing else then modeling and models ….. :)
Regards, Peter
For sure that was a lovely get-together! And always enough conversation.
Also looking forward to the Amsterdam get-together and in a historic setting as well. All ingredients for a successful day are there.
 
All good things must come to an end and that also applies to those darling little ratlines.
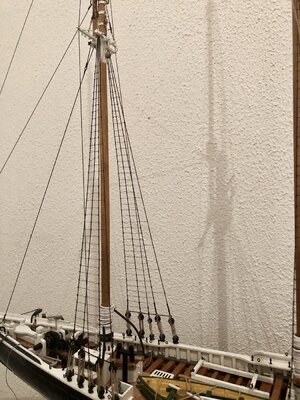
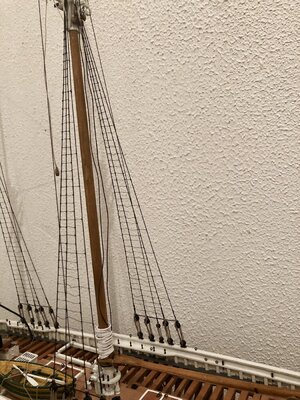
Tonight I was able to finish my work on the ratlines and I'm glad it's done. In all I think I did about 170 ratlines on the fore- and main mast and I pity those who are building a 17th- or 18th century three- or four mast ships with their countless shrouds.
I was (and in a way I still am) not entirely happy with the end result, because I have seen some beautiful examples of very crisp looking ratlines. But all in all, I gave it my best shot and used a process of installing a ratline on every fourth position. The pitch between the lines was set at 6 mm, which converts to 420mm in real life, a reasonable step, IMHO. I drew the required position of the ratlines on a piece of paper, numbering them all and marking every fourth ratline. I clamped the paper to the shrouds and started the proces. As ratline I used 0,12mm Serafil, thanks to @Peter Voogt , and applied a double flat hitch (to have a firm starting point of the ratline) at the second shroud and cow's hitches at the end of the ratlines. The marked ratlines ran from the first- to the fourth shroud (AL-FI) and the in-between ratlines ran from the first- to the third shroud. After being satisfied with both position and tension in the ratline, I applied a tiny drop of CA adhesive to lock the hitches and after drying cut the surplus serafil.
It proved to be very difficult to prevent putting too much tension on the lines. I contacted @Peter Voogt about it and realized that instead of putting in about 10 lines, prior to final adjustment, I put in the line, adjusted the line as good as I could get it and applied CA. That left me with no room for error and fine tuning. Maybe to be further evaluated for a next build...
The shrouds, being thinner than prescribed by YQ's build instructions and the serafil ratlines give an in my opinion rather realistic image of the real thing and emphasize the size of the real great old lady.

A view on both masts, with ratlines:
IMG_0525.jpeg

Fore mast:
IMG_0527.jpeg

Main mast:

IMG_0528.jpeg
 
All good things must come to an end and that also applies to those darling little ratlines.
Tonight I was able to finish my work on the ratlines and I'm glad it's done. In all I think I did about 170 ratlines on the fore- and main mast and I pity those who are building a 17th- or 18th century three- or four mast ships with their countless shrouds.
I was (and in a way I still am) not entirely happy with the end result, because I have seen some beautiful examples of very crisp looking ratlines. But all in all, I gave it my best shot and used a process of installing a ratline on every fourth position. The pitch between the lines was set at 6 mm, which converts to 420mm in real life, a reasonable step, IMHO. I drew the required position of the ratlines on a piece of paper, numbering them all and marking every fourth ratline. I clamped the paper to the shrouds and started the proces. As ratline I used 0,12mm Serafil, thanks to @Peter Voogt , and applied a double flat hitch (to have a firm starting point of the ratline) at the second shroud and cow's hitches at the end of the ratlines. The marked ratlines ran from the first- to the fourth shroud (AL-FI) and the in-between ratlines ran from the first- to the third shroud. After being satisfied with both position and tension in the ratline, I applied a tiny drop of CA adhesive to lock the hitches and after drying cut the surplus serafil.
It proved to be very difficult to prevent putting too much tension on the lines. I contacted @Peter Voogt about it and realized that instead of putting in about 10 lines, prior to final adjustment, I put in the line, adjusted the line as good as I could get it and applied CA. That left me with no room for error and fine tuning. Maybe to be further evaluated for a next build...
The shrouds, being thinner than prescribed by YQ's build instructions and the serafil ratlines give an in my opinion rather realistic image of the real thing and emphasize the size of the real great old lady.

A view on both masts, with ratlines:
View attachment 388111

Fore mast:
View attachment 388112

Main mast:

View attachment 388113
Nice job Johan. Your ratlines look exceptionally well done. Each and every little knot look tight and even (one of my weaknesses).
 
In years from now, Johan, you'll look at your completed BN model with pride and remember each and every ratline it took to get you there. They look superb in the photos you posted by the way :)
 
All good things must come to an end and that also applies to those darling little ratlines.
Tonight I was able to finish my work on the ratlines and I'm glad it's done. In all I think I did about 170 ratlines on the fore- and main mast and I pity those who are building a 17th- or 18th century three- or four mast ships with their countless shrouds.
I was (and in a way I still am) not entirely happy with the end result, because I have seen some beautiful examples of very crisp looking ratlines. But all in all, I gave it my best shot and used a process of installing a ratline on every fourth position. The pitch between the lines was set at 6 mm, which converts to 420mm in real life, a reasonable step, IMHO. I drew the required position of the ratlines on a piece of paper, numbering them all and marking every fourth ratline. I clamped the paper to the shrouds and started the proces. As ratline I used 0,12mm Serafil, thanks to @Peter Voogt , and applied a double flat hitch (to have a firm starting point of the ratline) at the second shroud and cow's hitches at the end of the ratlines. The marked ratlines ran from the first- to the fourth shroud (AL-FI) and the in-between ratlines ran from the first- to the third shroud. After being satisfied with both position and tension in the ratline, I applied a tiny drop of CA adhesive to lock the hitches and after drying cut the surplus serafil.
It proved to be very difficult to prevent putting too much tension on the lines. I contacted @Peter Voogt about it and realized that instead of putting in about 10 lines, prior to final adjustment, I put in the line, adjusted the line as good as I could get it and applied CA. That left me with no room for error and fine tuning. Maybe to be further evaluated for a next build...
The shrouds, being thinner than prescribed by YQ's build instructions and the serafil ratlines give an in my opinion rather realistic image of the real thing and emphasize the size of the real great old lady.

A view on both masts, with ratlines:
View attachment 388111

Fore mast:
View attachment 388112

Main mast:

View attachment 388113
The ratlines are looking great, Johan. And some AL-FI gives it a nice personal touch. I'm glad I could help you with some advice.
Regards, Peter
 
Congratulations my friend! A fine result!
Thanks, Paul, it's appreciated. With all my misgivings and mistakes I made, it is still presentable.
Congratulations , you can be proud of yourself, it's wonderful ship model Okay Okay
Thanks so much, Shota and I agree, it's a beautiful model.
I think it looks good! And remember once all the sails and rigging are on the model, those will no longer be the main focus. ;)
I think that's my safing grace, once all is said and done, there's enough camouflage to take the attention away from the ratlines... :cool:
Congratulations that must be an opluchting
Hey Steef, an "opluchting" (relief) it most definitely is. Very much unlike your "shell-first" challenge, but still a nerve wrecking exercise and experience.
The ratlines are looking great, Johan. And some AL-FI gives it a nice personal touch. I'm glad I could help you with some advice.
Regards, Peter
Thanks Peter, both for your compliments as your advice. For a next build I possibly have to come up with an alternative process. For now I'm okay.
I just saw the enlarged photo on my phone and thought WOW that looks cool

Nice work Johan
Talk to you this afternoon
Regards
Henk
Thanks Henk, I'm quite sure your BN will be at least as cool as this mine, if not more.
Talk to you in a bit!
 
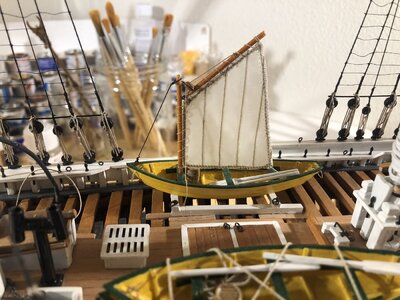
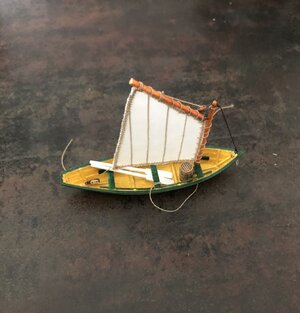
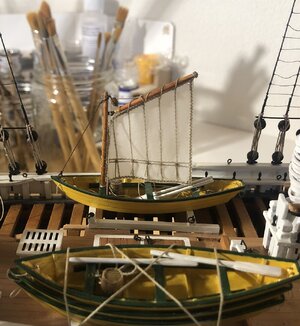
Just a little fun, before starting the real serious stuff of setting sails:
View attachment 388191View attachment 388192View attachment 388193
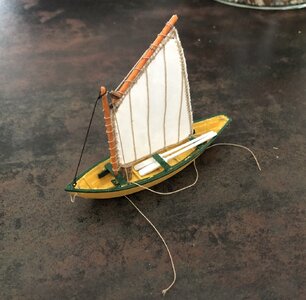
Couldn't help myself nót being satisfied; it just looked too childish. Redo time it was!

After two attempts a new sail emerged, including reeflines. I used the same settings on the sewing machine I used for the final version of the other sails. The first sail was made from an earlier version sail, but it looked too coarse.
Also tapered the gaff a little and tried again:
IMG_0533.jpeg
 
Couldn't help myself nót being satisfied; it just looked too childish. Redo time it was!

After two attempts a new sail emerged, including reeflines. I used the same settings on the sewing machine I used for the final version of the other sails. The first sail was made from an earlier version sail, but it looked too coarse.
Also tapered the gaff a little and tried again:
View attachment 388393
A very nice re-do, Johan.
Ps: Because of the reefband whit reeflines, there must be a boom. Otherwise you can’t reef te sail ……. ;) So, one little spar to go.
Regards, Peter
 
Back
Top