YQ Bluenose by Johan [COMPLETED BUILD]

Good morning Johan. All the little details !!! The boom hinge on the foremast is so good! The main boom looks spot on. You are owning this. Mast hoops and mast bands made from paper or cardboard is the best. It works so well and comes out realistic at our scales. I can’t believe I used copper for my Victory mast bands, it is one of my disappointments- ahh we live and learn right.
Cheers Grant
Thanks Grant!
I did look at copper bands, but I had to discard that idea as being not very realistic.
But I have to admit, every little detail requires attention on how to make it and maintaining consistency is an issue, because all too frequently I am hampered by not having the proper tools or by me being clumsy.
Have fun!
Johan
 
After rigging the bowsprit, work on the spars began in earnest, with the odd little job to complete all the various deck components. I use those little jobs as stop-gap activity.
The lower fore- and main mast spars have been provided with the hardware to support the fore- and main booms.
I fabricated a simplified fore boom hinge, in between the very simple YQ solution and the rather complex configuration per the MS drawings. The interface per the MS drawings was maintained though, since I plan to use the MS rigging schemes.

Below two pictures of the foremast with the fore boom temporary installed.
Several parts had to be fabricated, amongst others the fife rail (more nails required than per the YQ instructions) and the mast foot rosette.
View attachment 366542View attachment 366544


Below two pictures of the main mast, with the main boom support in place. In order to check the boom/mast interface, I attached the necessary parts to the boom. The boom is also a temporary install; still requires a lot of details to be added.
View attachment 366543View attachment 366546


Before continuing my journey upwards I into the masts, towards the tressles, I first needed to fabricate the mast hoops. It will not be possible to install those at a later moment.
The mast hoops are not part of the kit, so I needed to make my own.
I've seen xamples of people, making them from wood, almost in the same manner as the original hoops were produced.
Being lazy :cool: I copied for the most part @Peter Voogt 's process.
I bought some sturdy sheet of white paper, with a thickness of 0,4mm, 0,0016" and cut strips with a width of 2mm, 0,08" and a length of 74mm, 2,9". The length was determined by wanting to have two complete revolutions around the mast, plus an overlap, with an inner diameter of the hoop of 10mm, 0,39". The overlap is about 5mm, 0,2".


Marking and cutting the strips:
View attachment 366577

Form the strips around a drill bit of dia 10mm, 0,4". I secured the ends with a drop of super glue gell:
View attachment 366578

Soak the hoops in a solution of 50% water and 50% D2 wood adhesive.
View attachment 366580

And then we let them dry. To seal the hoops I will apply a single coat of white paint, but that's not for now.
I still need to make the hoops for both topmast sails...
View attachment 366628
Yippee! Redo-time!
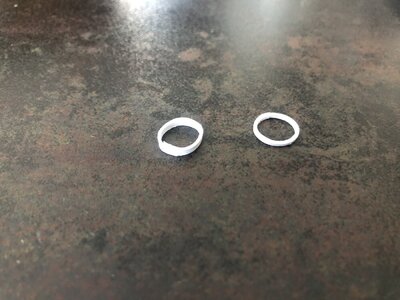
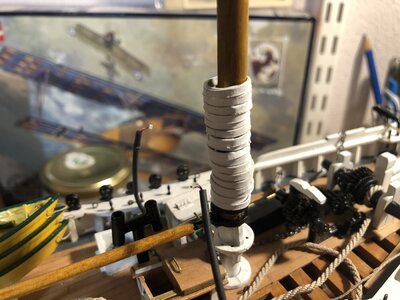
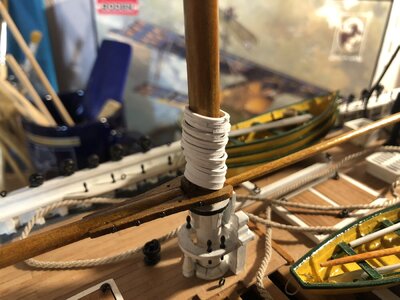
After completing the odd forty mast hoops, I started stacking the mainmast with the hoops. Stacking 18 hoops of which two are double, i.a.w. the Model Shipways drawings, I realised that the stack was rather high. Time to do some overdue math: the hoop width is 2mm/0,08"x72=144mm/5,67". That's far from realistic and so there's nothing to it but to start again on the hoops, now halving the width of the paper strips use to form the hoops, this is also more in line with the dimensions of @Peter Voogt 's masthoops. Still, halving the width of the hoops still results in rather crude hoops, but I don't dare reducing the width any further.
An old lesson, learned anew: first research, check and do your math!

Left the old, higher masthoop, right the new, 1mm/0,04" masthoop.
Still some 50 hoops to go, give or take a few...
5C563165-B763-42EB-9154-141CE58DBA00.jpeg
 
Yippee! Redo-time!
After completing the odd forty mast hoops, I started stacking the mainmast with the hoops. Stacking 18 hoops of which two are double, i.a.w. the Model Shipways drawings, I realised that the stack was rather high. Time to do some overdue math: the hoop width is 2mm/0,08"x72=144mm/5,67". That's far from realistic and so there's nothing to it but to start again on the hoops, now halving the width of the paper strips use to form the hoops, this is also more in line with the dimensions of @Peter Voogt 's masthoops. Still, halving the width of the hoops still results in rather crude hoops, but I don't dare reducing the width any further.
An old lesson, learned anew: first research, check and do your math!

Left the old, higher masthoop, right the new, 1mm/0,04" masthoop.
Still some 50 hoops to go, give or take a few...
View attachment 367431
The perseverant wins...... Just turn de switch inside your head and it’s redo-time.;)
And sorry for ‘my dimensions’ …….
Regards, Peter
 
The perseverant wins...... Just turn de switch inside your head and it’s redo-time.;)
And sorry for ‘my dimensions’ …….
Regards, Peter
Nothing to be sorry about, after stacking it didn't look right, so it ain't right...
(Actually, it looked quite ridiculous Sick)
 
Yippee! Redo-time!
After completing the odd forty mast hoops, I started stacking the mainmast with the hoops. Stacking 18 hoops of which two are double, i.a.w. the Model Shipways drawings, I realised that the stack was rather high. Time to do some overdue math: the hoop width is 2mm/0,08"x72=144mm/5,67". That's far from realistic and so there's nothing to it but to start again on the hoops, now halving the width of the paper strips use to form the hoops, this is also more in line with the dimensions of @Peter Voogt 's masthoops. Still, halving the width of the hoops still results in rather crude hoops, but I don't dare reducing the width any further.
An old lesson, learned anew: first research, check and do your math!

Left the old, higher masthoop, right the new, 1mm/0,04" masthoop.
Still some 50 hoops to go, give or take a few...
View attachment 367431
Hi Johan, I'm sorry to hear about your mandatory redo. You have provided those of us who haven't reached this stage with a big heads up regarding the potential trap of ring size. Thanks for sharing this.
 
Hi Johan, I'm sorry to hear about your mandatory redo. You have provided those of us who haven't reached this stage with a big heads up regarding the potential trap of ring size. Thanks for sharing this.
Hey Daniel,
Well, there's nothing to it and, when you depart from the build instructions, you know you'll encounter some issues...

To amuse and educate a couple of pictures to illustrate my reason to re-do the hoops...

Front mast with 2mm/0.08" hoops:
95D1C5E3-447D-461A-8DCF-D0B393B7139E.jpeg

Main mast with 1mm/0.04" hoops:
9537BD92-084A-45A2-84B8-C85F3C555385.jpeg

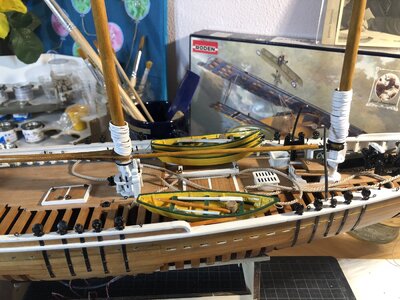
Comparison between the two masts, with the same number of hoops:
B56ADACA-E211-4D80-A0C3-8F5A8724DF2F.jpeg
 
Hey Daniel,
Well, there's nothing to it and, when you depart from the build instructions, you know you'll encounter some issues...

To amuse and educate a couple of pictures to illustrate my reason to re-do the hoops...

Front mast with 2mm/0.08" hoops:
View attachment 367460

Main mast with 1mm/0.04" hoops:
View attachment 367461

Comparison between the two masts, with the same number of hoops:
View attachment 367459
Good evening Johan. You and I both. I learned my lesson after a couple of times (takes me a while ROTF) with the Victory. Now I only make one item(especially if it a scratch item) leave it and only start the production line after I double check everything. Redo’s part of the job with this hobby.Nice tho, the resized look good. Cheers Grant
 
Good evening Johan. You and I both. I learned my lesson after a couple of times (takes me a while ROTF) with the Victory. Now I only make one item(especially if it a scratch item) leave it and only start the production line after I double check everything. Redo’s part of the job with this hobby.Nice tho, the resized look good. Cheers Grant
Yep, about that, I made my first (wider) hoops and I was really happy having pulled that one off, so I immediately started going forward. It wasn't until I was able to stack the hoops, that I discovered the error of my ways. Quite honestly, I think the smaller ones are still a tad too wide, but no more re-do's on the hoops.
I have found that every step of one's build, especially when lacking sufficient experience, have many potential re-do possibilities. At least one is gaining experience fast... ROTF
 
Hey Daniel,
Well, there's nothing to it and, when you depart from the build instructions, you know you'll encounter some issues...

To amuse and educate a couple of pictures to illustrate my reason to re-do the hoops...

Front mast with 2mm/0.08" hoops:
View attachment 367460

Main mast with 1mm/0.04" hoops:
View attachment 367461

Comparison between the two masts, with the same number of hoops:
View attachment 367459
A very nice re-do, Johan. With a very fine saw or knife , you can split the 2mm into 1mm hoops ……….;)
No just kidding, just sit relaxed and roll some new ones.
Regards, Peter
 
More work on the spars, focus is now on the lower fore- and main masts.
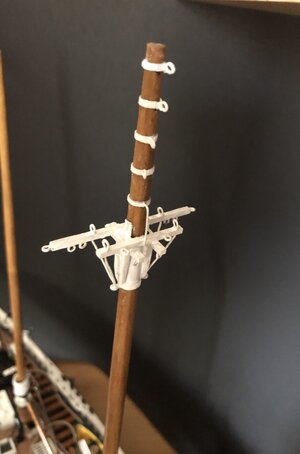
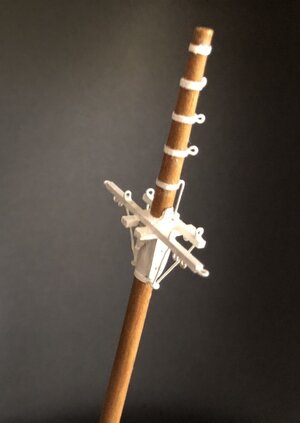
The latter mast is nearing completion, again the Model Shipways drawings are leading, so there's quite a few parts self-fabricated, especially the tresseltree (or is it Christmas tree?) is almost entirely scratch-build, with some parts used from the kit.

View from the port side, looking fwd.
The upper four eyes are not positioned in line on the mast's center line, but are displaced radially to prevent interference of the later to be installed blocks. This is in accordance with the MS drawings, but I overdid it a little, to make it look like a deliberate action:
9012EB8F-9506-4E78-8D7A-3F7B5FFEE084.jpeg

View from the port side, looking aft.
In all, some 25 eyes in one form or another have been added, incredible...
The tresseltree itself consists of 12 parts.
DBDAA3DC-4BFC-4557-B934-6ABE6D93F2B7.jpeg
And now up to the foremast.

Happy Easter to those who celebrate this holiday!
 
More work on the spars, focus is now on the lower fore- and main masts.
The latter mast is nearing completion, again the Model Shipways drawings are leading, so there's quite a few parts self-fabricated, especially the tresseltree (or is it Christmas tree?) is almost entirely scratch-build, with some parts used from the kit.

View from the port side, looking fwd.
The upper four eyes are not positioned in line on the mast's center line, but are displaced radially to prevent interference of the later to be installed blocks. This is in accordance with the MS drawings, but I overdid it a little, to make it look like a deliberate action:
View attachment 367930

View from the port side, looking aft.
In all, some 25 eyes in one form or another have been added, incredible...
The tresseltree itself consists of 12 parts.
View attachment 367931
And now up to the foremast.

Happy Easter to those who celebrate this holiday!
Nice work Johan…it’s a busy area of the mast! ;)
 
More work on the spars, focus is now on the lower fore- and main masts.
The latter mast is nearing completion, again the Model Shipways drawings are leading, so there's quite a few parts self-fabricated, especially the tresseltree (or is it Christmas tree?) is almost entirely scratch-build, with some parts used from the kit.

View from the port side, looking fwd.
The upper four eyes are not positioned in line on the mast's center line, but are displaced radially to prevent interference of the later to be installed blocks. This is in accordance with the MS drawings, but I overdid it a little, to make it look like a deliberate action:
View attachment 367930

View from the port side, looking aft.
In all, some 25 eyes in one form or another have been added, incredible...
The tresseltree itself consists of 12 parts.
View attachment 367931
And now up to the foremast.

Happy Easter to those who celebrate this holiday!
It’s looking very nice, Johan. New boundaries have been pushed.:)
Regards, Peter
 
Back
Top