YQ Bluenose Ted R

My excuses, Johan. But also to Daniel. For pointing yours and Daniel’s as build-to-instruction. That’s the problem when you start typing BN builds. Won’t do it again.
Regards, Peter
No apologies needed, Peter, my reaction was more to forewarn Ted that I didn't follow the YQ instructions, so while I might be able to answer some of Ted's questions, my build deviates too much in order for it to be able to help Ted out.
Btw, how's the ride going? Weather okay?
 
I got the forward lower deck assembly in correctly. I didn't come out as nice as the first time
Ted
 
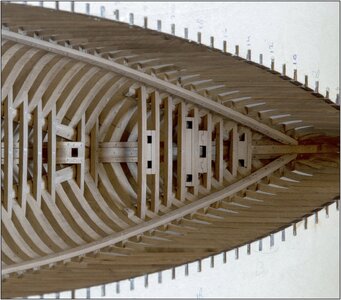
I have almost all of the main deck level parts Shaped and glued together. I am planning on getting the main deck parts out to use as a guide when installing the deck beams to make sure it will fit.
What other considerations should I keep in mind when installing the deck beams
I'm already thinking about the parts that have to go through the deck to the lower deck level but am not sure how to verify fit.
Thanks for the help.
Ted
 
When I temp install main deck beam 126-11 and sight down it appears that part 121, figure 11, is1-2mm too far to starboard. If I am understanding figure p7, sheet 8-3 correctly the post from the geaar setup mounts into or on top of part 121.
 
One of the problemsi have is that I don't know the best practices or procedures. You gentlemen doing graduate level to post doctoral level builds probably don't remember struggling with this. I'm not sure on checking the alignment of the main deck beams (port to starboard). Do I visually check by looking how far they go into the frames or make some type of measurement. Are the plans accurate enough for scaling. (Definitely verboten in my field of aircraft and construction.). I've bought several books but they are all too generalized and gloss over the deeper details. The same goes for the YouTube videos. A guy will say, for example, we need to chamfer this strake the prevent a gap. But doesn't explain how to calculate the varying degrees of chamfer needed as the strake moves through varying curves .
Maybe I'm looking for an easy way out when what I need is some trial and error experience.
Please don't get me wrong. I'm not glum or discouraged. I'm really having fun. I really don't care if the above mentioned post doesn't align perfectly in this case but want to know how to do it when it would really be visible.
Happy modeling,
Ted
 
What I did installing the deck beams was copying other builders...
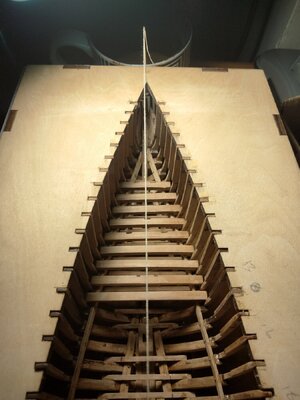
I numbered all deck beams, 126-01, 126-02, etc, and pencil-marked the centerline of each beam. Next I marked the centerline of the keel, by drilling a small hole, dia 0,6mm, at both bow and stern and strung a thin line between to nails, inserted in the two pre-drilled holes. The line then was used the center the beams. This procedure can also be used for the below deck's beams.
Secondly, all parts for the bits and Samson posts should be centered at the keel's centerline as well. If you marked the keel's centerline with a line and the centerline of part 121, it's ever so easy to make sure part 121 is centered. (This also applies for the mast feet.)
Unfortunately, accuracy will yield the best results. Worse yet, unattended errors will create havoc in the next steps of your build.
Make use of every trick in the box to ensure your build is as close to specs as you can get it, dry fitting parts (pre-printed decks for instance) is very enlightening.
 
Are the plans accurate enough for scaling. (Definitely verboten in my field of aircraft and construction.).

Since we're lacking a fully dimensioned set of drawings, or 3D-models, we're allowed to take measures from the drawings.
(In the old days we used FS drawings on mylar, shrink- and stretch free drawing material. One was allowed to take measures from these FS drawings.)

Maybe I'm looking for an easy way out when what I need is some trial and error experience.

Have to disappoint you; there's no easy way out, unless one uses the dustbin...
 
When I temp install main deck beam 126-11 and sight down it appears that part 121, figure 11, is1-2mm too far to starboard. If I am understanding figure p7, sheet 8-3 correctly the post from the geaar setup mounts into or on top of part 121.
The opening in deck sheet #127 will need to be directly over part 121 with their corresponding openings otherwise piece # 64 especially on the port side will not set down. This is why it is paramount you find the centerline as described by Johan and line up pcs 118-121 as well as the mast steps and all other deck penetrations.
Dry fitting was a must for me, and I still had to pull out my needle files for a little cutting here and there. For example, not only does piece # 64 need to hit two openings but it also has to sit plumb to the deck.
Thank you. I moved part 121 over an into alignment. I will get the parts that penetrate out and check alignment as I install the deck beams (purlins?).
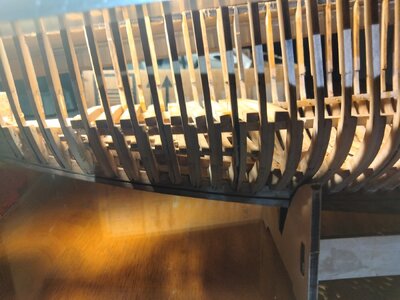
I found that I had to adjust the front portion of part102 for level and got that straightened out. I probably should check the beams for straightness as far as fitting the finished deck at the same time.
Thanks for the pointers.
Ted
 
What I did installing the deck beams was copying other builders...
I numbered all deck beams, 126-01, 126-02, etc, and pencil-marked the centerline of each beam. Next I marked the centerline of the keel, by drilling a small hole, dia 0,6mm, at both bow and stern and strung a thin line between to nails, inserted in the two pre-drilled holes. The line then was used the center the beams. This procedure can also be used for the below deck's beams.
Secondly, all parts for the bits and Samson posts should be centered at the keel's centerline as well. If you marked the keel's centerline with a line and the centerline of part 121, it's ever so easy to make sure part 121 is centered. (This also applies for the mast feet.)
Unfortunately, accuracy will yield the best results. Worse yet, unattended errors will create havoc in the next steps of your build.
Make use of every trick in the box to ensure your build is as close to specs as you can get it, dry fitting parts (pre-printed decks for instance) is very enlightening.
I found that part 62 also has a 3mm post but the corresponding (purlin) beam over head has smaller notches. Should these be enlarged at this point or should I wait until later for better accuracy. It seems that if the notch in the beam was larger than 3mm it will not show on the finished model but assure alignment with the lower level.
 
I setup a thread on the centerline. I've been looking up the parts that penetrate the deck to the lower levels and filing them out to the correct size and then trial fitting them through the deck frames. I haven't tried fitting the finished deck piece but itid pretty flat using a strake to check. Some very minor sanding might be needed at the bow. The plans are starting to come together in my minds eye. I've grown some in my abilities and feel much calmer. At least I got all of the slotted parts in the correct position and direction this time.
17168596162258496259237978766258.jpg17168596606073748873066097167796.jpg
 
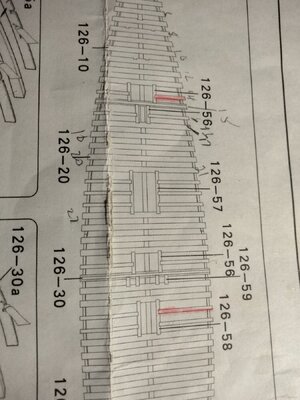
I'm at the subassembly of deck beams 13, 14 and 15 with parts 126-56 (figure 12).
Of course, the milled recesses do not fit. Part 126-56 has no recesses for deck frame 14. Should I skip over these frames that need to be whittled out and install the non notched frames or should I take them in order?
It appears to me that the only notches visible on the finished model are on the starboard sides of 126-56 and 126-58 at the mast openings. My intent at this point is to save these notches for last while I work through my learning curve. Never having done this before. Am I overlooking something. 17169118985235187204134081407415.jpgHighest regards,
Ted
 
Back
Top