- Joined
- Oct 1, 2023
- Messages
- 2,012
- Points
- 488

I'm sorry I posted on your build log.i don't know how to remove it.
Ted
Ted
 |
As a way to introduce our brass coins to the community, we will raffle off a free coin during the month of August. Follow link ABOVE for instructions for entering. |
 |
 |
The beloved Ships in Scale Magazine is back and charting a new course for 2026! Discover new skills, new techniques, and new inspirations in every issue. NOTE THAT OUR FIRST ISSUE WILL BE JAN/FEB 2026 |
 |

It doesn’t matter, Ted. Only the admins can.I'm sorry I posted on your build log.i don't know how to remove it.
Ted

DittoYou're working at a PhD level I'm I. Kindergarten.

Thank you Peter.Before I can continue with the construction on top of the lower masts, I first had to make the mast hoops. The main- and top sails are attached to this and thus slide up and down over the masts.
Here's the example in the old photo and the specification drawing in Howard Chapell's book:
View attachment 326436
Here you are looking at the reefed main sail behind the main mast. (There is a good chance that it will also appear on my BN.)
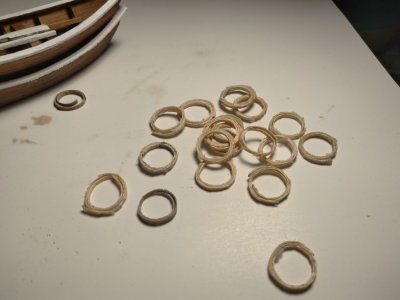
The kit does not provide these hoops and in terms of desired size I think I can find them somewhere. So got started myself. With the following steps:
View attachment 326437
1: Selected a nice brown color from my Admiral's scrap-book paper collection. Cut strips of about a mm there.
2: Select a pen with the right diameter. Chapelle writes that the 'hoops' are about a quarter larger than the diameter of the mast. My main boom is 7.6 mm at the bottom. The pin is 9.3mm. So look for other pins for the foremast and upper masts.
Strips cut to length so they can go 3x around the pen.
Secure the first contact point of the 1st round with glue.
3: Always apply a piece of glue and start rolling.
4: Because I glue with wood glue (PVA), the glue remains flexible for a while and I can place the rows nicely on top of each other with a pin set.
5: The end between the points of the picet so that I can clamp it flat in the rest to get a round hoop.
Then this will be the result:
View attachment 326438
According to L.B. Jenson in The Saga has 36 on the mainmasts, so 18 each. On the uppermasts 24, so 12 each.
He draws fewer in his drawings. But Chapelle writes, "Two or three spare hoops are carried on each mast at the boom.
I have something to do .........
Regards, Peter

Thanks, Mark.Still looking magnificent Peter,
Not so much, a lot of challenges with my Balder ……you must miss working on her?
Yes, here to. Last week had a storm and a lot of rain.And seeing that “bit of sunshine” is a welcome start here to a very wet and windy day.
But be careful - the sun fades everything......
This BN is legendary……
Hello Peter, Great Job, I just love all of that detail that you have added to your YQ Bluenose.

I do, Phil. It just now the low winter sun, exactly through a small skylight in less than half an hour.But be careful - the sun fades everything......
This BN is legendary……
Hello Peter, Great Job, I just love all of that detail that you have added to your YQ Bluenose.
Regards Lawrence
Thanks for the very nice words, Grant/Lawrence/Ted.Absolutely stunning. I'm amazed every time I see this brilliant work of art
Best regards
Ted

It's one of those cases where everyone else is competing for second. IMHO I'm just doing the best I can with my beginner skills set and learning by watching all the skilled builders around meI do, Phil. It just now the low winter sun, exactly through a small skylight in less than half an hour.
Thanks for the very nice words, Grant/Lawrence/Ted.
And of course all the extra likes !
Regards, Peter
Ted, every builder of models starts with his first. And learned from another or must be very inventive and starts directly from scratch. What I see: you have learned a lot!It's one of those cases where everyone else is competing for second. IMHO I'm just doing the best I can with my beginner skills set and learning by watching all the skilled builders around me
How did you construct the case, and what is it made of, Peter? I’m thinking of building a case for my daughter’s Soleil Royal. It will be a huge case.
Hi Vic. This case is made from 3mm glass plates. I used the side profiles from -> Occre <-- In the blue text the link.How did you construct the case, and what is it made of, Peter? I’m thinking of building a case for my daughter’s Soleil Royal. It will be a huge case.
