
I can’t imagine. Praying for the family and friends.Thank you Vic. It was a 7 month struggle….young man still. A retired RCMP who we became dear friends with over they years because of our Akita Bears in both our families…..left a young, 52 year old wife with two Beautiful Bears and no kids….they were married for 30 years…kids in love from college…so sad!

You are using an out of date browser. It may not display this or other websites correctly.
You should upgrade or use an alternative browser.
You should upgrade or use an alternative browser.

Really sorry to hear of your loss my thoughts are with you.i lost a lot of time over the past month…. very little Pearl work! Lost a dear friend to Stage 4 cancer! Hope to pick it up again some starting this week! Working on bow next! Be well, Tony! Your rigging lookd
s great!
Finally got the first sail installed not sure which is the best method bottom up or top down. I will do the next one the other way around and see what works best. None of the ropes have been belayed because the drawings have more than one on the same pin so I'll work it out when all the ropes are ready.


Any questions on my methods please ask.
Any questions on my methods please ask.
- Joined
- Mar 1, 2021
- Messages
- 315
- Points
- 168

Thank you Tony!Really sorry to hear of your loss my thoughts are with you.
- Joined
- Mar 1, 2021
- Messages
- 315
- Points
- 168
Excellent work Tony….you’re actually scaring me….ha! The level of precision and detail is truly inspirational. I will have to study for a year to do this type of rigging with sails….I may take the easier approach and roll up my sails or no sails at all….LOL, Just fantastic….you will have a real show piece when completed!Finally got the first sail installed not sure which is the best method bottom up or top down. I will do the next one the other way around and see what works best. None of the ropes have been belayed because the drawings have more than one on the same pin so I'll work it out when all the ropes are ready.
View attachment 256144
View attachment 256145
View attachment 256146
View attachment 256147
View attachment 256149
Any questions on my methods please ask.
I did think about making the first admiralty style (no masts or rigging) Pearl but I wanted to learn how to do the rigging and sails. It has taken a bit of time to work out how to do it but it's going to be a lot easier on my next build if I can remember what I did.Excellent work Tony….you’re actually scaring me….ha! The level of precision and detail is truly inspirational. I will have to study for a year to do this type of rigging with sails….I may take the easier approach and roll up my sails or no sails at all….LOL, Just fantastic….you will have a real show piece when completed!
My next build will need to have good instructions as I have spent a lot of time working out what to do.
As I have a few other things to do, not much has been done in the shipyard this week. This is my progress to date the second sail is on and the others are being prepared.

This is how I shape the sails, they are clamped in place and coated with diluted PVA.

I need smaller hands and longer fingers.


Next sail ready for tomorrow.
This is how I shape the sails, they are clamped in place and coated with diluted PVA.
I need smaller hands and longer fingers.
Next sail ready for tomorrow.

Everything you do turns out great Tony. You have a gift.
Did I miss your tutorial on how to make a mouse that looks that good?
Did I miss your tutorial on how to make a mouse that looks that good?

Beautiful rigging and sail work Tony. I can almost see your mind 10 steps ahead of the pictures you post. You have some interesting spools of rope/thread on your work table. Is that a handy invention of yours?
Thanks for the complement, I'm surprised nobody has noticed but they are all around the wrong way. I only realised when it was to late to change them.Everything you do turns out great Tony. You have a gift.
Did I miss your tutorial on how to make a mouse that looks that good?

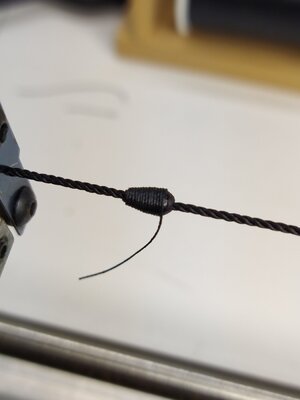
This is how I made the mouse, first a wooden cone and a piece of thread are glued on the rope.

I found it very hard to serve going down the taper as the thread would slip down. The best way I found to serve it was to do one side first.

Then then do the serving from the other direction going over the first serving

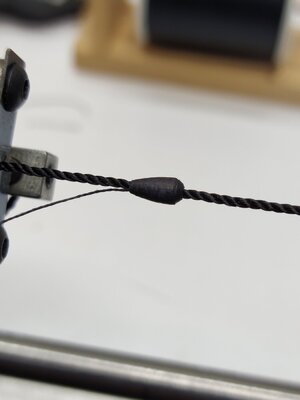
This mouse is around the wrong way, the loop on the stay goes against the widest part of the mouse. With me a 50/50 chance of getting it right is a pretty poor bet.
Before following this advice it may wrong I am trying to find out the correct way to install the mouse, see the following posts.
Attachments
Last edited:
Hi Daniel there are nothing special something I knocked up quickly. The ropes came in coils and no matter how careful I was knotted up very easily so I made some reels and holders. The ends pull off to change the reel.Beautiful rigging and sail work Tony. I can almost see your mind 10 steps ahead of the pictures you post. You have some interesting spools of rope/thread on your work table. Is that a handy invention of yours?

Thanks for the tip Tony. I'm definitely going to try that. Also I did not know about about the mouse being reversed, I always assumed the narrow end went into the loop first.Hi Daniel there are nothing special something I knocked up quickly. The ropes came in coils and no matter how careful I was knotted up very easily so I made some reels and holders. The ends pull off to change the reel.View attachment 257713
I think your right I saw a model with the mouse the opposite to the way I had it. I then checked against Historic Ship Models and it looked like I was wrong.Thanks for the tip Tony. I'm definitely going to try that. Also I did not know about about the mouse being reversed, I always assumed the narrow end went into the loop first.

Today I checked some other books and cannot find a definitive answer, some show a round mouse but there are a lot of models with the mouse like mine. Thanks Daniel I'll try to find out what is correct.

Colleagues, good afternoon. The loop is put on the thick end. If put on a narrow one, then the loop can come off at the most inopportune moment.
Thank you for clarifying that Sasha.Colleagues, good afternoon. The loop is put on the thick end. If put on a narrow one, then the loop can come off at the most inopportune moment.
- Joined
- Mar 1, 2021
- Messages
- 315
- Points
- 168
As I have a few other things to do, not much has been done in the shipyard this week. This is my progress to date the second sail is on and the others are being prepared.
View attachment 257538
This is how I shape the sails, they are clamped in place and coated with diluted PVA.
View attachment 257537
I need smaller hands and longer fingers.
View attachment 257536
View attachment 257538
This is how I shape the sails, they are clamped in place and coated with diluted PVA.
View attachment 257537
I need smaller hands and longer fingers.
View attachment 257536
View attachment 257535
Next sail ready for tomorrow.
Great work Tony!
I've taken some photos as I prepared the next sail to show my methods. First the rope holes at the top of the sail, the easiest way I found was to punch them out.

Firstly a 0.8 hole was drilled in a piece of steel held on the drill table with double sided tape. Once the hole is drilled I removed the drill and ground the other end (that normally goes in the chuck) flat so the edge is sharp. This is used to punch the holes out. A piece of timber clamped in place sets the distance from the top of the sail. The scrap ply is the same thickness as the steel I used.

The sail is placed up against the timber where the first hole will go, bring the punch down and make a hole. The drill is not spinning.

Move the sail so the hole lines up with the pin make another hole and repeat.

All holes finished.

The holes for the tie ropes had to be a lot smaller so I used a pair of dividers. The smallest rope I had looked to thick so I used thread. I tried knots but they didn't look right, watered down PVA where the rope entered the sail worked well.

The yard and sail are complete and ready to assemble.

Corners are tied to yard.

Then the sail.


Finally add blocks and ready to install.
Firstly a 0.8 hole was drilled in a piece of steel held on the drill table with double sided tape. Once the hole is drilled I removed the drill and ground the other end (that normally goes in the chuck) flat so the edge is sharp. This is used to punch the holes out. A piece of timber clamped in place sets the distance from the top of the sail. The scrap ply is the same thickness as the steel I used.
The sail is placed up against the timber where the first hole will go, bring the punch down and make a hole. The drill is not spinning.
Move the sail so the hole lines up with the pin make another hole and repeat.
All holes finished.
The holes for the tie ropes had to be a lot smaller so I used a pair of dividers. The smallest rope I had looked to thick so I used thread. I tried knots but they didn't look right, watered down PVA where the rope entered the sail worked well.
The yard and sail are complete and ready to assemble.
Corners are tied to yard.
Then the sail.
Finally add blocks and ready to install.
Last edited:
Here's some photos now I have installed the sail on the ship.


None of the sails are set and I'm still working on the belaying points. I mostly know where the lines will be tied up but will hold off till I'm 100%.
None of the sails are set and I'm still working on the belaying points. I mostly know where the lines will be tied up but will hold off till I'm 100%.
Tony X, great job. Your work on the Pearl is perhaps one of the best I've seen with this model. Continue in the same way.