-

Win a Free Custom Engraved Brass Coin!!!
As a way to introduce our brass coins to the community, we will raffle off a free coin during the month of August. Follow link ABOVE for instructions for entering.
-

PRE-ORDER SHIPS IN SCALE TODAY!
The beloved Ships in Scale Magazine is back and charting a new course for 2026!
Discover new skills, new techniques, and new inspirations in every issue.
NOTE THAT OUR FIRST ISSUE WILL BE JAN/FEB 2026
You are using an out of date browser. It may not display this or other websites correctly.
You should upgrade or use an alternative browser.
You should upgrade or use an alternative browser.
ZHL Black Pearl Golden 2021 - 1:64 - JeffT [COMPLETED BUILD]
Thanks Jay. Progress is not as fast as I envisioned when I retired. I have been working on the Admiral's list as well as those for her mates (the daughters) and have started a consulting business that is taking some of my time.Jeff, you are doing a fantastic job. I am enjoying your build.
The lower mast are installed and I finished the lower shrouds for the masts. The BP is beginning to look like a ship now, not just a hull. 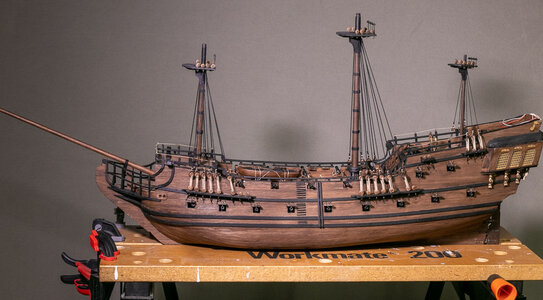
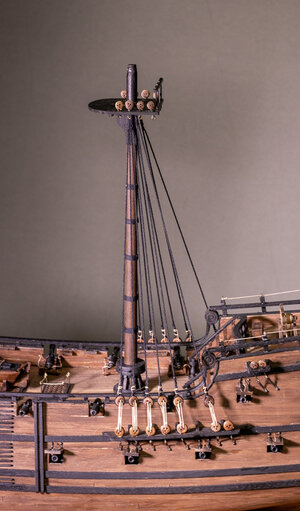
The next step was to install the lower stays. In retrospect, I probably should have looped them over the masts before the shrouds. I get that right on the next build.
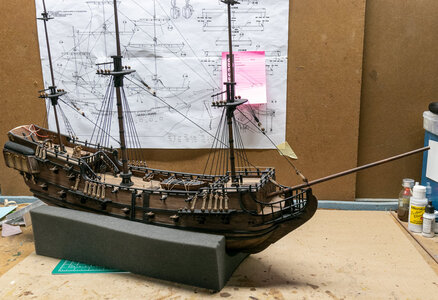
The rigging from the stays to the platforms went well. Here's the main mast.
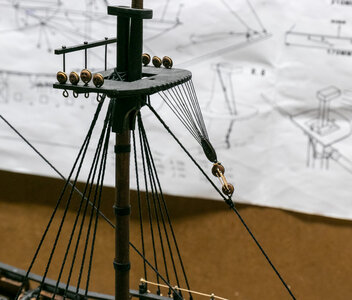
An interesting note on the mizzen mast... There are an even number of predrilled holes in the mizzen platform. This does not work for the manner in which this bit of rigging is made; there needs to be an odd number of holes. I decided to add an extra hole in the middle of the platform to correct this. I have seen at least one other example of how members have approached this situation.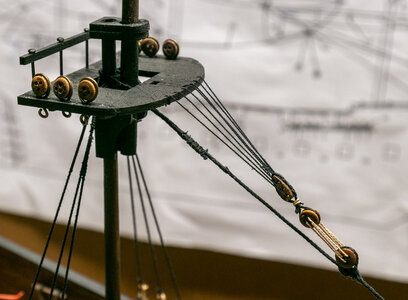


The next step was to install the lower stays. In retrospect, I probably should have looped them over the masts before the shrouds. I get that right on the next build.

The rigging from the stays to the platforms went well. Here's the main mast.

An interesting note on the mizzen mast... There are an even number of predrilled holes in the mizzen platform. This does not work for the manner in which this bit of rigging is made; there needs to be an odd number of holes. I decided to add an extra hole in the middle of the platform to correct this. I have seen at least one other example of how members have approached this situation.

Nice work I found with the masts in place the look of the ship changes completely.
- Joined
- Aug 30, 2020
- Messages
- 676
- Points
- 353

Aha the trusty workmate, now why didn't i think of using mine like that.I just started building the ZHL Black Pearl Golden Version 2021. This was inspired by the build logs of Reggie (WarrLight) and Vic (Vfordyce). My daughter who has degrees in film and education just moved her first home and I am building the BP her and her husband as a house warming gift. She was totally enamored with the "Pirates of the Caribbean" series when she was younger, so this seemed like the perfect model. Her house warming gift is likely to be somewhat late to actually be a house warming gift, but I am sticking with that a reason to build the BP. I selected the Golden version of the BP due mainly to the lower price, size, and shorter assembly time.
So I will forego the box inventory. The 2021 version seems to be identical to the 2019 version built by Reggie. As far as I can tell the main difference is the stern decoration which is made of metal as opposed to carved on the stern bulkhead. I inventoried all the parts and found everything to be in the boxes. I started on 26-Dec and will catch up the build log over the next few days.
I started with assembly of the false keel. I was impressed that the keel had no warp. The assembly required gluing the two halves together along with the reenforcing pieces. The supports for the planks at the bow was shaped and glued into position. I am using my old Workmate extensively for this build as it is still very flat and clamps the BP keel well. I used the supplied base board as an additional support.
View attachment 202425View attachment 202426View attachment 202427
I dry fit the bulkheads and decks to the keel. Everything fit well. I glued the bulkheads in place using some pine blocks to keep everything perpendicular. The keel went together well.
View attachment 202428View attachment 202429
Jeff, if I understood the translation correctly, then we are talking about the staffs. You've done it right. The rods were installed on the top of the mast OVER the shrouds, and not before them.The next step was to install the lower stays. In retrospect, I probably should have looped them over the masts before the shrouds.
As mentioned previously, I am a bit ahead of my posts in actual construction. I have started ratlines, but needed a break to do something else for a while. I decided to start going through the spars needed for the build when I noted a potential discrepancy in the plans. The upper spar (P. 50 on the plans) for the mizzen mast is shown as being 175mm. This seemed much to long to me, so I checked the sail plan as well. On the sail plan the square rigged sail (Sail 7) has a top length of 135 mm (as does the actual sail provided). The majority of spars are between 10 and 15mm larger than the sail sizes which seems appropriate to me. Therefore I plan to make the mizzen spar (P. 50) 145mm instead of the listed 175mm.
Has anyone else encountered this and am I missing something that will be a problem later if I only make the spar 145 mm?
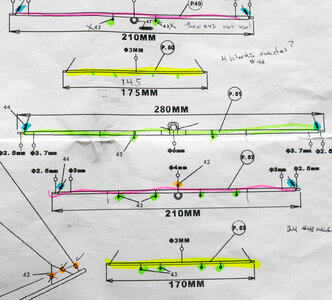
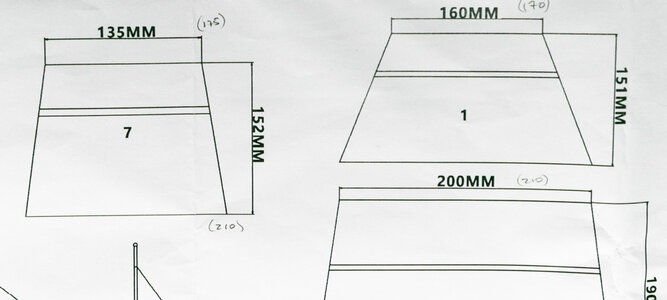
In any case, I think the sails provided are somewhat oversized for this ship. Maybe that is why the Black Pearl was supposed to be so fast?
Has anyone else encountered this and am I missing something that will be a problem later if I only make the spar 145 mm?


In any case, I think the sails provided are somewhat oversized for this ship. Maybe that is why the Black Pearl was supposed to be so fast?
I'll check mine, can't remember offhand what sizes mine are don't think I changed any.As mentioned previously, I am a bit ahead of my posts in actual construction. I have started ratlines, but needed a break to do something else for a while. I decided to start going through the spars needed for the build when I noted a potential discrepancy in the plans. The upper spar (P. 50 on the plans) for the mizzen mast is shown as being 175mm. This seemed much to long to me, so I checked the sail plan as well. On the sail plan the square rigged sail (Sail 7) has a top length of 135 mm (as does the actual sail provided). The majority of spars are between 10 and 15mm larger than the sail sizes which seems appropriate to me. Therefore I plan to make the mizzen spar (P. 50) 145mm instead of the listed 175mm.
Has anyone else encountered this and am I missing something that will be a problem later if I only make the spar 145 mm?
View attachment 251131View attachment 251132
In any case, I think the sails provided are somewhat oversized for this ship. Maybe that is why the Black Pearl was supposed to be so fast?
I had a look at mine and it's 175mm long, the pictures in the instructions show this yard sticks out more than the other sails. When I did mine I made up some paper sail templates but I took the size from the yards so I didn't notice this error. If I use the material supplied it will be a problem.As mentioned previously, I am a bit ahead of my posts in actual construction. I have started ratlines, but needed a break to do something else for a while. I decided to start going through the spars needed for the build when I noted a potential discrepancy in the plans. The upper spar (P. 50 on the plans) for the mizzen mast is shown as being 175mm. This seemed much to long to me, so I checked the sail plan as well. On the sail plan the square rigged sail (Sail 7) has a top length of 135 mm (as does the actual sail provided). The majority of spars are between 10 and 15mm larger than the sail sizes which seems appropriate to me. Therefore I plan to make the mizzen spar (P. 50) 145mm instead of the listed 175mm.
Has anyone else encountered this and am I missing something that will be a problem later if I only make the spar 145 mm?
View attachment 251131View attachment 251132
In any case, I think the sails provided are somewhat oversized for this ship. Maybe that is why the Black Pearl was supposed to be so fast?
Attachments
I checked the rigging drawings supplied with the kit. They are not fully scaled, in my opinion, but they show the upper mizzen and upper foremast spars to be nearly identical lengths. The fore spar is listed as 158mm and the mizzen is listed as 175. Maybe I will make the mizzen yard about 155 to 160mm based on that comparison., splitting the difference.I had a look at mine and it's 175mm long, the pictures in the instructions show this yard sticks out more than the other sails. When I did mine I made up some paper sail templates but I took the size from the yards so I didn't notice this error. If I use the material supplied it will be a problem.
I have often wondered if the rigging plan is really for this version, there are lots of parts that don't correspond to the model ie1:50 scale marked on the drawing, the centre door and shape of the bow.I checked the rigging drawings supplied with the kit. They are not fully scaled, in my opinion, but they show the upper mizzen and upper foremast spars to be nearly identical lengths. The fore spar is listed as 158mm and the mizzen is listed as 175. Maybe I will make the mizzen yard about 155 to 160mm based on that comparison., splitting the difference.
The lanterns have been a bit of a thorn from the beginning. First, I didn't allow for enough width for the edge lantern posts for the for the stern decorations/figurines to fit. Then I did not have a way to mount the wiring into the lanterns. I believe I have that solved now.
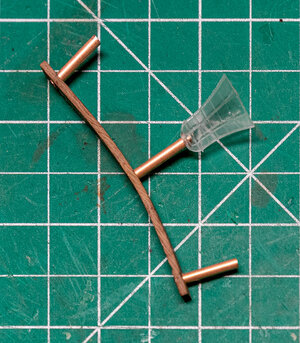
I drilled the stern covering piece of wood to accommodate three pieces of brass tubing and glued them in place after shaping the stern piece. The lanterns require a larger hole to accommodate the brass tube, but it still fits well. This one is just press fit in place.
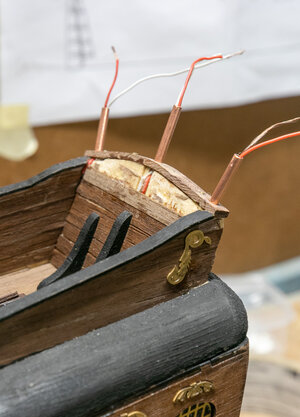
Next I ran the wires through the brass tubes and glued the stern piece to the boat. I had to remove some planking at the stern to get the wires where I needed them.
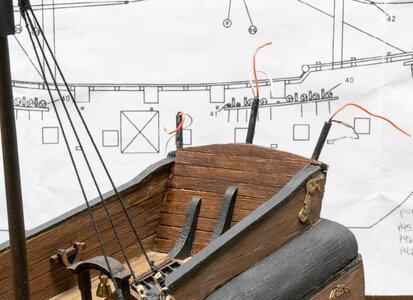
Stern piece stained black, brass tubing painted flat black, and planking replaced.
Next I glued on the stern decoration and prepared the figurines that sit on the stern piece previously added. Note that I had to file out some of the metal to get the figurines to seat correctly.
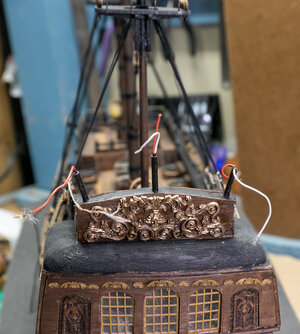
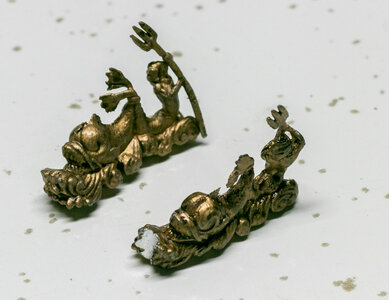
Here's the final construction. I see I have a bit of painting to do at the end of the port figurine where it was filed. The lanterns will be added later as they are with my son who is painting the frames on the plastic for me since he has more talent for painting fine details than I do.
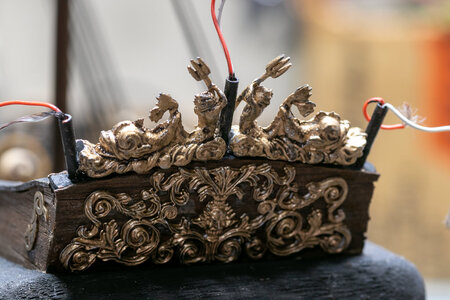
I drilled the stern covering piece of wood to accommodate three pieces of brass tubing and glued them in place after shaping the stern piece. The lanterns require a larger hole to accommodate the brass tube, but it still fits well. This one is just press fit in place.

Next I ran the wires through the brass tubes and glued the stern piece to the boat. I had to remove some planking at the stern to get the wires where I needed them.

Stern piece stained black, brass tubing painted flat black, and planking replaced.

Next I glued on the stern decoration and prepared the figurines that sit on the stern piece previously added. Note that I had to file out some of the metal to get the figurines to seat correctly.


Here's the final construction. I see I have a bit of painting to do at the end of the port figurine where it was filed. The lanterns will be added later as they are with my son who is painting the frames on the plastic for me since he has more talent for painting fine details than I do.

I reached a major milestone in the build. All standing rigging has been completed. I thought it was time to take the ship outside and take a couple of photos in the backyard on an overcast day to get nice even lighting on the ship. I am happy with the build so far.
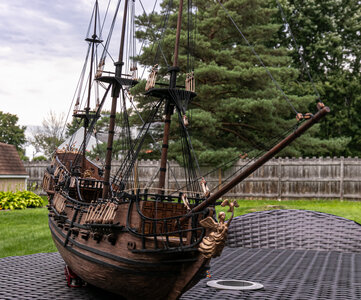
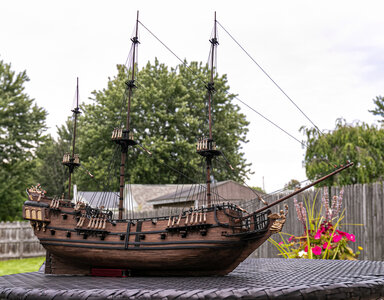
Next up is making the spars and getting ropes and blocks on them.


Next up is making the spars and getting ropes and blocks on them.
Looks great outside makes it look a lot more real.I reached a major milestone in the build. All standing rigging has been completed. I thought it was time to take the ship outside and take a couple of photos in the backyard on an overcast day to get nice even lighting on the ship. I am happy with the build so far.
View attachment 255117View attachment 255118
Next up is making the spars and getting ropes and blocks on them.
I wanted to do a setup where there would not be houses, fences or trees in the background, but the only place would have been in the middle of the street. Probably not a good idea to setup there.Looks great outside makes it look a lot more real.
Jeff, you have a wonderful fence in the background. Use the buttons to attach a white sheet or tablecloth to it. Transfer the table with the model to the fence. And you get a great photo shoot in natural light.I wanted to do a setup where there would not be houses, fences or trees in the background, but the only place would have been in the middle of the street. Probably not a good idea to setup there.
Thanks for the tip; it's actually a really good one. I am actually a part time portrait photographer, so I have lots of stands and backdrops. What I wanted was to get a plain sky behind the ship while having the camera a bit lower than the height as the ship in order to have a feel that the ship might be on the ocean. Maybe I will try to simulate a sunset shot just for fun. Something similar to the background in my avatar I just on this site. I'll probably wait until I get the spars up.Jeff, you have a wonderful fence in the background. Use the buttons to attach a white sheet or tablecloth to it. Transfer the table with the model to the fence. And you get a great photo shoot in natural light.
Congratulation for reaching this important working step ..... Bravo
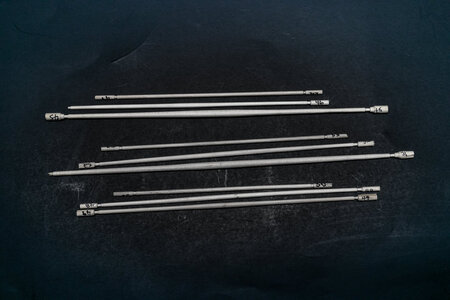
I completed the spars finally. These took me a lot longer than I would have thought. I still have to add the blocks on the ends for the braces, but I have completed the spars as per the spar drawings.
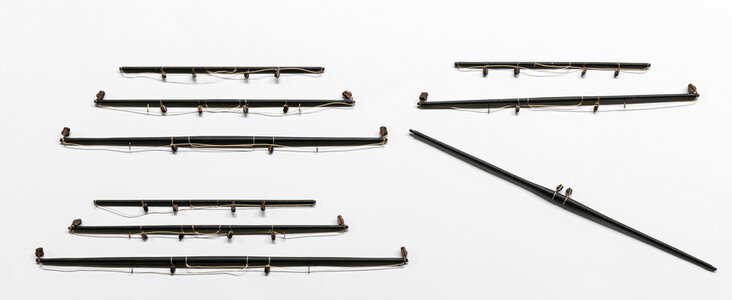
I am now working on the blocks for the braces. I have yet to decide whether to install them to the ends of the spars before or after putting hoisting the spars into place, but I am leaning toward before. I am also working on the blocks for the braces that attach to the stays.
I decided to order a package of belaying pins since there really are not enough in the kit. I think I will make some changes to the proposed rigging in the plans in order not to have so many shared belay points. The capstan around the mast really limits the rigging of the main mast.
I mounted the yards to the foremast and ran the running rigging associated with lifting and holding the yards. I reran a number of lines that interfered with other lines. The rigging won't be glued in place until I have all of the rigging completed. At that point I will adjust as necessary to keep lines taut, but not so tight that they pull yards out of place.
Next the main and mizzen masts. I will add the braces to the foremast yards once the main yards are installed.
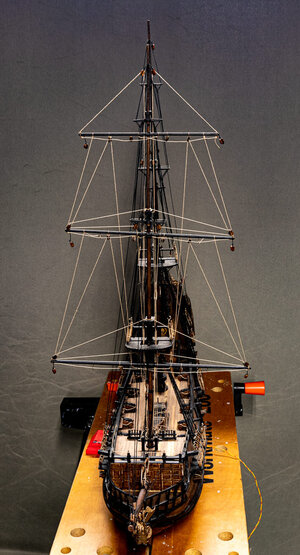
Next the main and mizzen masts. I will add the braces to the foremast yards once the main yards are installed.


