Hi Group,
It's been a while since I posted anything. That's not to say I haven't been doing anything worth posting. Let's just say I've entered a new phase of my life as a model shipbuilder and business owner. I now consider myself "semi-retired." What that means is that after 17 years in business and over 31 years building model ships, I'm no longer developing new products for my business. In all those years, I've developed quite a few practicums for both new modelers and experienced modelers, and I've written 24 high quality, color printed books on two subjects -- a generic set of 12 books on building model ship kits in general and a set of 12 books on scratch building model ships. I'll continue to offer my products on my website till the day I die, but now I'm building for myself.
For quite some time, I've admired the Royal Caroline POB model sold on ZHL as well as eBay. With the encouragement from my wife (who is an equal business partner as well), I took the dive and purchased the kit recently and have started building it. My work has been slow because after framing up the bulkheads, I decided to modify the aft area to open it up for detailing of both of the great cabins as others in this forum have done as well. I've also decided to take these details to the next level by loosely interpreting the floor shown in the kit's plans and creating somewhat of my own version of the two floors.
So that being said, I will start this build log with the completion of the forward great cabin area. It appears to me that the kit plans are an interpretation of the original admiralty drawings. Some areas of the plans are easy to make out while other areas are not so easy. That's why I say that my build is based on my interpretation and availability of images and drawings available for download on the internet. I found one particular website that allows a "sample" of its images to be downloaded for free, and it is those images that I used to create what I call the "rug" shown on the kit plans. But first things first.
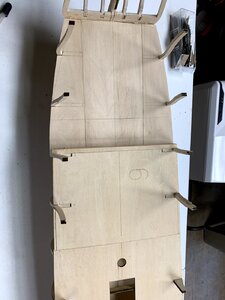
Here are a couple of photos of my framed hull. As you can see, I have opened up the aft room of the great cabin so that I can detail it as well.

By opening up this area of the model, I also had to make some changes to the stern transom part of the model. Here is a photo of the modified stern transom at this stage of construction. It has been reinforced to help stabilize it since the kit parts were trimmed down to allow for full detail inside.

Now for the forward great cabin floor. The kit plans clearly show a sunburst floor in both cabin areas. Due to the details of the remaining area of these floors, my interpretation is that the remaining visible part of these floors is not inlaid wood but some sort of rug which would have been a bit easier to detail in the actual ship than a wooden floor due to the availability of colors in such materials used for looming a rug compared to inlaying in wood. It also means that when a new king took the throne, the rug could have been more easily swapped out for something more suitable based on the new king's personal taste.
Since I plan to use longer strips of wood for the main deck planking because the wood strips provided in the kit are quite short and out of scale (planking in these ships usually averaged 25 feet to 30 feet in length) I decided to use the smaller teak wood strips to make my sunburst floor. On top of that sunburst teak wood floor, I placed (which will eventually be glued) the rug image I created using Adobe Photoshop. I later switched from Photoshop to Affinity Photo because it was much easier to create the sunburst pattern with Affinity than it was with Photoshop. here is a photo of my first printout of the rug.

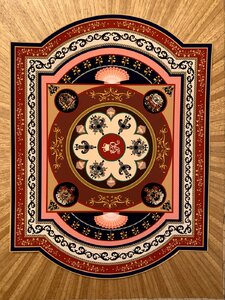
I took this photo in natural daylight and the rug image is simply sitting on top of the sunburst floor. This print does not however, show the true colors of the rug so I made one modification to the drawing and took a new photo under incandescent lighting with my iphone and autocorrection of the lighting. Here is a photo of the slightly modified rug drawing.

The colors in this photo are more true (in my opinion) to my actual drawing of the rug. Notice that I changed the King's emblem in the center by making the letters gold in color rather than blue. Based on my research, King George II reigned during the time period of the Royal Caroline (1749) so these initials are one of many different sets during his reign.
To create the sunburst pattern of wood, I first created the drawing of such a sunburst in Affinity Photo and put that drawing (which was in black and white) in a layer at the bottom of the layer chain of images. The remaining layers of the drawing contained the various elements of the rug. I then lowered the opacity of the rug elements and printed a scale copy of the drawing on regular bond paper.
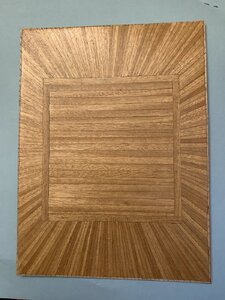
I glued this drawing to a thin piece of plywood (1/32" thick) to use as my guide. This drawing showed the lines of the sunburst as just black lines. I then laid strips of the kit floor planking one strip at a time trimming each strip to match each strip of the drawing but ending each strip inside the rug pattern. Here is a photo of the floor without the rug on top of it. As you can see, the inner portion of the floor is a rectangle of strips which are basically used to fill in the area under the rug so that it will lay flat on this floor.

After sanding this wooden floor, I gave it 4 coats of Minwax Wipe on Polyurethane. The rug image was printed on a Canon inkjet printer using Canon Photo paper with a Matt finish so there's no glossiness in the rug.
I'm now working on the aft floor drawing using Affinity Photo. Due to family commitments and such, I can only work a few hours a day on the model, and I'm not able to work every day of the week, so my progress will be slow. I'll make postings at various construction intervals based on my progress. The next posting will probably be when I finish planking the aft deck area in the sunburst pattern and again when I finish the aft deck area rug. I expect all of that will take about 2 to 4 weeks to accomplish. Then I plan to plank the main deck with 1/16" thick basswood strips that are 5/16" wide. This equates to 24 scale feet which is 9.6" and a scale width of 9.36 inches.
Take care,
Bob Hunt
It's been a while since I posted anything. That's not to say I haven't been doing anything worth posting. Let's just say I've entered a new phase of my life as a model shipbuilder and business owner. I now consider myself "semi-retired." What that means is that after 17 years in business and over 31 years building model ships, I'm no longer developing new products for my business. In all those years, I've developed quite a few practicums for both new modelers and experienced modelers, and I've written 24 high quality, color printed books on two subjects -- a generic set of 12 books on building model ship kits in general and a set of 12 books on scratch building model ships. I'll continue to offer my products on my website till the day I die, but now I'm building for myself.
For quite some time, I've admired the Royal Caroline POB model sold on ZHL as well as eBay. With the encouragement from my wife (who is an equal business partner as well), I took the dive and purchased the kit recently and have started building it. My work has been slow because after framing up the bulkheads, I decided to modify the aft area to open it up for detailing of both of the great cabins as others in this forum have done as well. I've also decided to take these details to the next level by loosely interpreting the floor shown in the kit's plans and creating somewhat of my own version of the two floors.
So that being said, I will start this build log with the completion of the forward great cabin area. It appears to me that the kit plans are an interpretation of the original admiralty drawings. Some areas of the plans are easy to make out while other areas are not so easy. That's why I say that my build is based on my interpretation and availability of images and drawings available for download on the internet. I found one particular website that allows a "sample" of its images to be downloaded for free, and it is those images that I used to create what I call the "rug" shown on the kit plans. But first things first.
Here are a couple of photos of my framed hull. As you can see, I have opened up the aft room of the great cabin so that I can detail it as well.

By opening up this area of the model, I also had to make some changes to the stern transom part of the model. Here is a photo of the modified stern transom at this stage of construction. It has been reinforced to help stabilize it since the kit parts were trimmed down to allow for full detail inside.

Now for the forward great cabin floor. The kit plans clearly show a sunburst floor in both cabin areas. Due to the details of the remaining area of these floors, my interpretation is that the remaining visible part of these floors is not inlaid wood but some sort of rug which would have been a bit easier to detail in the actual ship than a wooden floor due to the availability of colors in such materials used for looming a rug compared to inlaying in wood. It also means that when a new king took the throne, the rug could have been more easily swapped out for something more suitable based on the new king's personal taste.
Since I plan to use longer strips of wood for the main deck planking because the wood strips provided in the kit are quite short and out of scale (planking in these ships usually averaged 25 feet to 30 feet in length) I decided to use the smaller teak wood strips to make my sunburst floor. On top of that sunburst teak wood floor, I placed (which will eventually be glued) the rug image I created using Adobe Photoshop. I later switched from Photoshop to Affinity Photo because it was much easier to create the sunburst pattern with Affinity than it was with Photoshop. here is a photo of my first printout of the rug.

I took this photo in natural daylight and the rug image is simply sitting on top of the sunburst floor. This print does not however, show the true colors of the rug so I made one modification to the drawing and took a new photo under incandescent lighting with my iphone and autocorrection of the lighting. Here is a photo of the slightly modified rug drawing.

The colors in this photo are more true (in my opinion) to my actual drawing of the rug. Notice that I changed the King's emblem in the center by making the letters gold in color rather than blue. Based on my research, King George II reigned during the time period of the Royal Caroline (1749) so these initials are one of many different sets during his reign.
To create the sunburst pattern of wood, I first created the drawing of such a sunburst in Affinity Photo and put that drawing (which was in black and white) in a layer at the bottom of the layer chain of images. The remaining layers of the drawing contained the various elements of the rug. I then lowered the opacity of the rug elements and printed a scale copy of the drawing on regular bond paper.
I glued this drawing to a thin piece of plywood (1/32" thick) to use as my guide. This drawing showed the lines of the sunburst as just black lines. I then laid strips of the kit floor planking one strip at a time trimming each strip to match each strip of the drawing but ending each strip inside the rug pattern. Here is a photo of the floor without the rug on top of it. As you can see, the inner portion of the floor is a rectangle of strips which are basically used to fill in the area under the rug so that it will lay flat on this floor.

After sanding this wooden floor, I gave it 4 coats of Minwax Wipe on Polyurethane. The rug image was printed on a Canon inkjet printer using Canon Photo paper with a Matt finish so there's no glossiness in the rug.
I'm now working on the aft floor drawing using Affinity Photo. Due to family commitments and such, I can only work a few hours a day on the model, and I'm not able to work every day of the week, so my progress will be slow. I'll make postings at various construction intervals based on my progress. The next posting will probably be when I finish planking the aft deck area in the sunburst pattern and again when I finish the aft deck area rug. I expect all of that will take about 2 to 4 weeks to accomplish. Then I plan to plank the main deck with 1/16" thick basswood strips that are 5/16" wide. This equates to 24 scale feet which is 9.6" and a scale width of 9.36 inches.
Take care,
Bob Hunt


