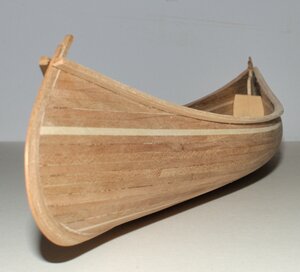
Gilles' 19-inch Canoe - cherry - Canoe # 1 [COMPLETED BUILD]

One of many strange and or stupid things we did in our youth on the water.

Like rolling over the canoe and swamping just to practice how to get canoe righted and empty while in deep water!
 
One of many strange and or stupid things we did in our youth on the water.

Like rolling over the canoe and swamping just to practice how to get canoe righted and empty while in deep water!
Yes, in the cold glacial melt waters of Lake Lower St. Mary's by Glacier National Park and declining a challenge to swim the mile plus across for which I followed in a row boat and was much warmer than the swimmer. We too had to do the rollover swamping and recovering the canoe at least every week with each scout troop on their beach day and for those going for their canoe merit badge. Oh the joys and endurance of youth!!!!!
 
Those old aluminum canoe our camp had were like a Timex watch, took a beating but kept on floating, and usually a trip to welder at end of summer.
 
Those memories all relate to a current build of a beautiful canoe together with past memories of beautiful trips that are vivid in the minds of old and younger canoeists (How do you spell that????) PT-2 Great to share these with those who have not had the highly rewarding experiences.
 
Great idea to bring some past life into the grain of the wood. Did you ever think that as some vibrations may be captured in obsidian as it cools, maybe wood as it grows picks up on the harmonics of the forest. . . we do see that in the growth rings. It will be fun to relive past journeys mentally as we cannot go back but some may be able to plan new trips to take. PT-2
 
Although I spent my bank on a Prox table saw yesterday, your build photos keep me coming back. Just have to work out the instructions order with GIlles and then get a lumber package once I can find out what the options and costs will be. PT-2
 
Do you have some pictures of the laminating process ?

With the reference to support #4, and in your manual, the part is fixed in place. Shaping and grinding is then a matter of course.

Since I haven't worked much with wood yet, my question is: how do you keep the bent wood on-site ?
Should I first fix the part in a template (for example a curved row of nails) ?
That's how I saw it with bentwood projects.
Or is it enough to fix the strips one by one with super glue and "hand-hold"
Sick

matz
 
Last edited:
With the reference to support #4, and in your manual, the part is fixed in place. Shaping and grinding is then a matter of course.
Since I haven't worked much with wood yet, my question is: how do you keep the bent wood on-site ?
Should I first fix the part in a template (for example a curved row of nails) ?
That's how I saw it with bentwood projects.
Or is it enough to fix the strips one by one with super glue and "hand-hold"
Sick
matz

"It is enough to fix the strips one by one with super glue and "hand-hold"
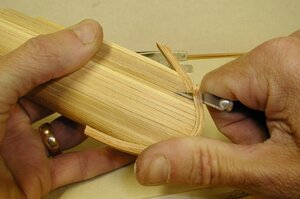
The strips are soaked in hot water for a few minutes, then bent directly on the canoe. I use "super glue" for this as well as for the installation of the rib.
You can just take your strip out of the water, wipe it down so that it is not dripping water, do a test fit on the canoe. once you know it bends well, apply a small amount of glue on the strip and put in place. Hold for a minute or so with your fingers. please make sure the surface on the stem is smooth for good contact with the strip.
Place a strip on one end of the canoe. Then move to the other end while the glue dries and so on.
You will probably need to laminate 5 strips on each side.

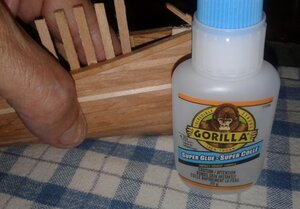
Here is the glue I use for the outer stems and for the ribs

20200801_115244 aa.jpg

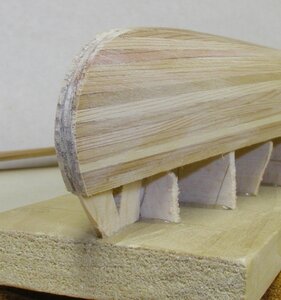
Here is what the surface looks like before laminating the strips.

058 sanded stem.jpg

G
 
Last edited:
Hello Gilles. Is there a reason for lamination? Is this by canoe design in general, or simply the method for easy bending process?
 
Hello Gilles. Is there a reason for lamination? Is this by canoe design in general, or simply the method for easy bending process?

Most wood strip canoes have a single strip about 3/4" bent to the curve, This strip is usually hard wood, well harder that the planking as it is used for protection against damage. The installation of such an "extension" of the planking requires tapering the ends of the planking strips to rest against the stem mold so that the extremities of the canoe can accommodate it.
In the model, I did chose to do laminated ends to avoid tapering the planking strips. This way, it is easier to bring down the width at the front and back. Once laminated, the ends are tapered to follow the canoe lines. This is something I started to do when I marketed the canoe as a kit since it made the construction much easier. It also allows the builder to make corrections, should the ends of the canoe not be perfectly vertical as it sometimes happens: the extra width at the extremities of the planking gives more room to work towards that.
The thicker the end of the planking is the stems, the larger the basic protective strip must be to allow working the final taper or bevel: bending a 1/16 x 1/16" or 3/32 x 3/32" around the stem pieces on the model would be to difficult, even bending it around a separate mold as shape of the mold and the actual stems on the model would have to be as precise as can be.

Hope it makes sense.

G.
 
Thanks for the prompt response and detailed answer!! It does make sense. ;)
With other glues I frequently add my fingers to the build. I"ll have to try the Gorilla Super Glue. My regular CA is bSi Bob Smith Industries INsta-Cure which gives me a 12-15 second working time and I use toothpicks to apply a dab where I want it.
I'll keep tracking your build lead. PT-2
 
Back
Top