I had my fuse hole enlarged from a small pin hole to 7/64 matching the fuse that I bought using some DuPont 7625 smokeless powder as a test. Ignition but main burn back out of the fuse hole and not enough pressure to eject the paper wad. I'll make some black powder in a few days and try it again but suspect that seeking closest point of least resistance it will again come back through the now proportionally too large fuse hole.Lit off 1-16th inch fuse and it burnt out at the entrance hole to the cannon and did not ignite the black powder. Will try a fulminate packed 1-16th combustion chamber tomorrow maybe if I can get it soldered. no pics because no battery charger.

-

Win a Free Custom Engraved Brass Coin!!!
As a way to introduce our brass coins to the community, we will raffle off a free coin during the month of August. Follow link ABOVE for instructions for entering. -

SUBSCRIBE TO SHIPS IN SCALE TODAY!
The beloved Ships in Scale Magazine is back and charting a new course for 2026!
Discover new skills, new techniques, and new inspirations in every issue.
NOTE THAT OUR NEXT ISSUE WILL BE MARCH/APRIL 2026
You are using an out of date browser. It may not display this or other websites correctly.
You should upgrade or use an alternative browser.
You should upgrade or use an alternative browser.
Fully functional realistic mini canons
- Thread starter zoly99sask
- Start date
- Watchers 15

I re did the shot with a smaller fuse that went inside the 1-16th hole ans put the fuse all the way into the chamber. Then I poured about 2-16th of powdered black powder and it shot more than 16 ft. So I guess we can shoot with powdered black powder.
PS yes I had back flash out of the fuse hole but the black powder sent the plug 1-4inch by 1-4inch 16 feet. Note I had to use a 9-32inch cannon tube since 1-4inch dowel fit in that tube and not in the 1-4.
PS yes I had back flash out of the fuse hole but the black powder sent the plug 1-4inch by 1-4inch 16 feet. Note I had to use a 9-32inch cannon tube since 1-4inch dowel fit in that tube and not in the 1-4.
Last edited:
Did you have the dowel plug/shot in a fabric patch for a sealed fit? BP Muzzle loaders place a fabric patch over the bore, set the ball on that , give it a partial set down, cut off the remaining fabric patch, and then firmly ram the ball against the wad ahead of the powder charge. When I get my powder I'll give that a try using your dowel instead of the steel ball bearings that I have and would not be able to worm out if it failed. Wood . . . yes, feasible. PT=2I re did the shot with a smaller fuse that went inside the 1-16th hole ans put the fuse all the way into the chamber. Then I poured about 2-16th of powdered black powder and it shot more than 16 ft. So I guess we can shoot with powdered black powder.
PS yes I had back flash out of the fuse hole but the black powder sent the plug 1-4inch by 1-4inch 16 feet. Note I had to use a 9-32inch cannon tube since 1-4inch dowel fit in that tube and not in the 1-4.
I glued an #26 wire into channels ground in the wood plug and bend ends over the plug at the chamber end glued with gorilla glue and it fit tight in the bore so no patch needed. The wire was there so I could retrieve the plug if it did not fire. It was not loose but it was not totally tight either. the glue residue kept the plug in the chamber.Did you have the dowel plug/shot in a fabric patch for a sealed fit? BP Muzzle loaders place a fabric patch over the bore, set the ball on that , give it a partial set down, cut off the remaining fabric patch, and then firmly ram the ball against the wad ahead of the powder charge. When I get my powder I'll give that a try using your dowel instead of the steel ball bearings that I have and would not be able to worm out if it failed. Wood . . . yes, feasible. PT=2
I ordered a new camera because mine is not available so when I get it I will take some videos of the cannon and firing. but that will be in a week.
I glued an #26 wire into channels ground in the wood plug and bend ends over the plug at the chamber end glued with gorilla glue and it fit tight in the bore so no patch needed. The wire was there so I could retrieve the plug if it did not fire. It was not loose but it was not totally tight either. the glue residue kept the plug in the chamber.
I ordered a new camera because mine is not available so when I get it I will take some videos of the cannon and firing. but that will be in a week.

The drawing helps to understand your approach. What is the diameter of your fuse hole? Maybe a small screw with the copper wire on the front end would work and not give you the problem of the glue attaching itself to the bore. Just wondering. It would also give some more mass to the projectile.
the chamber end cap is glued in tight and non-movable and the projectile glue is holding the retrieval wire onto the projectile body and there is no problem attaching to the bore. The glue on the Projectile just adds a little thickness so it fits snuggly in the bore and does not move. It is acting like a patch in mussel loaders. No added mass is needed for the projectile as it is not intended to smash boards on the side of a boat. If you want to smash boards then you need more powder and smaller fuse hole as you have already seen to get the power to eject a ball out of the cannon.
The fuse hole is 1-16th of an inch and I will make a smaller hole when I make a new test cannon for the wire spark ignition with a smaller hole when I get the ordered micro drills. This 1-16th hole is about as small as possible for a powdered black powder fuse to be made and used in the cannon and needs to be inserted inside the chamber in order to ignite the powdered black powder. No screw is possible at the fuse hole and I barely have enough room for the fuse.
The fuse hole is 1-16th of an inch and I will make a smaller hole when I make a new test cannon for the wire spark ignition with a smaller hole when I get the ordered micro drills. This 1-16th hole is about as small as possible for a powdered black powder fuse to be made and used in the cannon and needs to be inserted inside the chamber in order to ignite the powdered black powder. No screw is possible at the fuse hole and I barely have enough room for the fuse.
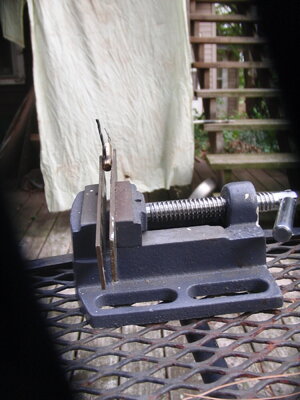
After receiving the firing kit from Miniature Cannon Technologies, LLC. including both black powder and their small .177 caliber balls I pulled out by reloading balance to measure both the grain weight of the small scoop measure (flat and rounded) and the balls together with measuring their diameter. I used this to compare with the ball bearings that I wanted to fire in my cannon by scaling things up in a slow safe manner. They also sell and have instructions for a 25 caliber and the related load. All of this together gave me a starting point for my own initial load/shot. Not a full load but 2/3 by scaling their 25 caliber to my 9/32 inch ball and slightly larger bore. An initial mission was to fine a fabric fine enough to wrap the ball properly onto the following sequence: fuse, powder load tamped firm, small paper napkin piece wad, wrapped ball and a final very small napkin wad. I clamped the barrel in an F-clamp and placed the barrel bore on to a small sandbag with two more behind the breach for recoil. I was firing into plastic tub with some heavy linen cloth folded over numerous times. Lit the fuse and stood behind an yard recycling barrel for safety and did not see the shot but it sounded like a 22 pistol. No noticeable recoil drift, everything in place and the ball creating a depression, still wrapped in to the cloth with bout a 1/2 inch indentation. I was most concerned about the 7/64 fuse hole size to the bore but the ratio was similar to the .177 inch cannons with their 1/16 inch fuse hole so it was not a significant firing problem. The fuse is the same 7/64 diameter as the hole so it is a tight fit.the chamber end cap is glued in tight and non-movable and the projectile glue is holding the retrieval wire onto the projectile body and there is no problem attaching to the bore. The glue on the Projectile just adds a little thickness so it fits snuggly in the bore and does not move. It is acting like a patch in mussel loaders. No added mass is needed for the projectile as it is not intended to smash boards on the side of a boat. If you want to smash boards then you need more powder and smaller fuse hole as you have already seen to get the power to eject a ball out of the cannon.
The fuse hole is 1-16th of an inch and I will make a smaller hole when I make a new test cannon for the wire spark ignition with a smaller hole when I get the ordered micro drills. This 1-16th hole is about as small as possible for a powdered black powder fuse to be made and used in the cannon and needs to be inserted inside the chamber in order to ignite the powdered black powder. No screw is possible at the fuse hole and I barely have enough room for the fuse.
Now to go back to complete a carriage, at least an initial trial one that I started previously; see how that works, and then cut out another with proper fittings.
The fun was in the bang! So I am looking to making my own powder and seeing the ballistics of loads and trajectory. Accuracy was always a problem in old naval cannons with the ball rattling around as it went out of the barrels.
Here is a photo of the barrel just after firing, back on the bench, cleaned and the loading items laid out before I took out the started carriage for continuation.After receiving the firing kit from Miniature Cannon Technologies, LLC. including both black powder and their small .177 caliber balls I pulled out by reloading balance to measure both the grain weight of the small scoop measure (flat and rounded) and the balls together with measuring their diameter. I used this to compare with the ball bearings that I wanted to fire in my cannon by scaling things up in a slow safe manner. They also sell and have instructions for a 25 caliber and the related load. All of this together gave me a starting point for my own initial load/shot. Not a full load but 2/3 by scaling their 25 caliber to my 9/32 inch ball and slightly larger bore. An initial mission was to fine a fabric fine enough to wrap the ball properly onto the following sequence: fuse, powder load tamped firm, small paper napkin piece wad, wrapped ball and a final very small napkin wad. I clamped the barrel in an F-clamp and placed the barrel bore on to a small sandbag with two more behind the breach for recoil. I was firing into plastic tub with some heavy linen cloth folded over numerous times. Lit the fuse and stood behind an yard recycling barrel for safety and did not see the shot but it sounded like a 22 pistol. No noticeable recoil drift, everything in place and the ball creating a depression, still wrapped in to the cloth with bout a 1/2 inch indentation. I was most concerned about the 7/64 fuse hole size to the bore but the ratio was similar to the .177 inch cannons with their 1/16 inch fuse hole so it was not a significant firing problem. The fuse is the same 7/64 diameter as the hole so it is a tight fit.
Now to go back to complete a carriage, at least an initial trial one that I started previously; see how that works, and then cut out another with proper fittings.
The fun was in the bang! So I am looking to making my own powder and seeing the ballistics of loads and trajectory. Accuracy was always a problem in old naval cannons with the ball rattling around as it went out of the barrels.

Wow sounds good and I like your setup; looks good. Happy you got another cannon to pattern it after. Shooting into cloth is a good idea, I will have to try that.
I am still waiting for a camera so have not done much more yet till I have it.
Well done friend!!!
I am still waiting for a camera so have not done much more yet till I have it.
Well done friend!!!
The barrel is just fine. It is the carriage that I will complete and then see about making another for the same barrel using a different parts and assembly than in the first but there were no standard carriages so it would be in how much detail that I want to take on with the very small threaded rods, bolts, and square washers with long holes for passage. I could get around the long holes by using three laminated layers with gaps between portions in the innermost ply covered by solid outer plys. No drilling what way, just more cutting and assembly. After final connections and the clamps for the trunnions are in place I'll fire it again that way. Then if all goes well I'll attach the breach restraining and side tackle lines and blocks. Shipboard gunship style to a forward bulkhead which would need to have its own bracing for the recoil which normal models don't have to deal with. It could be an aluminum angle bent and overlaid with faux planking.Wow sounds good and I like your setup; looks good. Happy you got another cannon to pattern it after. Shooting into cloth is a good idea, I will have to try that.
I am still waiting for a camera so have not done much more yet till I have it.
Well done friend!!!

That 45 makes my smaller 5/75 inch bored to fire a 9/32 bearing with black powder. I turned the barrel about 45 years ago from aHave had this thing for what seems like forever - a fully functioning .45cal. ships cannon. Now all I need is a ship to fit it.....lolView attachment 173930
 high strength steel rod. It works very well but the carriage is still to be completed. I used an F-clamp and some sandbags to elevate the barrel and control recoil. Fired it into a plastic tub with folded cloth inside as an initial trial with minimum charge when I can now work up noting the ballistics along the way to where I will call it max. I started with plumbing pipes and opened firecracker powder back in the 50's in Montana where all things go as long as you survive . . or back then
  PT-2
PT-2Now that is an eyecatching boat!!! Happy sailing. PT-2I have a boat you can mount it on. Only pic I have; lost them but it is a 2 masted bomb ketch 22 ft in length. The did on mount the masts in these pics. Love to shoot your cannon off it here in WView attachment 173990View attachment 173991View attachment 173990View attachment 173991isconsin.
Great looking Cannon and carriage as it is. I would do some more test firing with the cannon and your fuses and steel balls before worry about aluminum structures to build. I think all you need are some operating side tackle lines and blocks to absorb the recoil like on a real boat. nicely done Sire!
Thanks. I'll keep you posted as part of our guncrew. PT-2Great looking Cannon and carriage as it is. I would do some more test firing with the cannon and your fuses and steel balls before worry about aluminum structures to build. I think all you need are some operating side tackle lines and blocks to absorb the recoil like on a real boat. nicely done Sire!
The black powder components and instructions arrived today. It seems that it is primarily intended for fireworks so it may be not efficient for the cannon. I can always purchase some muzzle loaders powder from the local shop which may be less expensive than the close Cabellas. PT-2Wow sounds good and I like your setup; looks good. Happy you got another cannon to pattern it after. Shooting into cloth is a good idea, I will have to try that.
I am still waiting for a camera so have not done much more yet till I have it.
Well done friend!!!

I must say that I am just now catching up with this thread. I hope as it is apparent that we are adults here and I am not an alarmist. However, I do think that it would be wise to place a disclaimer that the author is not responsible for any mishap or personal injury.
I am not sure if we have any "young" readers here, but that is something to consider when having a thread like this. I do find all this very interesting and to be honest, I would like to try this myself if I had the time, money resources, etc. But, just like anything - anything can be used inappropriately. So, if you are young at heart, do this with an adult mindset, please.
Donald

With my little cannon I used FFF black powder. Got a bunch of Fireworks fuse - for M-80 type firecrackers - of about 1/16" diameter. Had a lot of fun around the 4th when I would load it without the shot - just packed in a bunch of wadding and let'er rip. For as small of a gun as you are building you could probably use some FFFF b.p. and not have to worry about singing your eyebrows grinding your own powder.