Montanes by OcCre 1:70

Continuing on. With the officers quarters brackets in place and my griping over I have moved on to other things. Took my time over the weekend to get the cannons in place and attached the cannon ropes. I finally got really good at making the knots when I got to the last one!! Arg! But in the process I think I gave myself a decent foundation when starting the rigging.

One of the items that was bothering me was how to deal with the cannon door (lines?). The rope for the crew to pull on to open cannon doors. Tried drilling a small hole but it was too hard to get the thread through, a bigger hole works but it just looks like a hole. So it was off to the hobby store and internet to try to find some 2 to 3mm grommets. Nothing available, at least nothing I would find. So while standing around in the hobby story I spotted some brass piping that seemed about the right size. I cut these up to make little pipes that the line would go through. Seemed to work ok.

with a 3/32 sized drill and a little tap with a hammer they slide in nicely and makes it look much better then a simple hole. The plan is to put these in this evening.

If it ultimately looks dumb we'll just paint them black.

pics below

May 25 2.jpgMay 25 3.jpgMay 25 4.jpgMay 25 5.jpgMay 25 6.jpg
 

Attachments

  • May 25 1.jpg
    May 25 1.jpg
    64.9 KB · Views: 8
Got the little pseudo grommets in place. I think they look pretty good. This evening we'll tie in the lines and stuff them into the holes. Hoping it looks good.

I also built the little tool boxes that go on the back end. All of the parts that made up the aft bits seemed way smaller then in the pictures. We'll get them painted this evening. Talking things over with my wife, we also decided to stain the top of the cabin.

May 27 1.jpgMay 27 2.jpg
 

Attachments

  • May 27 3.jpg
    May 27 3.jpg
    88.5 KB · Views: 8
Still paying the price for that initial twist and bend in the frame as I still need to alter and twist things. This time the ladders coming up the side of the boat. Had to but in a little wangle.

Capstans went together ok, although the provided capstan thingies were different then what was in the picture. Vertical fenders went on ok as well. No issues. I still need to finalize to tops of them.

The camera angle seems to make things look out of whack but oh well. As you can see I have not yet reworked the upper railing (sure looks like the work of an armature - oh yeah - that reminds me, I am basically a noob)

Have a nice Memorial Day weekend everyone.

May 29 1.jpgMay 29 2.jpgMay 29 3.jpgMay 29 4 Forward Capstan.jpgMay 29 5.jpg
 
During the week and this morning. Tackled the internal railing and the officers quarters.

First was the internal railing, basically everything went ok but..... reworked it at bit. Fragile for sure. The little posts are made of pewter and are very thin, they break very easily. A couple of them were broken before I even took them out of the bin. Got everything measured and holes drilled with no issues. The instructions called for the railing itself to be 1 x 4 sapelli. So I measured and cut and glued it to the posts. (a fiddly exercise to say the least). The 1 by 4 looks too tall, 4mm is too much. So I took a big breath and pulled it off the posts (only broke a couple of them). Found myself some 1 x 3mm walnut and used that instead. Looks much better!! Stained the walnut with Red Chestnut.

Here are some pics.

Jun 5 pic 2.jpgJun 5 pic 3.jpgJun 5 pic 5.jpgJun 5 pic 11.jpg
 
The next big task and one that I have been struggling with is the officers quarters. Now I'll find out if all of that fooling around a couple weeks ago will pay off. Seems it did.

One thing worth noting. I stuck the mid section pillars on the starboard side one at a time with great difficulty. So I thought to myself that has to be a better way. I came up with a solution that worked great! Here is what I did. I took the billers and laid them down face down against a straight jig. Next is to put in a bead of white glue along the top and bottom and glue in a thin, bendable, wire. Let it dry for a couple of hours. Now the thing is a single unit and you can shape it however you want. It was still a little fiddly gluing it to the frame but man it looks really good.

Jun 5 pic 7.jpgJun 5 pic 8.jpg


Here are a couple of pics of the officers quarters being constructed and a final pic of them at the 95% done stage. For the windows we used gold paint with a couple drops of white.

Jun 5 pic 4.jpgJun 5 pic 9.jpgJun 5 pic 10.jpg


Making progress.

Oh yeah - I also mounted the dead eye platforms.
 
The next big task and one that I have been struggling with is the officers quarters. Now I'll find out if all of that fooling around a couple weeks ago will pay off. Seems it did.

One thing worth noting. I stuck the mid section pillars on the starboard side one at a time with great difficulty. So I thought to myself that has to be a better way. I came up with a solution that worked great! Here is what I did. I took the billers and laid them down face down against a straight jig. Next is to put in a bead of white glue along the top and bottom and glue in a thin, bendable, wire. Let it dry for a couple of hours. Now the thing is a single unit and you can shape it however you want. It was still a little fiddly gluing it to the frame but man it looks really good.

View attachment 237331View attachment 237332


Here are a couple of pics of the officers quarters being constructed and a final pic of them at the 95% done stage. For the windows we used gold paint with a couple drops of white.

View attachment 237333View attachment 237334View attachment 237335


Making progress.

Oh yeah - I also mounted the dead eye platforms.
In the end, looks well. I -in my time as we'll as Mirek did NOT use the Metal frames on each quarter and the metal pieces in metal in between. was substituted with wooden pieces, but as it a free word-sometime I doubt -everyone makes in his or HERE way
DO NOT take it as a criticising, but some I think You are making an easy thing more difficult as it is.
WHY DO THING EASY, MEN IT IS MUCH EASIER TO DO IT DIFFICULT.
now up again after my accident
by the way, if you have a very tiny strip-deck or 2. planking, cut sone fine pieces and inserted in the window frames.
 
Weekly post.

Continuing on. Working on deadeyes. Man there are a lot of ways to do these. Mirek's method looks fabulous and I gave it a try but my soldering skills just sucked way to bad to continue with this method. John Aliprantis's (Youtube) approach seems ok and a bit more in my skill set. Although I reversed it and snipped the end wires off underneath. The next trick was figuring out how to place the support rods (not sure what they are called). The challenge is on the lower section. I tried using a hook (like at the top) but I did not like that. Then I tried a loop, which looks bulky. I showed both approaches to my wife and she gravitated straight to the loop look. So that's going to be the approach.

I went through seven 0.8mm drill bits. Although my arm is much better and does not hurt it's still a bit wobbly due to muscle rearrangement. So sure enough. I kept breaking the little buggers. All I could do was laugh at myself.

Given my progress over the weekend I am pretty sure I can finish the entire deadeye task this next week.

Below is the method I choose.

  • Wrap the deadeye with about 4 cm's of wire.
  • Do about 2 to 3 tight twists
  • Drop the wires down the hole
  • To make the loop underneath the platform I took a 2mm drill bit then twisted the wires tightly directly below the drill bit. Do this around the drill bit threads. This way you can "unscrew" it out leaving a nice loop.
  • Then snip off the excess wire at about the 2 twist mark.


Deadeyes 1.jpgDeadeyes 2.jpgDeadeyes 3.jpgDeadeyes 4.jpgDeadeyes 5.5.jpgDeadeyes 5.jpgDeadeyes 6.jpgDeadeyes 7.jpg
 
Weekly Post Jun 20.

Hello all, here's what been going on for the last week. I spent a ton of time working on the dead eyes, managed to get them all of the way around the boat. To be honest I am a little worried about tying them to the rat lines. The holes are sooooooo small. I tried using some thin CA glue to needle up the end of the string and it's too thick to get through. Using a needle threader I can do the deed easy enough, but, I'll need to come through the back side of them so the needle threader won't work. I guess, when the time comes I'll just need to rotate them to allow room for the threader. (two months away)

Did a bunch of the work outside as the CA glue fumes don't agree with me.

Jun 20 Outside.jpg

So this weekends objective was to wrap up as much of the detail items that I could so I can start the life raft. Placing the cleats was interesting. The little buggers were too big for the vertical placements. Knowing that they are actually used to tie things I had to file them down a bit. (30 of them) This did not take too long, I just clamped them with some small vice grips them chucked the whole thing into my vice. There are a couple pics below. After resizing they fit fine.

Got the pins in place as well. In the pictures in the manual I see that they had these painted black. After consulting with the spouse we decided to leave them as is.

The lanterns were pretty fun. The instructions call for some dark red plastic inside (not provided), so I went over to the local hobby shop, they did not have any but the local dollar store had some that would work just fine. Although not very dark, the end result worked out pretty good.

Over the next couple of days I plan on getting my cannon doors straightened out and the lines put in place that open them. Once that is done I will give it big survey and finish what ever might be missing (sans anchors and life raft). Then I plan on giving it a monster coat of varnish.

The big question is:

Satin or Semi-gloss. Opinions welcom.

ThanksJun 20 Pin Holders.jpgSun 20 Pins.jpgJun 20 Prepping Cleats.jpgSun 20 Cleat Compare.jpgSun 20 Cleat too big.jpgSun 20 Painting Cleats.jpgJun 20 Cleats and misc.jpgJun 20 View 3.jpgSun 20 Lanterns Pic 2.jpgSun 20 Prepping Lanterns.jpg
 
Weekly Post Jun 20.

Hello all, here's what been going on for the last week. I spent a ton of time working on the dead eyes, managed to get them all of the way around the boat. To be honest I am a little worried about tying them to the rat lines. The holes are sooooooo small. I tried using some thin CA glue to needle up the end of the string and it's too thick to get through. Using a needle threader I can do the deed easy enough, but, I'll need to come through the back side of them so the needle threader won't work. I guess, when the time comes I'll just need to rotate them to allow room for the threader. (two months away)

Did a bunch of the work outside as the CA glue fumes don't agree with me.

View attachment 239883

So this weekends objective was to wrap up as much of the detail items that I could so I can start the life raft. Placing the cleats was interesting. The little buggers were too big for the vertical placements. Knowing that they are actually used to tie things I had to file them down a bit. (30 of them) This did not take too long, I just clamped them with some small vice grips them chucked the whole thing into my vice. There are a couple pics below. After resizing they fit fine.

Got the pins in place as well. In the pictures in the manual I see that they had these painted black. After consulting with the spouse we decided to leave them as is.

The lanterns were pretty fun. The instructions call for some dark red plastic inside (not provided), so I went over to the local hobby shop, they did not have any but the local dollar store had some that would work just fine. Although not very dark, the end result worked out pretty good.

Over the next couple of days I plan on getting my cannon doors straightened out and the lines put in place that open them. Once that is done I will give it big survey and finish what ever might be missing (sans anchors and life raft). Then I plan on giving it a monster coat of varnish.

The big question is:

Satin or Semi-gloss. Opinions welcom.

ThanksView attachment 239884View attachment 239885View attachment 239886View attachment 239887View attachment 239888View attachment 239889View attachment 239890View attachment 239891View attachment 239892View attachment 239893
THESE PICS SHOW THAT HERE YOU HAVE DONE A MAGNIFICENT WORK. DO NOT MAKE PARTS MORE DIFFICULT, THAT THEY ARE (YOUR STRUGGLE WITH THE SIDE GALLERIES) WELL DONE. Flag boxes, The Lights and around the mast. WELL DONE
 
Thanks El Capi. Yep, going forward I plan on making things easier. I am concerned though about rigging. SOS members really have a high standard for this. I am leaning on purchasing a rope walk device and giving it a go.
DO NOT WOR6. I CAN GUID YOU tHROUGH
In fact, it is not that difficult v - 11Th Standing Riggen- inform me when you start. DO NOT Glue the upper parts of the mast now- first, you will have to rig the shrouds and forestays and finally backstays, before you will have to add the main platform. When this DRY, you can finish the other parts of the mast.
The Bowsprit is the most difficult part-
After the Standing riggen comes the running riggen, which your model will be with sails are divided into "Running Riggen to move Yards and mast -then there is the running riggen to move sails etc. you cal always contact me either here or more private E-Mail peandersen@telefonica.net
first may the 1Th part of the Bowsprit and insert it
 

Attachments

  • 1372-- BOWSPRYD MODEL.jpg
    1372-- BOWSPRYD MODEL.jpg
    42.3 KB · Views: 14
  • 1388--BOVSPRYD MASTER 04.jpg
    1388--BOVSPRYD MASTER 04.jpg
    28.8 KB · Views: 13
  • 1405-BOWSPRYD.gif
    1405-BOWSPRYD.gif
    19.9 KB · Views: 14
  • 1420--BOESPRTYD.jpg
    1420--BOESPRTYD.jpg
    94.9 KB · Views: 13
  • 1446--BOWSPRYD- STANDING RIGN.jpg
    1446--BOWSPRYD- STANDING RIGN.jpg
    95.5 KB · Views: 12
  • 1483-.jpg
    1483-.jpg
    266.7 KB · Views: 14
OK. It's going to be a couple weeks yet before I start this. I had already planned on not gluing the upper part of the masts. Looking forward to the challenge.

Oh Oh. Does anyone know where I can order more eye rings. Nails with a loop on top. Not sure what they are called. I can see that I will be way way short.

Thanks
Just last week I ordered some in different sizes from Cornwall model boats in the UK


I guess there are also shops in the States
 
Just last week I ordered some in different sizes from Cornwall model boats in the UK


I guess there are also shops in the States
As he is from the US. I did not mention the 2 biggest Spanish dealers with ant type Fitting, although the ship now worldwide-.
 
And if you allow me, here you have a webpage with all the information regarding the "Montañés" - "The mountain man", technical data, history, crew, etc.

TODO A BABOR. EL MONTAÑÉS

And a the release of a new book

EL MONTAÑÉS Y SU TIEMPO

Of course I don't have any type of economical interest in this.

Greetings
Jaime
Is there an English version of the ship's history? I would love to read more about it.

I also found this build log: https://modelshipworld.com/topic/755-montanes-by-slawek1303-occre-170/
 
Good afternoon, jbradford.
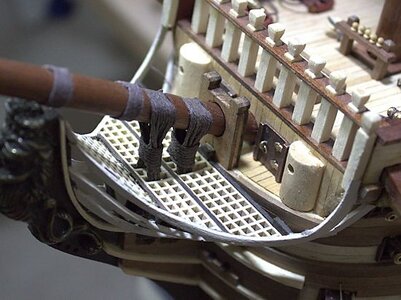
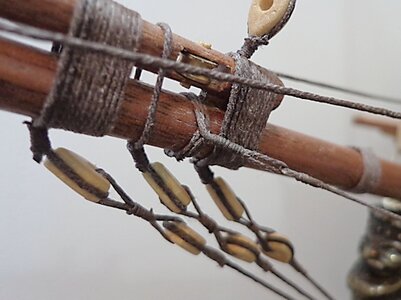
I´ve taken the text from the web page of "todoababor" and translate it with Google. Once reviewd and somewhat corrected this is the result. I hope is understandable...

Brigadier Don José de Bustamante y Guerra, being the military head of the square and province of Montevideo and the Río de la Plata squadron, obtained a subscription, among his wealthy migrant countrymen, to build a ship and give it to the king as a gift. It was baptized the Montañés "the mountainman" (Ferrol 1794), and added in the instance that for this purpose he raised, so that it was sent, especially in time of war and if there were "stocks", by a Cantabrian captain.

The Montañés was therefore built by Julián de Retamosa, successor to the famous José Romero Landa as a shipbuilder for the Navy. Based on Romero Landa's plans, he adjusted the weight of the ballast, refined the bows and reinforced the stern, achieving its perfection as a ship of the Spanish line in this ship, with the Neptune and the Argonaut being the ships of this class, being their properties sailing bowline, long or stern extraordinary and could be compared with advantage to the best foreigners.

Faster than her contemporaries, she reached 14 knots with fresh wind at a long and 10 close, being the normal 10 and 8 respectively. In addition, she perfectly kept her low battery, with a height above the waterline of 1.89 meters. Its first commander is the captain of the ship Don José Jordán, who after capturing the French frigate Efigenia managed to evade, during the war that Spain and other Western powers declared to revolutionary France, eight French ships (one of three bridges) and two frigates, managing to anchor in San Feliú de Guixols on March 30, where he had time to bow, and repel the attack that lasted 2h30 'where he fought at long distance with the ships that successively passed by his side and which was favorable to the Montañés, that came to shoot 1,100 projectiles.

The Spanish suffered only the loss of the constable and two sailors and several wounded. The French withdrew and returned to Menorca. On May 14, 1795, he arrived in Mahón, with the French prisoners that the "Efigenia" had from the captured frigate.

That same year, it was the insignia of the squadron of the Chief of Squad, Ignacio María de Álava, which was destined for the Philippines to reinforce the Spanish presence in the area, and which was made up of three ships and five frigates. On the voyage there were no sick people on board thanks to the clever dispositions of Álava and during the crossing of the Pacific the crews of the ships were continually exercised in the use of artillery, since they thought (correctly) that they were at war with England.

The ship was maintained, later, eight years with the main mission of harassing British trade in the seas of China. Although this work was not very prominent, the Spanish squad was perfectly prepared to fight the British if they had presented themselves, managing to make a deterrent to a hypothetical attack on the Philippines by them, who preferred to attack French positions, less strongly defended.

Alava once surprised two somewhat neglected British ships and a frigate off the coast of China near Canton. The English had to rig by chopping cables and abandoning boats and supplies. They were able to flee especially because the Montañés was leaking and had damage to the rigging. Then the English published that the two ships and the frigate had hunted the Spanish.

She returned in 1803 to Cádiz, where she would be off duty for repairs. In June 1805 it was decided to enlist it and in a record time of six and a half hours her hull was lined with copper. Her commander reports after arriving from Ferrol to Cádiz: "Since this ship left Ferrol, they began to fall ill with fever that the doctor characterizes as putrid and sinus. These have increased every day and today there are already 72, of which 31 have been in a state of convalescence, which It is attributed to the lack of clothing for their cleanliness and shelter, and although three individuals have died in these three days, one from the troop and the two from sailors, the surgeon does not judge that this disease is an epidemic. "

In Trafalgar he lost his two commanders, Don Francisco Alcedo and Don Antonio Castaños, but the Lieutenant Don Alejo Gutiérrez de Rubalcava managed to take him to the Bay of Cádiz, 20 crew members died and 29 were wounded. Once her breakdowns were repaired (February 25, 1806) she made several trips, landing in the Balearic and Canary Islands. In June 1808 she participated in the capture of the French Rosilly squad in Cádiz. Under the command of José Quevedo on May 1, 1809, the canned ship "San Lorenzo" and two Englishmen lead French prisoners to the Canary Islands, returning to Cádiz on September 18.

In December he left for Puerto Rico to take prisoners and inmates and collect funds.

It had its end in a violent storm in front of the bay of Cádiz being commanded by José Quevedo, on March 6, 1810. It was partially burned by the French, who were besieging the city, but it could be recovered, being sold at public auction on 12 March 1822.

Greetings
Jaime
 
Back
Top