Great job on the anchors Grant.
-

Win a Free Custom Engraved Brass Coin!!!
As a way to introduce our brass coins to the community, we will raffle off a free coin during the month of August. Follow link ABOVE for instructions for entering.
-

PRE-ORDER SHIPS IN SCALE TODAY!
The beloved Ships in Scale Magazine is back and charting a new course for 2026!
Discover new skills, new techniques, and new inspirations in every issue.
NOTE THAT OUR FIRST ISSUE WILL BE JAN/FEB 2026
You are using an out of date browser. It may not display this or other websites correctly.
You should upgrade or use an alternative browser.
You should upgrade or use an alternative browser.
HMS Victory Mantua 1:78 (first build) by Grant Tyler [COMPLETED BUILD]
- Thread starter GrantTyler
- Start date
- Watchers 102
Good evening. I have been working on the bowsprit rigging off and on and here is where I have progressed to -
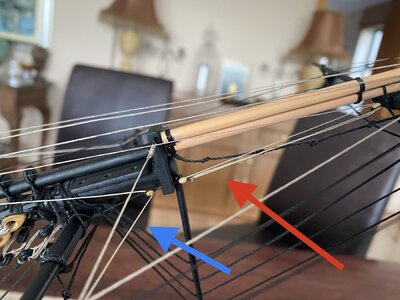
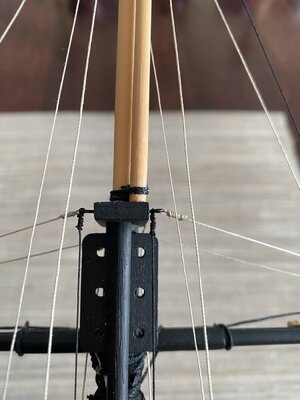
1;:The spritsail yard lift. Starts at the jibboom cap and through the yard block. Finished at the forecastle timber heads.(Blue arrow)
The red arrow shows the top sail inhaul line (no idea correct terminology) and blocks which also finish off at the forecastle timber heads.
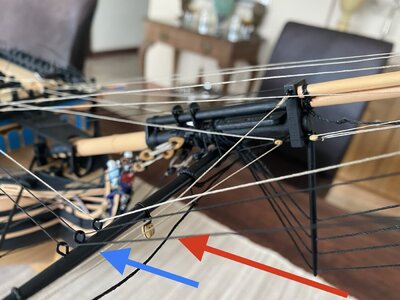
2:Next photo shows The spritsail and topsail yard brace ( blue arrow) I did correct these from previous incorrect positioning. These go from the forecastle 3mm blocks through the hoops ( on real ship these are rope) on the spritsail yard and topsail yard finishing off at various points on the bowsprit.
The red arrow reflect the rope walk through the stirrups. I made these with a 1mm thread (Per Mantua dimension)however I feel that a 0.5mm would be more realistic. I am debating redoing these to 0.5mm.
3: Next pic - The blocks for the yard brace are not linear but are at an angle as show by the blue arrow. As indicated I used 3mm double blocks and the color is black for the topsail yard and hemp for the spritsail. I have temporarily tied these to the forecastle. Debating wether I should just lash these to the end block- will look better.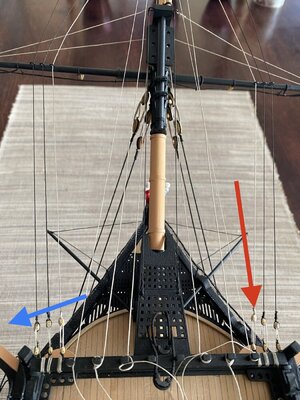
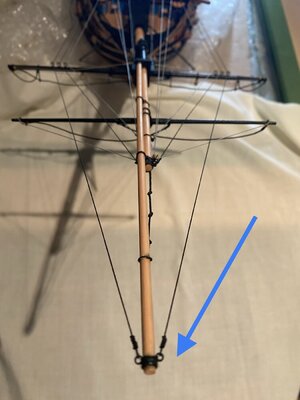
All the rigging has been whipped. Thanks to @dockattner cutting off the thread perpendicular has decrease my “tag” count...thanks Paul. The finishing onto the bowsprit was a bead bought from beads for Africa and looped onto bowsprit (blue arrow)
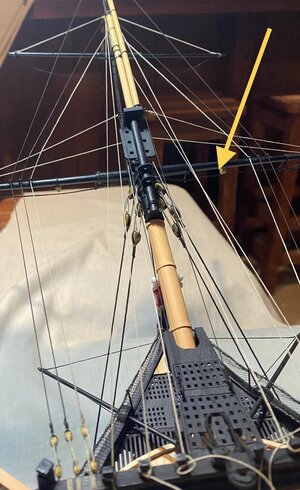
The clue line block was added to the spritsail yard - 5mm double block.( Yellow arrow).
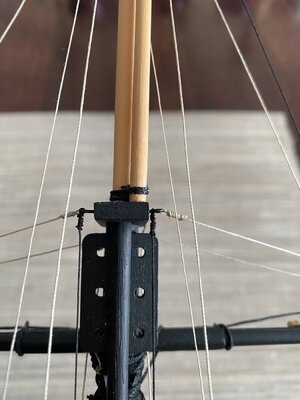
I have not tensioned any lines. Temporarily tied them to the timber heads. The remaining bowsprit rigging will have to wait unti the masts and preventor stays are completed.
Cheers Grant
1;:The spritsail yard lift. Starts at the jibboom cap and through the yard block. Finished at the forecastle timber heads.(Blue arrow)
The red arrow shows the top sail inhaul line (no idea correct terminology) and blocks which also finish off at the forecastle timber heads.


2:Next photo shows The spritsail and topsail yard brace ( blue arrow) I did correct these from previous incorrect positioning. These go from the forecastle 3mm blocks through the hoops ( on real ship these are rope) on the spritsail yard and topsail yard finishing off at various points on the bowsprit.
The red arrow reflect the rope walk through the stirrups. I made these with a 1mm thread (Per Mantua dimension)however I feel that a 0.5mm would be more realistic. I am debating redoing these to 0.5mm.

3: Next pic - The blocks for the yard brace are not linear but are at an angle as show by the blue arrow. As indicated I used 3mm double blocks and the color is black for the topsail yard and hemp for the spritsail. I have temporarily tied these to the forecastle. Debating wether I should just lash these to the end block- will look better.

All the rigging has been whipped. Thanks to @dockattner cutting off the thread perpendicular has decrease my “tag” count...thanks Paul. The finishing onto the bowsprit was a bead bought from beads for Africa and looped onto bowsprit (blue arrow)

The clue line block was added to the spritsail yard - 5mm double block.( Yellow arrow).

I have not tensioned any lines. Temporarily tied them to the timber heads. The remaining bowsprit rigging will have to wait unti the masts and preventor stays are completed.
Cheers Grant

Thank you Jay. Appreciate it.Grant, where have I been? This is the first time I’ve seen your build but how lucky am I to start at the beginning and look at your fantastic work. Will definitely be on your watch list.
Hello Daniel- thanks for this. Always appreciate your feedback and encouragement. Cheers GrantGreat job on the anchors Grant.
Thank you Vic- I take a load from your build and how you approach constructing these wonderful ships. Cheers GrantAnd you even wrapped the anchor rings with ropes! Good job! Excellent details.
No idea why I posted one photo twiceGood evening. I have been working on the bowsprit rigging off and on and here is where I have progressed to -
1;:The spritsail yard lift. Starts at the jibboom cap and through the yard block. Finished at the forecastle timber heads.(Blue arrow)
The red arrow shows the top sail inhaul line (no idea correct terminology) and blocks which also finish off at the forecastle timber heads.
View attachment 302870
View attachment 302875
2:Next photo shows The spritsail and topsail yard brace ( blue arrow) I did correct these from previous incorrect positioning. These go from the forecastle 3mm blocks through the hoops ( on real ship these are rope) on the spritsail yard and topsail yard finishing off at various points on the bowsprit.
The red arrow reflect the rope walk through the stirrups. I made these with a 1mm thread (Per Mantua dimension)however I feel that a 0.5mm would be more realistic. I am debating redoing these to 0.5mm.
View attachment 302865
3: Next pic - The blocks for the yard brace are not linear but are at an angle as show by the blue arrow. As indicated I used 3mm double blocks and the color is black for the topsail yard and hemp for the spritsail. I have temporarily tied these to the forecastle. Debating wether I should just lash these to the end block- will look better.View attachment 302872
All the rigging has been whipped. Thanks to @dockattner cutting off the thread perpendicular has decrease my “tag” count...thanks Paul. The finishing onto the bowsprit was a bead bought from beads for Africa and looped onto bowsprit (blue arrow)
View attachment 302868
The clue line block was added to the spritsail yard - 5mm double block.( Yellow arrow).
View attachment 302869
I have not tensioned any lines. Temporarily tied them to the timber heads. The remaining bowsprit rigging will have to wait unti the masts and preventor stays are completed.
Cheers Grant
View attachment 302867

- Joined
- Sep 3, 2021
- Messages
- 5,180
- Points
- 738

An immaculate rigging job, I'm severely impressed.Good evening. I have been working on the bowsprit rigging off and on and here is where I have progressed to -
1;:The spritsail yard lift. Starts at the jibboom cap and through the yard block. Finished at the forecastle timber heads.(Blue arrow)
The red arrow shows the top sail inhaul line (no idea correct terminology) and blocks which also finish off at the forecastle timber heads.
View attachment 302870
View attachment 302875
2:Next photo shows The spritsail and topsail yard brace ( blue arrow) I did correct these from previous incorrect positioning. These go from the forecastle 3mm blocks through the hoops ( on real ship these are rope) on the spritsail yard and topsail yard finishing off at various points on the bowsprit.
The red arrow reflect the rope walk through the stirrups. I made these with a 1mm thread (Per Mantua dimension)however I feel that a 0.5mm would be more realistic. I am debating redoing these to 0.5mm.
View attachment 302865
3: Next pic - The blocks for the yard brace are not linear but are at an angle as show by the blue arrow. As indicated I used 3mm double blocks and the color is black for the topsail yard and hemp for the spritsail. I have temporarily tied these to the forecastle. Debating wether I should just lash these to the end block- will look better.View attachment 302872
All the rigging has been whipped. Thanks to @dockattner cutting off the thread perpendicular has decrease my “tag” count...thanks Paul. The finishing onto the bowsprit was a bead bought from beads for Africa and looped onto bowsprit (blue arrow)
View attachment 302868
The clue line block was added to the spritsail yard - 5mm double block.( Yellow arrow).
View attachment 302869
I have not tensioned any lines. Temporarily tied them to the timber heads. The remaining bowsprit rigging will have to wait unti the masts and preventor stays are completed.
Cheers Grant
View attachment 302867
The stirrups should definitely be 0,5mm (0,5x78=39mm in real life), but that's from my perspective.
No idea why I posted one photo twice
I just checked your age so that’s no excuse

- Joined
- Sep 3, 2021
- Messages
- 5,180
- Points
- 738

Any age above fifty is an excuse...I just checked your age so that’s no excuse
- Joined
- Apr 20, 2020
- Messages
- 6,221
- Points
- 738

rigging work is very impressive, well doneGood evening. I have been working on the bowsprit rigging off and on and here is where I have progressed to -
1;:The spritsail yard lift. Starts at the jibboom cap and through the yard block. Finished at the forecastle timber heads.(Blue arrow)
The red arrow shows the top sail inhaul line (no idea correct terminology) and blocks which also finish off at the forecastle timber heads.
View attachment 302870
View attachment 302875
2:Next photo shows The spritsail and topsail yard brace ( blue arrow) I did correct these from previous incorrect positioning. These go from the forecastle 3mm blocks through the hoops ( on real ship these are rope) on the spritsail yard and topsail yard finishing off at various points on the bowsprit.
The red arrow reflect the rope walk through the stirrups. I made these with a 1mm thread (Per Mantua dimension)however I feel that a 0.5mm would be more realistic. I am debating redoing these to 0.5mm.
View attachment 302865
3: Next pic - The blocks for the yard brace are not linear but are at an angle as show by the blue arrow. As indicated I used 3mm double blocks and the color is black for the topsail yard and hemp for the spritsail. I have temporarily tied these to the forecastle. Debating wether I should just lash these to the end block- will look better.View attachment 302872
All the rigging has been whipped. Thanks to @dockattner cutting off the thread perpendicular has decrease my “tag” count...thanks Paul. The finishing onto the bowsprit was a bead bought from beads for Africa and looped onto bowsprit (blue arrow)
View attachment 302868
The clue line block was added to the spritsail yard - 5mm double block.( Yellow arrow).
View attachment 302869
I have not tensioned any lines. Temporarily tied them to the timber heads. The remaining bowsprit rigging will have to wait unti the masts and preventor stays are completed.
Cheers Grant
View attachment 302867
Those anchors look seriously authentic Grant, well doneGood morning. When I woke this am, I needed to do something other than blocks and rigging...(and I have just started). Decided to make the sleeves for my Mizzen top strops-as with the other masts I had to make these larger and more rectangle in shape to fit the brass blackened strops.
I drilled a larger hole and attempted with needle files as per the main and foremast - was going to break the crows nest. (Tip- never fit a mast until prep work completed) I put my “big girl panties” on and followed @Vfordyce example- used my dremmel tool with a small engraving tip. Came out ok however not as neat or linear as the other masts. Luckily the dead eyes will cover.
View attachment 302791View attachment 302792
I started adding the “tree nails “ to the anchors. Used 6mm brass and left small amount protruding so they would be visible- painted.
Cheers Grant
View attachment 302801

You have surpassed me in so many ways, Grant!Thank you Vic- I take a load from your build and how you approach constructing these wonderful ships. Cheers Grant
- Joined
- Aug 30, 2020
- Messages
- 676
- Points
- 353

Really nice touch with the anchor bolts, I think I will try to do a similar thing.Good morning. When I woke this am, I needed to do something other than blocks and rigging...(and I have just started). Decided to make the sleeves for my Mizzen top strops-as with the other masts I had to make these larger and more rectangle in shape to fit the brass blackened strops.
I drilled a larger hole and attempted with needle files as per the main and foremast - was going to break the crows nest. (Tip- never fit a mast until prep work completed) I put my “big girl panties” on and followed @Vfordyce example- used my dremmel tool with a small engraving tip. Came out ok however not as neat or linear as the other masts. Luckily the dead eyes will cover.
View attachment 302791View attachment 302792
I started adding the “tree nails “ to the anchors. Used 6mm brass and left small amount protruding so they would be visible- painted.
Cheers Grant
View attachment 302801
Good morning Vic...Thank you, however I do believe that is up for debate- I am still “wet behind the ears” as my late Dad would often remind me. Much appreciated. Cheers GrantYou have surpassed me in so many ways, Grant!
Good Morning- Thank you.rigging work is very impressive, well done
Good morning Mark.Thank you. I saw another modeler do this and I thought would add some value to my Victory- also gave me a break from the tangle of ropesThose anchors look seriously authentic Grant, well done
I love the feedback from guys who are in the know- much appreciated. Your post has made my decision for me- I will use 0.5. Eish- now need to redo these on the shipAn immaculate rigging job, I'm severely impressed.
The stirrups should definitely be 0,5mm (0,5x78=39mm in real life), but that's from my perspective.
 .The 1mm just seemed out of scale. Cheers Grant
- Joined
- Sep 3, 2021
- Messages
- 5,180
- Points
- 738

I'm not necessarily in the know, but sometimes I just run some calcs to see what dimensions things in real life have. That can be quite the eye-opener.I love the feedback from guys who are in the know- much appreciated. Your post has made my decision for me- I will use 0.5. Eish- now need to redo these on the ship.The 1mm just seemed out of scale. Cheers Grant
Sometimes you just follow the instructions, only to realize it "doesn't look right". Only thing to it is to redo the job to your own satisfaction.
I've seen the ropes, supplied with my BN kit and I'm not going to use those; too thick for my liking. The distance between ratlines is another pitfall; all too often they seem to be too far apart, wreaking havoc on the appearance of the model.
In the mean time, good luck with all the rigging trivialities. I'm confident your model will turn out great.
Last edited:
- Joined
- Jan 21, 2022
- Messages
- 855
- Points
- 403

Hi Grant
Is your decision about not making sails final? As I look at my royal louis I regret not making even rolled up sails. Ship would look much better but decision is up to you
Is your decision about not making sails final? As I look at my royal louis I regret not making even rolled up sails. Ship would look much better but decision is up to you


