Yep the boks won and the braai was a celebration. That is SA Heinrich down to a T.Thank you very much Grant - it is much appreciated! About Covid, in SA - my son tells me the exact same thing as well. That is the amazing thing about SA - the resilience to any crisis is always remarkable! As long as the Springboks are winning and the braai fires are kept going, all is good!
-

Win a Free Custom Engraved Brass Coin!!!
As a way to introduce our brass coins to the community, we will raffle off a free coin during the month of August. Follow link ABOVE for instructions for entering.
-

PRE-ORDER SHIPS IN SCALE TODAY!
The beloved Ships in Scale Magazine is back and charting a new course for 2026!
Discover new skills, new techniques, and new inspirations in every issue.
NOTE THAT OUR FIRST ISSUE WILL BE JAN/FEB 2026
You are using an out of date browser. It may not display this or other websites correctly.
You should upgrade or use an alternative browser.
You should upgrade or use an alternative browser.
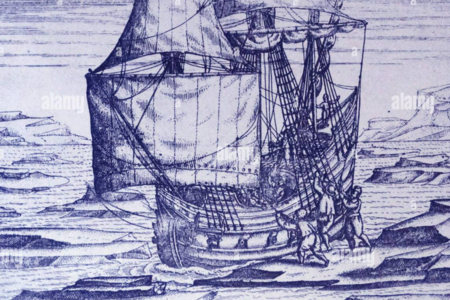
HIGH HOPES, WILD MEN AND THE DEVIL’S JAW - Willem Barentsz Kolderstok 1:50
- Joined
- Jan 9, 2020
- Messages
- 10,566
- Points
- 938

Dear Friends
Okiedokie - enough of doing nothing. Tonight, I quickly cut out the 6 gunports on the Port Side - all went well with no split or cracked planks, which is always a relief! Then began the laborious task of filing out the ports to their correct size.
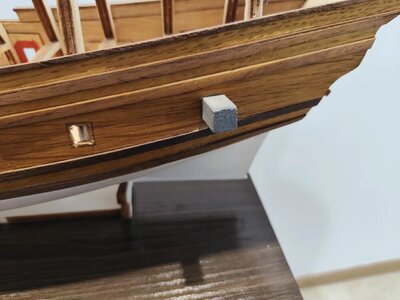
I would like to share my recipe of creating the correct-sized and square ports. Just like most builders out there, I also used a sandpaper block cut to the appropriate size and covered on all sides by sandpaper. However, as the sandpaper starts wearing down (and this inevitably does not happen evenly and you have to start adding more layers, the result becomes less than satisfactory (according to my idea of correctly shaped gunports in any case). So, I had a pumice stone cut for me to the exact size. After filing open the port to the point where it barely accepts the tip of the pumice stone, I then massage the opening until I get to the point where I can use the pumice stone as sanding block. The end result - perfect gunports.
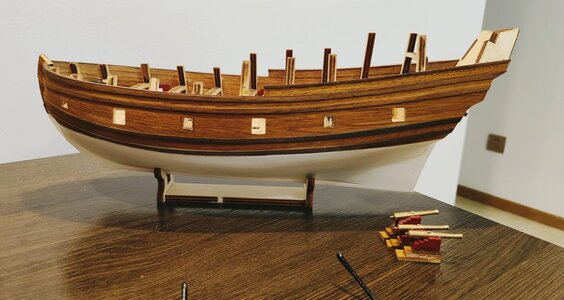
Three ports done - three to go.
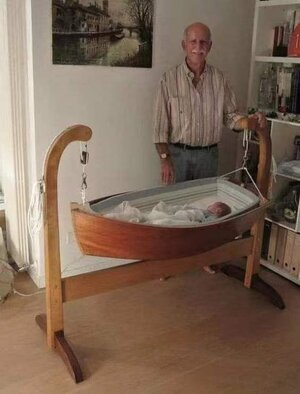
And then to all the grandfathers out there - how about this for your next project?
Okiedokie - enough of doing nothing. Tonight, I quickly cut out the 6 gunports on the Port Side - all went well with no split or cracked planks, which is always a relief! Then began the laborious task of filing out the ports to their correct size.

I would like to share my recipe of creating the correct-sized and square ports. Just like most builders out there, I also used a sandpaper block cut to the appropriate size and covered on all sides by sandpaper. However, as the sandpaper starts wearing down (and this inevitably does not happen evenly and you have to start adding more layers, the result becomes less than satisfactory (according to my idea of correctly shaped gunports in any case). So, I had a pumice stone cut for me to the exact size. After filing open the port to the point where it barely accepts the tip of the pumice stone, I then massage the opening until I get to the point where I can use the pumice stone as sanding block. The end result - perfect gunports.

Three ports done - three to go.
And then to all the grandfathers out there - how about this for your next project?


Now that is just awesome Heinrich! Very clever with the pumice stone. Someone had a true vision for their grandbaby's rocker!Dear Friends
Okiedokie - enough of doing nothing. Tonight, I quickly cut out the 6 gunports on the Port Side - all went well with no split or cracked planks, which is always a relief! Then began the laborious task of filing out the ports to their correct size.
View attachment 326969
I would like to share my recipe of creating the correct-sized and square ports. Just like most builders out there, I also used a sandpaper block cut to the appropriate size and covered on all sides by sandpaper. However, as the sandpaper starts wearing down (and this inevitably does not happen evenly and you have to start adding more layers, the result becomes less than satisfactory (according to my idea of correctly shaped gunports in any case). So, I had a pumice stone cut for me to the exact size. After filing open the port to the point where it barely accepts the tip of the pumice stone, I then massage the opening until I get to the point where I can use the pumice stone as sanding block. The end result - perfect gunports.
View attachment 326991
Three ports done - three to go.
And then to all the grandfathers out there - how about this for your next project?
View attachment 327007
That was an excellent idea with that punice stone Heinrich, and that is one very nice babybed my friend
- Joined
- Jan 9, 2020
- Messages
- 10,566
- Points
- 938

Thank you, my friend! I also think that rocker is the bees' knees! I'd better tell my son to hurry up and make a plan!Now that is just awesome Heinrich! Very clever with the pumice stone. Someone had a true vision for their grandbaby's rocker!

- Joined
- Jan 9, 2020
- Messages
- 10,566
- Points
- 938

Thank you, my friend. The pumice stone works beautifully. As I said to @Daniel20 Daniel, making the baby bed is not a problem, but where do I get the baby?That was an excellent idea with that punice stone Heinrich, and that is one very nice babybed my friend

Heinrich my friend, do you know about the flowers and the bee's??Thank you, my friend. The pumice stone works beautifully. As I said to @Daniel20 Daniel, making the baby bed is not a problem, but where do I get the baby?
You have a nice young Admiral my friend , give it your best shot.

 ( little joke )
- Joined
- Jan 9, 2020
- Messages
- 10,566
- Points
- 938

As soon as I wrote that, I knew I was in trouble!!!Heinrich my friend, do you know about the flowers and the bee's??
You have a nice young Admiral my friend , give it your best shot.( little joke )


 You are right, I do have a very young Admiral - the question is whether my best shot will be good enough!
Never stop trying HeinrichAs soon as I wrote that, I knew I was in trouble!!!

You are right, I do have a very young Admiral - the question is whether my best shot will be good enough!


Good evening Heinrich. That is a good idea to get those gunports just right. Hopefully it is still a while before I need to make one of those little cradles. Ha - the baby will probably fall out if I made oneDear Friends
Okiedokie - enough of doing nothing. Tonight, I quickly cut out the 6 gunports on the Port Side - all went well with no split or cracked planks, which is always a relief! Then began the laborious task of filing out the ports to their correct size.
View attachment 326969
I would like to share my recipe of creating the correct-sized and square ports. Just like most builders out there, I also used a sandpaper block cut to the appropriate size and covered on all sides by sandpaper. However, as the sandpaper starts wearing down (and this inevitably does not happen evenly and you have to start adding more layers, the result becomes less than satisfactory (according to my idea of correctly shaped gunports in any case). So, I had a pumice stone cut for me to the exact size. After filing open the port to the point where it barely accepts the tip of the pumice stone, I then massage the opening until I get to the point where I can use the pumice stone as sanding block. The end result - perfect gunports.
View attachment 326991
Three ports done - three to go.
And then to all the grandfathers out there - how about this for your next project?
View attachment 327007

- Joined
- Jan 9, 2020
- Messages
- 10,566
- Points
- 938

The trying is the fun part!Never stop trying Heinrich

- Joined
- Jan 9, 2020
- Messages
- 10,566
- Points
- 938

I disagree my friend.Good evening Heinrich. That is a good idea to get those gunports just right. Hopefully it is still a while before I need to make one of those little cradles. Ha - the baby will probably fall out if I made one
 I think your grandchild will amuse him/herself for hours with the rigging of the cradle!
True story- you did open yourself up for some banter here Heinrich.The trying is the fun part!
Practice Heinrich, practice!As soon as I wrote that, I knew I was in trouble!!!

You are right, I do have a very young Admiral - the question is whether my best shot will be good enough!


- Joined
- Jan 9, 2020
- Messages
- 10,566
- Points
- 938

Dear Friends
A point which I think deserves mention, is that research is not something which takes place in sporadic bursts. Rather, it is a continuous process which carries on regardless of whether actual work on the ship is performed or not. Some time ago, you might recall that @RDN1954 Joahn asked about the very different transom of the model compared to that of the replica ship. I went to great lengths to explain the different interpretations between De Weerdt, Kolderstok and Hoving in that regard.
Over the weekend, @Frank48 was kind enough to send me another copy of the Gerrit de Veer diary/journal on whose illustrations I base a large part of my build. Now I want to point out that I have various different copies and editions of this document, so you might well ask what the big deal is. Well, this one was published in 1605 which makes it the oldest edition that I have and the second oldest edition that exists - the oldest one was published in 1598.
Paging through it, like I have done so many times before with the other editions, I noticed the same drawing which has by now become very familiar to me - that of the two ships leaving on the 1596 and final expedition.
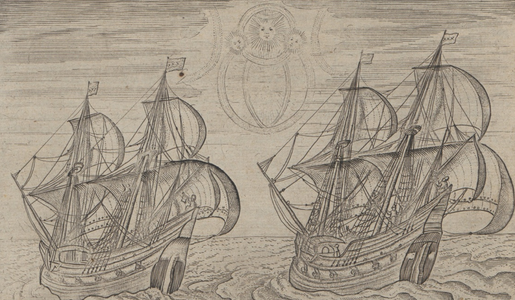
Looking at the drawing I saw the same - I almost want to call it generic-type drawing - that I had seen in the other editions. But because the print is so much clearer in this edition, I noticed for the first time the marked differences of the transoms of these two ships! Of course, I am not saying that it is not visible in the other editions - it is just that it is so much clearer in this one.
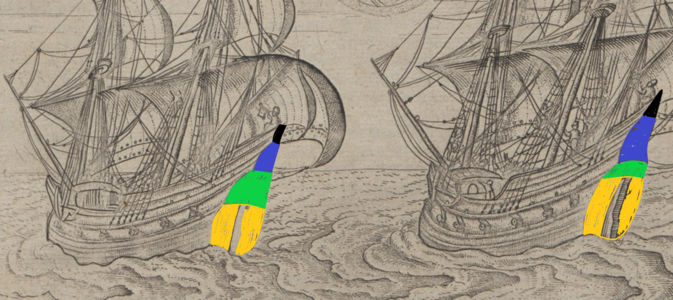
Just look at the two completely different configurations of the transoms which explains the difference in interpretation perfectly. There is no doubt that the @Kolderstok model closely follows the transom of the ship on the left - the one-million-dollar question though is, which ship was Barentsz's and which was one was Rijp's?
A point which I think deserves mention, is that research is not something which takes place in sporadic bursts. Rather, it is a continuous process which carries on regardless of whether actual work on the ship is performed or not. Some time ago, you might recall that @RDN1954 Joahn asked about the very different transom of the model compared to that of the replica ship. I went to great lengths to explain the different interpretations between De Weerdt, Kolderstok and Hoving in that regard.
Over the weekend, @Frank48 was kind enough to send me another copy of the Gerrit de Veer diary/journal on whose illustrations I base a large part of my build. Now I want to point out that I have various different copies and editions of this document, so you might well ask what the big deal is. Well, this one was published in 1605 which makes it the oldest edition that I have and the second oldest edition that exists - the oldest one was published in 1598.
Paging through it, like I have done so many times before with the other editions, I noticed the same drawing which has by now become very familiar to me - that of the two ships leaving on the 1596 and final expedition.

Looking at the drawing I saw the same - I almost want to call it generic-type drawing - that I had seen in the other editions. But because the print is so much clearer in this edition, I noticed for the first time the marked differences of the transoms of these two ships! Of course, I am not saying that it is not visible in the other editions - it is just that it is so much clearer in this one.

Just look at the two completely different configurations of the transoms which explains the difference in interpretation perfectly. There is no doubt that the @Kolderstok model closely follows the transom of the ship on the left - the one-million-dollar question though is, which ship was Barentsz's and which was one was Rijp's?

Can you make anything out of the flags Heinrich, there are differences in. Both ships have in the mainmast the Amsterdam flag, but the foremast flags are different in my eyes.the one-million-dollar question though is, which ship was Barentsz's and which was one was Rijp's?
The front canopy's are different as wel, and you know how the Willem Barents canopy should look like
- Joined
- Jan 9, 2020
- Messages
- 10,566
- Points
- 938

Hi Richie. Yes, I will rather refrain from the baby talk as wellWell spotted and an interesting question indeed.
I don't have anything witty to say about a baby in a boat so shall refrain from saying anything.
A pumice stone is very clever but how did you get it to the required size.
 - it's much safer! I had a pumice stone "rod" for want of a better word which was ground down to size by one of my ex-students in the Nantong Shipyard. What grinding wheel they used, and how they maintained the grit, remain a mystery - I have no idea. I am just glad that I have that little stone. It has made the sizing of the gunports on the Port Side an absolute pleasure. Once that pumice stone passes easily through the port, you can stop - you don't even have to check - it will be the correct size.
- Joined
- Jan 9, 2020
- Messages
- 10,566
- Points
- 938

Very good questions and observations my friend. We know that both ships sailed under the flag of Amsterdam (or Amstelredam) as it was called. The only mention that Ab makes about flags in the book is the following picture and description:Can you make anything out of the flags Heinrich, there are differences in. Both ships have in the mainmast the Amsterdam flag, but the foremast flags are different in my eyes.
The front canopy's are different as wel, and you know how the Willem Barents canopy should look like
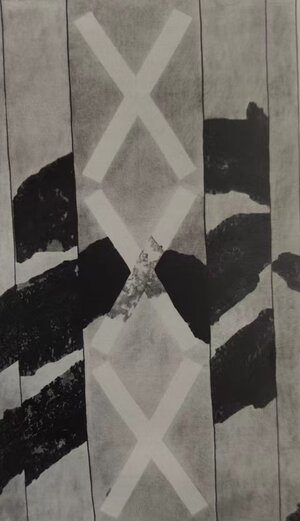
Remains of the large Amsterdam flag (made from wool) of Barents's ship. (Photograph: Rijksmuseum)
The front canopy is also an excellent observation. The ship on the left shows the front canopy completely open (which is in line with both Hoving and De Weerdt's interpretations. This is also the route that I will follow. The ship on the right shows a closed (or at least, partially closed) front canopy like I did on WB #1.
In principle an interesting discussion to compare the two transoms and their differences.Dear Friends
A point which I think deserves mention, is that research is not something which takes place in sporadic bursts. Rather, it is a continuous process which carries on regardless of whether actual work on the ship is performed or not. Some time ago, you might recall that @RDN1954 Joahn asked about the very different transom of the model compared to that of the replica ship. I went to great lengths to explain the different interpretations between De Weerdt, Kolderstok and Hoving in that regard.
Over the weekend, @Frank48 was kind enough to send me another copy of the Gerrit de Veer diary/journal on whose illustrations I base a large part of my build. Now I want to point out that I have various different copies and editions of this document, so you might well ask what the big deal is. Well, this one was published in 1605 which makes it the oldest edition that I have and the second oldest edition that exists - the oldest one was published in 1598.
Paging through it, like I have done so many times before with the other editions, I noticed the same drawing which has by now become very familiar to me - that of the two ships leaving on the 1596 and final expedition.
View attachment 327106
Looking at the drawing I saw the same - I almost want to call it generic-type drawing - that I had seen in the other editions. But because the print is so much clearer in this edition, I noticed for the first time the marked differences of the transoms of these two ships! Of course, I am not saying that it is not visible in the other editions - it is just that it is so much clearer in this one.
View attachment 327111
Just look at the two completely different configurations of the transoms which explains the difference in interpretation perfectly. There is no doubt that the @Kolderstok model closely follows the transom of the ship on the left - the one-million-dollar question though is, which ship was Barentsz's and which was one was Rijp's?
Nevertheless I have my doubts, that the artist did realy know, what he is showing.
Looking at the flags and the sails compared with the ships sailing direction I think he was not realy a technician or sailor, but more an explorer knowing icebeers etc.
Also in a lot of the engravings the vessels are looking completely different and often very simplified or technically incorrect (ship construction)
In my opinion very questionable, if a correct interpretation, of how the ship looked like, is possible......
