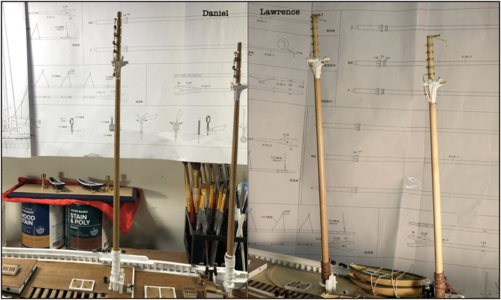
The Schooner Bluenose 1921, POF Yuanqing Models 1:72 [COMPLETED BUILD]

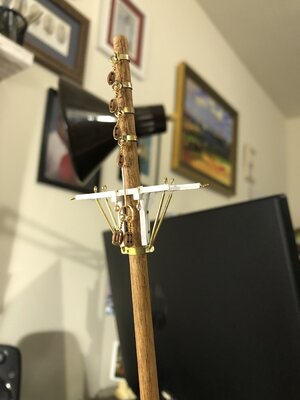
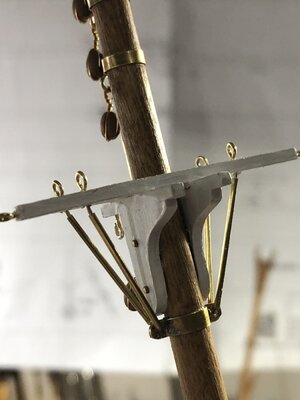
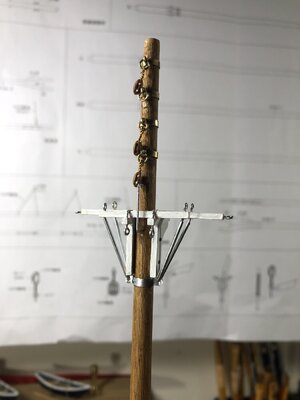
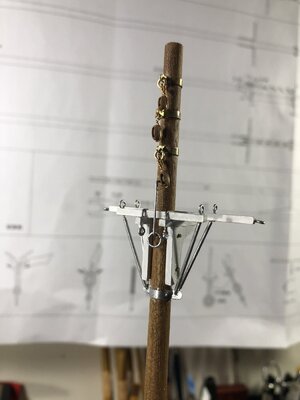
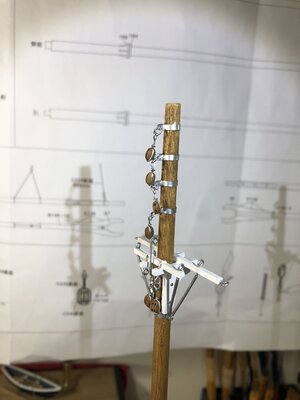
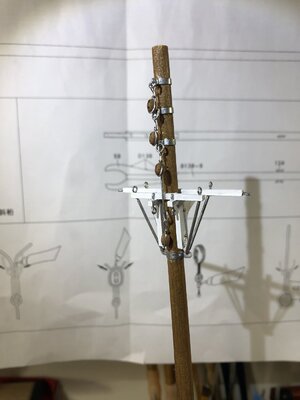
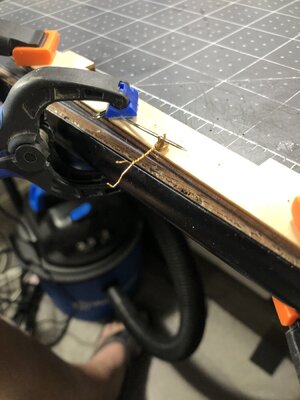
Good evening, everyone, I have been focused on the main mast crosstrees and fittings that will support the Main Sail Peak Halyard. We begin with the two drop rings at the front of and hang down from the crosstrees. Past experience has shown this to be a fitting that can pull out at the worst moment, so I extended it up through the member and bent it over into a little recess I created.
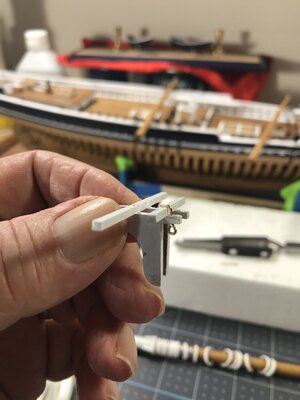
IMG_2949.jpgIMG_2950.jpg

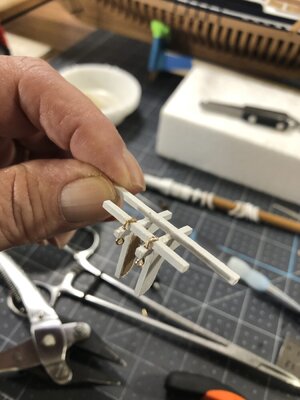
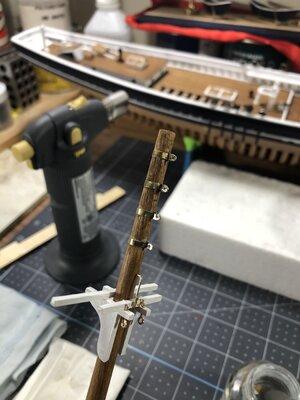
After glue down of the crosstrees I placed the banding rings above and the throat Halyard Hanger. I started by just trying to glue and hold the bands in place but after curing all night then trimming them, they just came apart. So, to heck with that, I soldered them off mast then easily trimmed and drilled the holes for the rings.
IMG_2952.jpgIMG_2953.jpg

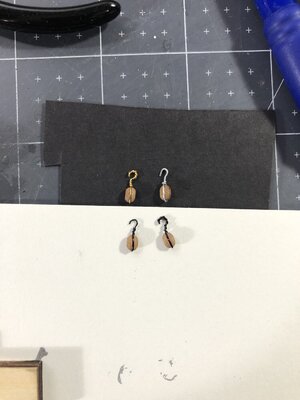
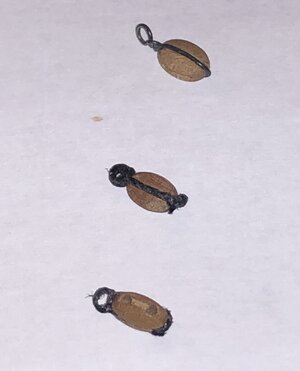
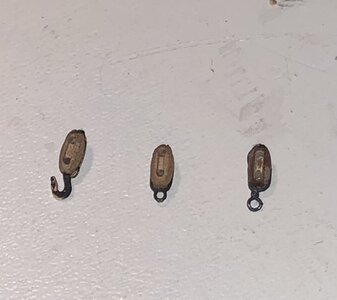
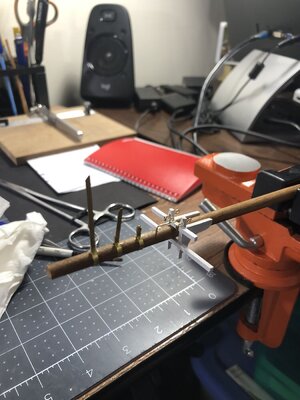
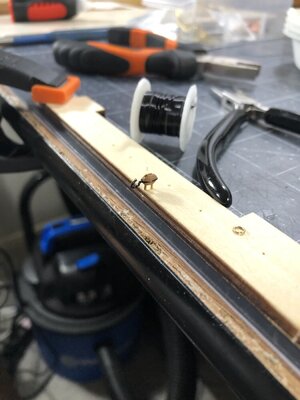
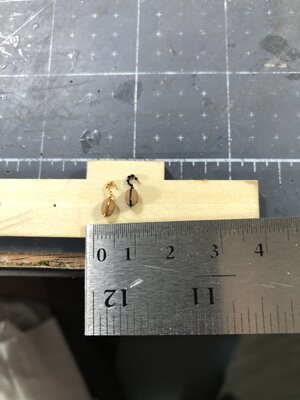
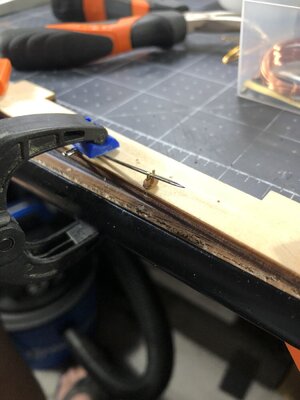
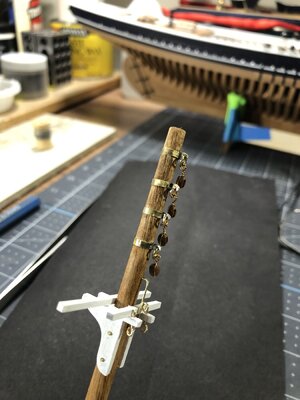
Next came stropping the 4.5mm blocks with 0.4mm wire and putting a hook on the end. I had to make a multi jig since all this is so small to work with.
I decided to go with the brass wire because, well I like the shine.
IMG_2954.jpgIMG_2955.jpgIMG_2957.jpgIMG_2958.jpg

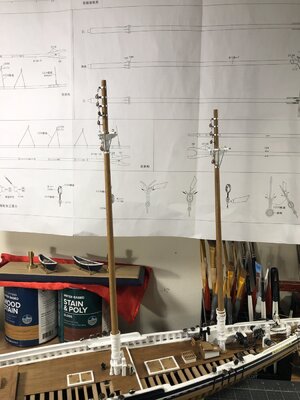
And here is a partial finished product.

IMG_2959.jpg

Since I will be adding sails there will be additional blocks and fittings, I'm sure so more studying is in store.
Hope you enjoy and happy modeling!
 
Good evening, everyone, I have been focused on the main mast crosstrees and fittings that will support the Main Sail Peak Halyard. We begin with the two drop rings at the front of and hang down from the crosstrees. Past experience has shown this to be a fitting that can pull out at the worst moment, so I extended it up through the member and bent it over into a little recess I created.

View attachment 394371View attachment 394372

After glue down of the crosstrees I placed the banding rings above and the throat Halyard Hanger. I started by just trying to glue and hold the bands in place but after curing all night then trimming them, they just came apart. So, to heck with that, I soldered them off mast then easily trimmed and drilled the holes for the rings.

View attachment 394373View attachment 394374

Next came stropping the 4.5mm blocks with 0.4mm wire and putting a hook on the end. I had to make a multi jig since all this is so small to work with.
I decided to go with the brass wire because, well I like the shine.
View attachment 394375View attachment 394376View attachment 394377View attachment 394378

And here is a partial finished product.

View attachment 394380

Since I will be adding sails there will be additional blocks and fittings, I'm sure so more studying is in store.
Hope you enjoy and happy modeling!
The work on this small parts for some hours on a few inches of mast looks very nice, Daniel. A solid base for the belonging rigging.
Regards, Peter
 
That looks gorgeous, Daniel! You are a wizard with a soldering iron to get those small joints look so neat. And the stropping of those miniscule blocks - marvelous. No wonder the finished part of the build looks so good!
 
Good evening, everyone, I have been focused on the main mast crosstrees and fittings that will support the Main Sail Peak Halyard. We begin with the two drop rings at the front of and hang down from the crosstrees. Past experience has shown this to be a fitting that can pull out at the worst moment, so I extended it up through the member and bent it over into a little recess I created.

View attachment 394371View attachment 394372

After glue down of the crosstrees I placed the banding rings above and the throat Halyard Hanger. I started by just trying to glue and hold the bands in place but after curing all night then trimming them, they just came apart. So, to heck with that, I soldered them off mast then easily trimmed and drilled the holes for the rings.

View attachment 394373View attachment 394374

Next came stropping the 4.5mm blocks with 0.4mm wire and putting a hook on the end. I had to make a multi jig since all this is so small to work with.
I decided to go with the brass wire because, well I like the shine.
View attachment 394375View attachment 394376View attachment 394377View attachment 394378

And here is a partial finished product.
View attachment 394380

Since I will be adding sails there will be additional blocks and fittings, I'm sure so more studying is in store.
Hope you enjoy and happy modeling!
Very nice work on the tresseltree and the fittings, Daniel.
And the tresseltree a seperate subassembly, very nice indeed and soldering the mastbands, man, do I feel like a cheat.
 
You are a wizard with a soldering iron to get those small joints look so neat.
very nice indeed and soldering the mastbands, man, do I feel like a cheat.
I thank you guys, I must admit, when the glue up option failed a little panic set in because soldering is not a strong point with me. When it works it works great but when it doesn't it's a frustrating mess. For informational purposes I used solder paste and a butane torch. Also sanding off the lacquer coating first is a must.
 
Good afternoon, I made some changes to the Mainsail Throat Halyard and trestle tree assembly. In keeping with the BN 2 build which is supposed to closely follow the original, I changed the Throat Halyard Hanger by removing the loop shone in YQ,s drawings and just made it straight. I added a Heart Iron with two double blocks hooked to it that will carry the load of the Main Gaff and sail.

You'll also notice I added 4 struts (if that's what they should be??) to the bottom side of the crosstrees. I made these from some 1mm tubing and attached to the main mast. They serve to anchor the upper shrouds and will probably paint them steel gray. See what you think.

IMG_2964.jpgIMG_2965.jpgIMG_2966.jpg

I'm starting to see too much brass with the crosstree, probably need to blacken the Heart Iron and like I mentioned paint the under struts.
Till next time hope everyone has a great weekend.
 
Job well done on those complicated tresseltrees and hardware installations on the upper part of the lower masts. There are quite a few details to be added in that area and it becomes crowded very quickly.
I agree with you on the "too much brass" remark. Applying some paint here and there gives good results.
 
Good afternoon, I made some changes to the Mainsail Throat Halyard and trestle tree assembly. In keeping with the BN 2 build which is supposed to closely follow the original, I changed the Throat Halyard Hanger by removing the loop shone in YQ,s drawings and just made it straight. I added a Heart Iron with two double blocks hooked to it that will carry the load of the Main Gaff and sail.

You'll also notice I added 4 struts (if that's what they should be??) to the bottom side of the crosstrees. I made these from some 1mm tubing and attached to the main mast. They serve to anchor the upper shrouds and will probably paint them steel gray. See what you think.

View attachment 394739View attachment 394740View attachment 394741

I'm starting to see too much brass with the crosstree, probably need to blacken the Heart Iron and like I mentioned paint the under struts.
Till next time hope everyone has a great weekend.
I understand that you are also looking again and again at the plans and old photos and discovering new items. :) Nice new additions to the top of the lower main mast. The four futtock shrouds now show indeed a bit to ‘brassy’. It’s up to the captain how to paint them: in a bit of contrast of in line with the other parts.
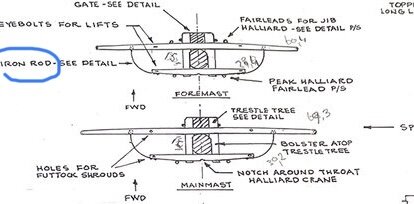
PS: Don’t forget the 2 small rods at the back side ends of the small spreader bar, going in a curve to halfway the front spreader bar. The prevent running lines or pieces of sail to become tangled between those spreader bars.
IMG_3846.jpeg
It’s all about the details ……. ;)
Regards, Peter
 
Last edited:
When I was adding my post a few minutes ago, I got a bit confused: am I adding it to the correct build-log?
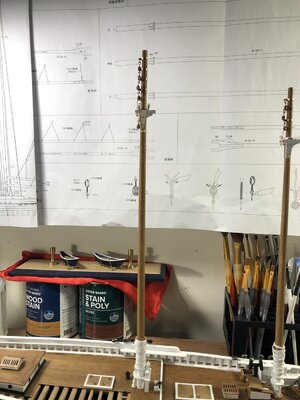
I saw a picture of two masts with the YQ-drawings on the background. But a big aha ........ both almost at the same level/height:
1694848097668.png
Or have I got them mixed up... ;)
S for the admin's: It looks like a double-post, but it isn't ........ ROTF
Regards, Peter
 
Last edited:
Job well done on those complicated tresseltrees and hardware installations on the upper part of the lower masts. There are quite a few details to be added in that area and it becomes crowded very quickly.
I agree with you on the "too much brass" remark. Applying some paint here and there gives good results.
Thanks Johan.
 
Don’t forget the 2 small rods at the back side ends of the small spreader bar, going in a curve to halfway the front spreader bar. The prevent running lines or pieces of sail to become tangled between those spreader bars.
Thanks for the heads up, Peter. I have been thinking about those excluder bars and have seen them on other builds in that curved fashion. Jensen seems to show them running straight and I've not seen the drawing you show in your post before. Would it matter, straight or curved?
 
Thanks for the heads up, Peter. I have been thinking about those excluder bars and have seen them on other builds in that curved fashion. Jensen seems to show them running straight and I've not seen the drawing you show in your post before. Would it matter, straight or curved?
The drawing is from the MS/Lankford plans. I made them this way:
1694869362994.png
But the Jenson's 'straights' are also nice.
Regards, Peter
 
Good afternoon, everyone. I have been obsessing somewhat with the color scheme of the fittings on the crosstrees. All the brass I was using started to look like some kind of jewelry, so I first switched everything below the crosstrees to my steel silver gray which was some improvement.

IMG_2968.jpgIMG_2969.jpg

There was still a disconnect between the brass and silver as well as the twisted wire hooks which never really set well with me. After several experiments with the stropping and hooks I went a 24 ga silver wire which I think you all can see which one looks the best.

IMG_2976.jpg

So, after choosing the block on the upper right the following is the results. See what you think.


IMG_2982.jpgIMG_2985.jpg

IMG_2981.jpg

I would actually prefer internally stropped blocks with black iron hooks, but I could not find them in the small size needed. I think this look is the best and now I can move on.
I do welcome all opinions as its always serves to expand my ideas.
 
Hey Dan,
The silver is a huge improvement over the brass, that's for sure. My own preference would have been either black or white, but that's my personal opinion. You better don't pay attention to it, the Admiral doesn't either... ;)
As far as stropping blocks go; I ordered etched strops with eyes and/or hooks on the ends. It's still rather difficult to get the strops around the blocks (different suppliers for blocks and strops) plus some of the strops, especially the 4mm ones, were possibly outside the minimum tolerance requirement. I already had issues with those... My swear jar royally benefitted from this discrepancy.
Overall these etched strops are really cool to look at, they do justice to the scale.
I also had a try on self-fabricated strops, but I couldn't get it to work properly, esthetically speaking; these home-made strops were way too coarse.
I'm not sure what dimension blocks you're using, but I use 3-, 4- and 5mm blocks. The home-made strops
on the 5mm worked okay, but going smaller was really bothersome.
It might be worth your time to make some completed blocks, strops included, for the various blocks to get an idea of the proportions.
Kind regards,
Johan


Initial tries; strops, made from rope and a strop, top, made from brass:
IMG_0116.jpeg


The two strops on the left are the etched ones, the one on the right is a handmade brass strop.
IMG_0169.jpeg
 
Last edited:
Hey Dan,
The silver is a huge improvement over the brass, that's for sure. My own preference would have been either black or white, but that's my personal opinion. You better don't pay attention to it, the Admiral doesn't either... ;)
As far as stropping blocks go; I ordered etched strops with eyes and/or hooks on the ends. It's still rather difficult to get the strops around the blocks (different suppliers for blocks and strops) plus some of the strops, especially the 4mm ones, were possibly outside the minimum tolerance requirement. I already had issues with those... My swear jar royally benefitted from this discrepancy.
Overall these etched strops are really cool to look at, they do justice to the scale.
I also had a try on self-fabricated strops, but I couldn't get it to work properly, esthetically speaking; these home-made strops were way too coarse.
I'm not sure what dimension blocks you're using, but I use 3-, 4- and 5mm blocks. The home-made strops
on the 5mm worked okay, but going smaller was really bothersome.
It might be worth your time to make some completed blocks, strops included, for the various blocks to get an idea of the proportions.
Kind regards,
Johan


Initial tries; strops, made from rope and a strop, top, made from brass:
View attachment 395272


The two strops on the left are the etched ones, the one on the right is a handmade brass strop.
View attachment 395274
Thanks for the input, Johan, the 24ga. or 0.5mm wire is the perfect size for stropping (I'm using 4.5mm blocks most everywhere) but the hobby store did not have it in black or I would have purchased it. Problem with that though is even if they had it would be a shiny black and not a matte black. I will probably stew on this for a day or two and in the meantime research other potential options.
 
Back
Top