Santa Ana 1784 AL by PaulV

Hello Paul,I bet you had hard time with mahogany but you tackled that planking,looks good,what finishes are you going to use on it?

Zoltan
 
Hi Zoltan.

Thanks, the Mahogany makes you think about it. Its not very forgiving. Not sure yet on finish. I've got a sanding sealer to apply, but I'm looking for something to bring out the wood color and grain features. Its a very dense fine grain wood. I i will go oil based rather than acrylic as I want it to penetrate the wood. This kit is all about the wood.
 
Hi Paul,

Nice project and can imagine that you want to keep the colour of the wood. If you want to have a satin gloss go for bee wax and polish, used this on my Royal Caroline. If you want to have a satin matt finish you can go for an oil used for parquet floors, I use monocoat oil with good results.
 
Thks for options Maarten

I am experimenting on hull scraps for the best look. No rush.

Okay 
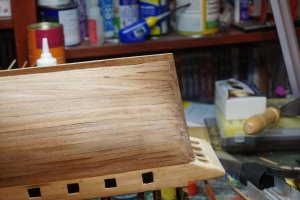
hull completed. Adding the keel parts was straight forward. Only issue was removing all the burn marks from laser cut.

DSC03516.jpg
DSC03520.jpg
DSC03519.jpg
DSC03521.jpg
DSC03518.jpg
Well Ive found something more mind blwoing than hull planking... its...its
Gun port lining !!!!!
6 down 108 to go !
DSC03522.jpg
 

Attachments

  • DSC03517.jpg
    DSC03517.jpg
    113.8 KB · Views: 10
G'day Paul
The hull planking has turned out brilliantly, and you should be very proud of your efforts.
A little trick that I have picked up MANY years ago, is to keep all the very fine sanding dust from the planks.
You can use this dust as a filler. All you have to do is to run PVA.or white glue (what ever you want to call it) along the joints of the planks and rub in the fine wood dust into the PVA. When dry, sand with a 200 grit sandpaper and the gaps seems vanish a lot.
Try it. I found it out accidentally when I was standing decks planks, when I used contact adhesive to glue the planks to the ply. The contact joined with the sanding dust and the result was a very smooth finish, and the caulking was still viable as it wasn't effected.
Happymodeling mate
Greg
 
Okay 
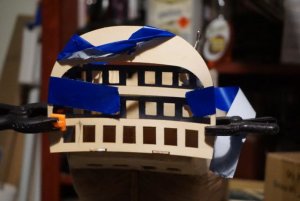
I was WARNED on http://www.modelismonaval.com/index.php that the doco was wrong for the rear exterior cabin area/ Unfortunately they did not say what.

Well what an exercise in mental gymnastics, re shaping evry part, parts numbered incorrectly, psycho glueing locations, a poor paint processes this was.

GREG pay special attention to the photos NOT the part numbers as masked in both the manul, addentum sheet AND PHOTOS and fit refit everything!
Ithink it suffers from a PANART moments at this stage!

Part 1

Adding lower floor
DSC03525.jpg

Adding Upper floor
DSC03526.jpg


Adding divider spacer
DSC03529.jpg
Adding interior walls/ Windows
DSC03533.jpg
Thia where it falls in to a mind game

DSC03536.jpg
Adding the upper walkway ( note there is no slots. You have to measure 25mm and position}
Used blocls and cling wrap parts to position it.
DSC03537.jpg
Addding the rear walkway cover. ( note they have you paint it later ) asn it is tp fiddly to not get pain on o the internal walkways do it now

All good soft of
DSC03539.jpg
Now the nightmare. The internal supports do not fit To big, not cut correctly their angles wrong and require a lot of modification
Tee external windows parts do not fit( The are numbered wrong and the wrong size ( require severe mortification)
Luckily its mistly l covered by whales
DSC03540.jpg
but what a nightmare.
Rear archway added

Well thats me for a while, back to gun port linings and re cutting missing ports from damage.
 

Attachments

  • DSC03538.jpg
    DSC03538.jpg
    32.6 KB · Views: 9
Hi alll

Its been a while ( a month) since my last update. Well the ports are finished and the stern cabin area has almost been completed. In typical AL fashion, the instructions basically revert to photo interpretations. Not a huge issue and all is progressing without major errors ( small human error still persist.

Anyway here we go

90 Gun ports lined.
DSC03541.jpg
Painting the stern cabin area
DSC03543.jpgDSC03544.jpg
Adding the whales & rubbing strakes

DSC03545.jpgDSC03546.jpg
DSC03547.jpg
Adding trim and windows to the stern cabins
DSC03553.jpgDSC03562.jpg
DSC03564.jpg
The cabin area was not to difficult, however getting the windoes to stick was a pin . in the ent I used 5 min Epoxy. The while stufff in the photo is left over PVA that has since be cleaned away.
 
Part 2.
Rear cabin windows added for upper cabins
DSC03565.jpg
Side windows added. These requried the windows to be threaed through from inside. Note the last window is nt seadled as it is the rear balcony way.
DSC03566.jpg

All Windows added and golf decoration added
DSC03567.jpg
DSC03571.jpg
Yet to be added rear and side balustrades
DSC03573.jpg
These needed lateral bending. ( good old hair curler & hit water)

Finally the lower planking was give a coat of sanding sealer. The wood came up very nice.
DSC03574.jpgDSC03576.jpgDSC03577.jpgNext up the balustrades will be added on the sides & rear and the 112 canon manifacturing plant will be staffed and build commencement will begin.

See you then.
 
The smelters were on overtime, the transport companys delivered the parts and the spanish unions wre no where to be seen. The gang forged 30 32Ib'ders & 30 24lb'ders. Sixty cannons fitted and 62 to go( next decks or so.

The trucks were fiddley as the wood was tiny and brittle. Axels were hand drilled & cleaned with 1.2mm bits. The quality of the canons is quite impressive for a AL kit, with each series veing reasonably scaled.

I intend to leave them in their natural brass state as I like the finish. Its just a personal preference.
The 32 ers in place.
DSC03578.jpg
DSC03579.jpgThe 24ers parts, carts, wheels, wire & cannons
DSC03580.jpg
30 as supplied to the builders
DSC03581.jpg
The completed cannon

DSC03582.jpg
Fitting out the hullDSC03584.jpg
the 30 installed and ready for 2nd deck( lower ?)
DSC03587.jpg
DSC03589.jpg
Back with middle deck assembly & fit out. ( Another 30 cannons )....
 
Your model is coming out realy good, good planking job.
To leave the brass natural is realy a personal decision, only a question by taste or preference ...... I am of the other group of modelers and would blacken them, because I think it is technically not correct. But this is only my personal opinion....

Hi Uwek.

Normally I would blacken them, and have done on other kits, but this kit was purchased solely for the natural wood & brass fininsh( Apart from the blue bit in the end). It was one of those love the look at first site kits. Did a lot for research on the cannons and the brass / Iron change and the 16-1800 period of that change. It all had to do with money and the ability to forge successfully in that age. Iron casting was not great nore catered for. From what I could find all 1st rate were supposed to be brass cannons, The Victory was supposed to be brass , but at the last minute was fitted with Iron due to poor brass availability & cost and a local iron foundary being completed nearby.

Yep we all do it differently. Tha'ts what its all about.

Cheers Paul
 
Hi Paul, I like the brass cannons, they catch the eye and then I noticed all the great detail such as the neat gun port lining and gun carriage detail. In this case leaving them brass works,
Cheers Andy
 
Very Accurate Cannon Ports and alignments by the way. I love the Cannons and the Carriages. Very nice. Great work.
 
Hi Donnie

Tks, but they were out a bit. The sizes and locations suggested on the instructions were not accurate. Luckly there was some leway and the ability to cover up misses. I'm happy so far, but the instructions I only use as a guide. AL definitely got it right as an 'experienced / advanced' kit. Not for the lighthearted, but a huge lot of fun. There are 'NO' real plans per-say except for the masts and rigging. The main hull sheet is just a 1:1 photo of the finished ship minus masts . They just say refered to plan for placement. At least the manual ( 120 Pages) is a bit more usefull. ( Except where they reverse print the photos!).
Good character building !

Big ship. Big fun! Lotsa entertainment to come.
 
Back
Top