A kind of double glazing, the second time I deliberately decided not to use glass. The liquid glass that I used on Le Coureur turned milky white in places, either it reacted with the superglue or it had expired. So I resorted to the second product, but this turned out to be a bit rubbery and after a short time it looked unsightly. All the dust stuck and it couldn't be cleaned properly. I found a very interesting article in the French forum in which the "glass" was discussed, which at the time was made of very thin leather and treated with paraffin or something similar. It was rather light brownish and semi-transparent, so probably not real glass.I chose to make the window frame oversize for height and then beveled the top and bottom to fit the opening (by hand). My light divides were applied on top of a mica sheet to both the inner and outer faces (a sandwich approach) - to the extent it is noticeable, then, mine are perpendicular to the glass rather than parallel to the frame. For that aspect I like your method better.
But I'm not sure if there would have been wood divides on both the inside and outside faces in real life. I assumed so... but maybe not. I guess most everyone only applies the glass/mica/plastic on the inner face as you will be doing.
-

Win a Free Custom Engraved Brass Coin!!!
As a way to introduce our brass coins to the community, we will raffle off a free coin during the month of August. Follow link ABOVE for instructions for entering.
-

PRE-ORDER SHIPS IN SCALE TODAY!
The beloved Ships in Scale Magazine is back and charting a new course for 2026!
Discover new skills, new techniques, and new inspirations in every issue.
NOTE THAT OUR FIRST ISSUE WILL BE JAN/FEB 2026
You are using an out of date browser. It may not display this or other websites correctly.
You should upgrade or use an alternative browser.
You should upgrade or use an alternative browser.
LE ROCHEFORT - Harbour yacht from 1787 1:36 by Tobias (Monograph by ANCRE)
- Thread starter Tobias
- Start date
- Watchers 71
-
- Tags
- ancre group build le rochefort
Thanks Peter for your feedback. Sorry AL-FI? I already know some abbreviations from my kids and I don't know these now, please be so kind and explain them to me.The red one looks logical, Tobias. No problem with you AL-FI.
Regards, Peter

We used that in the Bluenose area often: Artistic-License and Free-Interpretation. For all the option of parts that are not documented.Thanks Peter for your feedback. Sorry AL-FI? I already know some abbreviations from my kids and I don't know these now, please be so kind and explain them to me.
Regards, Peter
Makes total sense, thanks.We used that in the Bluenose area often: Artistic-License and Free-Interpretation. For all the option of parts that are not documented.
Regards, Peter
Hello everyone and have a great weekend.
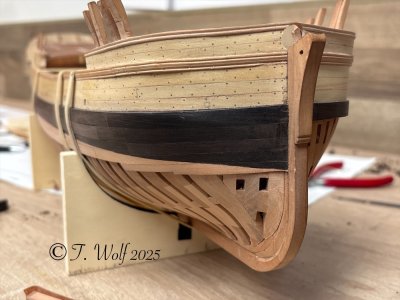
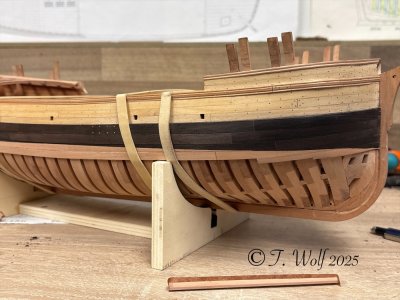
The next phase begins: planking the starboard side. A very tedious process, as I've discovered, with a maximum of one row per day. Here, I decided to have the dark hornbeam planks follow the waterline. I can't yet say whether it was a good idea for my first hull planking . Here are the initial progress after three evenings this week.
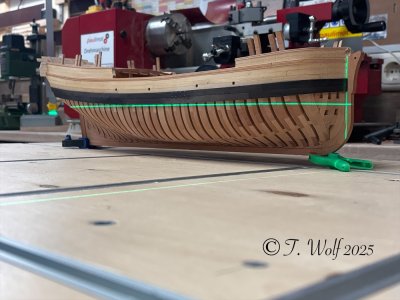
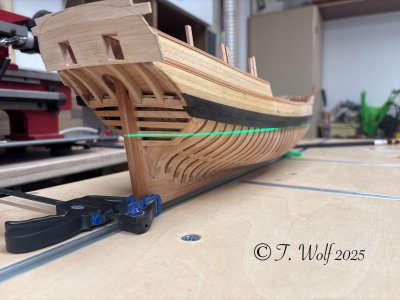

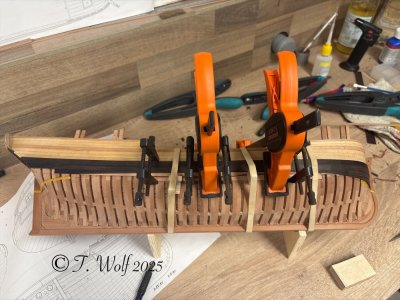
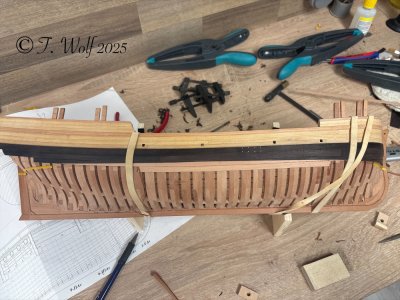
The next phase begins: planking the starboard side. A very tedious process, as I've discovered, with a maximum of one row per day. Here, I decided to have the dark hornbeam planks follow the waterline. I can't yet say whether it was a good idea for my first hull planking
 . Here are the initial progress after three evenings this week.


- Joined
- Dec 9, 2019
- Messages
- 964
- Points
- 403

Witaj
Dobry początek Tobiaszu, trzymam za ciebie kciuki jest to powolny proces ale dużo satysfakcji po ukończeniu. Pozdrawiam Mirek
Hello
Good start Tobiasz, I keep my fingers crossed for you, it is a slow process but a lot of satisfaction after completion. Best regards Mirek
Dobry początek Tobiaszu, trzymam za ciebie kciuki jest to powolny proces ale dużo satysfakcji po ukończeniu. Pozdrawiam Mirek
Hello
Good start Tobiasz, I keep my fingers crossed for you, it is a slow process but a lot of satisfaction after completion. Best regards Mirek
Last edited by a moderator:
Hi Tobias, no doubt you researched this step... but I don't think I have seen hull planking where each strake didn't run from stem to stern (well, I have seen plenty of examples of simplified model planking done that way but not on a 'real' ship and not on a model as given over to the details as yours). I'm sorry if I'm missing something but I wanted to ask about this before you get too far.
Hello Paul,Hi Tobias, no doubt you researched this step... but I don't think I have seen hull planking where each strake didn't run from stem to stern (well, I have seen plenty of examples of simplified model planking done that way but not on a 'real' ship and not on a model as given over to the details as yours). I'm sorry if I'm missing something but I wanted to ask about this before you get too far.
you're absolutely right that this type of plank doesn't exist. I'd like to follow Le Rochefort's color scheme, but since I'll never be able to paint it cleanly, I'm trying to create the actual black area with the wood I have available. Ricci used this method on his L'Amarante. To perhaps explain it better, I'm attaching a picture of LR to better understand what I mean.

Got it. Nigel did the same on his Soleil Royale. A very clever technique that will require some careful work (you are definitely the man for the job). Thank you for explaining - I was a bit timid about posting because you work at such a high level that it was all rather mystifying to me...Hello Paul,
you're absolutely right that this type of plank doesn't exist. I'd like to follow Le Rochefort's color scheme, but since I'll never be able to paint it cleanly, I'm trying to create the actual black area with the wood I have available. Ricci used this method on his L'Amarante. To perhaps explain it better, I'm attaching a picture of LR to better understand what I mean.
View attachment 507424
Shota my dear friend, it is a pleasure that you missed my reports.Tobias my dear friend
I missed the impressive progress of the last month, as usual you manage to combine precision with the beauty of the creative process and the results speak for themselves.
Well done
This is my first hull planking, and I hope I succeed. Otherwise, I'll have to dismantle it. It's completely new territory for me. The individual planks all have different dimensions, varying tapers, plus the curvature of the hull, the damping of the planks, etc. It will probably take a while, but I'm confident I can manage this part fairly well. Therefore, I'm grateful for any advice.Got it. Nigel did the same on his Soleil Royale. A very clever technique that will require some careful work (you are definitely the man for the job). Thank you for explaining - I was a bit timid about posting because you work at such a high level that it was all rather mystifying to me...
Good afternoon Tobias. A very unique way to plank by following the “painting” lines vs the hull planks. I think it will be very effective visually and a challenge no doubt. Enjoy. Cheers GrantThis is my first hull planking, and I hope I succeed. Otherwise, I'll have to dismantle it. It's completely new territory for me. The individual planks all have different dimensions, varying tapers, plus the curvature of the hull, the damping of the planks, etc. It will probably take a while, but I'm confident I can manage this part fairly well. Therefore, I'm grateful for any advice.
At the end it’s gonna look like a half-cut saw model on the waterline, Tobias.Hello everyone and have a great weekend.
The next phase begins: planking the starboard side. A very tedious process, as I've discovered, with a maximum of one row per day. Here, I decided to have the dark hornbeam planks follow the waterline. I can't yet say whether it was a good idea for my first hull planking. Here are the initial progress after three evenings this week.
View attachment 507395
View attachment 507396
View attachment 507392
View attachment 507393
View attachment 507394
 Above the waterline the dark hornbeam and below the ‘normal’ wood. The start looks promising with nice connections of the 2 different planks.
Regards, Peter
Hello Grant, it's going to be a tedious and exciting process. I've definitely learned one thing already: First, do the planking inside and out, then build out the interior. The further you get toward the keel, the more clamps you can get to it.Good afternoon Tobias. A very unique way to plank by following the “painting” lines vs the hull planks. I think it will be very effective visually and a challenge no doubt. Enjoy. Cheers Grant
Hi Peter, if that doesn't work, I can saw it in half at this point, which would allow me to join your exclusive Half-Cut Saw Club. Interesting idea.At the end it’s gonna look like a half-cut saw model on the waterline, Tobias.Above the waterline the dark hornbeam and below the ‘normal’ wood. The start looks promising with nice connections of the 2 different planks.
Regards, Peter

I'm impressed! Very fine workmanship, Tobias!
Looks very, very good.
- Joined
- Apr 20, 2020
- Messages
- 6,241
- Points
- 738

magnificent workשלום לכולם,
סיימתי את המעבר לקשת. הנה הרושם הראשוני שלי. אני די מרוצה.
View attachment 507778
View attachment 507779


