-

Win a Free Custom Engraved Brass Coin!!!
As a way to introduce our brass coins to the community, we will raffle off a free coin during the month of August. Follow link ABOVE for instructions for entering.
-

PRE-ORDER SHIPS IN SCALE TODAY!
The beloved Ships in Scale Magazine is back and charting a new course for 2026!
Discover new skills, new techniques, and new inspirations in every issue.
NOTE THAT OUR FIRST ISSUE WILL BE JAN/FEB 2026
You are using an out of date browser. It may not display this or other websites correctly.
You should upgrade or use an alternative browser.
You should upgrade or use an alternative browser.
Xebec of 1753 - Plank on Bulkhead Kit by Amati in 1/60 Scale - Build by Smithy
- Joined
- Dec 3, 2022
- Messages
- 1,547
- Points
- 488

I'll bet that's the first time Meat Loaf has been quoted (nearly) on this forum!
You took the words right out of my mouth.
- Joined
- Dec 28, 2024
- Messages
- 141
- Points
- 113

Every Xebec model I've seen has the red paint accents. I'm not a fan of the color. Anyone ever see one in something other than red (bulwarks)? I'm thinking some off blue or green?
Of course I realize it is my choice and the model cops aren't making rounds these days. I have the model being delivered this coming Monday. Now I have to get the Andrea Gail moving along.
Of course I realize it is my choice and the model cops aren't making rounds these days. I have the model being delivered this coming Monday. Now I have to get the Andrea Gail moving along.
- Joined
- Dec 3, 2022
- Messages
- 1,547
- Points
- 488

Every Xebec model I've seen has the red paint accents. I'm not a fan of the color. Anyone ever see one in something other than red (bulwarks)? I'm thinking some off blue or green?
Of course I realize it is my choice and the model cops aren't making rounds these days. I have the model being delivered this coming Monday. Now I have to get the Andrea Gail moving along.
I think you answered your own question there. Trust yourself, you don't need approval from anyone else.
- Joined
- Dec 3, 2022
- Messages
- 1,547
- Points
- 488

Now you are quoting someone else you've mentioned to me a bit earlier. But, of course she and you are correct.I found this.
View attachment 514690
Good dramatic colour combination. Three primary colours but each a little unusual. Nice.
I sense some tension with my admiral, but the deep bond we share with our pets reflects the love we have for one another.
Did you put it with the control yoke for the Anson?View attachment 514678
That was inevitable. Even with the regular breaks (ha!) sooner or later I was going to become impatient and go just a little too fast, a little too hard. I've never built a boat without breaking some of these. I didn't even curse. I carefully put the broken part somewhere safe* and when the planks are on, it will be glued tidily into place again. One out of 22 ain't bad, as the great philosopher Mr M Loaf (almost) put it.
And now I've run out of 240 grit sandpaper in the middle of the Easter Holiday. Sigh.
Good day though. I'm pleased with progress and I think I might be able to put a few planks on tomorrow. I'll have to check the instructions first in case there's something important that I've forgotten.
Evenin' all.
_____________________
* That sounds oddly familiar.
Great idea for dust removal. I do 98% of my sanding in the garage. I will only do a light sanding I my work space. I just noticed that I have a light layer of dust covering everything in my work room. I need to be careful, because the admiral said I could use this space as long as I kept it clean.
I have found it easier to start by cutting off all of the stanchions and add them later. The more careful I would be, the more I would break off.
It is great to have a furry best friend to share everything with.
I have found it easier to start by cutting off all of the stanchions and add them later. The more careful I would be, the more I would break off.
It is great to have a furry best friend to share everything with.
- Joined
- Dec 3, 2022
- Messages
- 1,547
- Points
- 488

Did you put it with the control yoke for the Anson?
For the record, it’s with the blocks in the Xebec box.
I did hope that putting it safely away would spark some memory of the yokes but no.
Incidentally, thanks for using the correct term for what I’ve been calling the steering wheel for so long. How could I forget a word like that? Same way I forgot where they are I guess. Is it normal absent mindedness or something sinister, I wander.
- Joined
- Dec 3, 2022
- Messages
- 1,547
- Points
- 488

Great idea for dust removal. I do 98% of my sanding in the garage.
Living in a flat and having no garage, I’ve had to sand hulls in the communal garden. That was awful because folks kept coming to talk to me!
Now when I sand big jobs I mount that spray bay facing up and get a gravity assist to the suction.
I just noticed that I have a light layer of dust covering everything in my work room. I need to be careful, because the admiral said I could use this space as long as I kept it clean.
The room is also sifted with dust but that doesn’t mean it’s not clean. Sawdust isn’t dirt, it’s just wood. In small helpings.
I have found it easier to start by cutting off all of the stanchions and add them later. The more careful I would be, the more I would break off.
How do you cut/refit them while retaining strength for supporting the bulwark?
.
Last edited:
- Joined
- Dec 3, 2022
- Messages
- 1,547
- Points
- 488

I've had a good morning on the boat today.
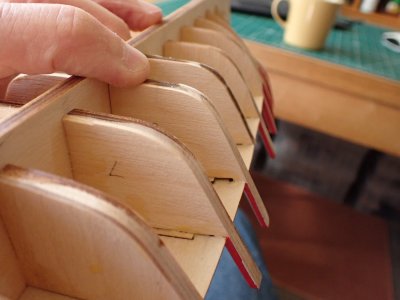
I blasted through the fairing of the frames without too much blood, sweat and toil. It's a difficult job for me because I have a lot of astigmatism and judging the infinite number of angles required, is therefore rather hit and miss. I rely greatly on a batten to obtain smooth lines on one side of the hull and then on the laser char to ais me in making the other side match.
I used a small sanding disc in a rotary tool for the bulk of it and then finished off with one of my few remaining fragments of 120 grit paper.
I put the bevels in and was about to pack away when I noticed this bulkhead, the one my finger is touching. It has quite a sharp corner and fairly flat sides, more akin to a coal barge than a swift sea predator.
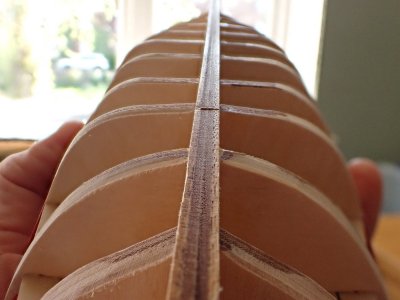
You can see that one sticking out on the left of picture but the whole boat is quite flat bottomed. I checked my ANCRE plans of Le Requin and the Amati plans for this kit and the flat bottom aspect seems to be correct.
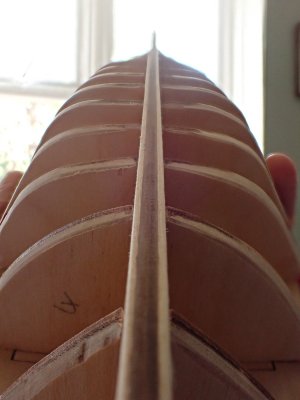
So I just rounded the corner radii to match each other. It looks a bit weird at the far end but I hope that's just the camera's problem.
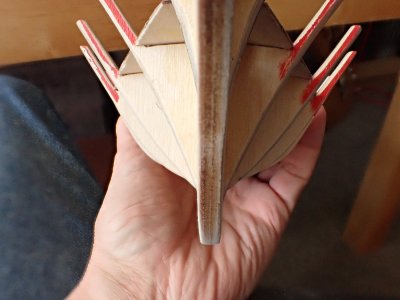
With power sanding available I thinned down the stem.
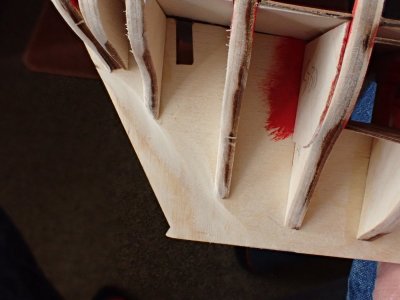
And made a bearding at the stern to accept the thickness of the planking. Plywood is great for this because the laminations tell you exactly how far you've gone.
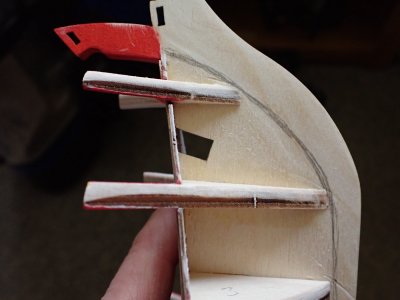
I drew on my proposed rabbets in pencil.

To ensure symmetry I photographed both sides and compared the pictures on my laptop. What a waste of time; I had forgotten the mirror in the bathroom.
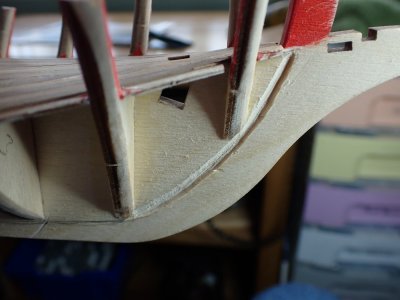
I cut the rabbet with a v-chisel intended for cutting lino and wood blocks for engraving and tidied up the profile of the groove with the rotary tool.
I was in the mood for work today and it all went well. I'm glad I didn't force myself to do this at the weekend when I wasn't really keen on anything but chocolate.

I blasted through the fairing of the frames without too much blood, sweat and toil. It's a difficult job for me because I have a lot of astigmatism and judging the infinite number of angles required, is therefore rather hit and miss. I rely greatly on a batten to obtain smooth lines on one side of the hull and then on the laser char to ais me in making the other side match.
I used a small sanding disc in a rotary tool for the bulk of it and then finished off with one of my few remaining fragments of 120 grit paper.
I put the bevels in and was about to pack away when I noticed this bulkhead, the one my finger is touching. It has quite a sharp corner and fairly flat sides, more akin to a coal barge than a swift sea predator.

You can see that one sticking out on the left of picture but the whole boat is quite flat bottomed. I checked my ANCRE plans of Le Requin and the Amati plans for this kit and the flat bottom aspect seems to be correct.

So I just rounded the corner radii to match each other. It looks a bit weird at the far end but I hope that's just the camera's problem.

With power sanding available I thinned down the stem.

And made a bearding at the stern to accept the thickness of the planking. Plywood is great for this because the laminations tell you exactly how far you've gone.

I drew on my proposed rabbets in pencil.

To ensure symmetry I photographed both sides and compared the pictures on my laptop. What a waste of time; I had forgotten the mirror in the bathroom.

I cut the rabbet with a v-chisel intended for cutting lino and wood blocks for engraving and tidied up the profile of the groove with the rotary tool.
I was in the mood for work today and it all went well. I'm glad I didn't force myself to do this at the weekend when I wasn't really keen on anything but chocolate.
Last edited:
- Joined
- Dec 3, 2022
- Messages
- 1,547
- Points
- 488

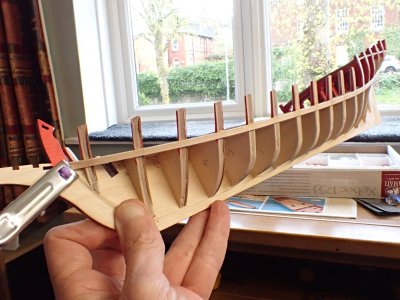
After my evening meal I thought I'd throw some planks on so that I could reattach the broken timberhead and finish off the deck - two things that are beginning to irritate me. It doesn't take long to plank when you weld the wood together with hot Titebond. Only one clamp needed!
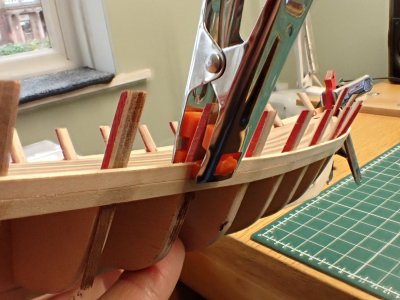
Two planks on each side and the timberhead clamped up.
![P4220002[1].JPG P4220002[1].JPG](https://shipsofscale.com/sosforums/data/attachments/498/498939-39751bffc054420d5f3470b31e4cdd0c.jpg?hash=PbE6pvOIRq)
You can't even tell which one was broken. That was a good day's work and play.
- Joined
- Dec 3, 2022
- Messages
- 1,547
- Points
- 488

I just couldn’t stop myself yesterday.
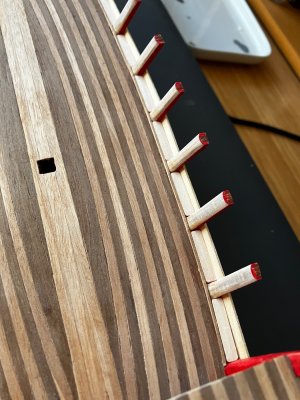
As far as I’m concerned I’ve fixed the awkwardness of the deck edge. The thin walnut stringer was a swine to fit but worth it for the way it separated the deck from the lime lozenges that form that strange but interesting ‘waterway/planksheer’. It is totally fictitious of course though I prefer the word fantastic. How do you like that, Bob the Snob?*
I began by trying to make the lime pieces fit perfectly but I’m not a perfect carpenter and trying and failing looked horrible shabby. The rounded corners however, look deliberate - a chosen motif. Which is what it is now. That’s the brand new Smithy Style.
Most edges and corners on real ships were rounded for safety reasons. I choose to wildly exaggerate the rounding because I really like the effect. It’s just a bonus that it makes everything easier now I no longer even need to try for right angles.
This is something of a breakthrough for my modelling in wood. I’ve been comfy with a similar kind of thing in my plastic modelling which I call Grand Opera Style. It’s taken a long time for me to fully embrace the principle in the far more conservative arena of wooden modelling, but the penny has finally dropped.
I'll do what you can, with what I have, where and when I happen to be. I choose to revel in my Smithyness and not waste my brief remaining time failing to make anonymously perfect replicas of anyone else’s work. So there!


 (For you imperial Yanks, that’s a metric decalaugh of joy.)
~~~~~~
* Lurker friend of mine.

As far as I’m concerned I’ve fixed the awkwardness of the deck edge. The thin walnut stringer was a swine to fit but worth it for the way it separated the deck from the lime lozenges that form that strange but interesting ‘waterway/planksheer’. It is totally fictitious of course though I prefer the word fantastic. How do you like that, Bob the Snob?*

I began by trying to make the lime pieces fit perfectly but I’m not a perfect carpenter and trying and failing looked horrible shabby. The rounded corners however, look deliberate - a chosen motif. Which is what it is now. That’s the brand new Smithy Style.
Most edges and corners on real ships were rounded for safety reasons. I choose to wildly exaggerate the rounding because I really like the effect. It’s just a bonus that it makes everything easier now I no longer even need to try for right angles.
This is something of a breakthrough for my modelling in wood. I’ve been comfy with a similar kind of thing in my plastic modelling which I call Grand Opera Style. It’s taken a long time for me to fully embrace the principle in the far more conservative arena of wooden modelling, but the penny has finally dropped.
I'll do what you can, with what I have, where and when I happen to be. I choose to revel in my Smithyness and not waste my brief remaining time failing to make anonymously perfect replicas of anyone else’s work. So there!


 (For you imperial Yanks, that’s a metric decalaugh of joy.)
~~~~~~
* Lurker friend of mine.
Last edited:
- Joined
- Dec 3, 2022
- Messages
- 1,547
- Points
- 488


All finished. You can see a few lozenges on the stbd bow that I didn’t round off before fitting. They were before my road to Damascus moment. I’ve done what I could with a tiny chisel but they will stand to remind me of my breakthrough. Or breakdown if you like. Ha!
I think it’s looking beautiful. X
And that’s the main thing, innit?
Last edited:


