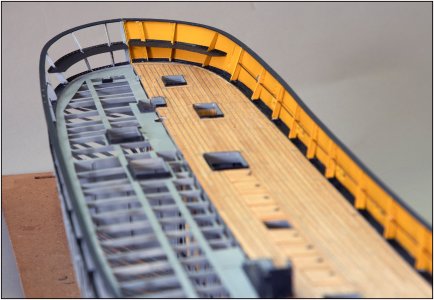
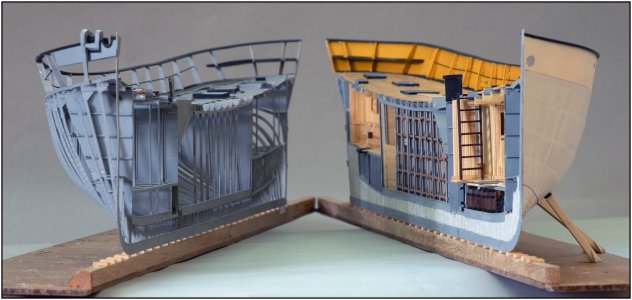
Uitstande en uitstekend!!!!!! Wow. Yep Peter, a different level of modelling on display here. Bravo. Cheers GrantBefore I could start putting the bulwark plates, I had to make some '3rd-8th hands'. I have to glue the plates to a strip of +/- 2 mm on the inside of the 5th row of plates. Which thus just protrudes above the outer profile of the waterway.
View attachment 525002
A: from a set of clothespins one leg shortened and I can put it on the edge;
B: the long leg supports further down on the outside and takes the angle of the plating.
C: the pegs fit neatly over the plate and the short port clamps on the narrow edge;
D: once the glue adheres immediately check the alignment with the hand rail. I had shown the double curvature of the plate earlier.
After a few hours of intensive building, this was the result:
View attachment 525003
View attachment 525004
Immediately outside I took some pictures. But out of the sun because then I have a lot of glare on the deck and the white skin panels.
The black rod halfway is still dry-fit because various parts still need to be attached to and on the bulwark.
This is what the complete plating with hand rail looks like now:
View attachment 525005
View attachment 525006
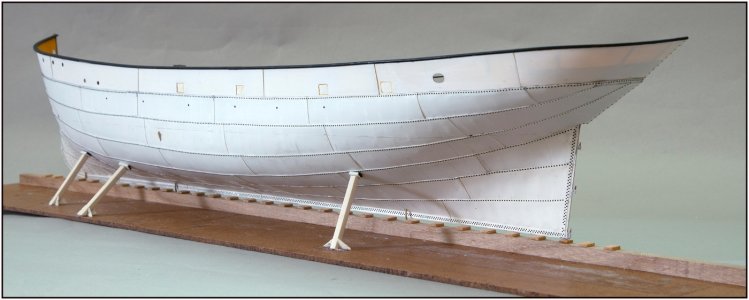
Spray painting this side will be the next step.
With 2 more photos showing her lines nicely:
View attachment 525007
View attachment 525008
In the bow the reinforcement block still needs to be made and in the back the so-called 'koekepan'.
Regards, Peter
-

Win a Free Custom Engraved Brass Coin!!!
As a way to introduce our brass coins to the community, we will raffle off a free coin during the month of August. Follow link ABOVE for instructions for entering.
-

PRE-ORDER SHIPS IN SCALE TODAY!
The beloved Ships in Scale Magazine is back and charting a new course for 2026!
Discover new skills, new techniques, and new inspirations in every issue.
NOTE THAT OUR FIRST ISSUE WILL BE JAN/FEB 2026
You are using an out of date browser. It may not display this or other websites correctly.
You should upgrade or use an alternative browser.
You should upgrade or use an alternative browser.
BALDER, Vlaardingen Herring Lugger from 1912, scratch build scale 1:50 Plate-On-Frame
- Thread starter Peter Voogt
- Start date
- Watchers 65
Thanks, Dean.Wow! That’s stunning Peter! A real masterpiece of craftsmanship.
Thanks, Pete. What a few words can tell ….As rant likes to say "True Story"!
Freudian slip?
Ooops...Grant. (Sorry Grant)
True story
How a few words became a long story……..True story
Thanks, Grant.Uitstande en uitstekend!!!!!! Wow. Yep Peter, a different level of modelling on display here. Bravo. Cheers Grant
Regards, Peter
Last edited:
This is one of the best build logs I've seen on this forum, and there are some very, very good ones out there.
Thanks for sharing it and for the work anf effort you've put in.
Thanks for sharing it and for the work anf effort you've put in.
Thanks for this very nice compliment, Adri.This is one of the best build logs I've seen on this forum, and there are some very, very good ones out there.
Thanks for sharing it and for the work anf effort you've put in.
Regards, Peter
Started with the GRC: the Great Rivet Chapter.
When spraying the bulwark supports I discovered that the penciled numbers continued to shine through the paint. They only disappeared after 3 layers.
Above the waterline the Balder gets a light blue/grey colour. Even more shines through that.
That is why I have to remove all the pencil lines above the waterline that I had drawn to indicate the position of the frames.
On my 'Astro laser pen' I stuck a piece of tape with a tiny punched hole and used it to line up the waterline:
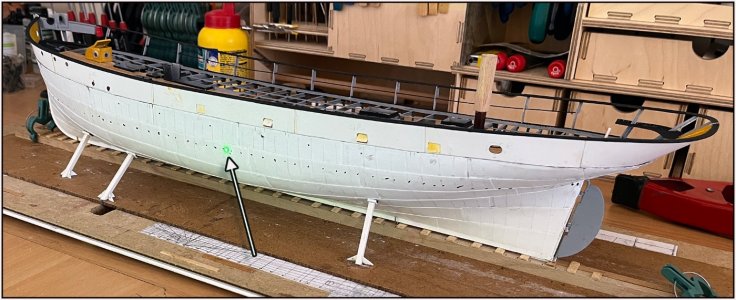
The light point is just visible at the arrow.
Below the points I drew the line:

Above that I have to remove everything. The drawn waterline is then my reference point for the blue/grey paint. Depending on what is still visible afterwards, draw a new one, mask it off and then spray the black under the waterline on. I found a tape from 3M that has an adhesive layer that sticks a little less than the Post-It memo notes. Because if it sticks too much, I pull the rivets off again. A test gave a satisfactory result.
Started with the GRC:
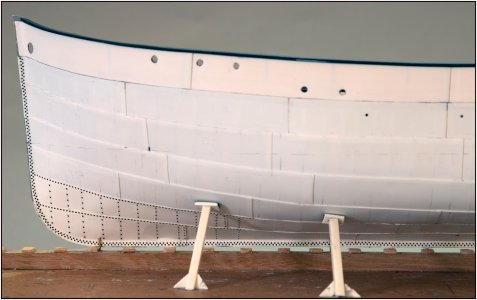
- the connection on the bow and keel beam has a double staggered row;
- the horizontal plate connections have a row that are close together;
- vertically they are further apart at the place of attachment with the frames and the vertical plate connections.
Once they are all set, first apply a layer of primer.
Now everything is very dominantly visible, but later with paint a lot more subtle.
Now have to wait until the new rivet stock is in.
Regards, Peter
When spraying the bulwark supports I discovered that the penciled numbers continued to shine through the paint. They only disappeared after 3 layers.
Above the waterline the Balder gets a light blue/grey colour. Even more shines through that.
That is why I have to remove all the pencil lines above the waterline that I had drawn to indicate the position of the frames.
On my 'Astro laser pen' I stuck a piece of tape with a tiny punched hole and used it to line up the waterline:

The light point is just visible at the arrow.
Below the points I drew the line:

Above that I have to remove everything. The drawn waterline is then my reference point for the blue/grey paint. Depending on what is still visible afterwards, draw a new one, mask it off and then spray the black under the waterline on. I found a tape from 3M that has an adhesive layer that sticks a little less than the Post-It memo notes. Because if it sticks too much, I pull the rivets off again. A test gave a satisfactory result.
Started with the GRC:

- the connection on the bow and keel beam has a double staggered row;
- the horizontal plate connections have a row that are close together;
- vertically they are further apart at the place of attachment with the frames and the vertical plate connections.
Once they are all set, first apply a layer of primer.
Now everything is very dominantly visible, but later with paint a lot more subtle.
Now have to wait until the new rivet stock is in.
Regards, Peter
Last edited:
Looks very promising! You are the rivet master! I have a P-38 that will need your expertise. 
Thanks, Dean. I can recommend this site:Looks very promising! You are the rivet master! I have a P-38 that will need your expertise.
-> Archer Rivets <-
Johan @RDN1954 has also used them on his Kolibri.
Regards, Peter
Thanks for posting that link Peter. I bought a LOT of their products before they closed. Glad to see them back. Have used them extensively on my mid-20th century destroyers.
Bruce
Bruce
I'm glad I could help you, Bruce.Thanks for posting that link Peter. I bought a LOT of their products before they closed. Glad to see them back. Have used them extensively on my mid-20th century destroyers.
Bruce
Regards, Peter
Thanks for the compliments, Shota. I can't do more than 'my best' and share it with you all.Dear Peter
your ship model looks beautiful because your incredible work
Regards, Peter
- Joined
- Oct 23, 2018
- Messages
- 886
- Points
- 403

Lots of progress. It's looking really good, Peter. I like the color of your painted inside. Do you use an airbrush?
Thanks, Christian. Yes, I used my airbrush for the painting. I was a bit worried about spraying the bigger areas but it has it’s advantages. At the end of the last part, the first part was dry enough to spray the next thin layer. And interacted well with the new layer.Lots of progress. It's looking really good, Peter. I like the color of your painted inside. Do you use an airbrush?
Regards, Peter
You are right about both, Johan. Perhaps from time to time a Trappist ……..Those rivets really make a difference in her appearance. A monk's job, for sure, but so rewarding.
Regards, Peter
- Joined
- Aug 8, 2019
- Messages
- 5,579
- Points
- 738

A good view on the thin keel of both sides.
And repeted work is always taking a lot of breaks to take. Trappist is a good alternative to go on, but be aware, like the monks say; "Chaos is lurking around the corner" before you know you got a 17th century Dutch looking hull, with to many Trappist breaks.
And repeted work is always taking a lot of breaks to take. Trappist is a good alternative to go on, but be aware, like the monks say; "Chaos is lurking around the corner" before you know you got a 17th century Dutch looking hull, with to many Trappist breaks.
You ate correct, Stephan. But you have to take your time and choose your moments.A good view on the thin keel of both sides.
And repeted work is always taking a lot of breaks to take. Trappist is a good alternative to go on, but be aware, like the monks say; "Chaos is lurking around the corner" before you know you got a 17th century Dutch looking hull, with to many Trappist breaks.
Such as for now almost at the end of the season: asparagus and a nice Chardonnay-Semillon.
Regards, Peter
- Joined
- Aug 8, 2019
- Messages
- 5,579
- Points
- 738

I got that exactly last sunday for diner. Now the season is over, next year again. The asparagus isn't that taste at the moment. The sweetness is gone and it is starting to tast earthy. But last week the Chardonnay tasted still good. And while the admiral don't like white wine, just rosé. I had to make that bottle kapitain in my own.Such as for now almost at the end of the season: asparagus and a nice Chardonnay-Semillon.


