• Win a Free Custom Engraved Brass Coin!!!
    As a way to introduce our brass coins to the community, we will raffle off a free coin during the month of August. Follow link ABOVE for instructions for entering.

HMS Enterprize 1774 Scale Scale 1/160 Midships Cross Section

Thanks Gunther. The reason I brought this up is that they don't look like English ships' boats seen in contemporary drawings but who knows, the small yards that built them probably had many differences in construction. For example none of the three in the photo have risings for the thwarts or gunwales for the tholes.. In the end as long as they floated and did the job, I am sure there were no complaints. :)
Allan
They don't have planking either, so there's that. :D
 
Thanks Gunther. The reason I brought this up is that they don't look like English ships' boats seen in contemporary drawings but who knows, the small yards that built them probably had many differences in construction. For example none of the three in the photo have risings for the thwarts or gunwales for the tholes.. In the end as long as they floated and did the job, I am sure there were no complaints. :)
Allan
Hey Allan,

yes, you're right. But the model is really tiny ... I think it's important to see what the boats looked like at this scale ... Thumbsup
 
They don't have planking either, so there's that
:) :) You're right, and that can be added, but it is too late for the other two things mentioned.

But the model is really tiny
I agree, and tiny is VERY DIFFICULT for most of us. But if the parts that are in the boats in the photo can be put on, and they look to be more difficult than the correct parts, why not put in the correct parts instead of something that should not be there?
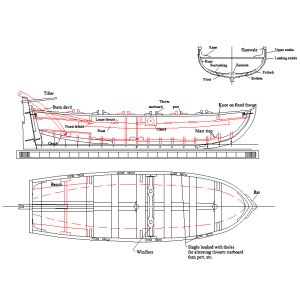
Sorry for not explaining the parts better for anyone not yet familiar. The below is a single banked launch, but might be useful regarding terminology and parts found on boats. There were variations in size, style of gunwale, and more, but most of the basics are shown.
1761610218706.png
 
Last edited:
Tolle Illustration, Allan. Ich wette, alle Neulinge wurden auf die dritte Ruderbank eingeteilt und stießen mit den Knien gegen die Ankerwinde.
How right you are, Russ! It's normal for all beginners in the navy to have to earn their sailor's boots first. In other words, all the hard and unpleasant work had to be done by the (novice) sailors first. But if you persevered, you later earned a place among the sailors and could then look down on the other beginners!
 
GIG1810, hello.
What exquisitely delicate boats!:D
The kit seems well-designed and easy to assemble.
It even includes jigs and such.
That 1/160 scale is just... wow...
Amazing!! :eek:
Hey Mellpapa,

The kit is really well made. Unfortunately, I can't always follow the instructions and that's why mistakes happen. The workmanship is really great. Unfortunately, the assembly is anything but easy. If you want to do it right and sand down the planks to a thickness of 1mm × 0.6mm, you will be surprised how quickly such a plank breaks!!! Nevertheless, I'm having a lot of fun with the building project, right up to the point of madness. I've already ordered the rear. But in boxwood. I think the wood is easier to work with than my Pearwood. We'll see ... ;)
 
Hello Gunther. WOW. That is so tiny and I admire the way you have persisted to make a fine example of the cutter at such a small scale. Cheers Grant
Good morning, Grant,

Thank you very much for the great words and I'm glad you like it. I honestly thought I could finish this tiny thing quickly. I was probably wrong! ROTFThe tiny boat still needs a few more building steps and I hope I can finish it today. I'll post the pictures of course ..:D.
 
Hey folks,

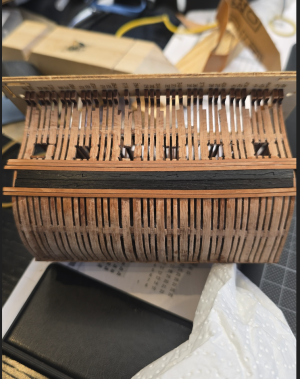
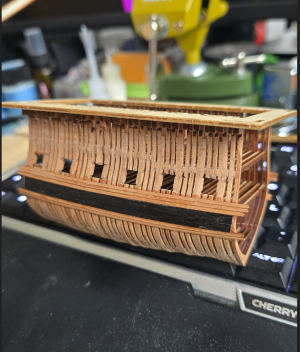
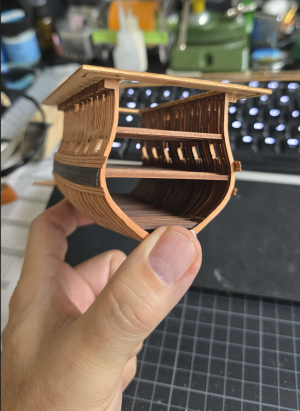
So, here's another little step forward with my Enterprise. :D

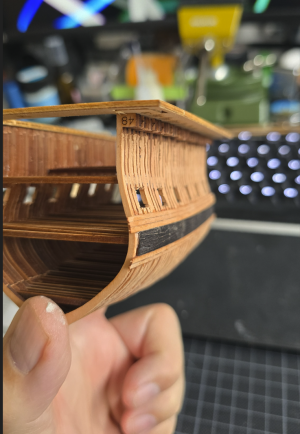
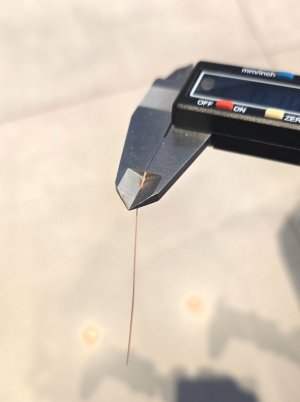
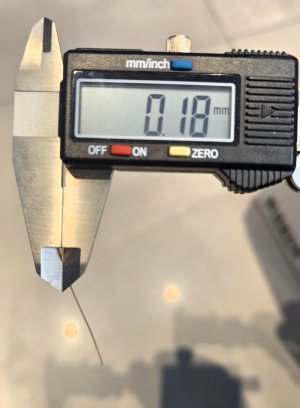
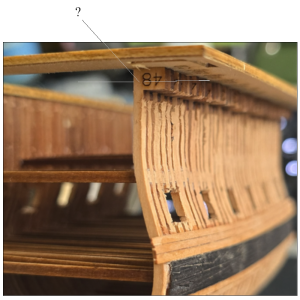
As you know, I unfortunately made a construction error because I mixed up the frames for the gun ports. That meant I had to make the notches for the gun ports myself. To do that, I needed the exact dimensions for the gun ports. Luckily, Richard is also building the middle section of the HMS Enterprise and is further along than I am in my build report. He was kind enough to give me the exact measurements: H 4.7 mm and W 5.8 mm. I transferred the measurements to my frames and cut and sanded them out. I have also already attached the butt planking. Everything has yet to be sanded and polished, but that will come. I will also soon be finished with the small dinghy. I now have to glue the planks in place. To do this, I sanded the planks down to 0.18 mm. What madness... Of course, two planks broke again...

As always, here are a few pictures of my construction progress, and I hope you like them.

1761719807617.png

1761719867049.png

1761719926707.png

1761719976598.png

Screenshot_20251029_074544_Gallery.jpg

That's so tiny...ROTF:eek:

Screenshot_20251029_074601_Gallery.jpg

Floral greetings and have a lovely day...CoffeeShip-1

Screenshot_20251029_074615_Gallery.jpg
 
Hey Richard,

Thank you very much for your kind words. I really needed them. I was feeling totally uncertain! Thank you. :D Thumbsup

I have a question about the cutter. How did you attach the planks? It looks like my only option is to attach the planks to the bow and stern, as that's where the raised areas are and where I can glue the planks down. But what about the hull itself? I don't know how to glue them down there. At most, I could attach small pieces of wood, which I could then use as a surface for gluing. What do you think?

P.S.: I hope you understand what I mean. Please excuse my poor English. I have to rely on English translators.
 
Your English is excellent Gunther,
I haven't attached the planks yet. I considered extending some frames as a support and steaming the planks, but am not really sure?
Oh, I'm glad you understand me. That makes me very happy. :D Thumbsup

You can see that we are both concerned about the same problem.:confused: Unfortunately, there is nothing about it in the instructions. That's why I'm really wondering how the planks were attached... I'm also thinking about something...Explosion
 
Hey Paul,

Thank you for your encouragement. :D Yes, the gun ports look good now. Unfortunately, my construction error cost me time. But that's just how it is.;)

As they say, mistakes are not forgiven, but noticed until they are corrected... Thank you for your trust, and I am sure this kit is full of little challenges...
 
Hey folks,

So, here's another little step forward with my Enterprise. :D

As you know, I unfortunately made a construction error because I mixed up the frames for the gun ports. That meant I had to make the notches for the gun ports myself. To do that, I needed the exact dimensions for the gun ports. Luckily, Richard is also building the middle section of the HMS Enterprise and is further along than I am in my build report. He was kind enough to give me the exact measurements: H 4.7 mm and W 5.8 mm. I transferred the measurements to my frames and cut and sanded them out. I have also already attached the butt planking. Everything has yet to be sanded and polished, but that will come. I will also soon be finished with the small dinghy. I now have to glue the planks in place. To do this, I sanded the planks down to 0.18 mm. What madness... Of course, two planks broke again...

As always, here are a few pictures of my construction progress, and I hope you like them.

View attachment 553437

View attachment 553438

View attachment 553439

View attachment 553440

View attachment 553441

That's so tiny...ROTF:eek:

View attachment 553442

Floral greetings and have a lovely day...CoffeeShip-1

View attachment 553443
That must be a big relief that you got the gunport made and in line, Günther. They look nice.
Regards, Peter
 
Back
Top