• Win a Free Custom Engraved Brass Coin!!!
    As a way to introduce our brass coins to the community, we will raffle off a free coin during the month of August. Follow link ABOVE for instructions for entering.

Modelship Dockyard - New Kit [Modelship Dockyard] PoF H.M.S. Enterprize 1774, the 1/48 version!

It would seem (so my research has concluded) that square nails were indeed a part of French ship construction. Perhaps it was used by other nations as well. With that said, proceed with caution on an English ship, my friend :).

Of course, you are the captain and should do what appeals to your eye and brings your model to the look you want! My work is replete with all manner of departures, and no one has ever complained (well, that's not true...I just try to not let it bother me too much ROTF).
Agree, true.
I'm not a craftsman, just a modeler, i like small details on model.
I'm also a bit intrigued by perfectionist approach, that some people take to a simple model.

If i had to do everything perfectly, i'd kneel in a museum by a display case for two weeks, day and night, and i would come out as stupid as i came in...
Then it would be a matter of who's crazier, you or me... ROTF
Indeed. We are all a bit crazy building tiny ships that no one cares about with the exception of other crazy people building tiny ships :rolleyes:.
 
Last edited:
Interesting solution and I am guessing they would look great. Hope you post some photos when you get them. I have always just gone with copper wire and made nails as I can use these as is, then once in place and wiped clean with some water to get the filings removed, blacken in place with diluted liver of sulfur as it will not stain the wood. I cannot find any contemporary drawings that show square heads so only used round stock, but would love to see drawings that show the square nails.

Allan
FWIW the "Ed Tosti" method is the best I've ever seen/used and faster than anything I've ever seen.
Simple black monofilament in a few diameters, simply glue, snip, sand down, perfect where iron nails were used. The copper wire system works as well for joints exposed to water.
 
Last edited:
Indeed. We are all a bit crazy building tiny ships that no one cares about with the exception of other people building tiny ships :rolleyes:.
Not a surprise that something as complicated as a full scratch requires modes adjustments and adaptations.
I suspect complete revision of all instructions would have resulted in higher pricing.
I've had a couple curve balls but.....you work them out in the end
 
Sounds like a nice home made draw plate! I just use a regular draw plate with holes down to 0.016" diameter and my own choice of wood at these small diameters has been bamboo most of the time. Bamboo from skewers at found at the grocery store works really well and the color is very subtle. I slit them to a suitable size then start drawing them as you describe going from the larger holes to the smallest required.
Allan
View attachment 553470

View attachment 553471
View attachment 553472
nice one Allen 30.00 on amazon
 
SORTED THIS its on the plan Not instructions
The Sheet numbers for the Hanging Knees, Lodging Knees and Beam Arms Please for Lower Deck
I am Looking at D5 which has L2d (Twice)
and D6 which is L1d and C2 which also has L1b and L1d

THANKS
 
Last edited:
Not a surprise that something as complicated as a full scratch requires modes adjustments and adaptations.
I suspect complete revision of all instructions would have resulted in higher pricing.
I've had a couple curve balls but.....you work them out in the end
But probably not so many REplacement Parts
 
nice one Allen 30.00 on amazon
The one in the photo is from Jim Byrnes that I bought from him when we first met many years ago. It has never failed me. $25 plus freight from Byrnes Machines. Freight and duty may be exorbitant though from Florida to the UK. I have no idea if the one you found is Byrnes, but if not, be careful. I have two others that were less expensive but the holes were not always perfectly round and something not sequential in size . Caveat Emptor.
Allan
think i will find me tobacco tin and/or drill a new one !! its only for light wood !! but thanks
 
if you want tree nails i use small thin square strips
I pull it through an old tobacco tin from 50 tears ago 7 or 8 different sizes of holes an pull the wood through successive smaller holes
Will try and fid it - i do need it!!
What a great idea. I have some of my old jewellery drawplates somewhere, but they work in a different way. I had considered abrading the flat side and using them backwards for wood, but the tobacco tin idea is great. Just need some thin steel sheet.
 
What a great idea. I have some of my old jewellery drawplates somewhere, but they work in a different way. I had considered abrading the flat side and using them backwards for wood, but the tobacco tin idea is great. Just need some thin steel sheet.
any decent tin will do its just the right size and new tin boxes / cans are thinner
 
Getting the notches cut in the exact right place before the beams are installed is difficult regarding alignment if the beams are not perfectly placed. Many find it better to install the beams, then mark out the notches for the carlings and cut or file a notch so they are properly aligned. Just another way to achieve a perfect result. It is not such a big deal for a cross section model as there are not that many beams and it is pretty much straight line midships, but for a full hull, it can be tricky to have everything lined up.
Allan
yes my blandford had a couple not aligned exactly

Just looking at Hanging Knees
L1d Looks like the LOdging Knees D6 C6
L1e Looks like the Hanging knees E3

ABOVE FOR LOWER DECK

Ld2 Looks like the Lodging Knees for GUNDECK D5
I then have =E4 which has numbers not and Ld numberv
Is this for GunDEck

WHAT SIZE ARE CARLINGS on these DEcks Please
THESE JUST ASKING not reall looked
ive then got another E4
Which has an A & B
Are these Quarter DEck
And what is E5 & E3

THanks
 
Last edited:
WHAT SIZE ARE CARLINGS on these DEcks Please


Not sure if you are asking the actual size or the scale size from others who building the kit. If you are looking for the actual sizes then want to scale them, the following are the scantlings for the carlings and ledges.
Allan

From the contract
Platforms
..............Carlings & Ledges of oak on the fore Platform & fir on the after Platform of the same scantlings &c the Lower deck

Lower Deck
To have 3 tier of fir Carlings on each side from the second room before the Main Hatch, to the second room abaft the main mast room, from thence forward & Abaft to have 2 tiers, the Carlings to be 6 ¼ ins broad, & 5½ ins deep, to be scored on upon the Beams 1⅛ ins aloft, & ¾ ins below, The ledges to be of fir 3¾ ins broad, & 3½ ins deep, to be placed not more the 12 ins, nor less than 9 ins asunder. All the Carlings & ledges from the fore hatch forward to be of oak

Upper Deck
To have 3 Tier of Oak Carlings on each side from the second room abaft the main mast room to the second room afore the main hatch, from thence forward to have 2 tier, & in wake of the forecastle to be of oak, the Carlings to be 7 ins broad, & 5½ ins deep; the ledges also to be oak in wake of the said forecastle & from the mizen mast aft to have half beams to be let into oak carlings of sufficient distance from the side to shift the knees, the half beams to be fir 7 ins broad, & 5 ins deep.

The contract also gives scantlings for the carlings of the mast partners and hatches, but at 1:160 the difference is negligible.
sorry wonder what size the carlings are on the 1:4th Model ie 3 x 4mm thanks
 
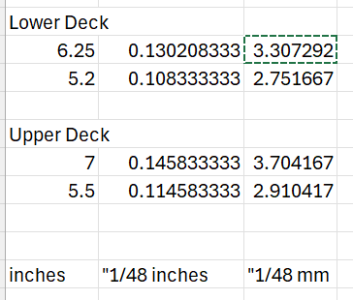
Actual scale size by calculation based on what Allen provided above:
View attachment 553859
I don't know what the model manufacturer provided. :)

THANKS
Calings for Gun DEck are on F3 and are approx 4 x 4
But not sure about LOWER deck
Guss they are also 4 x 4
they really dont help the instructions are not good
VICTOR why does the instructions not show Carlin Sizes for LOwer DEk
It looks like 3 x 2 BUT ARE THERE ENOUGH 2 x 3 for the MODEL?
Interestingly ALLEN says he would recommend cutting the slots as you FIT them and I am going to start that on the GUN deck with (i think 13 which is solid and work fore and aft )

Thanks ALL
 
Back
Top