• Win a Free Custom Engraved Brass Coin!!!
    As a way to introduce our brass coins to the community, we will raffle off a free coin during the month of August. Follow link ABOVE for instructions for entering.

BALDER, Vlaardingen Herring Lugger from 1912, scratch build scale 1:50 Plate-On-Frame

Wow! Excellent fabrication Peter. The ship is just beautiful.
Thanks, Dean. It's about pushing boundaries from time to time.
That's because there aren't any more.
But it’s more then enough!
PETER! I would write a poem, but no voice can sing a fitting song.

So, I will simply say: Holy Sh*t!!!!! and leave it at that.

Thank you for the experience.

Blessings. Peace. Gratitude.
Chuck
Thanks for this nice words/poem, Chuck.

Regards, Peter.
 
A new post took some time. A lot of tinkering with parts and placing them on the model.
The bollards on the deck and the bulwark were next.
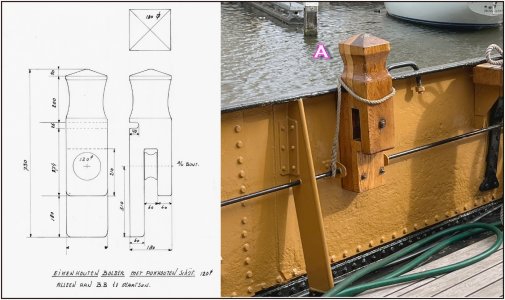
For hauling the 'reep', the rope on the 'vleet' (fishing nets), there's a wooden bollard with a disk:
0869 Bolders.jpg
The lashing rail is interrupted and secured to a little support on either side. Arrow A is shown in the overview photo that will follow.

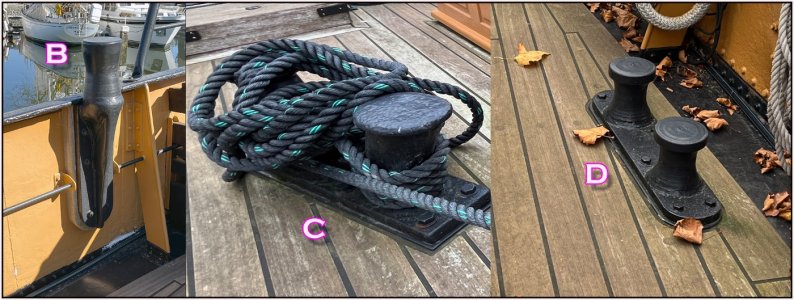
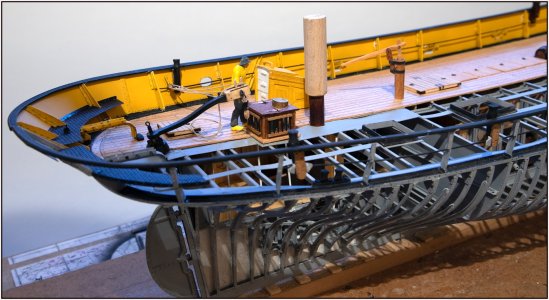
There are also three different cast iron bollards:
0870 Bolders.jpg
B: On both sides, three 'hanging bollards' secured on a wooden plate on the bulwark.
C: On the foredeck, only on the starboard side, a large bollard with two diagonal arms.
D: On the aft deck, on both sides near the hawseholes, a double bollard.

An overview photo:
0871 Bolders.jpg
So there also need to be detailed photos ....... ;)

The wooden bollard:
0872 Bolders.jpg
With the interrupted lashing rail. There's still a lot of 'touching up' to be done, but that's for later.

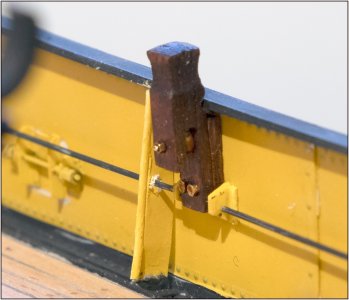
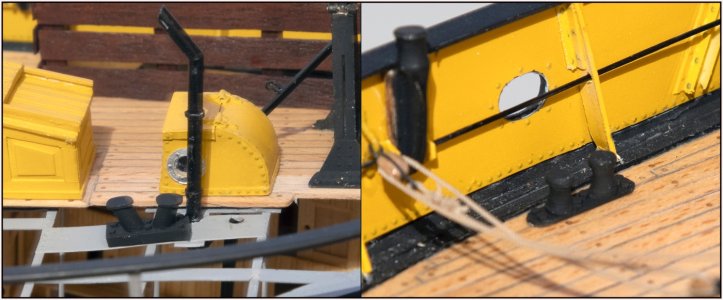
One of the cast iron bollards:
0873 Bolders.jpg
Equipped with the wooden back plate.

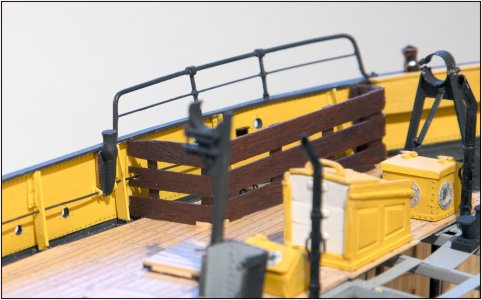
On the open side of the structure, I had to be creative (thanks AL-FI :)):
0874 Bolders.jpg
With the wooden plate with pre-drilled holes to attach it to the bulwark plate. Also with the interrupted lashing rail.

The double bollard on the foredeck and aft deck:
0875 Bolders.jpg
The bollard on the foredeck rests on a filler so that it just rises above the deck planks.

Meanwhile, the skipper also came to take a look on the building progress:
0876 Schipper.jpg
A real fisherman on wooden clogs, with an oilskin jacket and a "southwester."
Thanks to:
Carl @Carl W for the-> design <-, a member of the Dutch Forum ‘Bert’ for the ‘clog-adjustment’ and printing and Henk @Henk Liebre for the painting.
Regards, Peter
 
Last edited:
just perfect...
Incredible, with each addition it becomes more convincing it’s a real ship! ;)
Can you please show us not only fotos from the original ship. ;)
Fantastic details.
Nicely made details, which I recently saw live, very impressive.

The crew is a nice addition.
Regards Henk
Thanks for this compliments, Stephan, Dean,Christian and Henk. And of course all the ‘likes’. Simply visiting and reading is already a compliment in itself.
Having the real/original Balder within reasonable proximity and a lot of pictures of her is a big advantage.:)
Sorry for confusing you by accidentally swapping photos of the model and the real/original ……… ;)
PS for Henk: The skipper now gives a nice reference to the scale.
Regards, Peter
 
A new post took some time. A lot of tinkering with parts and placing them on the model.
The bollards on the deck and the bulwark were next.
For hauling the 'reep', the rope on the 'vleet' (fishing nets), there's a wooden bollard with a disk:
View attachment 557156
The lashing rail is interrupted and secured to a little support on either side. Arrow A is shown in the overview photo that will follow.

There are also three different cast iron bollards:
View attachment 557157
B: On both sides, three 'hanging bollards' secured on a wooden plate on the bulwark.
C: On the foredeck, only on the starboard side, a large bollard with two diagonal arms.
D: On the aft deck, on both sides near the hawseholes, a double bollard.

An overview photo:
View attachment 557158
So there also need to be detailed photos ....... ;)

The wooden bollard:
View attachment 557159
With the interrupted lashing rail. There's still a lot of 'touching up' to be done, but that's for later.

One of the cast iron bollards:
View attachment 557160
Equipped with the wooden back plate.

On the open side of the structure, I had to be creative (thanks AL-FI :)):
View attachment 557161
With the wooden plate with pre-drilled holes to attach it to the bulwark plate. Also with the interrupted lashing rail.

The double bollard on the foredeck and aft deck:
View attachment 557162
The bollard on the foredeck rests on a filler so that it just rises above the deck planks.

Meanwhile, the skipper also came to take a look on the building progress:
View attachment 557163
A real fisherman on wooden clogs, with an oilskin jacket and a "southwester."
Thanks to:
Carl @Carl W for the-> design <-, a member of the Dutch Forum ‘Bert’ for the ‘clog-adjustment’ and printing and Henk @Henk Liebre for the painting.
Regards, Peter
So it is true: Wonders never cease!

Blessings.
Chuck
 
Continued with the components on and around the bulwark.
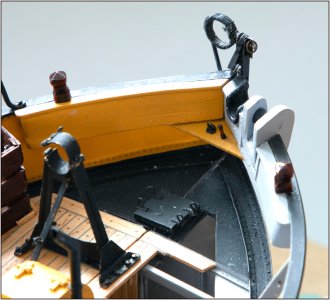
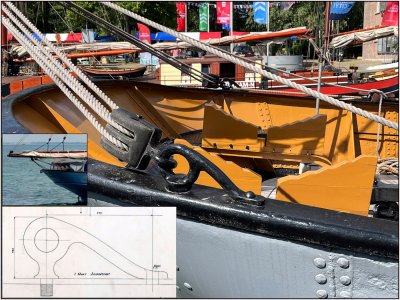
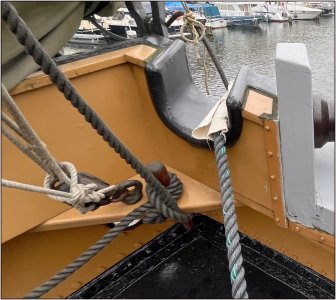
On the forepeak, the so-called "klapmuts" is located under both blocks. I have no idea how that little seat is called in English.
0877 klapmuts.jpg
The jib tack is attached to the belay pin. When the sails are not set it's for common use.
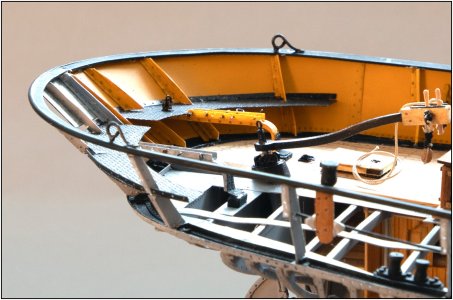
On the model:
0878 klapmuts.jpg
Only secured on the port side... because the two parts still need to be separable. Lacking decent belay pins, I made one myself. Just like the two on the tiller.

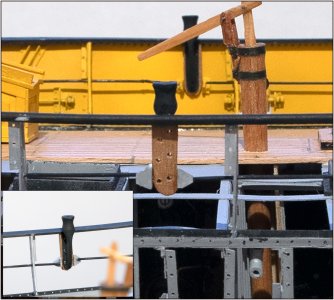
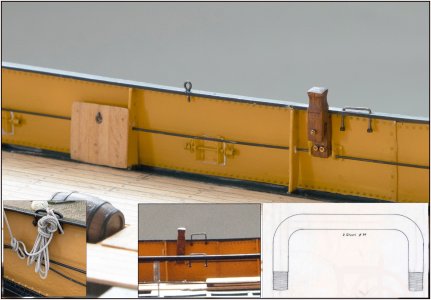
A little behind the mainmast, this bracket is located in the handrail:
0879 Beugel.jpg
- Two nuts on the underside to prevent it from slipping out. It took some fiddling before I could slide the M0.6 mm nuts onto the ends of 0.5 mm brass wire on both sides.
- I wasn't satisfied with the wooden bollard that I had coated with Schmincke "Brasil Brown." I removed it and coated it with linseed oil. At least the details are visible again.
-Now you can also see why the black bar halfway along the bulwark is called "lashing rail." The removed hatches can be lashed to it.
-Also visible is one of the six eyebolts on the handrail. Various hook blocks will be placed there. Another nine eyebolts are placed in various places on the deck. Maybe they will become visible later.

On both sides on the handrail at the rear are brackets for securing the mizzen sheets:
0880 Bezaanschoot.jpg
Here are the two-sheave hook blocks on both sides. I now have an idea of how the brackets are positioned around those blocks. That will be a bit of 'soldering-fiddling' again.
0881 Bezaanschoot.jpg
Can't wait to start with the rigging ......... ;)
Regards, Peter
 
Last edited:
Fantastic detail Peter! Just when I think you couldn't possibly amaze me any more, you do it again.


Soooo, that brings up an interesting question - do you plan on rigging just half a ship?
Thanks for the compliments, Russ.
About your rigging question? That’s already from the start more then 2 years ago running in my head. :rolleyes:

My current intention is to equip her with the full rigging, with the masts positioned in the port side. The stub of the mizzen mast is already there.

Initially, both sections will be joined together.
The challenge: to be able to lower the mainmast as if she were fishing -> "aan de vleet" <- , behind her nets. This will be her standerd lay-out position.

I need to be able to take both sections apart. I currently have to detach some parts to make this possible.
The challenges:
1: to be able to release all lines and tackles on the starboard side. With some stretch and flexibility, this should be possible.
2: to make the rigging on both masts on the starboard side separable.

I'm considering neodymium magnets for this purpose. Both hull halves already have a few to help hold them together. The idea is to hide a few in the upper part of the shrouds where I'll try to create a largely invisible closing seam. I already have tiny 1mm magnets and gradually larger ones.

In short: there's still a lot to think about and test. And it will be busy for a while in my head …….:rolleyes::)
Regards, Peter
 
Last edited:
Back
Top