• Ships of Scale has incorportated an extra level of security when you log In. Please follow on-screen prompts to acknowledge that you are not a robot via a "Check Box" or a "Pictorial Check Box Puzzle". This is needed due to higher level of AI Activity Security.
  • SUBSCRIBE TO SHIPS IN SCALE TODAY!

    The beloved Ships in Scale Magazine is back and charting a new course for 2026!
    Discover new skills, new techniques, and new inspirations in every issue.

    NOTE THAT OUR NEXT ISSUE WILL BE July/August 2026
  • Win a Free Custom Engraved Brass Coin!!!
    As a way to introduce our brass coins to the community, we will raffle off a free coin during the month of August. Follow link ABOVE for instructions for entering.

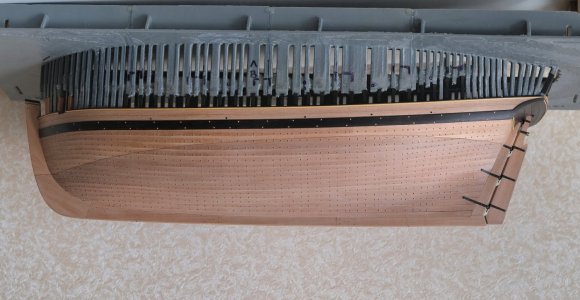
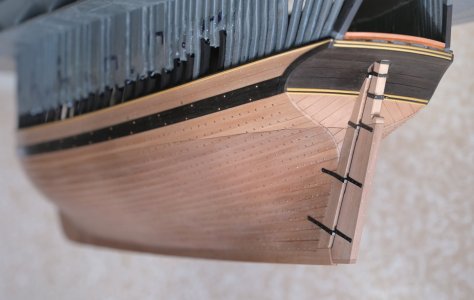
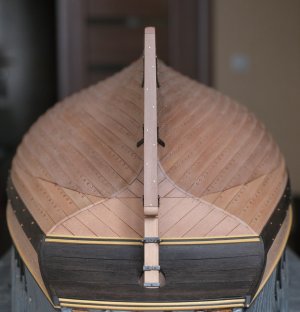
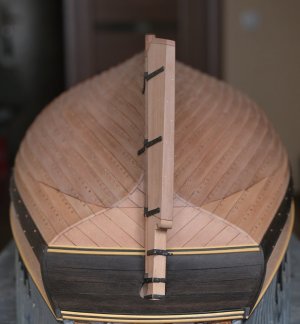
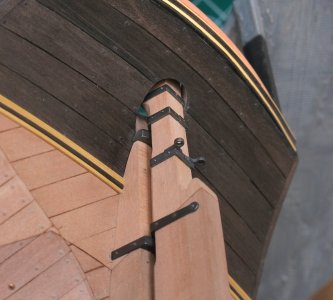
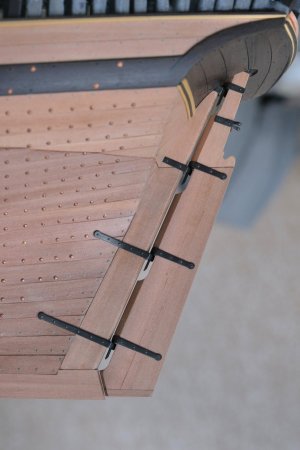
HMS Alert [1777] 1:48 POF by serikoff. (Two hulls: skeleton and fully rigged)

Imitation bolts.

Alert 2805.jpg

I've already discussed the issue of bolts, and it's quite a controversial topic, especially given the scale involved.

So what is a bolt? Firstly, it's not a thread and nut, but a rod of forged steel or copper, riveted on one end in a forge to form a saucer-shaped head, not a mushroom-shaped one. Then there are two options.

First, if the length is very long (a stem or sternpost assembly), the bolt was driven into several elements (not all the way through), and because it was driven at different angles, the bolts fused the elements together.

And the second option is that the rod was driven from the outside, without heating, into a hole smaller than the bolt (so that the bolt would work across its entire length, not just at its ends). Then, the head was pressed against a kind of anvil on the outside, and a washer was inserted into the inside, and the rod was cold-riveted so that the metal would flow onto the washer, thus preventing it from falling off.

Both ends were treated against corrosion. Sometimes the bolt was recessed and covered with a wooden plug, but more often, a small indentation was simply made on the outside so the head was flush with the surface and did not interfere with the movement of the bolt through the water.

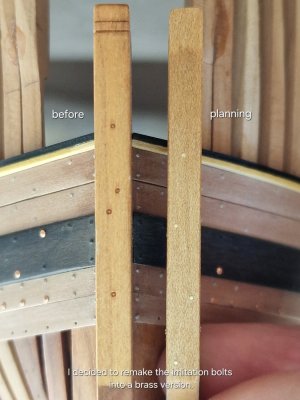
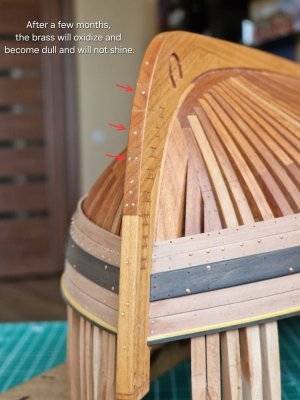
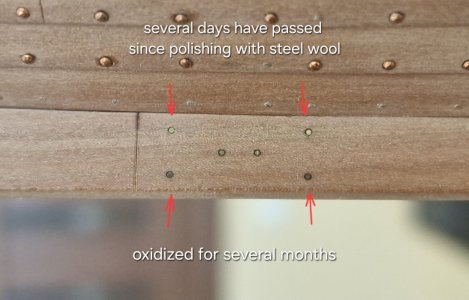
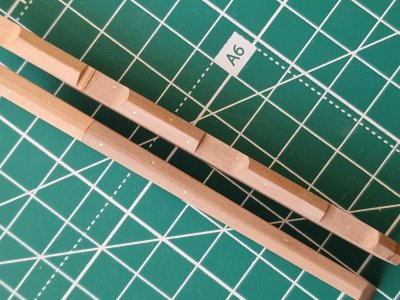
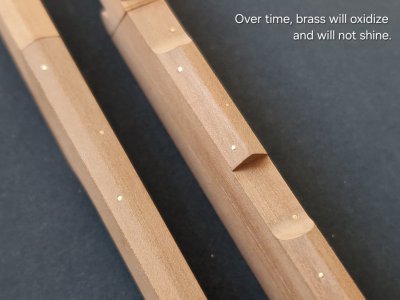
The dimensions were naturally standard for each rank and size of ship. On a small cutter, the bolts were naturally an order of magnitude smaller than on, say, a frigate. If we recalculate to scale, we have specific dimensions, but we also have to consider the model's visibility. Sometimes we have to reduce or increase certain parameters to avoid overloading an element or, conversely, to make it more visible. Therefore, I made the bolts almost flush with the wood, almost flat, and slightly smaller, 0.5 mm, like the nails (dowels). I chose brass because my copper bolts are copper, and I wanted to make the forged ones a different color. I didn't like the plain blackened ones, so I left the pure brass. After many months, it oxidizes and becomes very dark, somewhat mimicking the appearance of corroded metal. But that's my choice; I'm simply explaining my reasons.

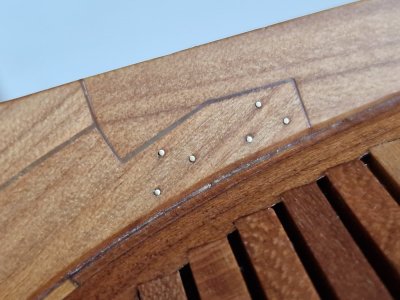
Also, the bolts were usually not positioned precisely in the center of the part. They were typically placed alternately on either side for increased rigidity and to prevent the wood from splitting along the drill line.
Alert 2807.jpg

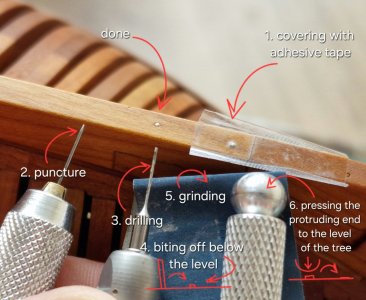
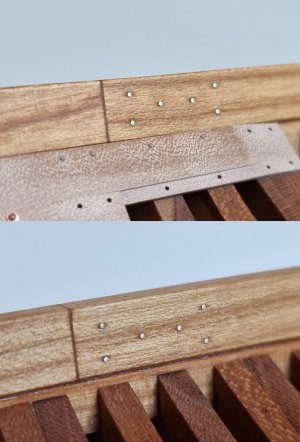
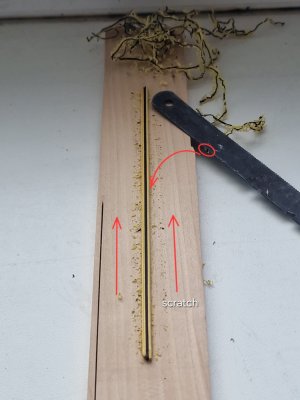
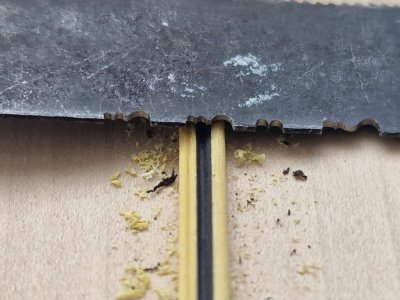
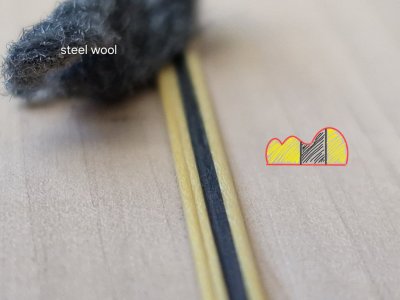
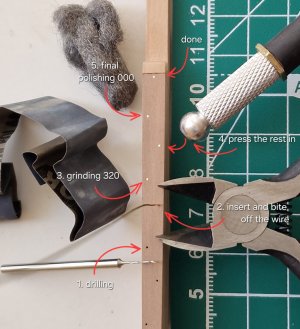
To give the wire a slight roundness, I cut the wire off not right at the end, but at a small tip, then sand it lightly and press the remaining part with something hard. If I don't want to scratch the wood during this process, I lay down some masking tape and sand over it to avoid damaging the wood. After pressing the wire, I remove the tape.
Alert 2808.jpg

Alert 2809.jpg

Over time, brass will tarnish significantly, and I really like this color, as opposed to black spots (like after blackening). But that's a matter of taste.

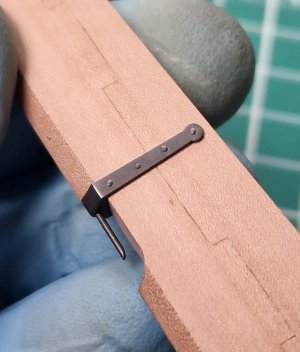
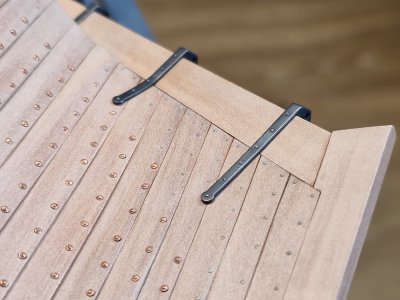
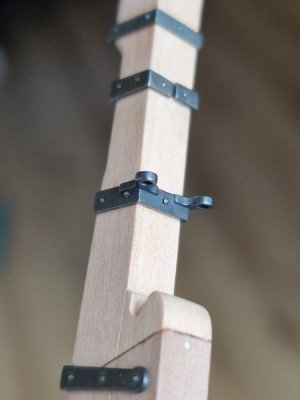
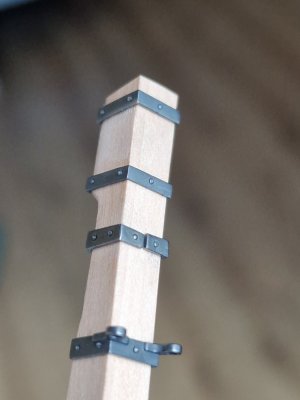
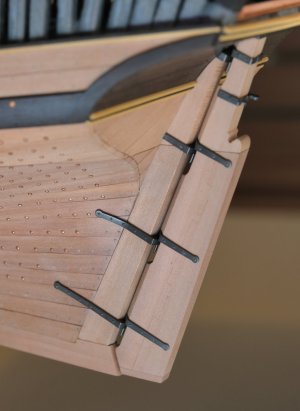
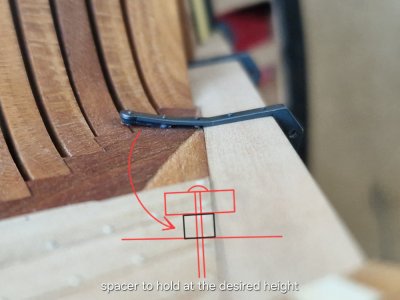
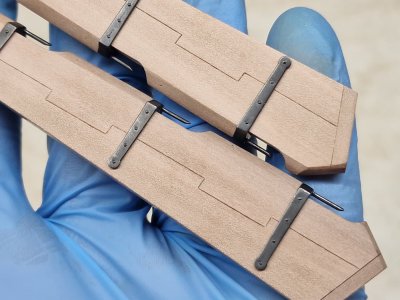
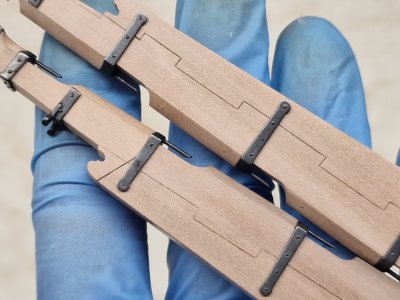
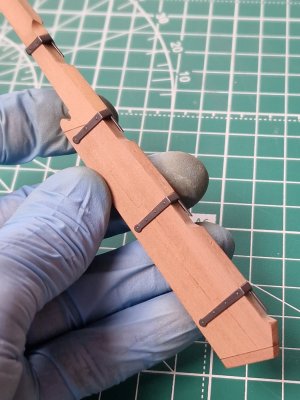
On the other hand, I make the hinge bolts black, which is natural, since the hinges themselves are black. The head here also can't be hidden, so I create it by rolling it with a knife, just like I did with the copper bolts in the clinker paneling.
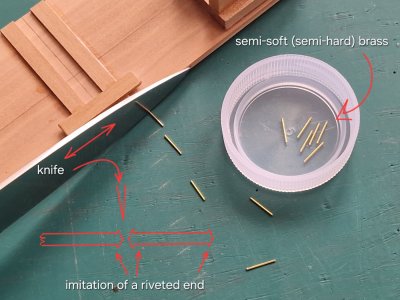
Alert 2810.jpg

Then I cut them to the required length after blackening and install them in the holes that I drilled through the loop in the wood.
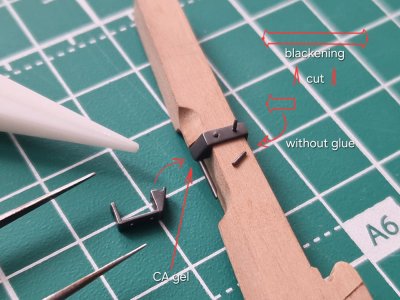
Alert 2811.jpg

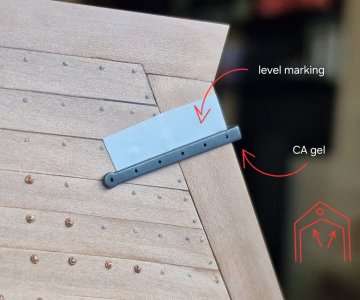
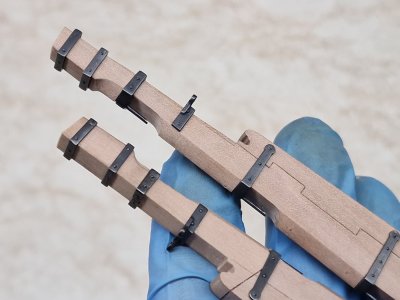
My top hinge is made in two pieces because it wraps around the back of the steering wheel. I first glue the hinge to the wooden part, then drill one hole in each piece and insert one bolt, then drill the second, and so on, to avoid any distortions or misalignments.
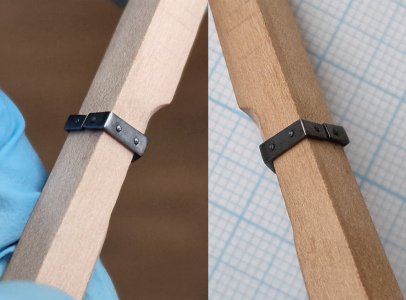
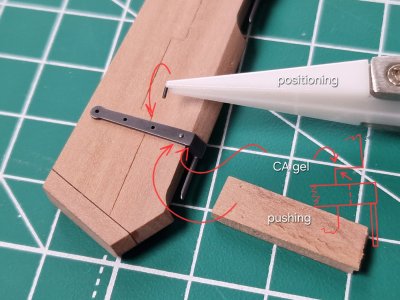
Alert 2812.jpg

Alert 2813.jpg

First, I fix all the loops on the steering wheel, since they have strict places for this...
Alert 2814.jpg

Alert 2815.jpg

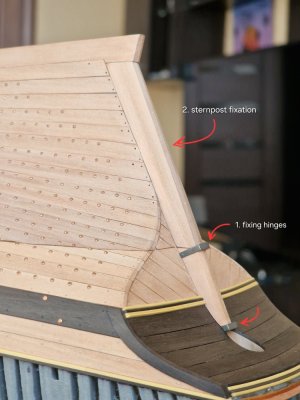
...and then, from this position, I secure the hinges to the sternpost. But I'll show you that next time.

By the way, the color here is exactly like in real life: not black, but a very dark gray, and the bolts are clearly visible, not blending into one black spot.
 
Imitation bolts.

View attachment 627326

I've already discussed the issue of bolts, and it's quite a controversial topic, especially given the scale involved.

So what is a bolt? Firstly, it's not a thread and nut, but a rod of forged steel or copper, riveted on one end in a forge to form a saucer-shaped head, not a mushroom-shaped one. Then there are two options.

First, if the length is very long (a stem or sternpost assembly), the bolt was driven into several elements (not all the way through), and because it was driven at different angles, the bolts fused the elements together.

And the second option is that the rod was driven from the outside, without heating, into a hole smaller than the bolt (so that the bolt would work across its entire length, not just at its ends). Then, the head was pressed against a kind of anvil on the outside, and a washer was inserted into the inside, and the rod was cold-riveted so that the metal would flow onto the washer, thus preventing it from falling off.

Both ends were treated against corrosion. Sometimes the bolt was recessed and covered with a wooden plug, but more often, a small indentation was simply made on the outside so the head was flush with the surface and did not interfere with the movement of the bolt through the water.

The dimensions were naturally standard for each rank and size of ship. On a small cutter, the bolts were naturally an order of magnitude smaller than on, say, a frigate. If we recalculate to scale, we have specific dimensions, but we also have to consider the model's visibility. Sometimes we have to reduce or increase certain parameters to avoid overloading an element or, conversely, to make it more visible. Therefore, I made the bolts almost flush with the wood, almost flat, and slightly smaller, 0.5 mm, like the nails (dowels). I chose brass because my copper bolts are copper, and I wanted to make the forged ones a different color. I didn't like the plain blackened ones, so I left the pure brass. After many months, it oxidizes and becomes very dark, somewhat mimicking the appearance of corroded metal. But that's my choice; I'm simply explaining my reasons.

Also, the bolts were usually not positioned precisely in the center of the part. They were typically placed alternately on either side for increased rigidity and to prevent the wood from splitting along the drill line.
View attachment 627327

To give the wire a slight roundness, I cut the wire off not right at the end, but at a small tip, then sand it lightly and press the remaining part with something hard. If I don't want to scratch the wood during this process, I lay down some masking tape and sand over it to avoid damaging the wood. After pressing the wire, I remove the tape.

View attachment 627328

View attachment 627329

Over time, brass will tarnish significantly, and I really like this color, as opposed to black spots (like after blackening). But that's a matter of taste.

Die Scharnierbolzen hingegen sind schwarz, was naheliegend ist, da die Scharniere selbst schwarz sind. Auch hier lässt sich der Kopf nicht verbergen, daher forme ich ihn, wie bei den Kupferbolzen der Klinkerverkleidung, durch Umrollen mit einem Messer.

View attachment 627330

Dann schneide ich sie nach dem Schwärzen auf die benötigte Länge zu und setze sie in die Löcher ein, die ich durch die Schlaufe im Holz gebohrt habe.

View attachment 627331

Mein oberes Scharnier besteht aus zwei Teilen, da es sich um die Rückseite des Lenkrads legt. Zuerst klebe ich das Scharnier auf das Holzteil, dann bohre ich in jedes Teil ein Loch und setze eine Schraube ein, dann bohre ich das zweite Loch und so weiter, um Verformungen oder Fehlausrichtungen zu vermeiden.

View attachment 627332

View attachment 627333

Zuerst repariere ich alle Schlaufen am Lenkrad, da diese an bestimmten Stellen angebracht sind...

View attachment 627340

View attachment 627341

...und dann befestige ich von dieser Position aus die Scharniere am Heckpfosten. Aber das zeige ich Ihnen beim nächsten Mal.

Die Farbe hier entspricht übrigens genau der Realität: nicht Schwarz, sondern ein sehr dunkles Grau, und die Bolzen sind deutlich sichtbar und verschmelzen nicht zu einem einzigen schwarzen Fleck.
Ein tolles Ergebnis. Absolut authentisch. Klasse Farbton. Die Bolzen sind sehr realistisch gelungen. Auch die Step by Step-Anleitung der einzelnen Schritte sind hilfreich für Jeden hier. Sehr schön auch die Darstellung und Handhabung der verwendeten Werkzeuge. Das I-Tüpfelchen wäre noch eine Bezugsquelle des Werkzeuges.Vielen Dank fürs Zeigen und die ausführlichen Details. Tolle, gelungene Aufnahmen. Wie der ganze bisherige Baubericht sehr durchdacht und handwerklich absolut top ausgeführt.
 
Display case 2.0

2/3


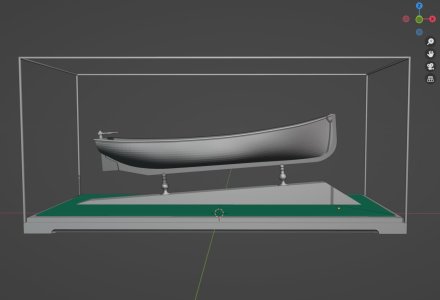
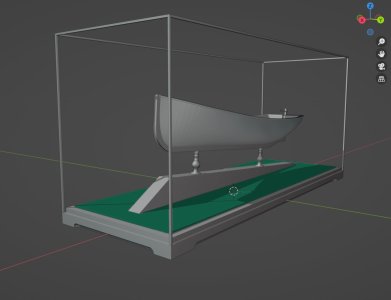
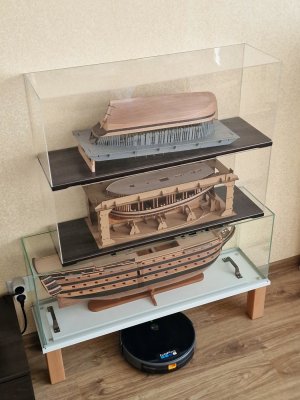
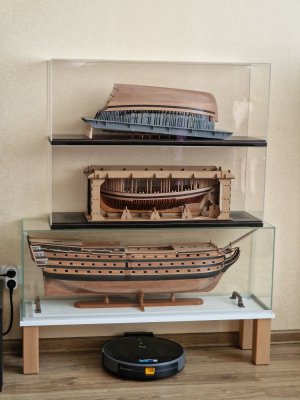
Let me remind you that I initially planned a display case like this, so that the model would be in the center, but...

Case 07.jpg

Case 10.jpg


... but as I said, I moved the model back to install the bowsprit and therefore the whole structure was lengthened. Therefore, the jumpers that will hold the wedges will be displaced.
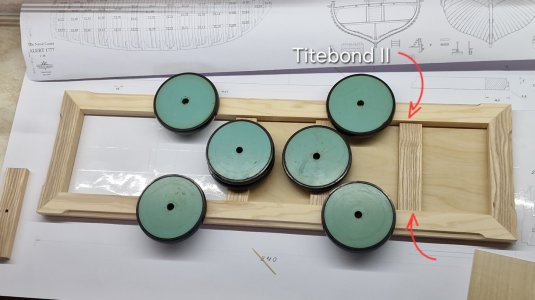
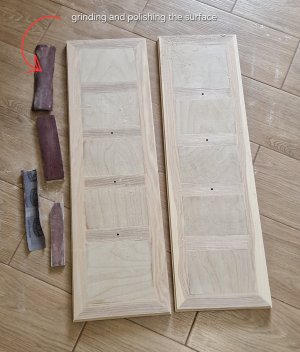
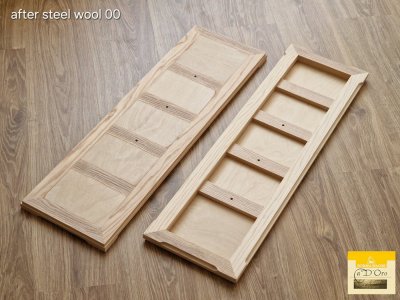
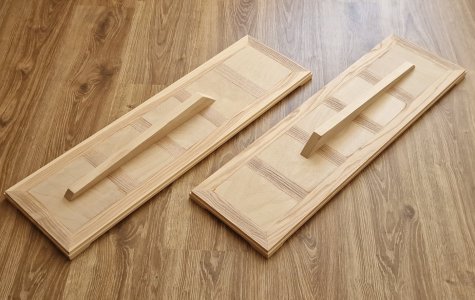
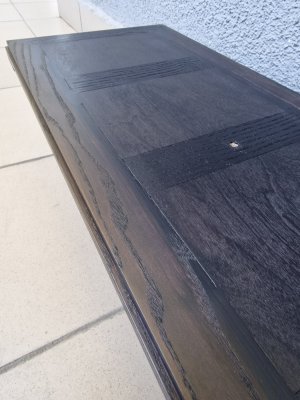
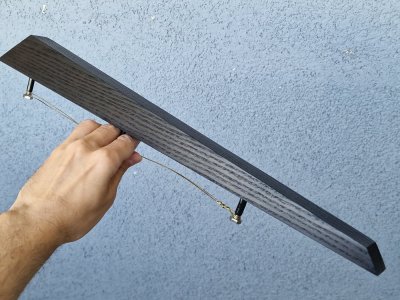
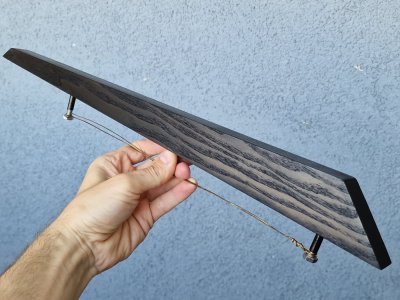
To lighten the entire structure, I made the slab not solid but like a picture frame. Inside, I inserted rectangular 2mm plywood inserts, alternating them with 15mm-thick wooden inserts.

Box 08.jpg

Box 09.jpg

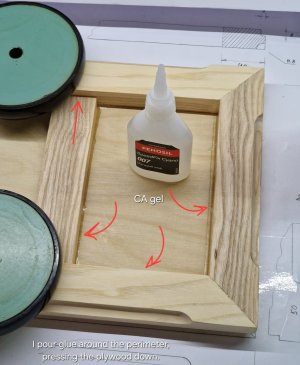
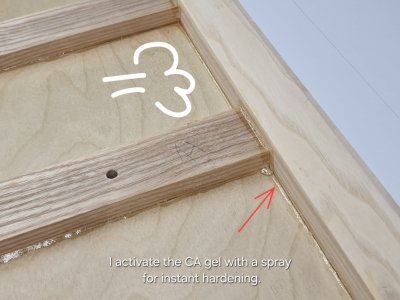
For convenience, four of the five were identical, so I cut them into a single piece. Then I glued the wooden inserts with PVA glue and filled the plywood with CA gel and activator.

Box 10.jpg

Box 11.jpg

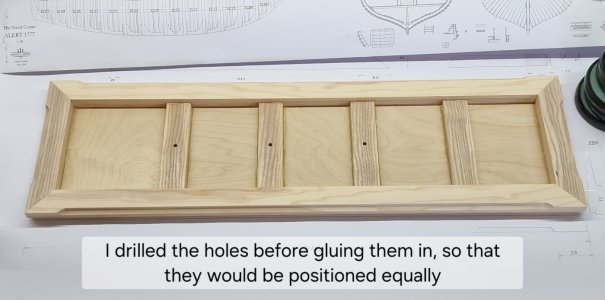
This made the structure rigid but not very heavy.

Box 12.jpg

I drilled holes for ease of installation and centering before gluing. Then I sanded all the boards and treated them with steel wool.

Box 13.jpg

Box 14.jpg

Box 15.jpg

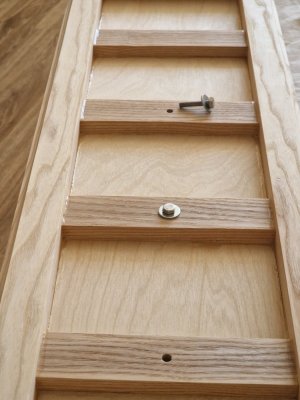
From below, through these holes, bolts will hold wedges to which metal columns will be fixed.

Box 16.jpg

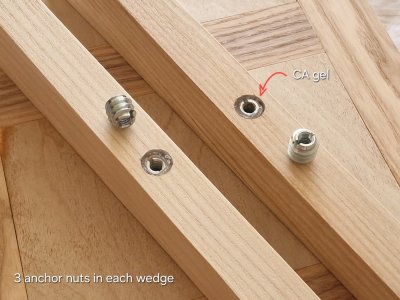
On the underside of these wedges, I screwed and glued anchor nuts for the aforementioned screws.

The end result will look like this, but between the wedges and the slabs there will also be a spacer with felt (blue or green fabric) stretched over it.

Box 17.jpg

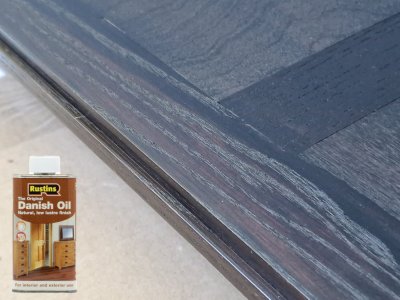
The next step is to stain the wood and apply Danish oil, and glue the plexiglass boxes together.
 
Thanks for the detailed explanations on how you dye the rope – I’ve saved them as a PDF straight away. I’ll definitely give it a go sometime; I really like that look :-)

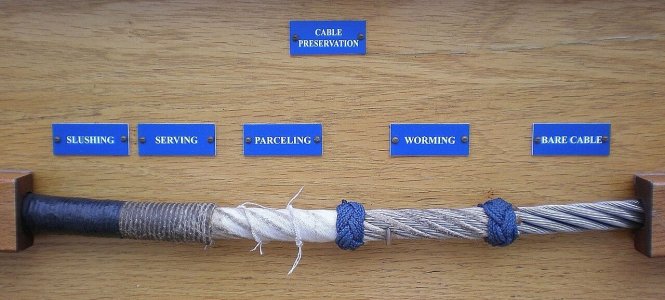
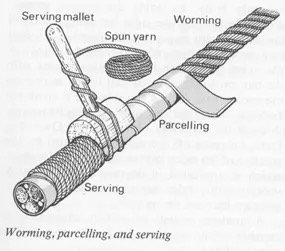
I’ve attached a picture to clarify the terminology – the term ‘checkering’ confused me at first :-D

rope-wording-01.jpgrope-wording-02.jpg

What also confused me was that you showed a left-laid hawser rope, but that was probably just a sample and was then used for dyeing. In my eyes the rope could be a bit more laid tighter but pretty sure this is just because these are samples.

Anyway, great post as usual :-P
 
Thanks for the detailed explanations on how you dye the rope – I’ve saved them as a PDF straight away. I’ll definitely give it a go sometime; I really like that look :-)

I’ve attached a picture to clarify the terminology – the term ‘checkering’ confused me at first :-D

View attachment 627815View attachment 627816

What also confused me was that you showed a left-laid hawser rope, but that was probably just a sample and was then used for dyeing. In my eyes the rope could be a bit more laid tighter but pretty sure this is just because these are samples.

Anyway, great post as usual :-P
Thank you.
Yes, I really like the method. It's the method of Dmitry Shevelev and many others who follow his example.
Yes, some of the ropes were loosely wound—they were just samples, and the color of some didn't match their winding.
All of this is just for samples.
 
It's really quite something to watch the next generation of master model builder develop his skills and produce work that those of us watching can only shake our heads at in wonder. It's a privilege to follow your work, Sergey. I can't wait to see what you will show us in the future.
It's so nice to hear these words from you, colleague. I'm always inspired by your work. Laziness is such a thing, and I have to come up with ways to speed up and simplify the process without compromising the quality of the finished product. But I've always been amazed by the perseverance and patience of handcrafted craftsmen; it's not just a tribute to tradition, but also a sign of talent.
 
Display case 2.0

3/3


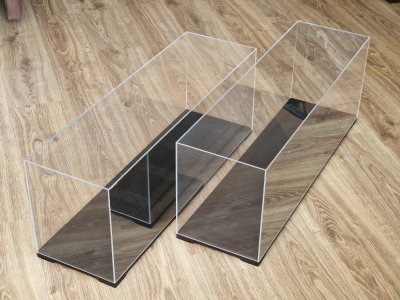
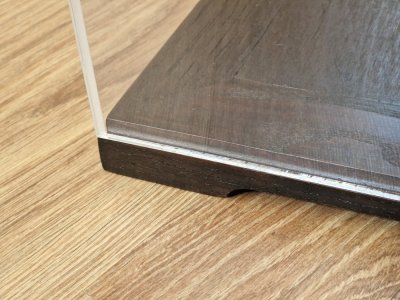
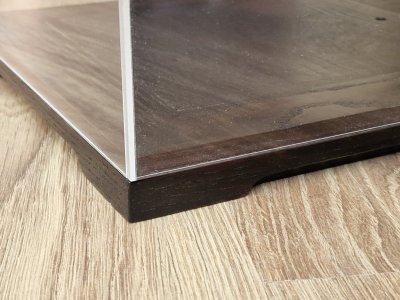
I ordered plexiglass immediately with laser cutting. The accuracy is high and the edges are smooth, but there is a slight bevel from the cut and this is a plus (I’ll tell you why below).

Box 18.jpg

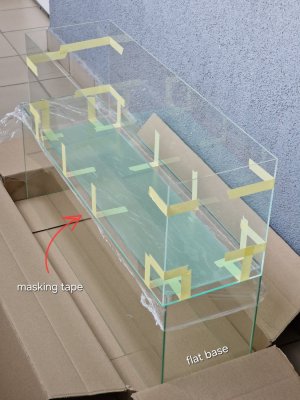
Assembly isn't difficult; you just need to secure everything (while it's dry) with masking tape. Regular tape won't work; you need masking tape—it has a little elasticity, which helps keep the pieces taut.

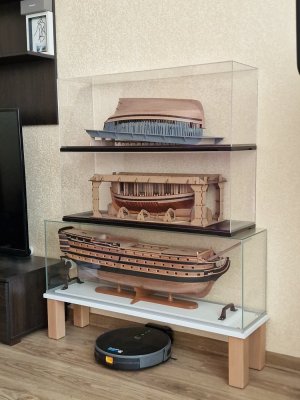
It's important to have a very flat base! I used a glass display case from Victory.

Box 19.jpg

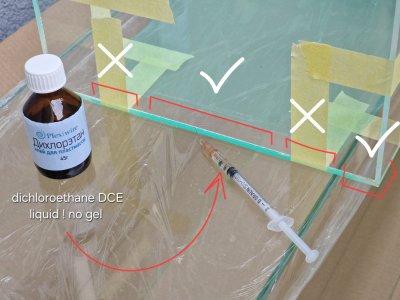
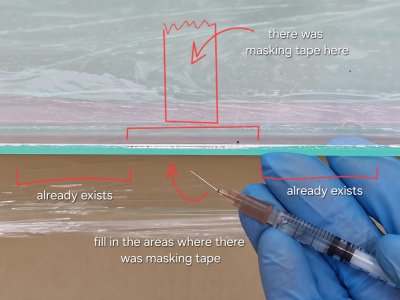
I glued it with dichloroethane. It's not really an adhesive in the traditional sense... it's a solvent! If you draw it into a syringe and carefully pour it into the joint with a thin needle (like an insulin syringe), its incredibly fluid nature will cause it to seep into the joint via capillary action, dissolving the plexiglass on both sides. After a few minutes, the dissolved plexiglass will fuse and fuse into a single, solid piece. This isn't a bonded joint, but essentially a cold weld. This type of joint is extremely difficult to damage. The bevel left by the laser cutting provides a place for the solution to flow. Avoid pouring onto a joint with masking tape, as the liquid can seep under it! You need to be extremely careful and act very carefully and slowly! Even the slightest leak should be wiped off immediately with a glove (which you should wear at all times!). If 2-3 seconds pass, the leak will become a permanent stain! You can wipe it off only in the first second and without any consequences.

Box 20.jpg

Then you need to wait 15 minutes, remove the masking tape, and apply the sealant to the seams underneath. They're clearly visible. I apply the sealant again to the corners (joints) where there's no wall, from the inside, so that the liquid gently flows 10-15 cm along the inner corner. This area will be the most heavily loaded and can be reinforced.

After another 20 minutes, you can carefully move the box to a suitable location where it should sit for another 24 hours. After this, the box will be in one piece.

Point 1: Dichloroethane is highly toxic, so it's essential to use gloves and a respirator. It's heavier than air, so it's best placed above the plexiglass. It's highly recommended to apply the sealant either outside or on a balcony. The internet warned me that it had a very unpleasant odor, but I didn't notice it at all. I applied the sealant on a shared balcony, and there was a draft. I didn't notice any odor or discomfort.

Step 2. Plexiglass is cut and transported with a protective film on both sides. This must be removed before gluing, otherwise dichloroethane can seep under it and cause stains. Removing this film creates a tremendous amount of static electricity, and dust and debris will stick to the plexiglass like a magnet, so the room must be clean. To get rid of this, coat the box with an antistatic spray every other day or spray it on and wipe dry with a microfiber cloth (not cloth, paper, or napkins!!) using a solution of regular fabric softener. Spray one teaspoon per 200 ml onto the box and wipe. Wipe off dust only with a microfiber cloth.

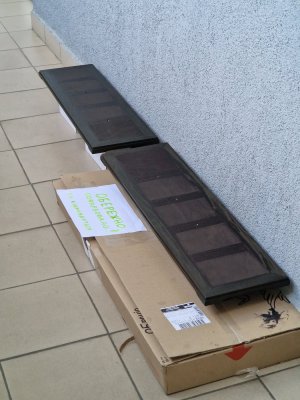
On this same shared balcony, I stained the display panels and wedges.

Box 21.jpg

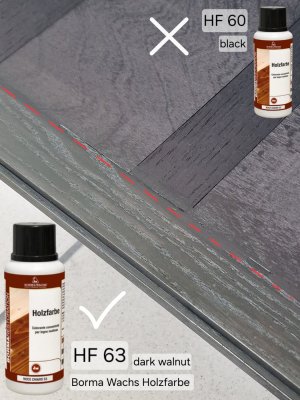
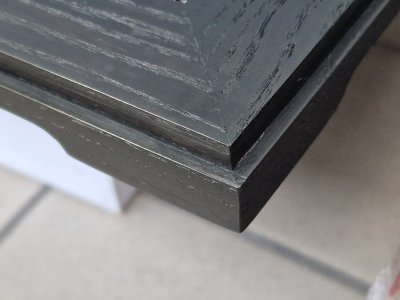
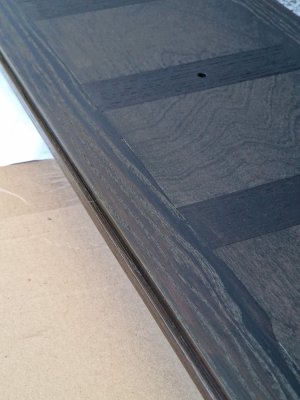
I ordered two 100ml stain samples at once (it's cheaper that way). One was black (I didn't like it because it had a blue tint). The other was dark walnut. I didn't like the single application, but... I applied four coats. And the dark walnut turned black, not with a blue tint, but with a brown undertone, and I liked that.

Box 22.jpg

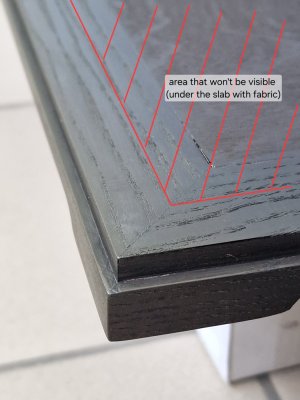
100 ml wasn't enough for all the surfaces, but it was just enough for the entire visible area. I covered the rest (the bottom surface and the center, which will be under the fabric) with black stain.

Box 23.jpg

I liked the fact that the ash texture is very visible and doesn't have a paint-like effect. And a huge plus is that the filler is consistent in color and the surface is highly uniform. Overall, I'm pleased with the result so far.

Box 24.jpg

All that's left to do is apply two coats of Danish oil and wait for it to dry completely, and the display cases will be ready...

And with an interval of 24 hours I covered with two layers of Danish oil.

Box 25.jpg

Box 26.jpg

Above for the first model, below for the second (temporary).

Box 27.jpg

Box 28.jpg

Both wedges will await their fate for now, as the models will simply lie on the slabs. When the time comes, I'll install them on these wedges, followed by the column, but more on that later.

Box 29.jpg

I tested the strength of the plexiglass box and found that the dichloroethane hadn't leaked in two spots, but the seam had come apart. I applied the sealant again from the outside, as I had the first time, and then applied the sealant again to all the seams. However, I tilted the box each time so that the seam was at the bottom and the surfaces were at a 45-degree angle to the horizontal. This ensured that when applying the sealant to the seam, the walls would act as a V-shaped stop to hold the liquid. This way, I could be sure that the entire surface was perfectly sealed. Here's the result:

Box 30.jpg

Box 31.jpg

To prevent the plexiglass from scratching when the second slab is placed on top of it, I glued felt stickers underneath the wooden slab (like the ones I use on chair legs to prevent them from scratching the floor). I also wiped the plexiglass with a solution of fabric softener diluted at 1-2 ml per 100 ml of distilled water. This eliminates static electricity and prevents dust from sticking to the surface (otherwise, it's a real disaster... the surface crackles with static electricity).

Box 32.jpg

Well, here is the intermediate result.

Box 33.jpg

While the models are in the stands, they will be freely displayed in the display cases. Then I will mount them on the wedge-shaped holders of the stand with columns.

Box 34.jpg

That's it for now, I'll wrap up the whole saga with the display cases; it took a lot of my time. Plus, I accidentally dripped water on the slab, causing streaks because the Danish oil hadn't had time to cure. Just for fun, I coated it with Teak Oil (since this slab is for temporary storage, I decided to try this mixture on it). It's sticky and very glossy right now, but we'll see how the slabs react to water in 2-3 weeks.

Box 35.jpg

This chapter isn't finished yet, as the display cases are still in progress. For now, they'll serve as dust covers during assembly. To be continued...
 
Display case 2.0

3/3


I ordered plexiglass immediately with laser cutting. The accuracy is high and the edges are smooth, but there is a slight bevel from the cut and this is a plus (I’ll tell you why below).

View attachment 629089

Assembly isn't difficult; you just need to secure everything (while it's dry) with masking tape. Regular tape won't work; you need masking tape—it has a little elasticity, which helps keep the pieces taut.

It's important to have a very flat base! I used a glass display case from Victory.

View attachment 629090

I glued it with dichloroethane. It's not really an adhesive in the traditional sense... it's a solvent! If you draw it into a syringe and carefully pour it into the joint with a thin needle (like an insulin syringe), its incredibly fluid nature will cause it to seep into the joint via capillary action, dissolving the plexiglass on both sides. After a few minutes, the dissolved plexiglass will fuse and fuse into a single, solid piece. This isn't a bonded joint, but essentially a cold weld. This type of joint is extremely difficult to damage. The bevel left by the laser cutting provides a place for the solution to flow. Avoid pouring onto a joint with masking tape, as the liquid can seep under it! You need to be extremely careful and act very carefully and slowly! Even the slightest leak should be wiped off immediately with a glove (which you should wear at all times!). If 2-3 seconds pass, the leak will become a permanent stain! You can wipe it off only in the first second and without any consequences.

View attachment 629091

Then you need to wait 15 minutes, remove the masking tape, and apply the sealant to the seams underneath. They're clearly visible. I apply the sealant again to the corners (joints) where there's no wall, from the inside, so that the liquid gently flows 10-15 cm along the inner corner. This area will be the most heavily loaded and can be reinforced.

After another 20 minutes, you can carefully move the box to a suitable location where it should sit for another 24 hours. After this, the box will be in one piece.

Point 1: Dichloroethane is highly toxic, so it's essential to use gloves and a respirator. It's heavier than air, so it's best placed above the plexiglass. It's highly recommended to apply the sealant either outside or on a balcony. The internet warned me that it had a very unpleasant odor, but I didn't notice it at all. I applied the sealant on a shared balcony, and there was a draft. I didn't notice any odor or discomfort.

Step 2. Plexiglass is cut and transported with a protective film on both sides. This must be removed before gluing, otherwise dichloroethane can seep under it and cause stains. Removing this film creates a tremendous amount of static electricity, and dust and debris will stick to the plexiglass like a magnet, so the room must be clean. To get rid of this, coat the box with an antistatic spray every other day or spray it on and wipe dry with a microfiber cloth (not cloth, paper, or napkins!!) using a solution of regular fabric softener. Spray one teaspoon per 200 ml onto the box and wipe. Wipe off dust only with a microfiber cloth.

On this same shared balcony, I stained the display panels and wedges.

View attachment 629092

I ordered two 100ml stain samples at once (it's cheaper that way). One was black (I didn't like it because it had a blue tint). The other was dark walnut. I didn't like the single application, but... I applied four coats. And the dark walnut turned black, not with a blue tint, but with a brown undertone, and I liked that.

View attachment 629093

100 ml wasn't enough for all the surfaces, but it was just enough for the entire visible area. I covered the rest (the bottom surface and the center, which will be under the fabric) with black stain.

View attachment 629094

I liked the fact that the ash texture is very visible and doesn't have a paint-like effect. And a huge plus is that the filler is consistent in color and the surface is highly uniform. Overall, I'm pleased with the result so far.

View attachment 629095

All that's left to do is apply two coats of Danish oil and wait for it to dry completely, and the display cases will be ready...

And with an interval of 24 hours I covered with two layers of Danish oil.

View attachment 629097

View attachment 629098

Above for the first model, below for the second (temporary).

View attachment 629099

View attachment 629100

Both wedges will await their fate for now, as the models will simply lie on the slabs. When the time comes, I'll install them on these wedges, followed by the column, but more on that later.

View attachment 629101

I tested the strength of the plexiglass box and found that the dichloroethane hadn't leaked in two spots, but the seam had come apart. I applied the sealant again from the outside, as I had the first time, and then applied the sealant again to all the seams. However, I tilted the box each time so that the seam was at the bottom and the surfaces were at a 45-degree angle to the horizontal. This ensured that when applying the sealant to the seam, the walls would act as a V-shaped stop to hold the liquid. This way, I could be sure that the entire surface was perfectly sealed. Here's the result:

View attachment 629102

View attachment 629103

To prevent the plexiglass from scratching when the second slab is placed on top of it, I glued felt stickers underneath the wooden slab (like the ones I use on chair legs to prevent them from scratching the floor). I also wiped the plexiglass with a solution of fabric softener diluted at 1-2 ml per 100 ml of distilled water. This eliminates static electricity and prevents dust from sticking to the surface (otherwise, it's a real disaster... the surface crackles with static electricity).

View attachment 629104

Well, here is the intermediate result.

View attachment 629105

While the models are in the stands, they will be freely displayed in the display cases. Then I will mount them on the wedge-shaped holders of the stand with columns.

View attachment 629106

That's it for now, I'll wrap up the whole saga with the display cases; it took a lot of my time. Plus, I accidentally dripped water on the slab, causing streaks because the Danish oil hadn't had time to cure. Just for fun, I coated it with Teak Oil (since this slab is for temporary storage, I decided to try this mixture on it). It's sticky and very glossy right now, but we'll see how the slabs react to water in 2-3 weeks.

View attachment 629107

This chapter isn't finished yet, as the display cases are still in progress. For now, they'll serve as dust covers during assembly. To be continued...
You did a very nice job with your show cases, Sergey. Almost the same technique I used.
When I order my plexiglass, I have the option to have the edges of the sheets polished square. When placed against each other, they are then virtually seamless. When administering the chloroform with the syringe, I need very little because, due to capillary action, the liquid is drawn in completely, filling it. I do not press the syringe down. Only the warmth of my fingers causes the slight increase in pressure. But you have to prepare the syringe with the liquid just like a doctor does for vaccinating: ensure no air settles in the reservoir.
With the masking tape outside, I fill the seams from the inside.
Regards, Peter
 
Display case 2.0

3/3


I ordered plexiglass immediately with laser cutting. The accuracy is high and the edges are smooth, but there is a slight bevel from the cut and this is a plus (I’ll tell you why below).

View attachment 629089

Assembly isn't difficult; you just need to secure everything (while it's dry) with masking tape. Regular tape won't work; you need masking tape—it has a little elasticity, which helps keep the pieces taut.

It's important to have a very flat base! I used a glass display case from Victory.

View attachment 629090

I glued it with dichloroethane. It's not really an adhesive in the traditional sense... it's a solvent! If you draw it into a syringe and carefully pour it into the joint with a thin needle (like an insulin syringe), its incredibly fluid nature will cause it to seep into the joint via capillary action, dissolving the plexiglass on both sides. After a few minutes, the dissolved plexiglass will fuse and fuse into a single, solid piece. This isn't a bonded joint, but essentially a cold weld. This type of joint is extremely difficult to damage. The bevel left by the laser cutting provides a place for the solution to flow. Avoid pouring onto a joint with masking tape, as the liquid can seep under it! You need to be extremely careful and act very carefully and slowly! Even the slightest leak should be wiped off immediately with a glove (which you should wear at all times!). If 2-3 seconds pass, the leak will become a permanent stain! You can wipe it off only in the first second and without any consequences.

View attachment 629091

Then you need to wait 15 minutes, remove the masking tape, and apply the sealant to the seams underneath. They're clearly visible. I apply the sealant again to the corners (joints) where there's no wall, from the inside, so that the liquid gently flows 10-15 cm along the inner corner. This area will be the most heavily loaded and can be reinforced.

After another 20 minutes, you can carefully move the box to a suitable location where it should sit for another 24 hours. After this, the box will be in one piece.

Point 1: Dichloroethane is highly toxic, so it's essential to use gloves and a respirator. It's heavier than air, so it's best placed above the plexiglass. It's highly recommended to apply the sealant either outside or on a balcony. The internet warned me that it had a very unpleasant odor, but I didn't notice it at all. I applied the sealant on a shared balcony, and there was a draft. I didn't notice any odor or discomfort.

Step 2. Plexiglass is cut and transported with a protective film on both sides. This must be removed before gluing, otherwise dichloroethane can seep under it and cause stains. Removing this film creates a tremendous amount of static electricity, and dust and debris will stick to the plexiglass like a magnet, so the room must be clean. To get rid of this, coat the box with an antistatic spray every other day or spray it on and wipe dry with a microfiber cloth (not cloth, paper, or napkins!!) using a solution of regular fabric softener. Spray one teaspoon per 200 ml onto the box and wipe. Wipe off dust only with a microfiber cloth.

On this same shared balcony, I stained the display panels and wedges.

View attachment 629092

I ordered two 100ml stain samples at once (it's cheaper that way). One was black (I didn't like it because it had a blue tint). The other was dark walnut. I didn't like the single application, but... I applied four coats. And the dark walnut turned black, not with a blue tint, but with a brown undertone, and I liked that.

View attachment 629093

100 ml wasn't enough for all the surfaces, but it was just enough for the entire visible area. I covered the rest (the bottom surface and the center, which will be under the fabric) with black stain.

View attachment 629094

I liked the fact that the ash texture is very visible and doesn't have a paint-like effect. And a huge plus is that the filler is consistent in color and the surface is highly uniform. Overall, I'm pleased with the result so far.

View attachment 629095

All that's left to do is apply two coats of Danish oil and wait for it to dry completely, and the display cases will be ready...

And with an interval of 24 hours I covered with two layers of Danish oil.

View attachment 629097

View attachment 629098

Above for the first model, below for the second (temporary).

View attachment 629099

View attachment 629100

Both wedges will await their fate for now, as the models will simply lie on the slabs. When the time comes, I'll install them on these wedges, followed by the column, but more on that later.

View attachment 629101

I tested the strength of the plexiglass box and found that the dichloroethane hadn't leaked in two spots, but the seam had come apart. I applied the sealant again from the outside, as I had the first time, and then applied the sealant again to all the seams. However, I tilted the box each time so that the seam was at the bottom and the surfaces were at a 45-degree angle to the horizontal. This ensured that when applying the sealant to the seam, the walls would act as a V-shaped stop to hold the liquid. This way, I could be sure that the entire surface was perfectly sealed. Here's the result:

View attachment 629102

View attachment 629103

Um Kratzer auf dem Plexiglas zu vermeiden, wenn die zweite Platte daraufgelegt wird, habe ich Filzgleiter unter die Holzplatte geklebt (ähnlich denen, die ich an Stuhlbeinen verwende, um Kratzer auf dem Boden zu verhindern). Außerdem habe ich das Plexiglas mit einer Lösung aus 1–2 ml Weichspüler auf 100 ml destilliertem Wasser abgewischt. Dadurch wird statische Aufladung beseitigt und verhindert, dass Staub an der Oberfläche haften bleibt (sonst ist das wirklich ärgerlich … die Oberfläche knistert vor statischer Elektrizität).

View attachment 629104

Nun, hier ist das Zwischenergebnis.

View attachment 629105

Solange die Modelle in den Ständern stehen, können sie frei in den Vitrinen ausgestellt werden. Anschließend werde ich sie auf den keilförmigen Halterungen des Ständers mit Säulen montieren.

View attachment 629106

Das war’s fürs Erste. Ich schließe die ganze Geschichte mit den Vitrinen ab; das hat mich echt viel Zeit gekostet. Außerdem ist mir versehentlich Wasser auf die Platte getropft, wodurch Streifen entstanden sind, weil das dänische Öl noch nicht richtig aushärten konnte. Zum Spaß habe ich sie mit Teaköl behandelt (da die Platte nur vorübergehend gelagert werden soll, wollte ich diese Mischung mal ausprobieren). Sie ist im Moment noch klebrig und sehr glänzend, aber wir werden sehen, wie die Platten in zwei bis drei Wochen auf Wasser reagieren.

View attachment 629107

Dieses Kapitel ist noch nicht abgeschlossen, da die Vitrinen noch in Arbeit sind. Vorerst dienen sie während der Montage als Staubschutz. Fortsetzung folgt…
Die Vitrinen sind wie das Modell absolut erstklassig geworden. Sie wirken jetzt schon sehr edel und werden das wunderschöne Modell entsprechend zur Geltung bringen. Auch hier wieder eine fantastische Erklärung der einzelnen Montageschritte. Vorbildlich!. Der Bau- und Montagebericht ist wie ein guter „Krimi“. Er lässt einen nicht mehr los.
Auch das „Behandeln“ der Vitrinen gegen das „Staubmonster“, das ja jeder kennt, ist spitze. Ich habe sogleich meine Vitrinen ebenfalls mit der Mischung behandelt. Danke für die stetigen praktischen Tipps. Es ist schwer bei deinen rasanten Fortschritten am eigenen Modell-Projekt selbst ruhig zu bleiben und am eigenen Projekt nicht „hastig“ zu werden. Die Ruhe und überlegte Schritte ist aber die stärkste Kraft für ein sehr gutes Ergebnis. Das zeigt dein Modell und das von den Kollegen.
Erlaube mir noch eine Frage zum verwendeten Plexiglas. Ist es eine bestimmte „Sorte“, bezüglich Oberflächenhärte? Wir alle kennen ja das Probkem der feinen Kratzer ( abwischen der Vitrine usw ). Oder polierst Du ab und an die Oberfläche?
 
You did a very nice job with your show cases, Sergey. Almost the same technique I used.
When I order my plexiglass, I have the option to have the edges of the sheets polished square. When placed against each other, they are then virtually seamless. When administering the chloroform with the syringe, I need very little because, due to capillary action, the liquid is drawn in completely, filling it. I do not press the syringe down. Only the warmth of my fingers causes the slight increase in pressure. But you have to prepare the syringe with the liquid just like a doctor does for vaccinating: ensure no air settles in the reservoir.
With the masking tape outside, I fill the seams from the inside.
Regards, Peter
Thank you. Unfortunately, I've come to terms with the fact that the display case won't be 100% as I envisioned. It's very difficult to find good craftsmen. There are some microdefects in the wood and the plexiglass isn't cut perfectly, but you can see all of this from a very close distance. Overall, from a distance of 40 cm, everything looks pretty good, and that's enough for this project. I'm more focused on the models, and the display case is secondary. Especially since the first one turned out better, and the second one will be used for military purposes. I still have to make a second main display case for the model with paramours. Regarding the capillary effect, yes, due to the imperfect cutting, the edges don't fit perfectly, so I had to apply glue on all sides. Now the appearance is a 4, but the strength is a 5, and that's the main thing. Thank you for your interest and feedback. Congratulations on the finished project. Maybe I missed something, but what are you planning to build next?

Great job on the cases !
Thanks for sharing your methods !!!
Thank you. As I said, it's not as perfect as I'd hoped, but the result is satisfactory and will serve its purpose. I'll try to make the main display case even better; the main thing is to find good carpenters and well-cut plexiglass. But for now, I'm happy with the finished product.

Die Vitrinen sind wie das Modell absolut erstklassig geworden. Sie wirken jetzt schon sehr edel und werden das wunderschöne Modell entsprechend zur Geltung bringen. Auch hier wieder eine fantastische Erklärung der einzelnen Montageschritte. Vorbildlich!. Der Bau- und Montagebericht ist wie ein guter „Krimi“. Er lässt einen nicht mehr los.
Auch das „Behandeln“ der Vitrinen gegen das „Staubmonster“, das ja jeder kennt, ist spitze. Ich habe sogleich meine Vitrinen ebenfalls mit der Mischung behandelt. Danke für die stetigen praktischen Tipps. Es ist schwer bei deinen rasanten Fortschritten am eigenen Modell-Projekt selbst ruhig zu bleiben und am eigenen Projekt nicht „hastig“ zu werden. Die Ruhe und überlegte Schritte ist aber die stärkste Kraft für ein sehr gutes Ergebnis. Das zeigt dein Modell und das von den Kollegen.
Erlaube mir noch eine Frage zum verwendeten Plexiglas. Ist es eine bestimmte „Sorte“, bezüglich Oberflächenhärte? Wir alle kennen ja das Probkem der feinen Kratzer ( abwischen der Vitrine usw ). Oder polierst Du ab und an die Oberfläche?
Vielen Dank für die netten Worte, das freut mich sehr. Das Plexiglas ist für Vitrinen und Außenwerbung. Es sieht sehr hochwertig und robust aus und ist kratzfest. Sand kann es natürlich beschädigen, aber normaler Staub macht ihm nichts aus. Ich sauge vorhandenen Staub ab und behandle das Plexiglas anschließend mit einem Antistatikmittel.

Thank you for the kind words, it's very nice. The plexiglass is for display cases and outdoor advertising. It looks very high-quality, durable, and doesn't scratch easily. Sand can damage it, of course, but regular dust won't do anything. I try to vacuum up any dust that's present, and then treat it with an anti-static solution.
 
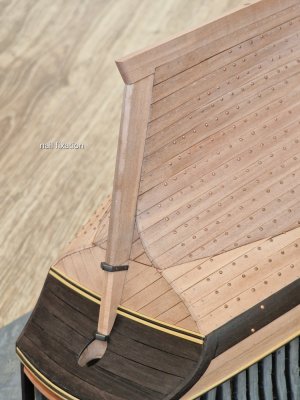
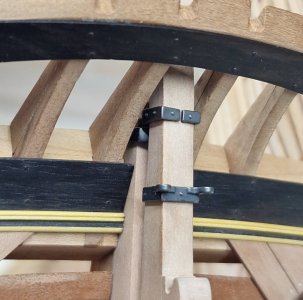
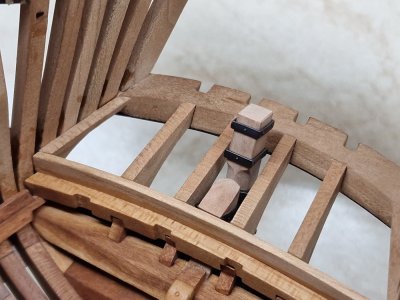
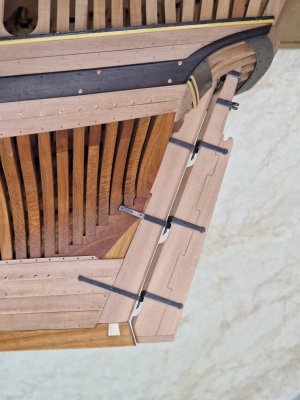
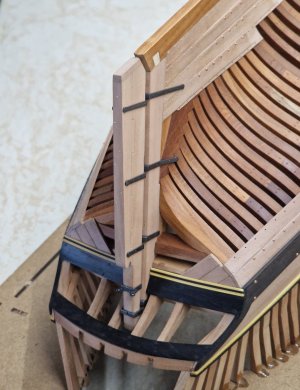
The rudder hinges are secured, now let's move on to the sternpost hinges.
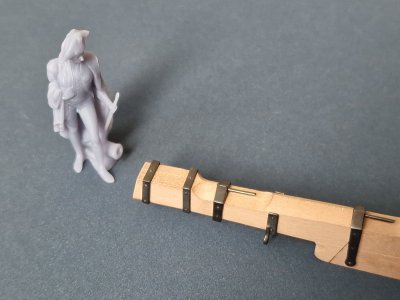
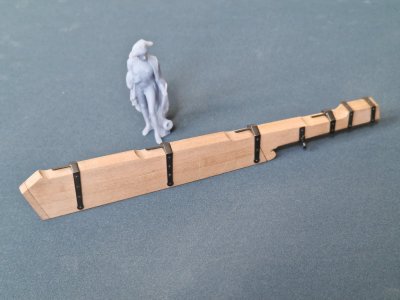
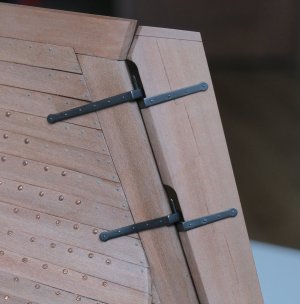
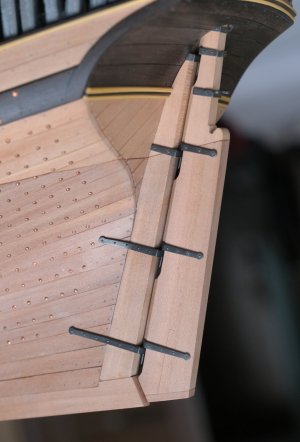
The logic is as follows. I started by securing the top two to make drilling holes easier. Then I glued the sternpost in place, and after polishing, I finished nailing it.

Alert 2816.jpg

Alert 2817.jpg

Alert 2818.jpg

Alert 2819.jpg

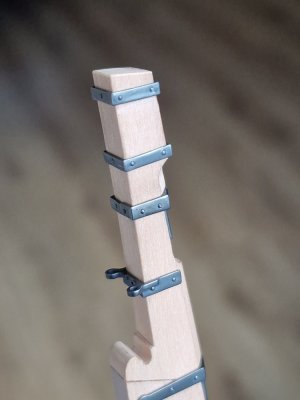
Then I secured the bottom two and top hoops and the chain mount.

Alert 2822.jpg

Alert 2823.jpg

Alert 2824.jpg

I will make the handle-lever when I work on the deck, but at this point the steering mechanism is completely ready.

Alert 2824a.jpg

Alert 2824c.jpg

So, the total number of parts on the sternpost is 41, and the rudder consists of 73 parts. And here's the assembled result:

Alert 2825.JPG

Alert 2826.JPG

Alert 2827.JPG

Alert 2828.JPG

Alert 2829.JPG

Alert 2830.JPG

Alert 2831.JPG

Alert 2832.JPG

Alert 2833.JPG

Alert 2834.JPG

Alert 2835.JPG

Next, all of this needs to be done on the first hull of the ship.
 
Die Ruderscharniere sind befestigt, nun machen wir uns an die Heckpfostenscharniere.
Die Vorgehensweise ist folgende: Zuerst habe ich die beiden oberen Teile befestigt, um das Bohren der Löcher zu erleichtern. Dann habe ich den Heckpfosten eingeklebt und nach dem Polieren die restlichen Nägel angebracht.

View attachment 629314

View attachment 629315

View attachment 629316

View attachment 629317

Dann befestigte ich die beiden unteren und die oberen Ringe sowie die Kettenhalterung.

View attachment 629318

View attachment 629319

View attachment 629320

Den Kurbelhebel fertige ich an, wenn ich am Deck arbeite, aber der Lenkmechanismus ist zum jetzigen Zeitpunkt vollständig fertig.

View attachment 629321

View attachment 629322

Die Heckstütze besteht also aus insgesamt 41 Teilen, das Ruder aus 73 Teilen. Und hier ist das fertige Ergebnis:

View attachment 629323

View attachment 629324

View attachment 629325

View attachment 629326

View attachment 629327

View attachment 629328

View attachment 629329

View attachment 629330

View attachment 629331

View attachment 629333

View attachment 629339

Als Nächstes muss all dies am ersten Rumpf des Schiffes durchgeführt werden.
Ein weiteres Stück im Puzzle eines fantastischen Models. Die Metalloptik kommt hier sehr gut zur Geltung. Auch das Farbspiel der verwendeten Hölzer wie „Blackhornbeam“ sieht man hiereindrucksvoll .
 
Imitation Bolts (1st Hull)

Initially, I didn't dare make the bolts on the frames out of metal, instead simulating them with round halos due to their number and so they wouldn't distract from the wood. However, on the keel, I didn't really like this look, so I tried it on a test piece and decided to replace the bolts with brass wire.

Alert 2836.jpg

To avoid damaging the already oiled wood, I first covered it with masking tape and then drilled and polished it. To ensure the wire was polished properly on the end, I cut it off, leaving a little bit sticking out, then polished it, and then pressed the rest of it in until it was flush with the wood.

Alert 2837.jpg

In the end it turned out like this.

Alert 2838.jpg

Alert 2839у.jpg

Alert 2841.jpg

I liked the fact that brass oxidizes over time. Especially when you rub it with greasy hands, it doesn't shine, but it also doesn't look like black spots like after blackening... but something in between, not flashy but still noticeable.

Alert 2842.jpg

Shaped plank.
Its construction is no different from what I previously showed on the second building.

Alert 2843.jpg

Alert 2844.jpg

Alert 2845.jpg

Alert 2846.jpg

Alert 2847.jpg


Rudder Hinges (1st case)

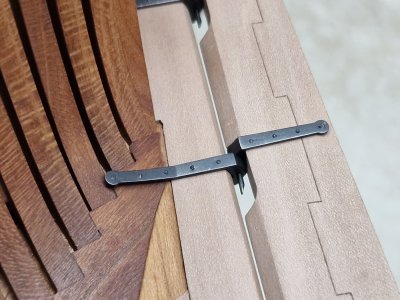
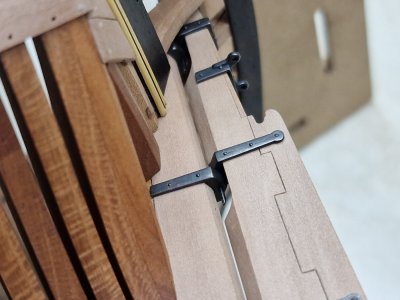
The fixing was the same as in the 2nd hull. I'll show a couple of differences in the photo:

Alert 2848.jpg

Alert 2849.jpg

Alert 2850.jpg

Rudder blade (1st and 2nd hulls).

Alert 2852.jpg

Alert 2853.jpg

Alert 2854.jpg

Alert 2851.jpg


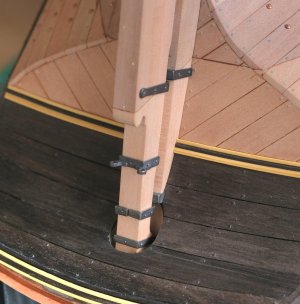
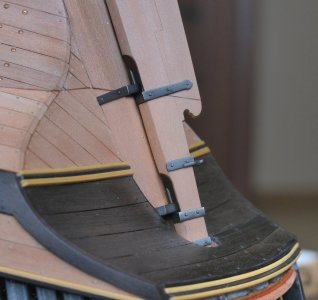
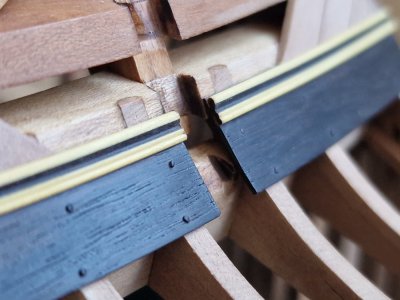
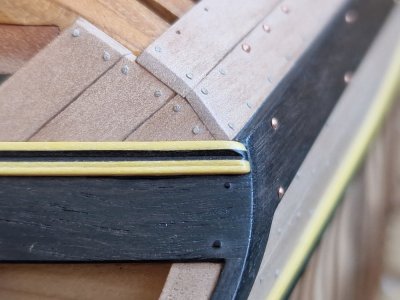
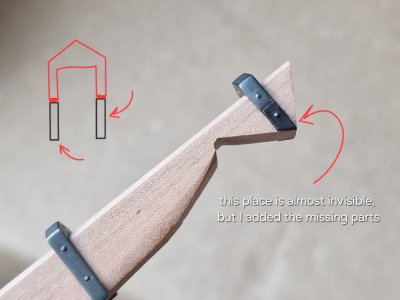
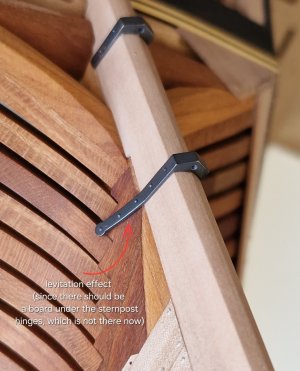
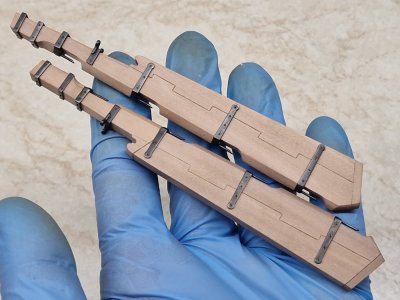
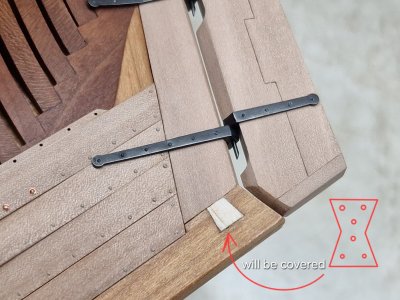
Since I replaced the sternpost, I will also replace the metal bracket (in the shape of an hourglass) and it will be thinner, because I covered the extra space.

Alert 2855.jpg

Alert 2856.jpg

Alert 2857.jpg

Alert 2858.jpg

Alert 2859.jpg

Alert 2860.jpg

Alert 2861.jpg

All that remains is to fix the metal brackets on the stem and sternpost and both hulls will be practically ready from the outside before the wave and I will move on to the decks...
 
Imitationsbolzen (1. Rumpf)

Anfangs traute ich mich nicht, die Bolzen an den Spanten aus Metall zu fertigen, sondern simulierte sie stattdessen mit runden Ringen, um ihre Anzahl zu berücksichtigen und die Holzoptik nicht zu beeinträchtigen. Am Kiel gefiel mir dieser Look jedoch nicht, daher probierte ich es an einem Probestück aus und beschloss mich, die Bolzen durch Messingdraht zu ersetzen.

View attachment 630208

Um das bereits geölte Holz nicht zu beschädigen, habe ich es zunächst mit Kreppband abgeklebt und anschließend gebohrt und poliert. Damit der Draht am Ende sauber poliert wurde, habe ich ihn so abgeschnitten, dass ein kleines Stück herausragte, dieses poliert und den Rest dann bündig mit dem Holz eingepresst.

View attachment 630209

Am Ende kam es so zustande.

View attachment 630210

View attachment 630211

View attachment 630212

Mir gefiel, dass Messing mit der Zeit oxidiert. Besonders wenn man es mit fettigen Händen anfasst, glänzt es nicht, aber es sieht auch nicht aus wie nach dem Schwärzen mit schwarzen Flecken … sondern etwas dazwischen, nicht auffällig, aber dennoch erkennbar.

View attachment 630213

Geformtes Brett.
Seine Konstruktion unterscheidet sich nicht von der, die ich zuvor beim zweiten Gebäude gezeigt habe.

View attachment 630214

View attachment 630215

View attachment 630216

View attachment 630217

View attachment 630218


Ruderscharniere (1. Herbst)

Die Befestigung war die gleiche wie beim zweiten Rumpf. Ich zeige auf dem Foto ein paar Unterschiede:

View attachment 630219

View attachment 630220

View attachment 630221

Ruderblatt (1. und 2. Rumpf).

View attachment 630223

View attachment 630224

View attachment 630225

View attachment 630222


Da ich den Heckpfosten ausgetauscht habe, werde ich auch die Metallhalterung (in Form einer Sanduhr) ersetzen, und sie wird dünner sein, da ich den zusätzlichen Raum abgedeckt habe.

View attachment 630226

View attachment 630227

View attachment 630228

View attachment 630229

View attachment 630230

View attachment 630231

View attachment 630232

Es müssen nur noch die Metallhalterungen am Bug und Heckpfosten befestigt werden, dann sind beide Rümpfe von außen praktisch fertig, bevor die Welle kommt, und ich kann mich den Decks widmen...
Es ist sehr schön zu sehen, wie Du die einzelnen Themen löst. Alles wirkt auch in der Großaufnahme absolut präzise und stimmig. Ein fantastischer Eindruck. Der Ruderbereich sieht klasse aus. Ich liebe es. Dein Arbeitspensum ist atemberaubend.
 
It’s great reading through all your recent posts Sergey. I find there’s always something to learn from your excellent and remarkable work. Especially, for me, your rigging work, tests and the observations about oils.
Thank you. Yes, experimentation and testing are very important, but they take a lot of time, and it can be difficult to motivate yourself to make long-term observations. However, it really helps later, and you understand why you're doing it all.

As always, wonderful work !!
Thank you for your rating.!

Ein weiteres Stück im Puzzle eines fantastischen Models. Die Metalloptik kommt hier sehr gut zur Geltung. Auch das Farbspiel der verwendeten Hölzer wie „Blackhornbeam“ sieht man hiereindrucksvoll .
Es ist sehr schön zu sehen, wie Du die einzelnen Themen löst. Alles wirkt auch in der Großaufnahme absolut präzise und stimmig. Ein fantastischer Eindruck. Der Ruderbereich sieht klasse aus. Ich liebe es. Dein Arbeitspensum ist atemberaubend.
Vielen Dank für Ihre freundlichen Worte, das ist wie immer sehr motivierend. ;)
 
Imitation Bolts (1st Hull)

Initially, I didn't dare make the bolts on the frames out of metal, instead simulating them with round halos due to their number and so they wouldn't distract from the wood. However, on the keel, I didn't really like this look, so I tried it on a test piece and decided to replace the bolts with brass wire.

View attachment 630208

To avoid damaging the already oiled wood, I first covered it with masking tape and then drilled and polished it. To ensure the wire was polished properly on the end, I cut it off, leaving a little bit sticking out, then polished it, and then pressed the rest of it in until it was flush with the wood.

View attachment 630209

In the end it turned out like this.

View attachment 630210

View attachment 630211

View attachment 630212

I liked the fact that brass oxidizes over time. Especially when you rub it with greasy hands, it doesn't shine, but it also doesn't look like black spots like after blackening... but something in between, not flashy but still noticeable.

View attachment 630213

Shaped plank.
Its construction is no different from what I previously showed on the second building.

View attachment 630214

View attachment 630215

View attachment 630216

View attachment 630217

View attachment 630218


Rudder Hinges (1st case)

The fixing was the same as in the 2nd hull. I'll show a couple of differences in the photo:

View attachment 630219

View attachment 630220

View attachment 630221

Rudder blade (1st and 2nd hulls).

View attachment 630223

View attachment 630224

View attachment 630225

View attachment 630222


Since I replaced the sternpost, I will also replace the metal bracket (in the shape of an hourglass) and it will be thinner, because I covered the extra space.

View attachment 630226

View attachment 630227

View attachment 630228

View attachment 630229

View attachment 630230

View attachment 630231

View attachment 630232

All that remains is to fix the metal brackets on the stem and sternpost and both hulls will be practically ready from the outside before the wave and I will move on to the decks...
Good morning Sergey. Wow your craft is brilliant. Every detail is made to perfection - the work is so fine it almost looks like the pics are AI generated. Come on ........there must be a flaw somewhere...... ROTF. I hope you and your family are staying safe my friend. Cheers Grant.
 
Back
Top