• Ships of Scale has incorportated an extra level of security when you log In. Please follow on-screen prompts to acknowledge that you are not a robot via a "Check Box" or a "Pictorial Check Box Puzzle". This is needed due to higher level of AI Activity Security.
  • SUBSCRIBE TO SHIPS IN SCALE TODAY!

    The beloved Ships in Scale Magazine is back and charting a new course for 2026!
    Discover new skills, new techniques, and new inspirations in every issue.

    NOTE THAT OUR NEXT ISSUE WILL BE July/August 2026
  • Win a Free Custom Engraved Brass Coin!!!
    As a way to introduce our brass coins to the community, we will raffle off a free coin during the month of August. Follow link ABOVE for instructions for entering.

La Créole 1827 by archjofo - Scale 1/48 - French corvette

Thank you very much, dear Johann, for your appreciation of our skills. It takes a great deal of sustained passion to maintain such a high standard, whilst also constantly overcoming the hurdles to further development of the building. Thank you, dear Johann.
 
@Holger.Schwarz
@GrantTyler
Hello, thank you for the interest and the nice comments.
I also want to thank everyone else for the LIKES.


Rigging the Main Topgallant Yard – Vergue de grand perroquet

One level higher up the mainmast, the running rigging of the corvette continues to take shape.

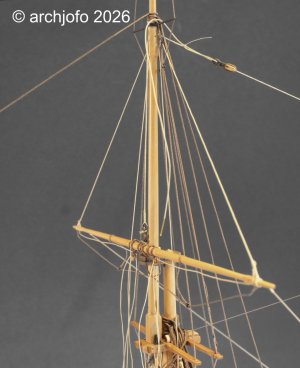
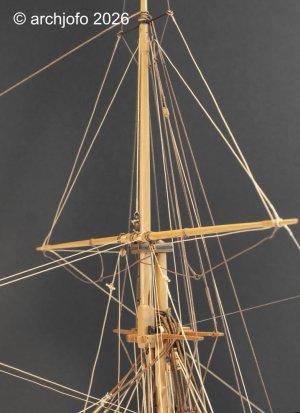
The main topgallant yard, already fully equipped with all rigging elements, has been temporarily secured with the parrel. After reeving the lifts through the thimbles between the topgallant shrouds, and the braces through the double blocks below the mizzen topgallant crosstrees, the yard could be roughly aligned. As long as the running rigging is not yet belayed, I always weigh these lines down with wooden clothespins, which makes the alignment process much easier. It looks a bit wild, but it is incredibly helpful.

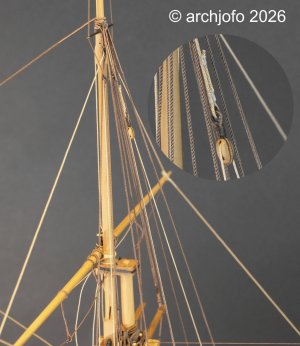
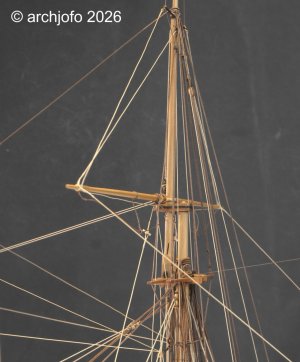
After reeving the tye through the sheave hole in the hound of the main topgallant mast, the block for the main topgallant haliard could be seized. To make this process easier, I clamped the assembly in place, as shown in the picture below:

DSC02818.jpg

DSC02825.jpg

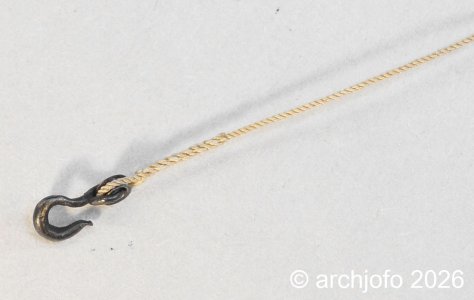
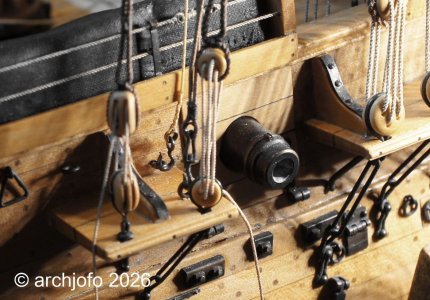
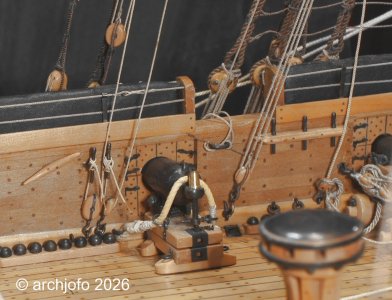
Based on earlier research, the standing part of the main topgallant haliard received a hook, which was hooked into an eyebolt on the outside of the bulwark on the starboard side. The running part of the haliard was led through a lead block and belayed on the port side, inside the bulwark, to a belaying pin next to the main topsail haliard.

DSC02823.jpg

DSC02289.jpg

DSC02828.jpg

In the next step, I still need to connect the main topgallant sheets with the main topsail clewlines, but more on that soon.

To be continued…

 
Witaj
Mistrzowski takielunek Johanie, pokolenia modelarzy powinny się uczyć od Ciebie. Pozdrawiam Mirek
 
@Holger.Schwarz
@GrantTyler
Hello, thank you for the interest and the nice comments.
I also want to thank everyone else for the LIKES.


Rigging the Main Topgallant Yard – Vergue de grand perroquet

One level higher up the mainmast, the running rigging of the corvette continues to take shape.

The main topgallant yard, already fully equipped with all rigging elements, has been temporarily secured with the parrel. After reeving the lifts through the thimbles between the topgallant shrouds, and the braces through the double blocks below the mizzen topgallant crosstrees, the yard could be roughly aligned. As long as the running rigging is not yet belayed, I always weigh these lines down with wooden clothespins, which makes the alignment process much easier. It looks a bit wild, but it is incredibly helpful.

After reeving the tye through the sheave hole in the hound of the main topgallant mast, the block for the main topgallant haliard could be seized. To make this process easier, I clamped the assembly in place, as shown in the picture below:

View attachment 633406

View attachment 633408

Based on earlier research, the standing part of the main topgallant haliard received a hook, which was hooked into an eyebolt on the outside of the bulwark on the starboard side. The running part of the haliard was led through a lead block and belayed on the port side, inside the bulwark, to a belaying pin next to the main topsail haliard.

View attachment 633407

View attachment 633405

View attachment 633409

In the next step, I still need to connect the main topgallant sheets with the main topsail clewlines, but more on that soon.

To be continued…

Your detailed metal work and rope splicing is breathtaking, Johann. I have great respect for your work!
Regards, Peter
 
@Mirek
@Peter Voogt

Thank you very much for your positive reaction.
I’m really happy about it. Thanks for the likes, too!

Continuation: Running rigging of the main topgallant yard – Vergue de grand perroquet

I then continued with the running rigging of the main topgallant yard. I connected the main topgallant sheets to the main topsail clewlines by means of toggles and subsequently belayed them at the bulwark.

DSC02844.jpg

DSC02846.jpg

The topping lifts were belayed to the cleats on the main topmast shrouds.

The bowlines for the main topgallant sails were likewise fastened with toggles at the centre of the main topgallant yard and led over the inner sheaves of the sheave holes at the aft end of the fore topgallant trestle trees. This interesting detail is not shown by Boudriot in his monograph on La Créole, yet it is present on the original model and depicted in the Atlas du Génie Maritime. I have already reported on this in detail in an earlier post.

DSC02847.jpg

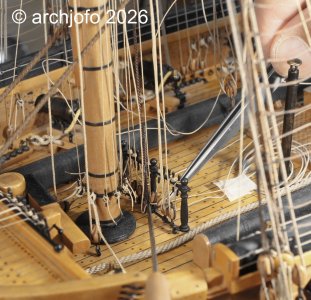
These bowlines were belayed at the pin rail aft of the foremast. Threading them through the turning blocks requires a steady hand, as shown in the next picture.

DSC02833.jpg

By now, rigging demands quite a bit of patience and resilience against frustration. Somewhere – whether it is the standing rigging or the braces – a line is touched unintentionally, creating pressure or tension that is detrimental to the overall arrangement. When new lines are added, something else may loosen again. Constant readjustment cannot be completely avoided, even with the greatest care.

Guiding the running rigging from top to bottom to the belaying points without collisions or entanglement with other lines also requires extremely careful work. Often one only notices after belaying that a line has taken the wrong path or is blocking another element – and the game begins anew.

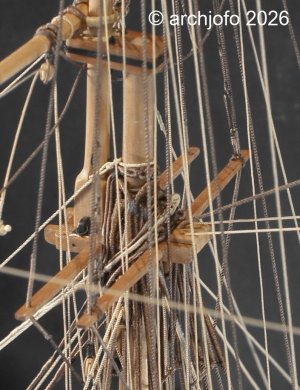
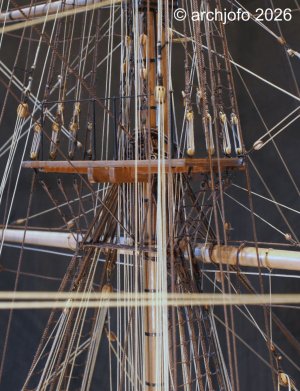
The following picture shows the maintop, where the bowlines of the main topsail and main topgallant sail run down the mast between the after trestle trees to the pin rail.

DSC02841.jpg

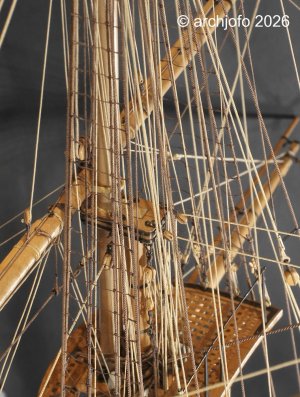
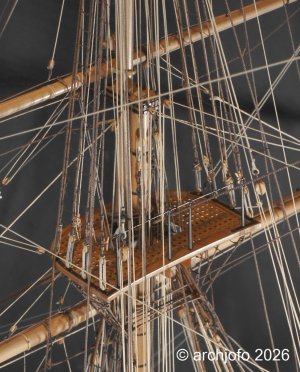
The bowlines of the main topsail are led downward through the single blocks at the aft side of the cap of the main mast, as can be seen in the next two pictures.

DSC02850.jpg


DSC02855.jpg


To be continued …
 
Dear Johann, these are still magnificent pictures. Yes, a great deal of inner calm – concentration and even more patience. Your perseverance really shows just how fascinating historical ship modelling is. All the best to you – with very best regards, Holger
 
Back
Top