
If we stop failing and learning from our mistakes, it’s because we’ve stopped trying altogether. It’s the process and the learning that’s important. The journey is everything.

-

SUBSCRIBE TO SHIPS IN SCALE TODAY!
The beloved Ships in Scale Magazine is back and charting a new course for 2026!
Discover new skills, new techniques, and new inspirations in every issue.
NOTE THAT OUR NEXT ISSUE WILL BE MARCH/APRIL 2026 -

Win a Free Custom Engraved Brass Coin!!!
As a way to introduce our brass coins to the community, we will raffle off a free coin during the month of August. Follow link ABOVE for instructions for entering.
You are using an out of date browser. It may not display this or other websites correctly.
You should upgrade or use an alternative browser.
You should upgrade or use an alternative browser.
LE ROCHEFORT
- Thread starter donfarr
- Start date
- Watchers 37
-
- Tags
- ancre le rochefort

It is always better to learn from other people's mistakes.If we stop failing and learning from our mistakes...

Because of this it is good to share also the mistakes with friends here in our forum......that others can learn.It is always better to learn from other people's mistakes.
-> and most important in my opinion: It is important, that you make never the same mistake twice !!!

OK EVERYONE, NEED HELP BADLY HAVE STARTED MY FIRST SCRATCH BUILD STARTING CUTTING AND FITTING THE KEEL PIECES AND HAVING A GREAT DEAL OF PROBLEMS WITH THE APRON SHOWING PICTURES, CAN NOT GET IT TO FIT SEE THE PINS THE DIMENSIONS HAVE BEEN CHECKED A LOT AND I AM OK THERE DO NOT KNOW WHAT TO DO CAN USE HELP PLEASE THANKS A WORD ABOUT THE MONOGRAPH AND THE PLANS INCLUDING THE TRANSLATION ARE FIRST RATE JUST NEED TO GET USE TO THEM ONCE UNDERSTOOD THEY ARE EXCELLENT I may have picked the wrong build for first total SCRATCH BUILD MAYBE SHOULD HAVE PICKED THE S. CATERINA, I AM DETERMINED TO DO THIS ONE JUST NEED SOME HELP PLEASE

Attachments
Hi,
I can't see it on the drawing. The corner is also on the drawing ? I think it's very simple. One part is not correct. You can show a better image from the plan ?
I can't see it on the drawing. The corner is also on the drawing ? I think it's very simple. One part is not correct. You can show a better image from the plan ?
Hi OLIVER, YES I WILL SHOW A BETTER IMAGE FROM THE PLANS WILL TAKE THE PICTURES IN A MINUTE, THANKS SO MUCH FOR THE REPLY. Don
HERE ARE MORE PICTURES OF THE PLANS, IF YOU NEED MORE LET ME KNOW, THANKS FOR THE HELP< WELL APRECIATED


- Joined
- Feb 18, 2019
- Messages
- 729
- Points
- 353

Hi Don,
Hard to tell from the images. Just a note: not sure about the use of pins. Wouldn't it be easier to just place and line up the parts over the plan.
It could be that the pattern glued to the lumber got distorted in the process either when applying the glue to the paper or when placing the paper on the lumber. Then there is the cutting around the patterns and cutting the joints so that everything fits.
The build is likely to be ok as a first build. It is just a matter of being as precise as possible in every step: when applying the cutout patterns on the wood and during cutting and fitting. The same goes for every operation including tracing and cutting joints No matter what the construction subject is, parts will need to fit together properly to achieve results.
What do you use the file for?
G
YES GILLES, I AM FINDING THAT OUT ALL OF THE PARTS EXCEPT THE APRON ARE GOING TO FIT OK, AS A ROUND SPOT OCCURED DURING SANDING ONCE LEVELED OUT THEY WILL FIT, REALLY NEED HELP ON THE APRON AS I DO NOT KNOW WHAT HAPPENED THERE, THIS IS THE SECOND ATTEMPT JUST DO NOT UNDERSTAND WHAT IS HAPPENING ALL HELP APPRECIATED. Don
Hi Don
I feel your method is boxing yourself into a corner a bit.I have seen many pictures of a stack of parts to make a keel or prow up and the sequence of pictures suggest that everything is cut dead on to the paper glued on and next picture shows the item assembled like an elaborate jigsaw.I wouldn't work like that and I have been messing with wooden models for over thirty years.
Taking your keel as an example ;
Firstly I would have cut the two parts that join together to form the outer profile outside the paper lines and focused and getting the scarph right.Then glued the two together.This can then be trimmed to final size to match the drawing.
Do the same with the two pieces that fit on the inside,joining these two together.
Finally Join the two items together tweeking where necessary but because you are now only joining two pieces instead of four the tweaking and fitting process becomes easier.
I have tried the cut everything out dead size and slap it together approach and you end up chasing gaps all over the shop and the pieces end up in the trash.
Hats off to those that can cut pieces out with jeweller precision but I would rather play it safe and fit things in stages.
Kind Regards
Nigel
THANKS NIGEL, I tried that my first shot did not work out well, I am going to try that again, will need more prints to cut patterens but can not get out until SATURDAY as I can not DRIVE ANYMORE AND DEPEND ON MY DAUGHTER FOR GETTING OUT, so switching to the STERN AND USING THAT METHOD WILL SHOW HOW THAT IS COMING ALONG. APPRECIATE ALL THE HELP AND I AM GOING TO NEED IT. Don
Hi Don,
Your part (Keel and stem) are not fixed together. In my opinion it´s not a good idea to apjust one part on two loose parts. Where is the reference ? Everytime on a other place. You have to fix the curve, you need stable parameters to adjust one thing with a other. I think a parting line on your apron are wrong.

I will describe how i resolve corner like this. Sorry, my english doesn´t helps me, i will try to explain on pictures. I am a beginner as well, but this methode me helps. The curved joint for me also isn´t very simple. I know modellers they cut it with the saw, and it and the parts fits. I dont´t have these golden hands, not the experience. So my method me helps to get a good result.
First what i find out for mit was that i need a Motherpiece and the second piece i need to adjust on them. Never change the adjusting between the parts. The mother is fixed. You change only the scond part. If you did a mistake, create the second part new ! Never modificate the mother. Outsidecurves are more simples to adjust than Inside curves !!! My Motherprts has every time insidecurves. I adjust the second part with the outsidecurve. This is not too complicated, most of times i do it wih the tabelsander ! Every attempt to adjust a part with the inside curve was a bad result.
I use a spindelsander and a tablesander for this works. I have 90 degress in the table and this helps to get a sharp an clean parting line on both sides of the part.
First you have to glue the drawings on the part. Then to make the joint with the keel an the stem. Important that in the inside and in the outside you have material.
After this you make the insidecurve (2). When the curve is good you can make the outsidecurve (3). When your insidecurve differ from the drawing
a little bit you can get a constant thinckness from the part when you can compensite this.
In the same way you can create now the apron, the deadwood ect. First you adjust the surface to the stem/keelon on no. 2, after this you make the thickness from the part.
Depend from the join of the parts it makes sometimes sense to mount more pieces together anjust together on the keel.

Maybe the professionals need to laugh with my way, but i am a beginner also. I spend a lot of hours to find a techique what helps me to get a clear an exact joint. What count finaly is the result. Here is the stem from my La Belle.
I don´t know the Rochefort exactly but i think she is a good project for beginners. Every beginning is hard. Tears, blood, an sweat. This kind of modelism you only will achieve if you fight. Every day, every part again. And again, and again. Remember the moon-speech from JFK. Every time !
Thats all")

"not because they are easy, but because they are hard; because that goal will serve to organize and measure the best of our energies and skills, because that challenge is one that we are willing to accept, one we are unwilling to postpone, and one we intend to win"

Your part (Keel and stem) are not fixed together. In my opinion it´s not a good idea to apjust one part on two loose parts. Where is the reference ? Everytime on a other place. You have to fix the curve, you need stable parameters to adjust one thing with a other. I think a parting line on your apron are wrong.
I will describe how i resolve corner like this. Sorry, my english doesn´t helps me, i will try to explain on pictures. I am a beginner as well, but this methode me helps. The curved joint for me also isn´t very simple. I know modellers they cut it with the saw, and it and the parts fits. I dont´t have these golden hands, not the experience. So my method me helps to get a good result.
First what i find out for mit was that i need a Motherpiece and the second piece i need to adjust on them. Never change the adjusting between the parts. The mother is fixed. You change only the scond part. If you did a mistake, create the second part new ! Never modificate the mother. Outsidecurves are more simples to adjust than Inside curves !!! My Motherprts has every time insidecurves. I adjust the second part with the outsidecurve. This is not too complicated, most of times i do it wih the tabelsander ! Every attempt to adjust a part with the inside curve was a bad result.
I use a spindelsander and a tablesander for this works. I have 90 degress in the table and this helps to get a sharp an clean parting line on both sides of the part.
First you have to glue the drawings on the part. Then to make the joint with the keel an the stem. Important that in the inside and in the outside you have material.
After this you make the insidecurve (2). When the curve is good you can make the outsidecurve (3). When your insidecurve differ from the drawing
a little bit you can get a constant thinckness from the part when you can compensite this.
In the same way you can create now the apron, the deadwood ect. First you adjust the surface to the stem/keelon on no. 2, after this you make the thickness from the part.
Depend from the join of the parts it makes sometimes sense to mount more pieces together anjust together on the keel.
Maybe the professionals need to laugh with my way, but i am a beginner also. I spend a lot of hours to find a techique what helps me to get a clear an exact joint. What count finaly is the result. Here is the stem from my La Belle.
I don´t know the Rochefort exactly but i think she is a good project for beginners. Every beginning is hard. Tears, blood, an sweat. This kind of modelism you only will achieve if you fight. Every day, every part again. And again, and again. Remember the moon-speech from JFK. Every time !
Thats all
"not because they are easy, but because they are hard; because that goal will serve to organize and measure the best of our energies and skills, because that challenge is one that we are willing to accept, one we are unwilling to postpone, and one we intend to win"
THANK YOU SO MUCH OLIVER, I AM GOING TO STUDY YOUR METHOD AND TRY BY MAKING THE PARTS OVER MAY MAKE THE APRON AND STEM INTO ONE PIECE I AM TRYING THAT ON THE STERN WILL POST PICTURES,,,,,, BY THE WAY YOU ARE CERTAINLY KNOW NOVICE, YOUR BUILD IS BEAUTIFULY DONE. THANKS AGAIN Don
Hi everyone, pictures showing the stern I combined the 2 pieces into one will do the same on the stem to correct my mistakes also learning on my new mill, the X AND Y work great but having a problem with the Z PLEASE ALL COMENTS AND CRITISMS ARE GREATLY APPRECIATED


Looking good Don  What problems with the z axis are you having?It is important to lock this axis off when cutting,vibration can cause the tool to lower on it's own accord.
Kind Regards
Nigel
What problems with the z axis are you having?It is important to lock this axis off when cutting,vibration can cause the tool to lower on it's own accord.Kind Regards
Nigel
THANKS NIGEL, IT IS A DIFFERENT KIND OF MILL (VAND_LAY), I will post some pictures of it, one of the main problems with it is the instructions, they are based on a old model and never updated makes it a problem i will post pictures would love to have the Z axis work as smothly as the X AND Y. Don
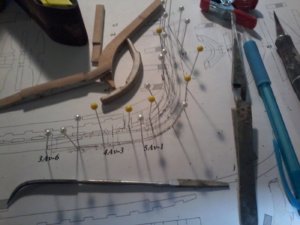
hi all, more pictures of the build showing the stern construction, my method of how i check for accracy using pins, i have attempted to be as accurate as possible as this is my first complete scratch build, am having some problems though, getting a mental block on determing the thickness of various items will post latter on items not sure of, have other questions coming up also, AND PLEASE ANY COMMENTS WOULD BE GREATLY APPRECIATED


Here's my 7 cents worth. First I think your doing pretty good just basically trying to hard. There's definitely a bit of art in building models, it's not just a technical exercise. You don't have to have each individual part perfect they just need to fit together well and be the right size on the outside dimension.
First thing I would recommend you get rid of the sanding block with the foam on it for this purpose. Due to the lack of support on the edges when you sand a piece of wood more material is removed at the edge of the wood than in the center. If you're using that block the foam allows the sandpaper to move in and I think you're inadvertently rounding the edge of the each piece as you sand it. Then even if the center matches you have gaps on the sides. That is what Oliver was eluding too with the comments about the sanding table that sands at 90 degrees. When I'm not using a machine I typically sand with the paper laying on a flat surface, like my steel work bench. Or I use a solid sanding block laying on the workbench to form a 90 degree angle and move the piece along the block.
Second; I would just work on the edges of the pieces your actually fitting together. Just as an example I would cut out the two back pieces of the keel like you did leaving them a little oversized. Then I would sand the edge of each of these pieces that will be glued together. Then glue them. After they dry I would sand the top and the bottom. In this case the top and bottom should match exactly in length and be nice and square. By waiting until after they are glued while still a little oversized, you can make the length match exactly on the top and the bottom without worrying about getting them perfect when you initially cut them out, in this case they could be 1/4 inch long and you could saw them both off after glueing.
I would leave the back of those first two pieces with a little excess. Then attach the L shaped piece to the piece you haven't made yet below it and then sand those at the same time to make it straight where it attaches to the first two pieces. Point being try to avoid needing to make a piece that has to fit exactly on 3 edges if possible and if two pieces have a straight line along an edge it's nice if you can glue them, then sand the straight line so you don't have to try to glue them to fit in perfect alignment.
I'm not saying it isn't important to get it close but perfection isn't necessary (or obtainable). No matter how hard we try to get it perfect, we always end up making things fit. If your seam is off by a mm or two you can adjust the planks or whatever to make it.
Real ships are the same way. I was stationed on the USS John Rodgers, it was a destroyer and it was 4 inches shorter than any of the other destroyers of the same class. There was an error when the constructed one section of the hull. They fixed it by squaring it off and making everything else work.
Enough of my rambling. hopefully this makes sense and some of it helps.
Your 7 cents actually values a millions... We all have our own methods, however, you detailed explanation will come handy to may of us who will challenge a first scratch build. Many thanks!Here's my 7 cents worth