HMS Medea (28) (1778) 1/48 scratch build

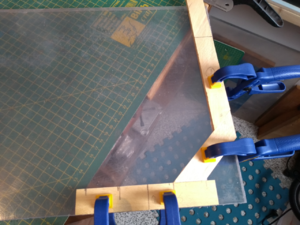
Because I am butt joining the frames before laminating the two halves together I struggled to find a way to hold them in place under pressure. I finally settled on this idea. The base is a thick piece of perspex (acrylic) - over 1 cm thick - and tested for flat. I can only do a bit at a time with this sheet but if it is successful I will cut another smaller sheet so that I can do a whole frame with clamps over the edge.

If the Aquadhere sticks to the perspex I'll be in trouble but I doubt that it will.

The wood is my Silver Ash which I am finding brilliant to work. I just hope I will have enough after I build my wife's table top. :cool:

First_Frame.png
 
I came across another problem with the frame plans on the blanks. I printed the frame plan on medium cardboard and cut out the shape, leaving about 5mm spare on the outside of the frame drawing. But when I went to glue it onto the frame timber I had trouble with it flexing and I could not be sure it was positioned right. So this is what I have done.

IMG_20200221_131103630.png
The whole page is printed and then the frame outline identified and highlighted.

IMG_20200221_132343140.png

The Frame blank is laid on my acrylic sheet and Elmer's Rubber Cement applied to the wood.

IMG_20200221_133734883_BURST000_COVER_TOP.png

The cardboard sheet is laid on quickly before the rubber cement dries and checked for alignment on my lightbox. The lightbox is actually my frosted glass garage window.

IMG_20200221_134035474.png

Next I cut out the plan roughly with scissors.

IMG_20200221_141958494.png

Off to my community workshop where I spend a few minutes on the bandsaw, bringing it down to within a mm or so of the desired size.

IMG_20200221_143158719.png

A quick sanding and then back home to finish off with hand tools.

This will be very old news for some more experienced SOS members and my methods are far from ideal or perfect, but I am new to scratch building and have to work a lot of this stuff out myself. That adds to the enjoyment (when things work) but some of my tips might help another new builder.
 
To find out the outside form of the frames will be more or less correct, but I think for the inside curve you should adjust
IMG_20200221_131103630.jpg
The area with the red arrows looks for me too thick, the green area looks correct

Here you have (scroll through) a lot of contemporary midship section drawings, so you get some impression, but maybe you will find also a good frigate section of the same period


BTW:There are two drawings of the Medea, which can be helpful for you
j8183.jpg j8184.jpg
and several others of the Enterprise class
 
To find out the outside form of the frames will be more or less correct, but I think for the inside curve you should adjust
View attachment 134062
The area with the red arrows looks for me too thick, the green area looks correct

Here you have (scroll through) a lot of contemporary midship section drawings, so you get some impression, but maybe you will find also a good frigate section of the same period


BTW:There are two drawings of the Medea, which can be helpful for you
View attachment 134063 View attachment 134064
and several others of the Enterprise class
Thanks Uwe.
I was really guessing on the mid-way thickness. I should take more care to research. As you say, the outside dimensions are correct as they follow the lines of the plan. I'll have another look at the drawings and Medea/Enterprise plans I have and see what I can do. I appreciate your advice as always.
 
So much to update since my last.

I was 2/3 through cutting out the frames on the bandsaw when our Community workshop was closed for social distancing. I continued at home with a coping saw until arthritis put paid to that idea.

So I dug around and found an old wooden computer monitor stand I built in 1990 (I KNOW) and that has now become my workstation.

IMG_20200330_153157476.jpg

For the frames I have mounted my jig saw in the top of the box as below.

First I made a frame to support the jig saw.

IMG_20200330_153223974.jpg

This mounts in the top of the box - a tight fit so no movement.

IMG_20200330_153245929.jpg
IMG_20200330_153300384_BURST000_COVER_TOP.jpg

The saw then slides in from the front and locks into position between the blocks and with the base plate above the plywood.

IMG_20200330_153315727.jpg
IMG_20200330_153336709.jpg
IMG_20200330_153400215.jpg
IMG_20200330_153352225.jpg

The working sheet is then placed over the first sheet, locking the jig saw base plate into position.
IMG_20200330_153444434.jpg

A hold down for the work was made from a piece off a dishwasher, or some other household appliance - I can't remember where I got it. The brackets screw down (wing nuts both ends for speed of adjustment) to apply pressure.IMG_20200330_152421327.jpg

It's not ideal working towards an exposed blade but I have ideas to improve that. The main thing so far is that it works and I can continue building.

IMG_20200330_152412770.jpg

Next post I'll show you a few more uses for this box (which has a port for a vacuum cleaner at the back to extract dust).
 
The first thing I mounted in this workstation box was the dremel drill press for sanding.

IMG_20200330_154501538.jpg

This was a great improvement on the earlier model I made which was bench mounted and impossible to control the dust. I have a series of pipes which connect to the vacuum cleaner hose so I can direct the suction where it is needed most.

To improve lighting I mounted a length of frosted plastic inside the box and put in a battery operated LED torch.

IMG_20200330_154526342.jpg
IMG_20200330_154456407_BURST000_COVER_TOP.jpg

I also use the box for my mini lathe. The same lighting and dust extraction applies.

IMG_20200330_154110141.jpg

Not the Proxxon setup I would like but needs must and I get a lot of satisfaction from solving the problems. So long as I keep all my fingers in good working order I'll get there. ;)
 
I said WOW! Sometimes a simple solution - is the best one!! Bravo Ian!
Thanks Jim.
It's a scary looking rig with the blade facing up but I'm working on an acrylic guard suspended from a frame above to protect me a bit better.

I will have to cut out more of the framework at the back of the saw so that I can attach the vacuum extractor fitting. At the moment it is throwing all the dust forward and up (or down as it is designed to do if used correctly)!

Building from home has made me completely change the way I work as all the machines I expected to have access to in our community workshop are now locked away. But at least we have no known cases of COVID-19 yet and we are 300+ people in a gated community of mostly aged people.
 
I've roughed out almost all the frames. Here's a sample. I still have to cut out the notch for the keel, finish sanding and insert the tree nails.

IMG_20200331_150816233.png

I've had a real rethink about the Hahn jig and have decided to start off with a more conventional one. I've kept the Hahn style cutout which I can still use to check the spacing of the tops of my frames.

IMG_20200331_151417929_HDR.png

I've tested it with a couple of dry fittings and I'm confident it will work.

IMG_20200331_150048285.png

Another change I have made is that I intend to create a diorama so I am not going to build the complete inside of this HMS Medea model. It will be displayed as it was on a particular day in 1783; guns stowed, hatches battened down etc. But more of that in the future....
 
Further to post #48 I've now modified the upturned jigsaw arrangement and made it much safer and controlled the dust.

All parts were 'found' bits lying around in my garage. I can't go shopping at the moment because of health vulnerability so I use what I have.

The dust guard is an old face shield. The frame is made from parts of a cheap vise and other bits and pieces which I had discarded.
IMG_20200404_163921508.png

I didn't have a 1 1/4" connector to connect the vacuum cleaner to the exhaust fitting on the jigsaw but fortunately my wonderful wife had a hard plastic sauce bottle which provided the perfect joiner. I left the lid on to provide some extra strength, after cutting out the top.

IMG_20200404_164109115.png

I was concerned that I needed to hold the work piece with two hands and couldn't turn off the machine if things went wrong. So I designed a foot pedal to press to turn off the machine, but when it was finished I found it worked so well I didn't have to lock on the trigger but could control the speed with the foot pedal. Now I'm a happy chap and ready to continue on my build.

IMG_20200406_145926855.png
IMG_20200406_145842880.png

It all comes apart in a couple of minutes when I want to use the work station for something else.

I know it looks a bit ugly but I would rather spend the time on my build than making the perfect workstation.
 
The first thing I mounted in this workstation box was the dremel drill press for sanding.

View attachment 140775

This was a great improvement on the earlier model I made which was bench mounted and impossible to control the dust. I have a series of pipes which connect to the vacuum cleaner hose so I can direct the suction where it is needed most.

To improve lighting I mounted a length of frosted plastic inside the box and put in a battery operated LED torch.

View attachment 140776
View attachment 140777

I also use the box for my mini lathe. The same lighting and dust extraction applies.

View attachment 140778

Not the Proxxon setup I would like but needs must and I get a lot of satisfaction from solving the problems. So long as I keep all my fingers in good working order I'll get there. ;)
There's a Youtube channel that makes very cheap, home made machines; here's a video of an inverted jigsaw table guide.
Inverted Jig Saw Guide
He also makes dremel jigs, scroll saws, etc,
 
There's a Youtube channel that makes very cheap, home made machines; here's a video of an inverted jigsaw table guide.
Inverted Jig Saw Guide
He also makes dremel jigs, scroll saws, etc,
Ah now John I'm just going to have to go back to my setup and make one of those guides......Fantastic ideas there. Thanks for sharing.
 
Back
Top