Excellent work! I am starting to think there is nothing you can’t make!  Such exquisite detail everywhere!
-

Win a Free Custom Engraved Brass Coin!!!
As a way to introduce our brass coins to the community, we will raffle off a free coin during the month of August. Follow link ABOVE for instructions for entering.
-

PRE-ORDER SHIPS IN SCALE TODAY!
The beloved Ships in Scale Magazine is back and charting a new course for 2026!
Discover new skills, new techniques, and new inspirations in every issue.
NOTE THAT OUR FIRST ISSUE WILL BE JAN/FEB 2026
- Home
- Forums
- Ships of Scale Build Logs
- Super Detailing Static Models / Other Genres
- Historical Trailways, Guns, Aircraft, and Cars
You are using an out of date browser. It may not display this or other websites correctly.
You should upgrade or use an alternative browser.
You should upgrade or use an alternative browser.
1/12 scale Alfa Romeo 8c 2300 roadster build log [COMPLETED BUILD]
Again, amazing details, François. Hats off!Did the tail lights and head lights today.
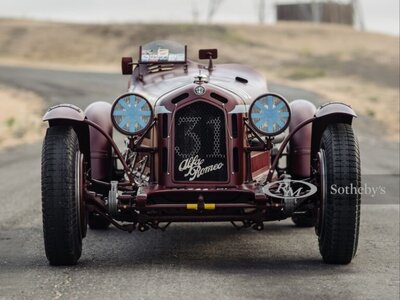
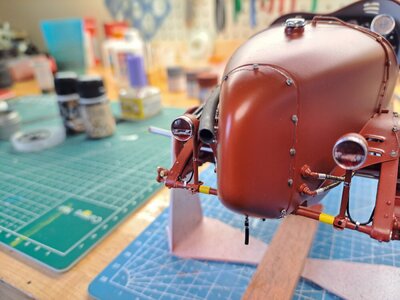
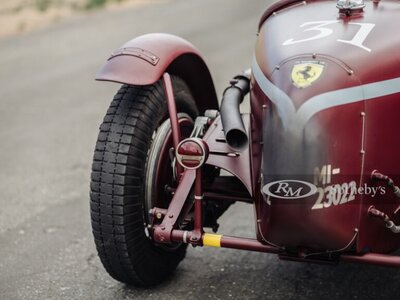
The tail lights in the kit are very different from the ones on the ref car so I had to redo them. The front are not do bad but I still modified them alot.
The kit's tail lights View attachment 367562
The ref car tail lights View attachment 367577View attachment 367578
I had to redo the mounting post with the mounting clamp, redid the bezel in aluminium and added the wire with ties.View attachment 367580View attachment 367579
The kit's front lights View attachment 367571
The ref car's View attachment 367575View attachment 367585View attachment 367576
For the front, I changed the mounting post from a plastic stud to an aluminium post, made an aluminium bezel complete with clamp, added the wire all the way to the buld (the bulb and wire can be seen thru the lens), reproduced the blue tape glued to the lens and added all missing bolts. For now, I used blue masking tape to do the criss cross but I'm waiting for custom made decals, I'll see which is best.View attachment 367582View attachment 367587View attachment 367581View attachment 367583
Finished the day by installing the exhaust and painting the steering wheel (don't like the color I choosed for the steering, I'll have to redo it).
View attachment 367588
View attachment 367574
View attachment 367589View attachment 367594View attachment 367595
Regards, Peter
Thank you all!!
Made a small improvement to the head and tail lights. First, I replaced the small wire with a bigger one since a light has 2 leads hooked up to it. I but in a black and red instead of just the one black.
Bigger wire with black and red lead to bulb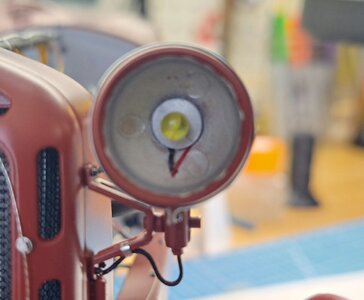
Second, I replaced the tape on the lens. It was too thick (.084 inche scaled up to 1:1) and too pale blue to my taste by a very thin Rice paper tape (.024 inche scaled up).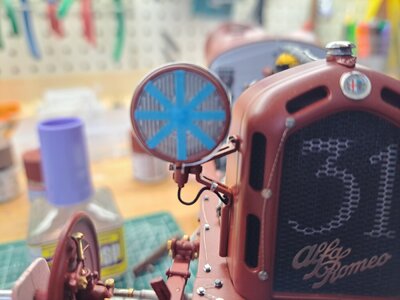
Made a small improvement to the head and tail lights. First, I replaced the small wire with a bigger one since a light has 2 leads hooked up to it. I but in a black and red instead of just the one black.
Bigger wire with black and red lead to bulb

Second, I replaced the tape on the lens. It was too thick (.084 inche scaled up to 1:1) and too pale blue to my taste by a very thin Rice paper tape (.024 inche scaled up).

That’s like looking at a photo of the real car! Amazing work!Thank you all!!
Made a small improvement to the head and tail lights. First, I replaced the small wire with a bigger one since a light has 2 leads hooked up to it. I but in a black and red instead of just the one black.
Bigger wire with black and red lead to bulbView attachment 367855
Second, I replaced the tape on the lens. It was too thick (.084 inche scaled up to 1:1) and too pale blue to my taste by a very thin Rice paper tape (.024 inche scaled up).View attachment 367854
I bet the reference photos you have, really help make this a better model, given your ability to duplicate what you see at scale!
Thanks Dean!
Yes it really does. It gives me inspiration and a goal.
Yes it really does. It gives me inspiration and a goal.
Wow, exceptional work. A pleasure to follow your log.
Jan
Jan
Did a few more add ont to the base model. The kit provides a breather tube that goes from the transmission to a small scoop mounted on the top bonnet. When compared to my ref car, the scoop is too forward and the tube too straight, it should be bent towards the rear and have a funnel at it's end. Like on this picture. 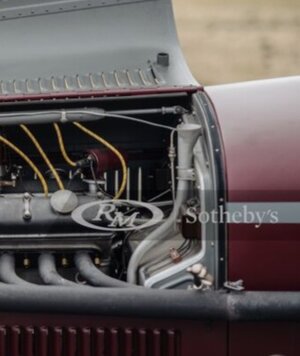
I also added a very thin black tape to simulate the bonnet gasket complete with screw heads.
my version of the breather tube
And black bonnet gasket
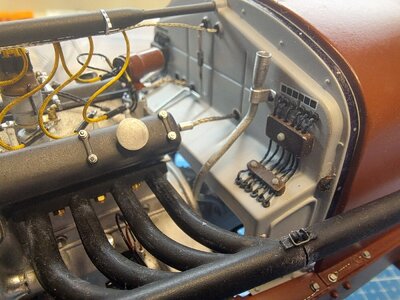
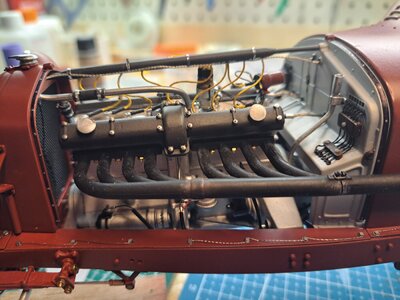
Scoop location of kit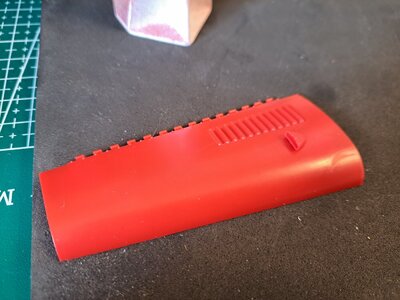
Where it should go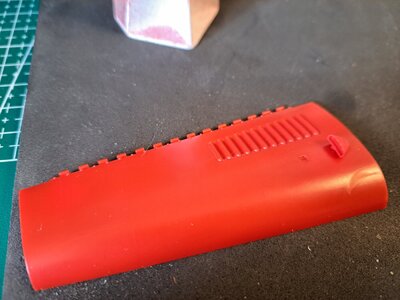
Fitted and painted bonnet panels ready to be installed.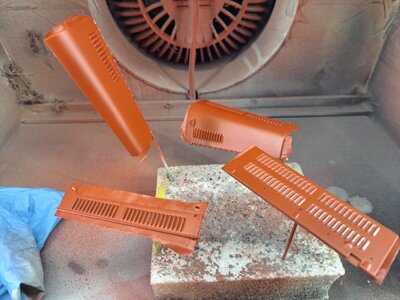

I also added a very thin black tape to simulate the bonnet gasket complete with screw heads.
my version of the breather tube
And black bonnet gasket


Scoop location of kit

Where it should go

Fitted and painted bonnet panels ready to be installed.

Last edited:
Did a few more add ont to the base model. The kit provides a breather tube that goes from the transmission to a small scoop mounted on the top bonnet. When compared to my ref car, the scoop is too forward and the tube too straight, it should be bent towards the rear and have a funnel at it's end. Like on this picture. View attachment 368639
I also added a very thin black tape to simulate the bonnet gasket complete with screw heads.
my version of the breather tube
And black bonnet gasket
View attachment 368645
View attachment 368644
Scoop location of kitView attachment 368641
Where it should goView attachment 368640
Fitted and painted bonnet panels ready to be installed. View attachment 368643
View attachment 368646
I pretty much finished installing the bonnet today. The fit is very good considering the quantity of parts that have to be aligned from the start of the build. From the frame to the engine, body, radiator... and they actually open ! I did come across 2 issues that had to be resolved. The first one is my own fault, if you remember, I added the carburator linkage but it turns out it's in the way of the bonnets side panel. I had to create a cut-out to clear the linkage and cover the cut-out with a dome of some sort. I think it turned out ok.
Problematic linkage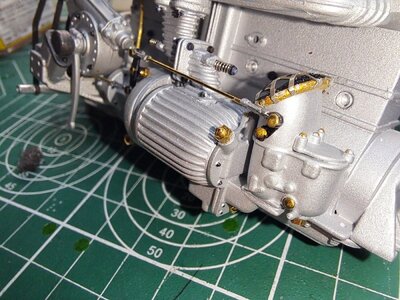
Cut-out made in panel and aluminium dome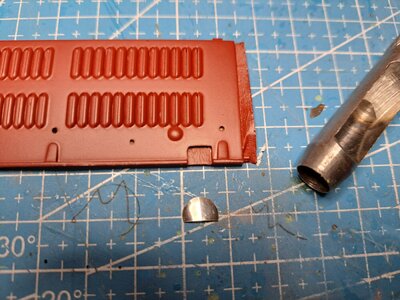
Dome in place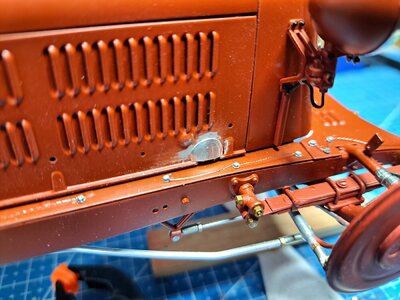
Panel going down over linkage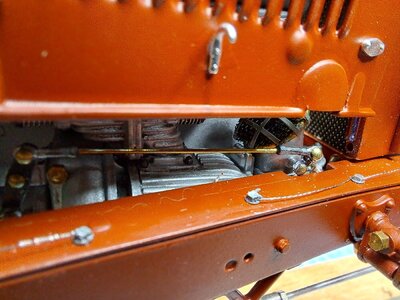
And in place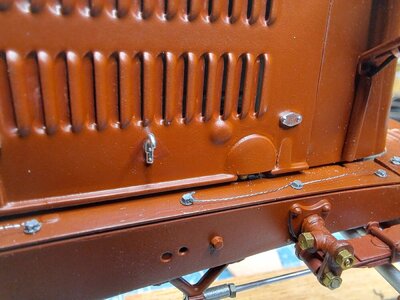
The second issue is from the kit. The bonnets are held in place with spring loaded clamps the need to pivot out of the way in order for the bonnet to clear them when they are lifted. The kit's clamps are simply glued in place so raising the bonnet became impossible due to arc created by it's edge as it is lifting. The solution was to create a pivoting clamp using the kit's non pivoting one.
The non pivoting clamps from the kit, hi-lighted in green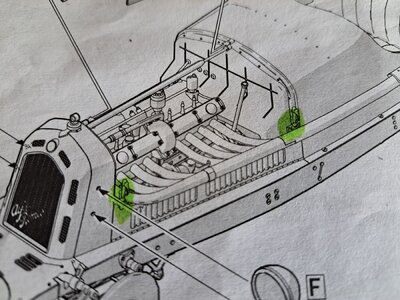
The kits clamp on the left and my pivoting clamp on the right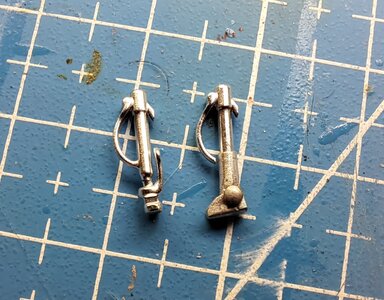
Bonnet down with clamps in place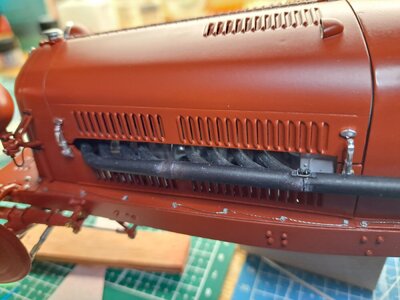
Bonnet up with clamps pivoted out of the way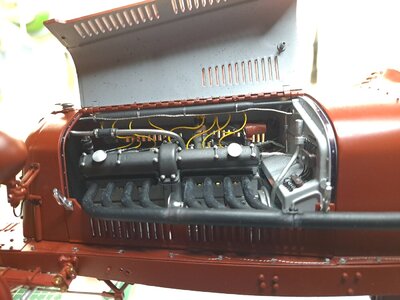
And the ref car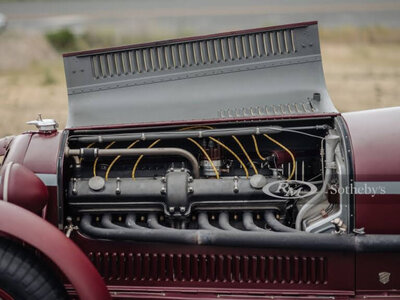
Here is the under side of the left bonnet. You can see the small scoop tubing that, once the bonnet in place, aligns with the breather tube. You can also see some oil splatters on the inside of the bonnet and on the firewall. These cars leaked oil almost as much as british cars!!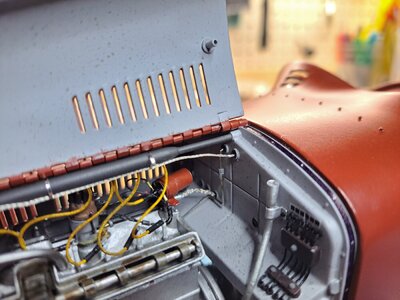
And the right side bonnet up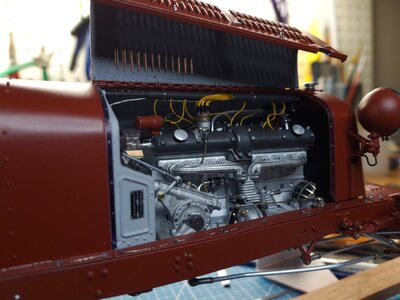
And down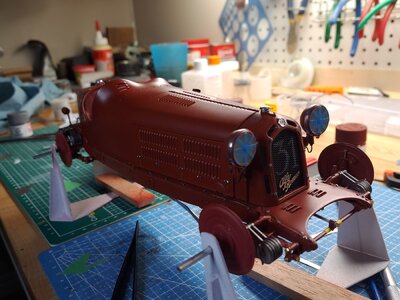
Problematic linkage

Cut-out made in panel and aluminium dome

Dome in place

Panel going down over linkage

And in place

The second issue is from the kit. The bonnets are held in place with spring loaded clamps the need to pivot out of the way in order for the bonnet to clear them when they are lifted. The kit's clamps are simply glued in place so raising the bonnet became impossible due to arc created by it's edge as it is lifting. The solution was to create a pivoting clamp using the kit's non pivoting one.
The non pivoting clamps from the kit, hi-lighted in green

The kits clamp on the left and my pivoting clamp on the right

Bonnet down with clamps in place

Bonnet up with clamps pivoted out of the way

And the ref car

Here is the under side of the left bonnet. You can see the small scoop tubing that, once the bonnet in place, aligns with the breather tube. You can also see some oil splatters on the inside of the bonnet and on the firewall. These cars leaked oil almost as much as british cars!!

And the right side bonnet up

And down

Still looking great ! I love your pivoting clamp solution ! And I don't think anyone is going to call you out on the modification for the carb linkage. 
Brilliant.
Didn't do much today, it was very sunny and hot so I went for my first ride of the season in the TR6, always fun. But I did take the time to do the 3 remaining pivoting clamps for the drivers side bonnet.
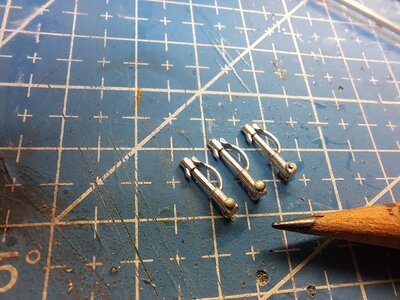
Clamps closed
Clamps opened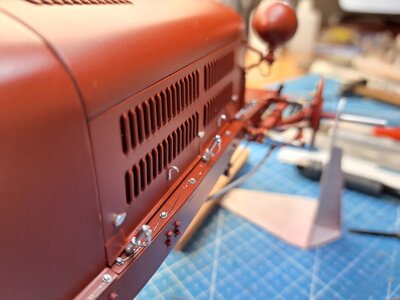
Bonnet opened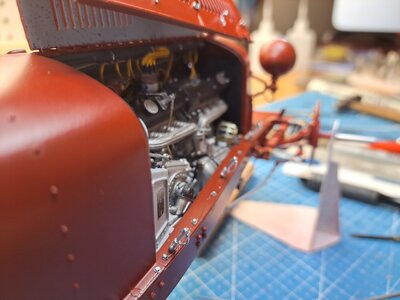
Next on the to do list is the windscreen and rearview mirrors. Here what I'll be reproducing.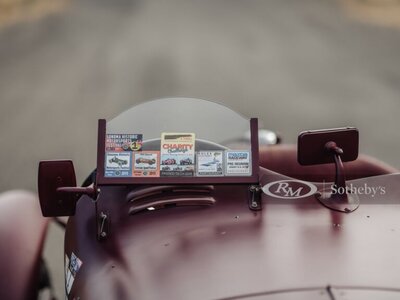
The kit gives 2 windscreens but no mirrors. Should be fun!

Clamps closed

Clamps opened

Bonnet opened

Next on the to do list is the windscreen and rearview mirrors. Here what I'll be reproducing.

The kit gives 2 windscreens but no mirrors. Should be fun!
Hi François. Stunning details and painting. You will make also the stickers on the screen?Didn't do much today, it was very sunny and hot so I went for my first ride of the season in the TR6, always fun. But I did take the time to do the 3 remaining pivoting clamps for the drivers side bonnet.
View attachment 369053
Clamps closed View attachment 369056
Clamps opened View attachment 369054
Bonnet opened View attachment 369055
Next on the to do list is the windscreen and rearview mirrors. Here what I'll be reproducing.View attachment 369057
The kit gives 2 windscreens but no mirrors. Should be fun!
Regards, Peter
Thank you everyone for your positive comments.
Peter, these stickers once scaled down would be a about 1/8 x1/8 in each. The details would be lost. I will try but really not sure what it will look like. Hey, another challenge !!
Peter, these stickers once scaled down would be a about 1/8 x1/8 in each. The details would be lost. I will try but really not sure what it will look like. Hey, another challenge !!
Yes, it’s s challenge. One’s made a instruction manual for a 1:50 crane AC200-1TP:Thank you everyone for your positive comments.
Peter, these stickers once scaled down would be a about 1/8 x1/8 in each. The details would be lost. I will try but really not sure what it will look like. Hey, another challenge !!
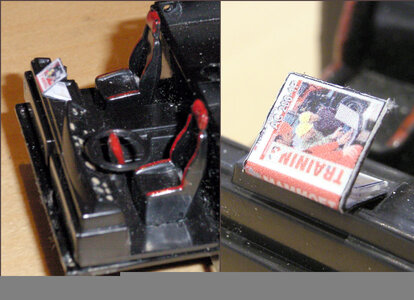
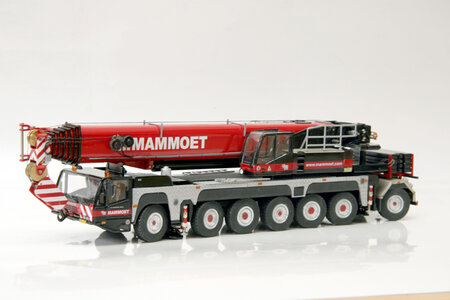
So, it’s possible……
No working gauges in the crane???? LOLYes, it’s s challenge. One’s made a instruction manual for a 1:50 crane AC200-1TP:
View attachment 369105
View attachment 369104
So, it’s possible……
Wow Peter, nicely detailed. How big is the instruction manual? I guess you color printed a scaled down real cover?
- Joined
- Mar 17, 2023
- Messages
- 2
- Points
- 1
GOOD MORNING FRANCOIS,
TO BEAUTYFULL, YOU HAVE VERY NICE TASTE TO WORK.
I LOVED ALL THIS PICTURES.
CIAO
FRANCESCO 779
TO BEAUTYFULL, YOU HAVE VERY NICE TASTE TO WORK.
I LOVED ALL THIS PICTURES.
CIAO
FRANCESCO 779


