17th Century Battle Station - HMS Mordaunt, 1:32 - DocBlake

Thanks, guys, for your interest!
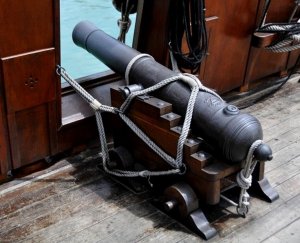
I spent yesterday assembling the main parts of the gun carriages. One of us (Don) noticed a problem with the fit of the quoins and getting proper elevation of the gun's barrel. I'll make a mockup of the stool bed and alter it such that the quoin fits.
The carriages are boxwood and the wreath is yellowheart. I used a pencil to darken the recesses of the wreath to give more of a "3-D" effect, as Mike demonstrated. The yellowheart is a nice approximation of gold as is the osage orange.Img_0255.jpg
 
Beautiful Dave. I have been side tracked lately with house chores and travel. But now that you have caught up to me, I should get back to work on my battle station!!! :)
 
I'm working on my cannons. I've posted Jeff Staudt's plans for the carriages and you notice that there are two rings attached to the brackets. One is for the breeching line and the other is to hook on the gun carriage tackle . I can't find another example of guns being rigged like that. I think I'l just eliminate the aft-most ring, and orient the eyebolt horizontally, like it's done on virtually every other carriage I've seen.staudt gun.jpg
 
I assembled all the carriages. I did make some modifications. I lowered the stool bed and it's support so that the quoins would fit properly. I also made new transoms that extend down to the carriage base, for ease of construction. Here's some shots of one of the long cannons with one coat of poly on it. No cap squares yet!
IMG_0259.JPGIMG_0262.JPGIMG_0263.JPGIMG_0264.JPG
 
Thanks Winston! By the way: Have you guys found Gene Bodnar's "Fubbs" practicum over at MSB yet???
Except for the gun port lids all the parts have been fabricated. Obviously the upper bulwark planking is not yet installed. Now the model has to be assembled. The gun deck must be completed before the upper deck is installed because of the tight quarters below. Rigging the guns would be impossible. Here's a preview of the model


a1.JPGa2.JPGa4.JPGa5.JPGa6.JPG
.
 
Hello Dave
I have been lurking in the background for some time now, great job on your cannons and charges they look just great and very well done. I have a question for you if you would be so kind to answer. I have read that medical; injection needles can be very easily to make treenails. I have tried a couple of times to buy some but am very confused as to the way they are listed. One fellow says that a grey tipped needle will cut a 0.8 treenail and that a green one will cut a 0.6 treenail. I did get a brownish tipped one from the vet yesterday but the outside dimensions are only 0.7 mm making it too small for treenails for my 1:48 scale Oliver Cromwell. I again tried at our drug store and not knowing just how these needles are labeled I purchased a pack of 8 mm needles but this turned out to be the length of the needle that has a 30 G needle I presume.

My question is, could you recommend an appropriate size and name of such needles and where they can be purchased. This system looks so easy and fast that I do want to give it a try. Sorry for taking you away from your build but you seem to be the most appropriate person to ask, ENJOY.

Regards Lawrence
 
Thanks Lawrence.

Treenails are about 1-1/4" in diameter. In 1:48 scale this is just a bit under 1/32". A 20 gauge needle is 0.9mm outside diameter and would be just about the right size. These needles have a yellow hub, and you can easily find them on the internet. Becton-Dickinson is a major producer.ava-hypodermic-needle_table.jpg
 
Sadly Dave, the Gene's Fubbs practicum has gone missing. I checked all my backups and have not found a copy of it. I could have it burned to a CD somewhere but to date, nothing.

Nice job on the model by the way.
 
Thanks, Joe!

A lot of things have gotten in the way, including a 17 day holiday, but I'm back in the shipyard. The next thing up on the battle station build is the blocks. Trying to stick to the totally scratch built principle, I made them from scratch. The blocks for the cannons would be 8" long, or 1/4" long in scale. I milled up some 3/16" square stock for the double blocks and 1/8" X 3/16" stock for the single blocks. I need 6 double blocks and 10 single blocks. The extra single blocks are for rigging the gun port lid control lines. The stock is swiss pear.


I marked and drilled the sheave holes with a #60 drill, then used a curved X-acto blade to cut out the simulated sheaves. The blocks were sanded round on the stock, then cut off and the other side sanded round. The stropping grooves were marked with an X-Acto and shaped with a file. All that is left is a final sanding and a bath in some boiled linseed oil to darken and protect them.IMG_1082.JPG
 
Back
Top