18 Inch Sharpie

Joined
Oct 19, 2018
Messages
180
Points
143

Location
Pawley's Island, SC
I recently found a model ship kit barn find of the Occre Santisima Trinidad at the local Salvation Army Resale Store. After some discussion I purchased it for $40.00 minus a senior discount. The hull had been completed and the kit box contained a bunch of supplies. So I started to work on it but needed something to slow me down so I looked at my file of plans on hand. I settled on building a model of an 18 foot Sharpie from a 1930s Yachting magazine. The magazine contained an article describing how to build the boat and providing some plans. I've attached a copy of the article. So this is going to be my Build Log on how I built a model the 18 foot Sharpie.

I also use my artist license to decided that I was not going to paint the model but use different colored wood to accentuate the model. I also decided that I would use only reclaimed wood from other projects. I other words I was not going to spent a great deal of money on wood. I used some cypress, I think, some pine and a brown wood that is of unknown wood species. I also plan on coating it with poly. I was going to use Wipe On Poly, but discovered that on hand supp0ly had dried up. So it off to Amazon to replace it.

I recently started to learn some CAD using Fusion 360 and had used this boat to practice on making a set of plans. I had made drawings of the Molds, Sides, Transom and Center Board Box. So I already had a start on building the model. The first thing I did was cut the molds and mount them on a building board.

1606403926923.png

The next step was to cut 6 pieces of wood 3/32 x 3/4 x 20 inches long for the sides. I butt glued them together using Elmer's glue to form 2 sets of three slats that the sides could be cut from. After the glue had set, I ran them through the Thickness Sander to reduce the size to 1/16 of an inch thickness.
1606404248458.png

Next I used a scroll saw to was to cut the sides to the proper shape.

1606404342933.png

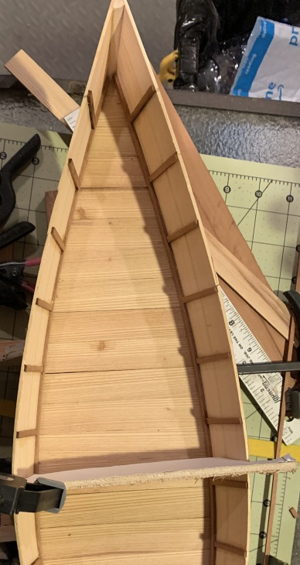
After the sides were cut, I cut the transom and glued pieces of 1/8 x 1/8 to the sides to use a base to clamp the transom to the sides as the glue dried. I used a two part stem, inner and outer, instead of a one part stem. I find that it is easier to glue up.
1606404554281.png

This has slowed me down on the S. Trinidad for awhile. But it is time to go back to work on it. It is turning into quite a project because of mistakes made during building the hull and a few missing parts. Luckily, I was able to make the missing parts.
 

Attachments

  • From the Yachting Archives.docx
    730.4 KB · Views: 36
  • Mould 1 Drawing.pdf
    211 KB · Views: 25
  • Mould 2 Drawing.pdf
    209.5 KB · Views: 14
  • 9 Inch Sideboard Drawing.pdf
    211 KB · Views: 17
  • Transom Drawing.pdf
    199.2 KB · Views: 13
  • Centerboard Box Drawing v1.pdf
    212.1 KB · Views: 15
Had a good Thanksgiving with a small group on the outside. Weather was beautiful here. So now it is back at the Sharpie. After getting the sides, transom and stem cut it was ready to attach the sides to the molds and glue on the transom and stem. This shows them glued together and some of the bottom boards attached.

1606574408559.png

I used 3/4 x 1/16 boards for the bottom which simulates a 1 x 8 inch board on he original. I started in the middle and worked to both ends. After the bottom was completed I installed the Chine and Ribs on the interior of the boat.

1606574477731.png

The Chines are made up from the brown wood and is 1/8 x 1/16. After the Chines set in I installed the Ribs using the same type of material. The Ribs were spaced at 1 1/4 inch apart.


1606574938237.png

At this point I needed to install the keel but first I wanted to cut the slot for the Center Board opening. The keel is the same 3/4 inch wide brown wood. I marked the slot on the keel 6 inches long by 1/8 wide. I used a 1/8 cutting bit on the milling machine to cut the slot.
1606574938002.png

I glued the keel in place on the hull and after the glue had set I used an 1/8 inch drill bit to cut the slot in the bottom of the hull.

That took me awhile to do and with glue drying time I also had some time to work on the S. Trinidad. Now it is time to spend some more time on the S. Trinidad
 

Attachments

  • 1606574656950.png
    1606574656950.png
    638 KB · Views: 8
Hey Doc.
I have inserted text that indicates the measurement from top to bottom. This is an interesting project and is a good filler project. I'm hoping it all comes together.
 

Attachments

  • Mold 1 Drawing.pdf
    32.2 KB · Views: 17
  • Mold 2 Drawing.pdf
    29.8 KB · Views: 13
Hey Doc.
I have inserted text that indicates the measurement from top to bottom. This is an interesting project and is a good filler project. I'm hoping it all comes together.
Thanks! I'm a sucker for small projects like these. I have a number started, but not completed. They divert my attention when I get stumped or bored with a bigger build! I may give this one a try!
 
I have several of the smaller scale kits for this small east coast sail boats, the oyster boats and day sailors.

Nice small simple kits, when you have time to a simple project. I am working my Skip Jack boat at present.
 
This particular Sharpie seems to be a more recreational Sharpie. I like Sharpies especially the east coast oyster ones. I built a skip jack some years ago. It is the one in “Model Boat Building: The Skipjack (Schiffer Book for the Hobbyist)” by Steve Rodgers and Patricia Staby-Rodger. It was a good build and I enjoyed building it.
 
Hey Doc.

Sorry, I should have included that. I used this drawing:
1606671406926.png

The molds are 4' 10" apart on the original. I used 4 3/4" as the spacing. I clamped the side boards onto the molds using the spacing of 5" from the stern to Mold #1. I'm using the measurements for the 18' boat.
 
I'm back at it again. I glued up 2 pieces of cypress 3/32 x/3/4 x 20" long for the center box and 2 pieces of the brown wood 3/32 x 3/4 x 12" for the mid seat. Afterwards I ran them thru the thickness sander and reduced to 1/16 thickness.
1606776294145.png

I cut the 2 sides for the center board box from the cypress at 1 1/4" x 6" and glued on a separator between the two at 1/8 x 1/8. I installed some of the brown wood onto the centerboard box for decorative purposes, not included on the plans.
1606776520984.png

Next I cut the mid seat boards to 1 1/4" width and fitted the seat in front of the center box.

1606776733712.png

For the pattern on the rear seat I used the enlarged copy of the plans, folded in half and cut the template out.
1606776838687.png

I used the brown wood for the rear seat.
1606777006617.png

This photo shows the pipe for the rudder holder installed. The plans called for a piece of galvanized pipe so I used aluminum. I used 3/16 inch pipe for the part installed and then will use 1/8 pipe to attach the rudder to the tiller. To cut the rudder I again used the enlarged plans as a template to cut the cypress.

1606777214648.png

The hull is finished at this point except for oarlocks, cleats and installing the rudder. That will come later. Also working on the mast and boom. I've already drilled the hole for the mast in the deck. Now I'll give the hull a couple coats of poly and be ready to continue after it dries. I need to build a display stand after applying the poly.

1606777353706.png
 
In keeping with my goal of using reclaimed wood for this project I used a wine crate to make the display stand. Someone had given me a crate of 5 bottles of wine so I drank the wine and kept the crate for future use. I cut the back out of the crate for the platform and used one side to cut the uprights. Then rounded the corners and I had a stand.


1607008253417.png

I cut the rudder from some cypress and attached a piece of 1/8 diameter aluminum tubing flattened on one end where it attaches to the rudder. Made a coupler out of wood and attached another piece of tubing to it for the tiller.
1607008459926.png

The hull is pretty much finished at this point. Next is to make 4 cleats, 2 oarlocks, the mast and boom and the sail. This is how the finished hull looks.

1607008620843.png

Another view showing more of the interior.

1607008666803.png

Off to work as soon as it warms up a little.
 
This particular Sharpie seems to be a more recreational Sharpie. I like Sharpies especially the east coast oyster ones. I built a skip jack some years ago. It is the one in “Model Boat Building: The Skipjack (Schiffer Book for the Hobbyist)” by Steve Rodgers and Patricia Staby-Rodger. It was a good build and I enjoyed building it.
I printed out the old Yachting article with the photo showing the leg'o mutton sail. I wonder how it would handle with a gaff rigged one bringing the center of force more aft and requiring the centerboard to be partially raised keeping the center of resistance in balance. Not a big deal but it makes sailing a lot more fun to get best performance. Rich (PT-2)
 
I'm not a sailor so the best type of sail is over my head. It is about all I can do to use an outboard and then I like to have a steering wheel and throttle.
 
Work is continuing on the Sharpie. The Oarlocks and Cleats have been made and the cleats have been installed.

1607351707987.png

1607351753140.png

I am blackening the Oarlock Holders and plan on installing them today. The mast is made from a 1/4 x 18 inch dowel and the boom is made from a 3/16 x 14 inch dowel. The plans indicated that a hole was bored through the top of the mast to insert the rigging. There is only one block and it is affixed to the deck. I have made a boom stand to hold the boom in place, I didn't know what else to do with it since there are no rigging lines to hold it up. The only rigging line on the boom is the one attached to the boom to move it from side to side to catch the wind. The only other rigging line is the one line to raise and lower the sail.

1607352146388.png

I am ready to install the mast and the block and oarlocks. I am waiting on my Wife to help me with the sail. I'll get those things done and post when I am at that stage in the build.
 
Do your plans show shrouds to hold mast upright?

My small sail craft has line from front bottom of boom to deck to keep boom down and taught. It also has line to control swing of aft end of boom. The aft end of sail should have line going out to end of boom and coming forward to cleat on side of boom to pull sail back on boom.
 
Your little Sharpie is going to be a great looking boat when done.

Please PM Donnie so he can add completion photo to our photo galleries.
 
Your little Sharpie is going to be a great looking boat when done.

Please PM Donnie so he can add completion photo to our photo galleries.
The line from the end of the boom to a turning block about a quarter or the way (to where the skipper with the tiller) or a crew forward can control it is the sheet. In many small boats like this the sheet goes from the boom turning block to another block with a cam cleat on the after end of a centerboard tank. It can be locked in position that way for long reaches if the skipper is lazy but the best manner is to continually adjust the boom with the sheet being popped in and out of the cam cleat. I spent many days sailing that way controlling both sheet and rudder for best feedback feel and continual adjustments for the best drive and speed in racing. The crew controlled the jib sheets in the same manner unless the boat was rigged for single handed sailing from aft. This looks like a fun little boat which with any speed would want the fore deck to keep things dry as my wife found out in our early racing days, even with a short foredeck. Looking forward to your approach to the race start line (your finish). Rich PT-2
 
Thanks for the comments. I should have mentioned that I am planning of displaying it with the sails furled. By doing so the boom has nothing to hold it up, therefore, the boom rest. I may change my mind in the next day or so but am strongly leaning toward furled sail.
 
Back
Top