Amerigo Vespucci, Panart 1:84 scale

Hi Ken,

Thats exactly what I like about this model, all these little details of doors, railings etc etc.
What is so horrible about your deck planking?
I would sand them with steel wool and put them in a matt oil.
See below the real ships deck.
View attachment 155695
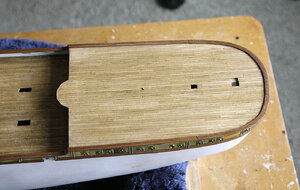
Hi Maarten, Thanks for your post and pics, appreciated. My build is a couple of days ahead of my posts, by the time I’ve photographed and written my log I’ve usually moved on. What I didn’t like about the decks was the colour, perhaps it doesn’t look so bad on screen but it just doesn’t look right seeing it for real I have made a start on my solution, I’m much happier now that I’ve taken the plunge, I’ll write it up when it’s done.

Ken
 
Great work Ken,but if you are adamant on a redo may I suggest this option;


I use their boxwood "Flatlines" for planking on some of my models.They are 0.6mm thick and available in various widths to suit the width of you decking.Plus they are open and delivering as normal.I got something from them a couple of weeks ago.

This is what the product looks like on My Royal Caroline build;

View attachment 155697

Kind Regards

Nigel

Hi Nigel, Thanks for your message. I must say that your deck looks pretty good, I don’t aspire to that level of detail for my build, with everything else that needs doing I would never get it finished. I’m not impatient when building but I do like to feel that I’m moving forward at a reasonable pace so as long as it looks good enough and is acceptable that’s ok for me, keep it simple is my motto.

Ken
 
Hi, As you know, I was unhappy with the decking and I was in the process of having another go at it. It’s completed and I’m delighted with the result, it was well worth the extra work.


I used a mouse type sander and sanded off all the walnut planking, the waist deck proved quite difficult and I only managed a slight reduction there and I removed the skirting from around the cabins in preparation for re planking.


Like most of you I have a small stash of left over wood from other builds but I didn’t have enough of the same type to complete the decks. I didn’t want to have to buy any in so I used what I had. I had enough light coloured wood but it was of different types in different widths and thickness, four in all. I’ve shown these in the photos. I used my small Proxxon table saw to cut them all to the same width, 3mm. I was quite surprised how clean it cut lengths of planks, the edges didn’t even need sanding. I didn’t mind the different thickness as once laid I would sand them down to a uniform height. I cut the strips into 8mm lengths for a four butt pattern. I tried some dyes on a test piece to see if I could get their colour and texture to look similar and ended up choosing a light oak.


I had no problem laying the planks although it was now awkward working around the cabins with the upper deck in place. I used white pva to fix them. I sanded them back, rubbed some walnut filler in to fill any gaps between the planks then rubbed in the dye. I find that the filler soaks up the dye like end grain, slightly darker thus giving the filler that has rubbed into the seams the slight appearance of corking, enough to take the plainness off. I refitted the skirting then finished off for now with a coat of sanding sealer.


I hope that you agree with me that it looks so much better than before.


Ken039a.jpg040.jpg041.jpg042.jpg043.jpg044.jpg045.jpg
 
Hi, Continuing, I’ve made a start on the second planking. This planking is done using 1x6mm lime wood strips, in my opinion far from the best wood for a good finish. I unpacked the bundle of strips and found that unlike the first planks they were of quite poor quality, they were very course grain and the edges were roughly cut and looked prone to splintering. To tidy them up a bit I sanded the edges, I held about six at a time in a sort of simple jig and sanded them as a block. Photo. It’s a big hull and there are rather a lot of planks to do so being able to do many at a time helped.


I started the planks from the top of the waist deck and continued down. My fears about the edges splintering happened, a lot of very fine ones occurred spoiling what I had hoped would be well butted seams. The very rough grain was even more noticeable seen with many of the planks fitted, I’ve shown a photo of this, it really is bad and as this will be a smooth painted hull I can see a lot of work will need to be done to make it acceptable. At the moment I think that it would have been better left as single planked, just another challenge.


Ken046.jpg047.jpg048.jpg049.jpg
 
`Hi, More progress on the hull. I finished the second planking without encountering any difficulties except for the state of the wood which I have already mentioned. My first thoughts were that I would never get rid of the grain and achieve a smooth enough surface for a painted finish but I set about it and the end result was so good that it surprised me, although it took longer than the actual planking.


I first gave it a thorough sanding, taking away about half the planks depth.

I then spread a thinned water based filler over the entire hull and when dry sanded that right back.

I gave it a very light coat of spray primer, this highlight any imperfections and shows where the seams will show fine cracks. I worked in filler again to the imperfect areas, sanded and again sprayed, I did this twice.

I was then left with an acceptable surface but after spraying again I had to use a fine acrylic filler intended for hiding the seams on plastic models before getting a perfect surface.
I then gave it a couple of coats of sanding sealer, then a fine sanding before another light spray to completed the job.

A lot of work but in the end well worth the extra effort.


I’ve attached some pictures of each stage so that you can see the progress.


Ken


050.jpg051.jpg053.jpg054.jpg055.jpg057.jpg058.jpg059.jpg060.jpg
 
Hi Ken,

As the original is a klinkered steel hull you can consider to have a third layer with sheet metal like aluminium tape. You have now a perfect smooth surface to do something like that.

Hi Maarten, Thanks for showing an interest in my build. That’s an interesting idea that you’ve suggested and one that I would have never considered, one for the future perhaps. As I mentioned at the start, for me this is a challenging build and I want to keep it as simple as possible but do it well, that way I stand a chance of completing it and not getting bogged down with trying to make it a perfect scale model.

Ken
A lot of modelers building airplane models use this technique. But sofar she is getting a fine model.
 
Cześć Ken,
Obserwuję Twoją relację z budowy Amerigo Vespucci i zauważyłem, że w zestawie masz rysunki i szkice, których brakowało w zestawie, który ja otrzymałem. Od znajomego dostałem niedokończony model, bez planów, który próbuję dokończyć. W tym celu ściągnąłem z internetu zeszyty z instrukcją budowy modelu ale brakuje mi szkiców masztów i reji ich wielkości, grubości. Chciałbym Cię prosić o pomoc w tej kwestii, jeśli posiadasz takie szkice (chodzi mi takie jak na ostatnim załączonym przeze mnie zdjęciu) czy mógłbyś mi je udostępnić w formie zdjęć na maila mirekmotyka@interia.pl. Przesyłam zdjęcia moich prac nad modelem oraz zeszytu, którymi dysponuję. Serdecznie pozdrawiam Mirek.

Google translate:
Hi Ken, I am observing your account of the construction of Amerigo Vespucci and I noticed that in the set you have drawings and sketches that were missing in the set that I received. I got an unfinished model from a friend, without plans, which I am trying to finish. To this end, I downloaded notebooks with instructions on how to build the model, but I miss the sketches of the masts and areas of their size, thickness. I would like to ask you for help in this matter, if you have such sketches (I mean the same as in the last photo attached by me) or could you share them with me in the form of photos by e-mail mirekmotyk@interia.pl. I send pictures of my work on the model and the notebook I have. Best regards, Mirek.

20200718_101040.jpg20200718_101045.jpg20200718_101328.jpg
 
Hi, Thanks for the many likes on my build.

I’m making good progress on the hull at the moment and all is going along quite well. I’ve not been keeping the log exactly up to date but here is a catch up.


I’ve put the capping on the edge of the decks, the instructions suggested the fore and aft curves should be done in small sections from the strip provided, I didn’t think that this would look too good. I had a small piece of walnut in my stash, not enough to do all of capping but if careful, enough for the curves. I made up a cardboard template first as I only had enough for one shot at it. I put the curved sections on then added strips along the straight part.


The brass platings along the upper part of the hull were then cut to shape, drilled where the portholes were needed and glued into place. I drilled holes for the riveting and used brass nails for them, I then put the wooden 2x2 strip bellow. I gave the brass a good polish to finish it off.


The two raised strips like wales were added next, these were made up of 4 x .5x 3mm walnut strips. It was quite time consuming getting the curves at the stern to sit flat, the picture of the plan shows this. The newer kits supply these wales as pre cut ply with the ports cut out, I believe that this version just does not work as they won’t curve and stay flat against the stern, most builders just leave them off and just paint the stripes on.


Ken

_M0W2251.jpg045a.jpg045b.jpg


061.jpg062.jpg063.jpg063.jpg065.jpg066.jpg067.jpg070.jpg071.jpg072.jpg071.jpg072.jpg
 

Attachments

  • 064.jpg
    064.jpg
    328.2 KB · Views: 9
  • 068.jpg
    068.jpg
    338.6 KB · Views: 10
Hi, Thanks for the many likes on my build.

I’m making good progress on the hull at the moment and all is going along quite well. I’ve not been keeping the log exactly up to date but here is a catch up.


I’ve put the capping on the edge of the decks, the instructions suggested the fore and aft curves should be done in small sections from the strip provided, I didn’t think that this would look too good. I had a small piece of walnut in my stash, not enough to do all of capping but if careful, enough for the curves. I made up a cardboard template first as I only had enough for one shot at it. I put the curved sections on then added strips along the straight part.


The brass platings along the upper part of the hull were then cut to shape, drilled where the portholes were needed and glued into place. I drilled holes for the riveting and used brass nails for them, I then put the wooden 2x2 strip bellow. I gave the brass a good polish to finish it off.


The two raised strips like wales were added next, these were made up of 4 x .5x 3mm walnut strips. It was quite time consuming getting the curves at the stern to sit flat, the picture of the plan shows this. The newer kits supply these wales as pre cut ply with the ports cut out, I believe that this version just does not work as they won’t curve and stay flat against the stern, most builders just leave them off and just paint the stripes on.


Ken

View attachment 165377View attachment 165362View attachment 165363


View attachment 165364View attachment 165366View attachment 165367View attachment 165367View attachment 165369View attachment 165370View attachment 165371View attachment 165374View attachment 165375View attachment 165376View attachment 165375View attachment 165376
Hi Ken
I read your blog and the photos you attached , this is very nice & impressive models, Well done.
Lots of success in further building the model
 
Hi Ken
I read your blog and the photos you attached , this is very nice & impressive models, Well done.
Lots of success in further building the model
Hi Shota, Thanks very much for your kind comment. Yes I think I will need some luck with this build, looking at the plans there is so much to do, some of it I will be at the limit of my ability and will be struggling, but hopefully will get it completed.
Ken
 
Hi Shota, Thanks very much for your kind comment. Yes I think I will need some luck with this build, looking at the plans there is so much to do, some of it I will be at the limit of my ability and will be struggling, but hopefully will get it completed.
Ken
Ken
I believe that with all the skills you have demonstrated so far, you will be able to face the challenges of construction and achieve results that will be very pleasing to you and us.Thumbsup
 
....... Yes I think I will need some luck with this build, looking at the plans there is so much to do, ........
Hello Ken,
I was looking at your log, because the Americo Vespucci has always my interest.
And glad you are continue your postings.
I recognize your line I have replied, the same as by the starting of my build. I also saw a lot of problems.
I see it as climbing a mountain: you see the hight, and think wow!
But start at the base and do it step by step. Look foreward, so you have time to think about a possible problem a few stept ahead. But you stil can do your steps and have time to think about the problem.
And take from time to time a rest. Sit back and look back to all the pictures and see what you already have done.
And that is what you are still doing, looking to the currend state.
Regards, Peter
 
Last edited:
Hi Peter, Thanks for your encouragement Yes your right one step at a time and the build will move forward. Now that the basic hull is finished l can look forward to the interesting bits of this project.

ken
 
Cześć Ken,
Obserwuję Twoją relację z budowy Amerigo Vespucci i zauważyłem, że w zestawie masz rysunki i szkice, których brakowało w zestawie, który ja otrzymałem. Od znajomego dostałem niedokończony model, bez planów, który próbuję dokończyć. W tym celu ściągnąłem z internetu zeszyty z instrukcją budowy modelu ale brakuje mi szkiców masztów i reji ich wielkości, grubości. Chciałbym Cię prosić o pomoc w tej kwestii, jeśli posiadasz takie szkice (chodzi mi takie jak na ostatnim załączonym przeze mnie zdjęciu) czy mógłbyś mi je udostępnić w formie zdjęć na maila mirekmotyka@interia.pl. Przesyłam zdjęcia moich prac nad modelem oraz zeszytu, którymi dysponuję. Serdecznie pozdrawiam Mirek.

Google translate:
Hi Ken, I am observing your account of the construction of Amerigo Vespucci and I noticed that in the set you have drawings and sketches that were missing in the set that I received. I got an unfinished model from a friend, without plans, which I am trying to finish. To this end, I downloaded notebooks with instructions on how to build the model, but I miss the sketches of the masts and areas of their size, thickness. I would like to ask you for help in this matter, if you have such sketches (I mean the same as in the last photo attached by me) or could you share them with me in the form of photos by e-mail mirekmotyk@interia.pl. I send pictures of my work on the model and the notebook I have. Best regards, Mirek.

View attachment 165311View attachment 165312View attachment 165313
Hi Mirek, Yes I will help if I can. My kit is a very old version and differs in many ways from the newer versions, mine has a full set of plans but no build guide or instructions. Your version has less plans but a pictorial build guide book instead but they both build into the same model. The full guide book including the rigging can be got free online in PDF version from Cornwall Model Boats. I will see about copying my plans soon and hopefully get them to you.
Regards, Ken
 
Hi, Today I thought that I would try and do one of the many small parts that make up this boat, a skylight. I learned what could well be a valuable lesson. The plans are entirely in Italian with no translation but they seemed simple enough. I made the skylight over the plan, I thought that I had made a good job until I placed it on the deck, it looked too big. On checking I found that not all parts of the plans are to scale!!
I had to make it again but this time using the measurements given. The picture shows on the left the skylight that I made over the plan and the one on the right shows it made using the given measurements, quite a size difference but a warning to be more aware during the rest of the build.

skylight.jpg
 
Cześć Ken,
Obserwuję Twoją relację z budowy Amerigo Vespucci i zauważyłem, że w zestawie masz rysunki i szkice, których brakowało w zestawie, który ja otrzymałem. Od znajomego dostałem niedokończony model, bez planów, który próbuję dokończyć. W tym celu ściągnąłem z internetu zeszyty z instrukcją budowy modelu ale brakuje mi szkiców masztów i reji ich wielkości, grubości. Chciałbym Cię prosić o pomoc w tej kwestii, jeśli posiadasz takie szkice (chodzi mi takie jak na ostatnim załączonym przeze mnie zdjęciu) czy mógłbyś mi je udostępnić w formie zdjęć na maila mirekmotyka@interia.pl. Przesyłam zdjęcia moich prac nad modelem oraz zeszytu, którymi dysponuję. Serdecznie pozdrawiam Mirek.

Google translate:
Hi Ken, I am observing your account of the construction of Amerigo Vespucci and I noticed that in the set you have drawings and sketches that were missing in the set that I received. I got an unfinished model from a friend, without plans, which I am trying to finish. To this end, I downloaded notebooks with instructions on how to build the model, but I miss the sketches of the masts and areas of their size, thickness. I would like to ask you for help in this matter, if you have such sketches (I mean the same as in the last photo attached by me) or could you share them with me in the form of photos by e-mail mirekmotyk@interia.pl. I send pictures of my work on the model and the notebook I have. Best regards, Mirek.

View attachment 165311View attachment 165312View attachment 165313
Hi Mirak, Just a thought, Panart make this model in different sizes, mine is scale 1:84 you should check that yours is the same as mine as the plans may be incompatible, they are different in detail and size

ken
 
Back
Top