It is very hard to disagree with you, Jack. Quality control is a very important point of the production process, and I am sure the small shop as they are will introduce Quality Control in its next kit. However, how many kits manufacturers can admit their mistakes and offer after-sales service as those folks do? Don't we all know the history of well-known names (will not be mentioned loud) when requesting missing parts or replacing broken ones? ...and those are the big names on the market. But none of us complained...As I see it Model Dockyard have rushed out, most likely for cash flow reasons, their kits too soon and underdeveloped and are paying the price with customer dissatisfaction. They might also have to look into their quality control procedures judged by the many logs I have seen where the builder has had to have parts replaced. Every one who builds a model from a kit wants a challenge to build a great ship, but I am sure they don't want to be lead down the wrong street with confusing instructions and bits that are just wrong. I hope Model Dockyard have a great future but they have to keep the customer satisfied. JJ.
-

Win a Free Custom Engraved Brass Coin!!!
As a way to introduce our brass coins to the community, we will raffle off a free coin during the month of August. Follow link ABOVE for instructions for entering.
-

PRE-ORDER SHIPS IN SCALE TODAY!
The beloved Ships in Scale Magazine is back and charting a new course for 2026!
Discover new skills, new techniques, and new inspirations in every issue.
NOTE THAT OUR FIRST ISSUE WILL BE JAN/FEB 2026
You are using an out of date browser. It may not display this or other websites correctly.
You should upgrade or use an alternative browser.
You should upgrade or use an alternative browser.
Another Hayling 1760 build
- Thread starter Tom of all trades
- Start date
- Watchers 29
There are more problem with the well known old European mfgs than broken or missing parts.It is very hard to disagree with you, Jack. Quality control is a very important point of the production process, and I am sure the small shop as they are will introduce Quality Control in its next kit. However, how many kits manufacturers can admit their mistakes and offer after-sales service as those folks? Don't we all know the history of well-known names (will not be mentioned loud) to request missing parts or replace the broken ones? ...and those are the big names on the market.
- Joined
- Aug 14, 2018
- Messages
- 825
- Points
- 403

I agree Zoly, and doubtless they will never change, but new companies trying to establish themselves will do themselves no favours by firing out kits with confusing instructions and full of unsorted glitches. There are new or recently started US, British and Chinese Co's. that are way ahead. I hope Model Dockyard can follow them.There are more problem with the well known old European mfgs than broken or missing parts.
...they are a very young Co, and still learning production and our marketplace.I hope Model Dockyard can follow them.
- Joined
- Mar 1, 2022
- Messages
- 683
- Points
- 308

Despite a few bugs, we all do consider how affordable is this kit. I got my own for less than 300€, including shipping costs (maybe over 100€) and charges, a figure that makes it possibly as one of the cheapest kit available. At that price, my dealer could just sell me an Amati, with its bulkheads made of MDF.
OK I WANT TO CHIP IN HERE WITH MY 50CENTS WORTH (INFLATION) I AM DING A PRTOTYPEOF THE MINEVA SETERN SECTION AND BRIAN CAROLL IS DOING A PRTOTYPE OF THE COMPLETE MODEL BY DA HAI MODELS WHEN THIS FIRST CAME ABOUT THERE WERE MANY DISGRUNTELED MEMBERS WANTING TO KNOW WHY NOT READY FOR RELEASE. JUST WONDERING IF IT WAS RELEASED AT THE TIME BRIAN AND I RECEIVED IT HOW MANY COMPLAINTS WOULD THE MEMBERS BE SHOUTING AT. BRAVO DA HAI KEEP IT GOING. GOD BLESS STAY SAFE ALL DON
- Joined
- Oct 14, 2020
- Messages
- 294
- Points
- 323

This is the second kit we released. Although we have tried to avoid problems as much as possible in the early development, there are still some issues left over due to lack of experience. For these problems, first of all, we will continue to accept the feedback from the players and actively cooperate with them to solve them. As you guys may know, we have replaced the problem sheets and missing parts for all buyers for free. We are also constantly updating the instructions to ensure the accuracy of the content. Secondly, we are also learning from these faults to provide better content in future kits. Finally, I would like to state that our design and production are not outsourced, they are all members of Modelship Dockyard, but our production and design are carried out in China, while I am currently in the UK.
- Joined
- May 31, 2021
- Messages
- 86
- Points
- 88

I've not been viewing this build log for a while because I've been building something else.
I give you 'Maria' from the 1927 b/w film 'Metropolis:
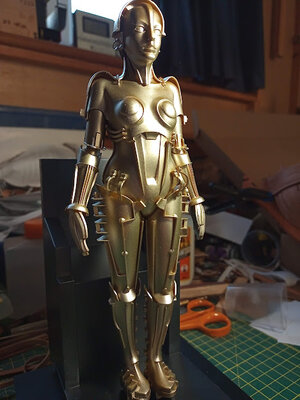
This 1/8th plastic kit has just been released and as I'm a big fan of the film, I had to build her. I'm really pleased with my airbrushing on this one.
Anyway, I'm back now and have only just seen the recent comments on the thread and sorry if I may have caused any friction. I will be posting an update on the ship model very soon.
Tom
I give you 'Maria' from the 1927 b/w film 'Metropolis:

This 1/8th plastic kit has just been released and as I'm a big fan of the film, I had to build her. I'm really pleased with my airbrushing on this one.
Anyway, I'm back now and have only just seen the recent comments on the thread and sorry if I may have caused any friction. I will be posting an update on the ship model very soon.
Tom
- Joined
- May 31, 2021
- Messages
- 86
- Points
- 88

A quick heads up for those building this kit.... there are two wale planks on fret K that have the wrong part numbers next to them. A2 and C4 should should be transposed. All it means is a bit of head scratching to work it out so no real problem and the wales fit really well and look good. 
Now to the rails. The instructions and PDF don't mention the extensions on some frames that are meant to be fed thru the rails to give birthing bollards but on my model they don't match too well (in fact the bow rails don't match at all) but there are 14 bollards on frame 'I' labelled X19 that I think are meant to be used which is what I will do.
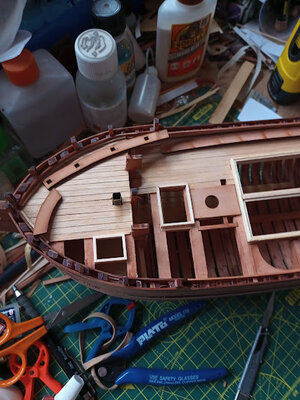
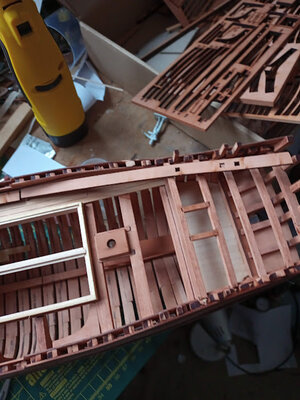
Also, the rails also don't quite conform to the curve on the bow on my model but I'm sure I can soak the wood and bend it enough to fit, so I will chop off the extensions and carry on with fitting the rails using the supplied bollards.
Cheers
Tom

Now to the rails. The instructions and PDF don't mention the extensions on some frames that are meant to be fed thru the rails to give birthing bollards but on my model they don't match too well (in fact the bow rails don't match at all) but there are 14 bollards on frame 'I' labelled X19 that I think are meant to be used which is what I will do.


Also, the rails also don't quite conform to the curve on the bow on my model but I'm sure I can soak the wood and bend it enough to fit, so I will chop off the extensions and carry on with fitting the rails using the supplied bollards.
Cheers
Tom
- Joined
- May 31, 2021
- Messages
- 86
- Points
- 88

Things have gone reasonably well since my last update so here's a few pics...
I fitted the rails after removing the extensions on the frames.
A thing to note is that if the mooring post are fitted straight into the holes in the rails, the ones near the stern will have a lean towards the bow because of the rake. I just beveled the bottom of them and glued them in upright.
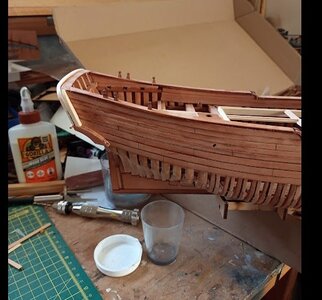
The stern windows etc. are a real pain. There are no clear plans/instructions to build it so I ended up with making some extra wood fittings and covering the kit stern piece with basswood so that the windows were recessed. It was the only way I could think of to get them to look 'right'.
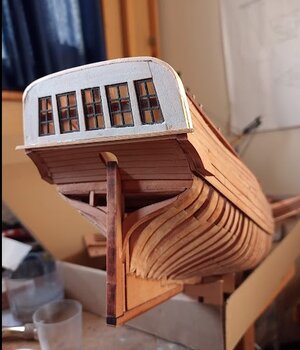
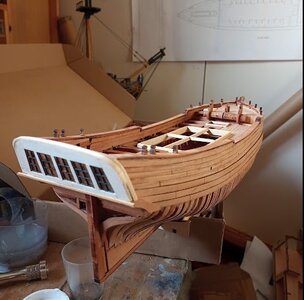
The result isn't as per the prototype ship but the model is still a Hoy although perhaps not 'Hayling'.
Next step is more cabin detail and fittings.
I fitted the rails after removing the extensions on the frames.

A thing to note is that if the mooring post are fitted straight into the holes in the rails, the ones near the stern will have a lean towards the bow because of the rake. I just beveled the bottom of them and glued them in upright.

The stern windows etc. are a real pain. There are no clear plans/instructions to build it so I ended up with making some extra wood fittings and covering the kit stern piece with basswood so that the windows were recessed. It was the only way I could think of to get them to look 'right'.


The result isn't as per the prototype ship but the model is still a Hoy although perhaps not 'Hayling'.
Next step is more cabin detail and fittings.
- Joined
- May 31, 2021
- Messages
- 86
- Points
- 88

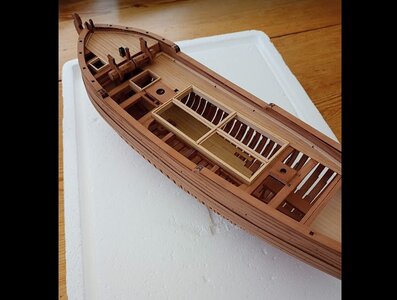
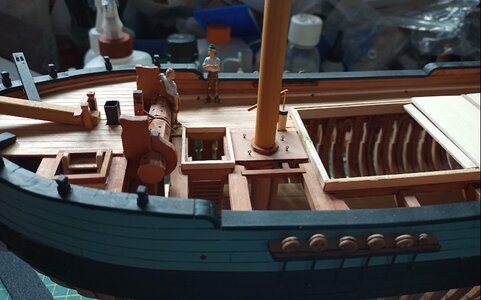
I've now got to the end of this build because I am going to leave it as a sort of dockyard 'cut away' model. So to round things off, here's a few photos taken by a phone that make it look a lot worse than it really is  ........
The rudder builds up rather nicely and the stern windows look fine (the stern is actually white but the photo makes it look pale blue)
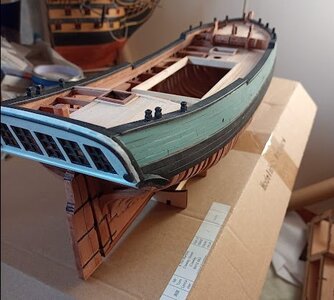
All the rest of the build went well (except for the windlass which is too tall according to other reference sources) and by adding a few figures to give a better scale indication, I think it's about done. I will make a nice display stand but that's about it.
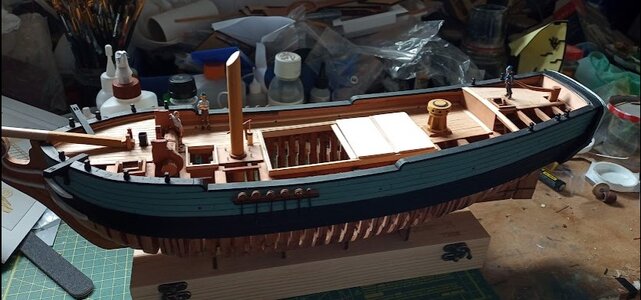
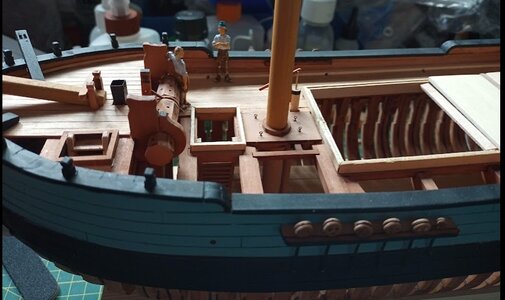
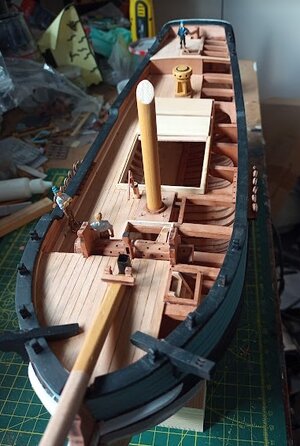
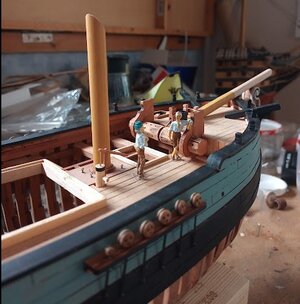
I think that except for the terrible instructions, it's a great kit. It is fine for an experienced modeller and makes an enjoyable build if somewhat frustrating.
Next project is a 1/18th WW1 Fokker E made from wood, string and canvas which is very much like model ship building!
Cheers
Tom
The rudder builds up rather nicely and the stern windows look fine (the stern is actually white but the photo makes it look pale blue)

All the rest of the build went well (except for the windlass which is too tall according to other reference sources) and by adding a few figures to give a better scale indication, I think it's about done. I will make a nice display stand but that's about it.


I think that except for the terrible instructions, it's a great kit. It is fine for an experienced modeller and makes an enjoyable build if somewhat frustrating.
Next project is a 1/18th WW1 Fokker E made from wood, string and canvas which is very much like model ship building!
Cheers
Tom

Hallo @Tom of all tradesAs requested by Jim, here's my build log of the Model Dockyard POF Hayling 1760 (I will try my best to keep it updated... honest).
First off, the quality of the kit contents is excellent - and I really mean that. The wood and etched sheets are the best I've ever seen. I've never used pear wood before so it's a new experience for me and found it to be very close grained, a wonderful colour but a bit hard unlike good old bass wood which is really easy to carve.
But...
The instructions are very minimal and the 3D renderings sometimes don't match the model which means you have to do some head scratching to work out what should be happening. All in all, though, a good value kit.
So to my build...... First off the center frames on the jig:
View attachment 331982
The bow frames are next... you can see the frames with the extensions which are not shown in the drawings...
View attachment 331983
This is where it gets interesting.. the slots are labelled F1 to F4 but the instructions say there is an F5 but the jig markings don't have an F5 slot although it look like there should be a gap between F4 and F5... most confusing...
View attachment 331984
And when F4 is slotted in, there appears to be no space for F5 pieces...
View attachment 331985
As the drawings show F4 and F5 as being one piece so I've decided to glue both F5 parts to F4 and carve the complete assembly to fit the gap. Which I think is what the instructions meant.
View attachment 331986
Wish me luck. I'll update when (if) I manage to get it to look right.
Cheers
we wish you all the BEST and a HAPPY BIRTHDAY

Did you glue F4 to F5 before you started any tapering. Or did you taper F4 and F5 and then glue them together? Thanks in advanceAs requested by Jim, here's my build log of the Model Dockyard POF Hayling 1760 (I will try my best to keep it updated... honest).
First off, the quality of the kit contents is excellent - and I really mean that. The wood and etched sheets are the best I've ever seen. I've never used pear wood before so it's a new experience for me and found it to be very close grained, a wonderful colour but a bit hard unlike good old bass wood which is really easy to carve.
But...
The instructions are very minimal and the 3D renderings sometimes don't match the model which means you have to do some head scratching to work out what should be happening. All in all, though, a good value kit.
So to my build...... First off the center frames on the jig:
View attachment 331982
The bow frames are next... you can see the frames with the extensions which are not shown in the drawings...
View attachment 331983
This is where it gets interesting.. the slots are labelled F1 to F4 but the instructions say there is an F5 but the jig markings don't have an F5 slot although it look like there should be a gap between F4 and F5... most confusing...
View attachment 331984
And when F4 is slotted in, there appears to be no space for F5 pieces...
View attachment 331985
As the drawings show F4 and F5 as being one piece so I've decided to glue both F5 parts to F4 and carve the complete assembly to fit the gap. Which I think is what the instructions meant.
View attachment 331986
Wish me luck. I'll update when (if) I manage to get it to look right.
Cheers
- Joined
- May 31, 2021
- Messages
- 86
- Points
- 88

Hi Van. Yes, I glued them together and gradually sanded them to fit. I hope you enjoy the build - even with the sometimes frustrating instructions!Did you glue F4 to F5 before you started any tapering. Or did you taper F4 and F5 and then glue them together? Thanks in advance
- Joined
- May 31, 2021
- Messages
- 86
- Points
- 88

'Fraid so Frank..... but you WILL enjoy the challenge(s)Yikes. Had an early morning start today & just flipping through this thread while drinking my cuppa… as a ship newb, is this what I have to look forward to?? LOL

I've never built a model before so it's sometimes hard to know where the instructions are unclear. But so far so good. Thanks for the adviceHi Van. Yes, I glued them together and gradually sanded them to fit. I hope you enjoy the build - even with the sometimes frustrating instructions!
- Joined
- Oct 14, 2020
- Messages
- 294
- Points
- 323

Hi Van. You can always Email: ModelshipDockyard@gmail.com or PM me if you need any help. Hope you enjoy the build.I've never built a model before so it's sometimes hard to know where the instructions are unclear. But so far so good. Thanks for the advice


