Artesania Latina Santisima Trinidad 1/84

Hi Nigel,

I’m very interested in the way your are improving this model. When I read the instruction I was surprised to see that there is no false deck to support the planking and was afraid that the light might go though the planks joints. I understood that you are doing these false decks. Is there any sketch available to cut the deck side? Are you going to use the existing template for cutting the various openings?

Best regards,
 
Nigel, your planked false deck looks fantastic. Looking ahead, I'm thinking about using the same approach for my main deck only. The thinnest plywood I've been able to find is 2mm, 3ply from a a supplier specializing in RC aircraft model supplies, Wicks Aircraft Supply.

Is is possible for you to show a close up of a cross section of the plywood you're using? Would you kindly provide a link to the supplier.

Obviously, I'd like to implement the thinnest sub deck as I can. Any thickness I can reduce in the sub deck I can add to the deck plank, making it more workable. The concern is stability.

In respect to the perimeter planking, I am thinking of leaving a margin of the sub deck unplanked initially and planking individually once the deck is permanently in place.

Thanks in advance!
 
Hi Nigel,

I’m very interested in the way your are improving this model. When I read the instruction I was surprised to see that there is no false deck to support the planking and was afraid that the light might go though the planks joints. I understood that you are doing these false decks. Is there any sketch available to cut the deck side? Are you going to use the existing template for cutting the various openings?

Best regards,

Hi Patrick

I will have to make templates for the bulkhead notches in each deck which I will cover when I cut the deck to size. There is no cutout for the grating and the dimensions for the position are clearly shown in the instructions. They illustrate just painting where the hatch sits black. I am currently making the hatch but using Caldercraft 1mm gratings and have tweaked the design to allow these to fit.I will paint the area under black as you will not be able to tell if it is cut out or not as there is no lighting underneath
 
Nigel, your planked false deck looks fantastic. Looking ahead, I'm thinking about using the same approach for my main deck only. The thinnest plywood I've been able to find is 2mm, 3ply from a a supplier specializing in RC aircraft model supplies, Wicks Aircraft Supply.

Is is possible for you to show a close up of a cross section of the plywood you're using? Would you kindly provide a link to the supplier.

Obviously, I'd like to implement the thinnest sub deck as I can. Any thickness I can reduce in the sub deck I can add to the deck plank, making it more workable. The concern is stability.

In respect to the perimeter planking, I am thinking of leaving a margin of the sub deck unplanked initially and planking individually once the deck is permanently in place.

Thanks in advance!

Hi Ken

The 1.5mm ply is three layers thick Birch. I can buy this down to 0.4mm thick.You will have been looking at Poplar "Liteply", great for aircraft as it weighs nothing but not so tough for this kind of work. That is why you can only find 2mm

I recommend you don't go much thinner than the 1.5mm I am using. I have found any thinner and the deck will cup badly if you are planking off the model.

The UK distributer for the ply I am using is SLEC but I will be surprised if you can't find it in the states
 
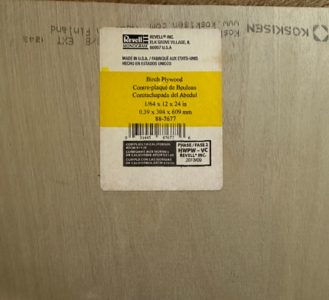
@Hoss6262 Ken, there is plywood available at 1/64 thickness. I believe Midwest makes one. However, a few years back I bought one labeled Revell (see below) image from ply I have.

View attachment 407918

here is Midwest's ply

Thanks Jim! I may have seen this as I'm sure I scoured Amazon before I looked anywhere else. My false deck is roughly 11" X 38". I would need to piece 6 pieces together to build the false deck. That scares the "you know what" out of me. :oops: Every seam would present a point for the structure to warp. Ideally, I'd like to have 2 pieces, Port and Starboard, much like Andrey Kudin built on his masterpiece. :)

Hi Ken

The 1.5mm ply is three layers thick Birch. I can buy this down to 0.4mm thick.You will have been looking at Poplar "Liteply", great for aircraft as it weighs nothing but not so tough for this kind of work. That is why you can only find 2mm

I recommend you don't go much thinner than the 1.5mm I am using. I have found any thinner and the deck will cup badly if you are planking off the model.

The UK distributer for the ply I am using is SLEC but I will be surprised if you can't find it in the states
Thanks for the speedy response Nigel. The 2mm plywood I found on Wicks is Birch. I would not use anything else. I just went to Wicks site and it seems now they offer Birch 3 ply down to 0.8mm now.

But your recommendation of not going thinner than 1.5mm has help me make up my mind. I think I am going stick with 2mm. So 2mm ply false deck + 2mm planking = 4mm structure thickness. I will glue and peg the deck to each of the 17 deck beams. I just need to find a reasonable way to lower the deck beams situated over each bulkhead. I need to gain 1.5mm. While not historic nor accurate, nothing below the main deck will be visible, so it is moot.

Thanks for your help Nigel.
 
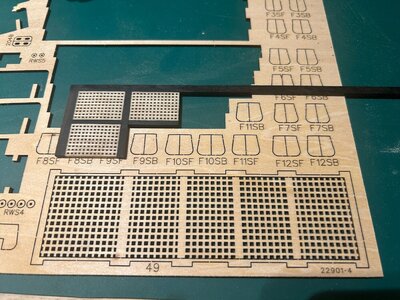
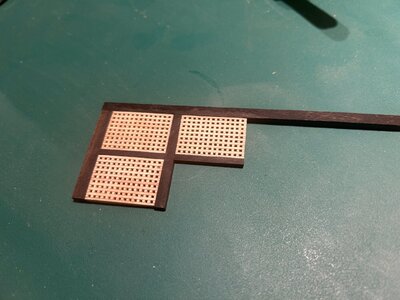
A small update as it best illustrates "working from a square corner out" when building hatches made up of multiple gratings.

I know I said "no exotic wood" but I did have some bits of Ebony in the scrap bin so sorry I am using that for the framework. It will save masking and painting the framework black, the gratings will be varnished wood. I will mill recesses for the cannon balls once the item is fully assembled

A nice comparison between the kit supplied part and my version. I figured the single expanses of Grating in the kit are too large and would be very weak in reality.

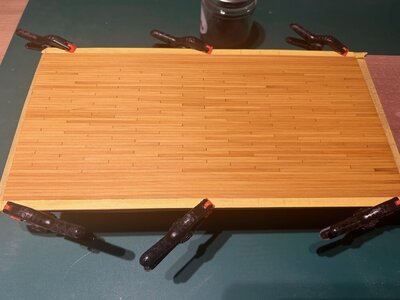
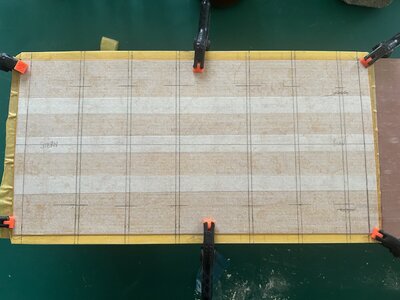
Finally a pic of the deck after the first coat of varnish, it had "cupped" in the middle slightly hence it being clamped to the piece of Pearwood while I apply the finish.

The spirit based Polyurethane has been thinned 20% with white spirit and applied by brush. I expect to have to apply a multitude of coats with sanding to get the finish I am after

IMG_1023.jpgIMG_1024.jpgIMG_1025.jpg
 
I have applied seven coats of spirit based poly to the deck at 24 hour intervals using an artists brush with light sanding every two coats.

I then applied masking tape to the top of the deck so I could mark the cutouts for the bulkhead extensions.These were cut out on my bandsaw and final finishing was done with a small file.

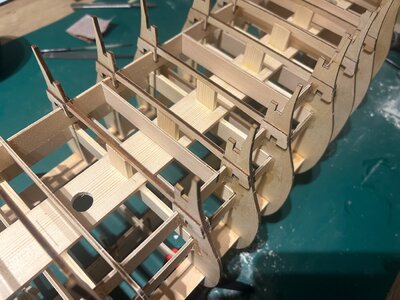
I added Pine reinforcements under the kit deck beams as they are rather weak and suspected they would deflect when clamping the deck down to introduce the camber.

I have decide to make my gunport heights conform to my now 2mm thick decks rather than attempt to sand 1mm off all my deck supports

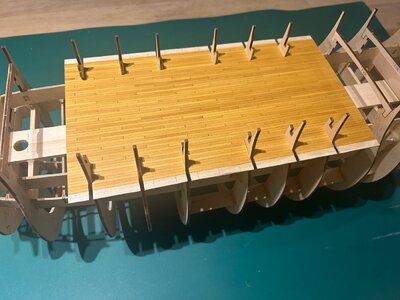
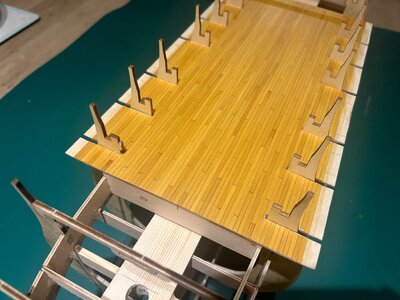
The deck was glued into position and then the masking tape protection was removed.Note I had to remove one tab on F4 to allow the deck to slide in place

The deck requires final trimming to conform to the inside of the hull planking. I made it overwidth to allow for easier pulling down at the sides.

IMG_1029.jpgIMG_1030.jpgIMG_1031.jpgIMG_1032.jpg
 
Last edited:
Very beautiful start and wonderful planking.
It's very interesting to see the difference between OCCRE's and Artesania's build process .
I will watch closely how your build is coming along.
 
I have applied seven coats of spirit based poly to the deck at 24 hour intervals using an artists brush with light sanding every two coats.

I then applied masking tape to the top of the deck so I could mark the cutouts for the bulkhead extensions.These were cut out on my bandsaw and final finishing was done with a small file.

I added Pine reinforcements under the kit deck beams as they are rather weak and suspected they would deflect when clamping the deck down to introduce the camber.

I have decide to make my gunport heights conform to my now 2mm thick decks rather than attempt to sand 1mm off all my deck supports

The deck was glued into position and then the masking tape protection was removed.Note I had to remove one tab on F4 to allow the deck to slide in place

The deck requires final trimming to conform to the inside of the hull planking. I made it overwidth to allow for easier pulling down at the sides.

View attachment 409816View attachment 409817View attachment 409818View attachment 409819
looks great Thumbs-Up :)
 
Excellent placement des décalages des planches.
Chaque siècle met des dispositions différentes.
De même, que l'on peut voir un travail différent entre la marine anglaise et celles espagnole et française, à la même époque.
Marco

Excellent placement of board offsets.
Each century has different arrangements.
Likewise, we can see different work between the English navy and those of Spain and France, at the same time.
Marco
 
Hi Nigel,

Really very nice!
Is the planking made using the 2,7 x 0,7 mm boxwood mentioned in one of your previous post?

Christmas Father is coming in advance and I should receive my Santisima Trinidad this week! I’m still a new comer in ship modeling, and I’m learning a lot from your explanations! thank you.

Hi Patrick

Yes it is the 2.7mm x 0.7mm Boxwood I mentioned earlier.

Personally I am not a fan of white or pale deck planks.I like the colour of Tanganyka planking but it has rather a pronounced grain and doesn't have the same crisp edges that boxwood has, shame as it is a third of the price
 
Back
Top