Thanks, Grant.What they all say Peter. Beautiful. Cheers Grant
Regards, Peter
 |
As a way to introduce our brass coins to the community, we will raffle off a free coin during the month of August. Follow link ABOVE for instructions for entering. |
 |
 |
The beloved Ships in Scale Magazine is back and charting a new course for 2026! Discover new skills, new techniques, and new inspirations in every issue. NOTE THAT OUR FIRST ISSUE WILL BE JAN/FEB 2026 |
 |
Thanks, Grant.What they all say Peter. Beautiful. Cheers Grant
Thank you for this reflection, Bill. For me it is also sometimes hard to believe of what is done, but also what still needs to be done. Just a multi-year project ……..Hello Peter,
I remember when you started this thread thinking, this is going to be a great project and it has been great. Hard to believe you’ve gotten all of this done in a little over a year.
Bill
... let it be always sunshine to see the gorgeous!
Right, Jim. She is a ray of sunshine in her own.... let it be always sunshine to see the gorgeous!

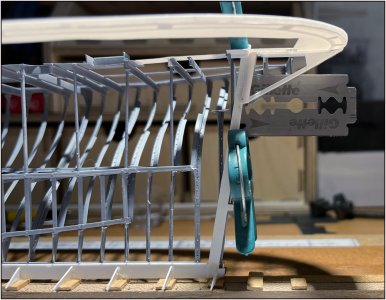
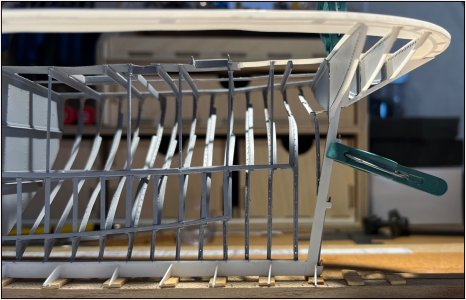
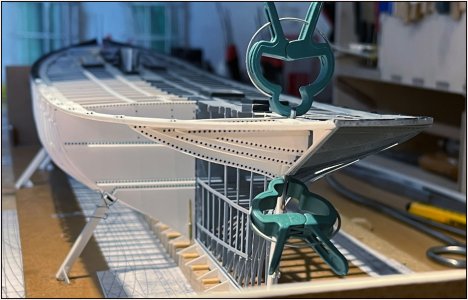
And keeps the cat away from the model...The razor blade prevents me from gluing both parts together.

this is a masterpieceAlthough building in 2 halves is a challenge in itself, building a rear with its different curves of the 2nd half is an even bigger one. A small difference will already be clear when both halves are against each other. Certainly with the now still very flexible loose hanging rear.
Therefore the assembled parts are fixed in position with clamps and the first parts are placed:
View attachment 487239
The half tube for the rudder stock and the sloping profile from that tube to the rear. The razor blade prevents me from gluing both parts together.
Then in 3 steps the 3 small bulkheads under the rear deck:
View attachment 487240
These 3 have the full rivet pattern because this remains open space that remains visible from the open side. Most other frames in the barrel hold and the rear accommodation are provided with barrels and wall cladding.
The deck curve / sheer is well aligned so far:
View attachment 487241
From this position I can start building the rest.
Regards, Peter


This is a beautiful view of her lines. Look at these sweeping lines!Although building in 2 halves is a challenge in itself, building a rear with its different curves of the 2nd half is an even bigger one. A small difference will already be clear when both halves are against each other. Certainly with the now still very flexible loose hanging rear.
Therefore the assembled parts are fixed in position with clamps and the first parts are placed:
View attachment 487239
The half tube for the rudder stock and the sloping profile from that tube to the rear. The razor blade prevents me from gluing both parts together.
Then in 3 steps the 3 small bulkheads under the rear deck:
View attachment 487240
These 3 have the full rivet pattern because this remains open space that remains visible from the open side. Most other frames in the barrel hold and the rear accommodation are provided with barrels and wall cladding.
The deck curve / sheer is well aligned so far:
View attachment 487241
From this position I can start building the rest.
Regards, Peter
At the Dutch forum there was almost at the same time a member who pointed to the used material and it's pro's and con's, Paul.To get the lines of the ship that smooth using plastic that started as straight sticks and that could not be sanded fair is almost unthinkable.
Brilliant stuff, Peter!
Thanks, Paul and Shota.this is a masterpiece
When al the deck stringer plates are installed ........ I have an old pictures during one of the restorations ....... you have to wait a while, Christian.Really wonderful progress, Peter. It's now looking like a real ship. If you post pictures of your model in black and white on an an old shipyard, nobody will see, that it is a model.
Yes, old fashion lines are a feast for the eyes, Marco. Almost the same with your latest models.This is a beautiful view of her lines. Look at these sweeping lines!
Thanks, Tobias. With your EOS on a tripod you can use the natural light and don't have to worry about longer shutter speeds. And pay more attention to the image cropping.Good morning Peter,
wonderful progress of the Balder. Your photos and the play with the light are very impressive. Thank you for sharing your approach to photography, I have often thought about doing it with my EOS 5 instead of the iPhone. We'll see what I will do in the future.
Best regards Tobias.
Never been in the army, Stephan? PSE? (In Dutch PSU): Personal Standard Equipment.You have a hairdryer?

I was just asking, I seen you in real and a towel .....Never been in the army, Stephan? PSE? (In Dutch PSU): Personal Standard Equipment.
Then you must have now the SHE: Standard Household Equipment: nail clippers, vacuum cleaner, hair dryer etc etc etc.
In plastics model building as a hobby a hair dryer is a necessary part of the PHE!
PS: Of course, there are 117 other possible abbreviations ……..
Regards, Peter

Nothings seems be what it is ……..I was just asking, I seen you in real and a towel .....

