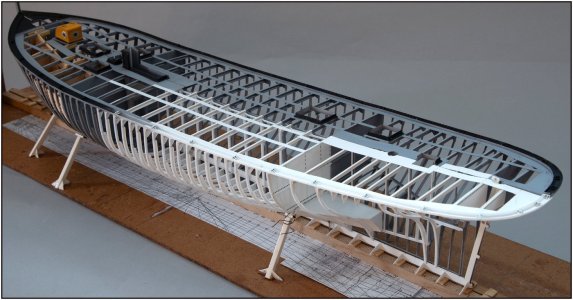
BALDER, Vlaardingen Herring Lugger from 1912, scratch build scale 1:50 Plate-On-Frame

Wauw Peter, It was some time ago that I visited this forum and I am totally impressed by what you have achieved so far. There have been so many compliments given that I could not think of one more that I could give you. I've read all of the 58 pages within one day and I can only say: "petje af" (maybe that one is a new one, although a Dutch one). I also must compliment you with the graceful way you handle all these compliments and keep your feet on the ground. Nice to see it all happening!

regards, Gijsbert
Thanks, Gijsbert: for your new visit, to read all the pages, the compliments and nice words.
Regards, Peter
 
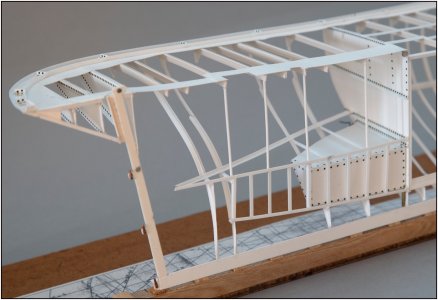
The next step was to apply 3 parts that contribute to supporting the entire structure:
-all deck beams;
-a number of frames;
-the keelson, floor beam and vertical support.
0468 Supports.jpg
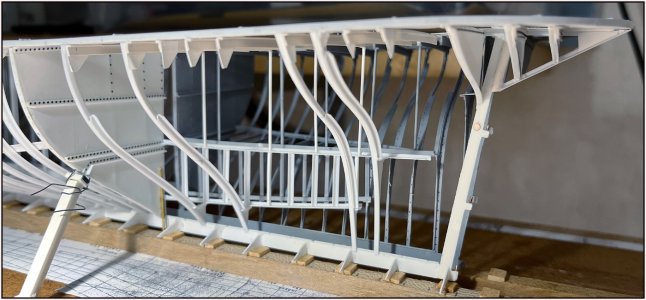
So now in the port side part not a free hand in interpreting the drawings, but make a mirrored copy.
The starboard part not connected close to it to show the difference between the grey and white new parts.

Connected to each other:
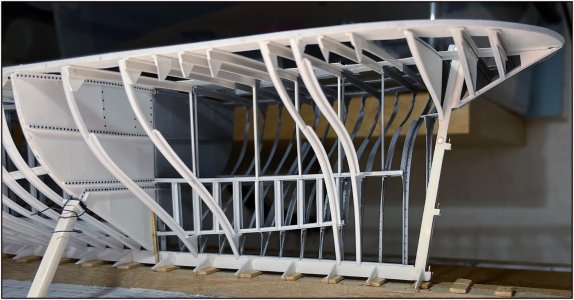
0469 Supports.jpg
And closed where the magnets do their job perfectly.

The next step would be to apply the horizontal floor beams to support the frames. But again thinking ahead: the water tank will also be in this part. To provide the Donkey steam boiler with water that comes on the floor above the water tank in this part. Together with the coal shed.
The water tank has right-angled, sloping and curved corners as well as a sloping arched side.
0470 watertank.jpg
A lot of fitting and measuring during the assembly of the water tank with also cutting new templates all the time.

Finally the first dry-fit between the frames and against the rear watertight bulkhead:
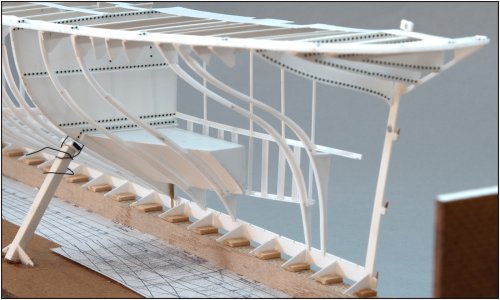
0471 watertank.jpg
The sloping arch along the frames was quite a 'thing to make'.
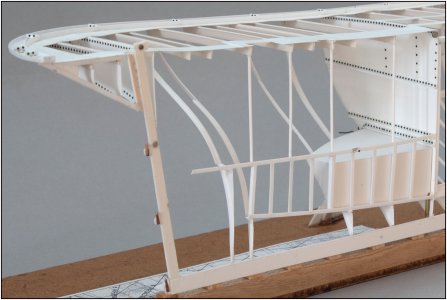
0472 watertank.jpg
With the flat side against the floor supports.
I could have left out the sloping arched side because it will no longer be visible when the floor and hull plates are installed. But it was a nice test to see how the thin Evergreen sheet material can be deformed. A good test for the hull plates later.

Another picture of the now partly asymmetric parts:
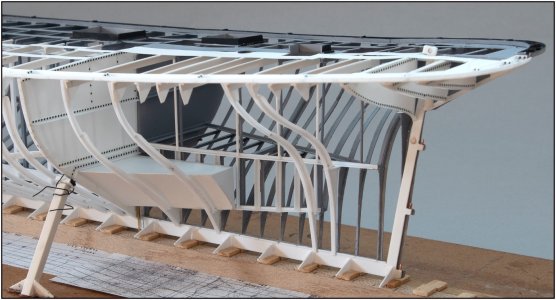
0473 watertank.jpg
And the current status:
0474 08-12.jpg
We are slowly moving towards the full shape ........
Regards, Peter
 
Last edited:
After applying some rivets on the water tank at the places that can be seen later:
0475 08-12.jpg
The tank placed, 3 horizontal floor profiles applied. Then I could bend the outer floor profile in its double curve. This also functions as a bilge stringer.
Here again, after a lot of fitting, bending and measuring I could glue it in place.
Continue with the rest of the frames ........
Regards, Peter
 
Last edited:
After applying some rivets on the water tank at the places that can be seen later:
View attachment 488915
The tank placed, 3 horizontal floor profiles applied. Then I could bend the outer floor profile in its double curve. This also functions as a bilge stringer.
Here again, after a lot of fitting, bending and measuring I could glue it in place.
Continue with the rest of the frames ........
Regards, Peter
Good morning Peter. Incredible. My superlative for this week ;). Cheers Grant
 
I love the structural aspect of this ship, being formed with angle iron and beams. And your approach using plastic makes it very convincing at scale, not to mention the thousands of rivets that are being added for realism and detail. You’re doing a fantastic job as usual and I look forward to your updates with enthusiasm. ;)
 
I love the structural aspect of this ship, being formed with angle iron and beams. And your approach using plastic makes it very convincing at scale, not to mention the thousands of rivets that are being added for realism and detail. You’re doing a fantastic job as usual and I look forward to your updates with enthusiasm. ;)
Thanks for your very nice, inspiring and friendly words, Dean. Although I have been building frames for over a year, I am not bored yet. The construction of the structure continues to fascinate. With the occasional distraction such as the build of the forecastle, it remains fun. That ensures that I can now think specifically about the design of the aft accommodation. And many other challenges ........
So for sure …. al lot of updates to come.
Regards, Peter
 
Your choice of Evergreen pays big dividends. As you know, I tried to build the torsion box of my Kolibri using Evergreen materials, but, unlike your Balder, the Kolibri's geometry, combined with the thin plastic sheets and profiles, did not yield a robust construction.
Using brass plate, i.c.w. some plastic profiles and sheet provides a better, stiffer torsion box.
Lesson to be taken away: thin plastic materials can be used for construction, provided one has a suitable geometry. In other words, the stiffness comes from both the materials used, as well as from the height and width of the subject.

The Balder is really taking shape now, with stunning results. Looking forward to the sheeting of the hull.
Hi, Johan. I fully agree with you that it depends on what kind of construction the use of Evergreen is useful of not. I am sure that for some deck structures I will also have to work with brass and getting better skills for soldering. Or (again) being creative with CA.;)
Installing the frames is almost to the end. But I am still sorting out what the next step will be. What is the best to do first now that I can still work through the openings between the frames.
Regards, Peter
 
I sure hope some of that framework will be visible on the end result. It’s too beautiful to hide.
Thanks, Marco. The port side will be completely build like the original and the starboard side will be like now with a view on the construction. Only the structure of the railing and some additional object on it must be build.
Regards, Peter
 
Back
Top