Black Pearl 1:50 ZHL All-Scenario version

Captain's Log ~~~ March 27, 2021

Build time today: 1.5 hours
Total build time: 2.5 hours

Construction start for the Black Pearl (All-Scenario version)

Outlining the Black Pearl Steps 1 through 26 in Pole #1 plan book
Remove parts 1 & 2 (5mm) —Keel
Remove parts 3-16 (6mm) —Bulkheads
NOTE: Parts 3 (combo of parts K5 & J21), 15, & 16 will not be set into the keel at this time. Place them aside from the other bulkheads.
Remove parts 17, 18, & 19 (2 each) (5mm)—Keel reinforcers.
Remove part 21 (lower deck) and set it off to the side.
Remove parts A1-A7 (6mm)—Starboard Bulkhead halves on the walnut board.
Remove parts 6D-12D (2 each) off the (3mm) board.
The above parts (excluding parts 3, 15, & 16) are the only parts used for Steps 1-26.

WARNING: Follow the plans with an open mind and try to familiarize yourself with the parts. Study the pictures and be prepared to improvise! Chinese to English translation and build transition in the kit plans can leave a lot more questions than answers.

This is me when I don’t follow my own advice.
View attachment 223714

Steps & Notes for construction on this phase:

1. Observe the fairing lines on any of the bulkheads and do some of the rough sanding prior to gluing the ribs to the keel. NOTE: Keep the groove on all the right side bulkheads. Do not sand flush!
2. If you are installing LED lights, now is a good time to drill holes in the bulkheads for any bus lines or wires, before gluing them to the keel.
WARNING: Mistake 1: I drilled my wire holes too close to the keel slot in my first three bulkheads...measure out at least 3/4-1" to make sure the center bulkhead holes clear parts 17-19 that go in after the bulkheads are glued to add additional support to the keel. Luckily, I caught this mistake but I will still have to re-drill the holes for those first three bulkheads. Arrrgggghhh!

View attachment 223715
3. Dry fit the bulkheads and get comfortable with their relationship to each other. Firm fit but not too tight to the keel. Don’t rush to pick up the glue.
4. Dry fit the lower deck and note it’s relationship to the bulkheads and keel. Make pencil marks to note the relation of the deck to the
bulkheads.

View attachment 223717

View attachment 223718

View attachment 223733

View attachment 223734

At this stage, I once again removed the bulkheads and was overthinking a bit. I used my micrometer to mark center point to center point in millimeters from bulkhead center to center. (just approximations, for what use I don't know but it seemed to be useful at the moment) I forgot to take a picture of the lower deck dry fit.

NOTE: Mixing some 502 CA adhesive to a good wood glue like Titebond Ultimate will enhance the bonding performance. A strongly bonded ship skeleton will endure the rigors of planking and future sanding and it seems like a good idea.

View attachment 223743

5. READY FOR GLUE. Place down some parchment or wax paper to cover
the work area for gluing the keel. Square up the keel and glue it together.
(Parts 1 & 2) Allow glue to thoroughly dry.

View attachment 223752

Following the charts of those who proceeded me, I grabbed anything that would add some weight to the keel to keep it flat so it would not buckle to the drying glue. Waited almost 24 hours before moving on.

NOTE: It is very important to square all parts when gluing the bulkheads to the keel. It may be best to work from the middle of the hull outward, leveling, squaring, and gluing each bulkhead one at a time. Right angle brackets, a small level, various clips and vises can be your best friend. Make sure to keep the right side bulkheads level and in alignment with each other. Let the glue thoroughly dry before proceeding!

View attachment 223792


View attachment 223795

I only glued the first three bulkheads today (#9, #10, & #11) starting from the center and working stern to bow. From all that I have read, it seems that you can't underestimate the importance of keeping everything squared and level. The plan instructions emphasize the importance to make sure that the right side (starboard) bulkheads are level to each other. I used the green level above to show me that reality and I used the yellow level to check each bulkhead.

NOTE: I chose to dry fit parts 17, 18 & 19 to help determine the correct positions of the bulkheads. I was careful to not be sloppy with the glue so they should be able to come back out as I proceed to the next grouping and then I will re-insert them to help again with the alignment

6. After all bulkheads are in place, proceed with fitting and gluing parts 17, 18, & 19 (2 each) to the keel. With proper alignment this step will add integrity and strength to the keel. Again, keep things square then glue and clamp as needed.

7. Once the glue dries take the lower deck and carefully dry fit it into place. Be careful to not force anything. Make any pencil marks as needed then remove the deck. NOTE: Use a razor knife to deepen the laser lines of the deck, making the boards more vivid after finishing. Lightly sand and apply your finish to the lower deck and set it aside to dry. Once satisfied, glue the lower deck into position and adding some weight to the deck is a good way to make sure it is contacting all surfaces while the glue is drying.
  1. Staining all the bulkheads is not necessary but you may want to finish the visible walnut bulkheads (A1-A7) on the exposed starboard side to match your chosen finish for the interior cells, posts, and beams of the lower deck.
  2. The next step after all the glue is dry is to finish, fit and glue parts A1-A7. These are the walnut bulkheads and they must be installed symmetrical to the opposite side. At this point, it seems this task would be much easier if you dry fit the main deck to these bulkheads before gluing them into place. An ounce of prevention here, will save a pound of cure later if things are not square and the main deck won’t fit in.
  3. Finally, follow the plans for placement of parts 6D-12D (2 each). Working with the parts in #2 above to achieve the correct alignment.
At this point, 10% of the Pole #1 plan book will be complete.

Mates, I will work through the above steps and report back with further comments and pictures. A few sidebars as well for keeping things interesting.

Be well and ahoy all.
Hola
 
Thank you Paul....coming from you and the work you do (beyond excellent), I’ll be smiling all weekend! :)
Hola Ahoy, mi nombre es joserra y vivo en Bilbao Vizcaya (España) como comentas que no tienes mucha experiencia, te recomiendo una página Web que tenemos en España, la dirección de la página Web es la siguiente: foromodelismonaval.es.
En esta página web puedes encontrar la mayoría de trucos y maneras de construir «cualquier modelo», que puedas imaginarte y verás la construcciones de diferentes modelos. Te recomiendo que si quieres y te apetece, veas la construcción del navío SANTISIMA.TRINIDAD, de Liberto Amate, creo que te encantará, sin otro particular te mando un saludo muy cordial, Joserra Iturriarte (joserraitu) que es mi nik
Hola Joserra, te doy la bienvenida a mi sitio de construcción de la Perla Negra!Muchas gracias por proporcionarme el sitio web para ayudar a los modelistas como yo.Sí, este es mi primer modelo, y aunque hay mucho que aprender para hacer un modelo de barco respetable, estoy disfrutando mucho del desafío y solo quiero que sea divertido de hacer.Estoy aprendiendo mucho del sitio web de Ships of Scale y he llegado a conocer a muchas personas talentosas que están construyendo sus propios barcos.
Ahoy mate,
Rick
 
Last edited:
¡Bienvenudo, Joserra!
Hi Vic,
I had to use a Spanish translator to understand Joserra’s message!:)
He gave me a website that looks to be a European version of Ships of Scale: foromodelismonaval.es I noticed several builds on the Soleil Royal as well as a few on the San Felipe. I’ll check out the site further when I get a chance. When you get there, it’s in Spanish, I think. You can select English in the upper tab to follow the site. Be well.
Rick
I was actually able to read and understand about 90% of it. Living in San Antonio gives an opportunity to practice my high school Spanish. Unfortunately, my German is getting rustier all the time. All I can do there is watch German TV on my phone or computer occasionally.
 
Captain's Log ~~~ May 21, 2021
Build time today: 5 hours
Total build time: 149 hours

Construction for the Black Pearl (All-Scenario version)

Build guidelines: At this stage of the 1st Pole, the Captain has been sailing the ship through various steps in random order. Generally speaking STEPS 130-134 are complete, STEPS 149-156 (wire completion in the hull) is complete as the hull is now planked. STEPS 164-173 are completed and STEPS 246-258 are completed, (Coffin assembly) Estimated 67% completion of the first pole.

Last week our voyage completed the 1st planking Portside. This week began with the 1st planking of the Starboard side.
View attachment 234606

As this was my first attempt at planking a model ship, I continued to experiment with different ways of sectioning the planks, gluing with either Titebond or Super glue, using a heat gun, soaking planks, etc.
The following are three pics after the 1st planking was completed and I applied plastic wood and did some rough sanding.

View attachment 234608
View attachment 234609
View attachment 234610

I continued to work with the plastic wood in order to make up for my inexperience with how to correctly plank a model ship. I will say that the only way to truly understand how to do such a job, is to "just do it". All the reading and studying doesn't measure up when you have your fingers glued together with super glue as you're trying to line up planks...
After a few hours, here are three more pics after the 2nd sanding.

View attachment 234611
View attachment 234613
View attachment 234614

So, at this time I decided to give the wood putty and sanding a break and start with firming up the stern area. Parts K1-K3 form the border of the stern and the base of the Captain's cabin.
View attachment 234615
The Titebond bottle was almost a perfect size for shaping the one piece for the stern. Soaked it for thirty minutes and used rubber bands to secure it to the bottle and used the heat gun on a lower temp to dry it out.
View attachment 234616
I glued it up to the previous stern piece that was secured to the "K" horseshoe above and let it dry. This is where things went awry....yes, its time for Ricky F. Up to visit.
View attachment 234617
What do you notice about the following picture?
View attachment 234618
You guessed it mates. I forgot to glue in the Captain's Quarters floor. No going back from this point because everything was already glued in. My only alternative was to trim down the floor and fit it as snug as I could. I also had to continue upward with my positive (+) and negative (-) feed wires so I drilled holes and set the deck.
View attachment 234619
I trimmed up the rear and side sections and lightly filed the joints smooth.
After, I got through this disaster, it was back to more sanding...It seems the one thing my knucklehead got right was to keep sanding until things are real smooth. So, I kept sanding until I finished the 3rd go around.
View attachment 234620
View attachment 234621
View attachment 234622
I could go on and on with the sanding pics....I think I kept using the putty and the sand block because I was afraid to sail on to the second planking. Finally, I got the courage after trying to figure out all the ways to start. I stole Jodie's strategy and followed his course.
View attachment 234623
I laid my 1st plank just in line with the top of the gun ports. I laid planking bands from the keel toward the bottom of the gun ports after marking them 5-8 planks wide....but abandoned the idea.....I did keep them on with the masking tape just to see how they lined up with me working from the top to the keel.
View attachment 234624

Moving along with some of the gun ports and sweep ports cut out and still trying to visualize things. I must admit that the thin walnut planks were much easier to work with. I was taking my time and alternating how I was fitting the planks and I'm pleased with how this stage is going since I never did this planking before. ARE THERE MISTAKES,? HELL YEAH! However, I can see if I take my time and don't rush things, by the time the stain and varnishing is done, I hope to have a nice looking hull for my first voyage. (from my perspective)
View attachment 234625
This is where I finished up for today Portside. Now, for a relaxing shore leave weekend...no work in the shipyard planned. Next week will be more planking and hopefully another Captain's log by June 1st.

Ahoy mates, thanks for keeping me on course. I welcome all comments, good or bad...LOL!
Have a great weekend.
Rick

The model is coming along nicely.
You seem to be doing a better job at your 1st model than I did.

When clicked on, your images don't expand to see details.
This would be nice.
 
The model is coming along nicely.
You seem to be doing a better job at your 1st model than I did.

When clicked on, your images don't expand to see details.
This would be nice.
Thanks Rowboat...nice to hear from you! I’m in a very slow stage right now...I have a few unique ideas how I want my final ship to be displayed and it requires that some of the cannons will be removable and they are taking me a long time to do because I did a bit of overkill on the detail...

Not sure about the pics....on my IPad I can expand them either by selecting them or using my thumb and forefinger to expand them....??
 
Hey man, I discovered over the weekend that about the last step in the second manual is to cut a hole for the upper portion of the rudder to go up into the bottom of the ship. It's like step 80 in the second book, or something like that, couldn't help but think that step should be about where you are so you can do it with the ship upside down and not have to stand on your head or break a bunch of deck furniture. Take a look at it when you get a minute.
 
Hey man, I discovered over the weekend that about the last step in the second manual is to cut a hole for the upper portion of the rudder to go up into the bottom of the ship. It's like step 80 in the second book, or something like that, couldn't help but think that step should be about where you are so you can do it with the ship upside down and not have to stand on your head or break a bunch of deck furniture. Take a look at it when you get a minute.
Hey Jodie! Thanks for the heads up! I’ll check it out. I’m working on cannons and making ram rods. Haven’t laid the main deck yet! Probably won‘t finish up the gun deck for a couple more weeks and then I’ll lay the main deck and complete the sides where there are three pieces running starboard and port side for the upper hull...then will likely move to put finish on the hull. Be well mate!
 
Hey Jodie! Thanks for the heads up! I’ll check it out. I’m working on cannons and making ram rods. Haven’t laid the main deck yet! Probably won‘t finish up the gun deck for a couple more weeks and then I’ll lay the main deck and complete the sides where there are three pieces running starboard and port side for the upper hull...then will likely move to put finish on the hull. Be well mate!
I noticed the same thing. They should have placed that step earlier.
 
Pirate Lore, Myths & Legends #7 (Part l)

Since I am spending an inordinate amount of time making my own original and unique “look” for my cannons and accessories to the Black Pearl, I wanted to research the armaments that were common to these ships of the 1700’s. Now, please understand that my finished designs for my cannons which I will display in my next Captain’s Log, is much too ornate for Captain Jack Sparrow’s ship. However, my ship’s crew deserves nothing but the best and I’ll explain my reasoning for making them look like they came off a Royal Navy flagship inside my next log!

For now, let’s learn a little about the cannons that were likely used during the height of Piracy!

The Pirate Empire

Fascinating facts about Pirates, their lives, weapons, ships, and history, by the author of The Pirate Empire, available on Amazon.

Pirate Cannons and How They Work
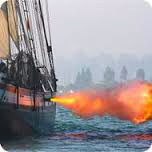
1623122147221.png

“Run out the guns!”

A pirate vessel comes sailing over the horizon, and the crew of the merchant ship they approach cowers in terror. For not only is the deck swarming with pirates, waving pistols, swords and machetes, but along the vessel’s side, a row of ports open and the cannons are pushed out, ready to deal death to any who defy these robbers.

Cannons were one of the marks of a pirate ship. But how did these things work?

doc3.jpg

In the first place, not all cannons were the same. There was the matter of size. Naval guns during the Golden Age of Piracy were based, not on caliber, but on the number of pounds that the cannon ball weighed. Thus, you had a 4-pounder, a 6-pounder, and on up through the 12, 18, 24, 36 and 42 pound cannons. The only cannon with an odd-pound rating was the “long nine” a gun which was usually mounted to fire over the bow or stern of the ship, instead of directly perpendicular to the keel. It had a longer barrel to help give it a longer range.

Most of these sizes, however, were limited to huge naval vessels. Since most pirate ships were smaller, nimbler vessels, they rarely had weaponry rated at more than six pounds. We will discuss a six pound cannon for the rest of this article.

(An aside – why didn’t pirates have the very biggest guns in existence? In the first place, cannons took up space, and there was only so much space available on the ship. The pirates had to live and sleep somewhere. Heavier weapons also meant that, for the ship to float, she could take on less cargo or plunder. And there’s also the problem that, in order to get a 24-pound cannon, the pirates would have to take it away from someone who was already using it. Not an easy thing to do.)

Doc2.jpg

Cannons at sea were most often of brass construction. Brass was lighter and did not corrode in salt air, as iron did. Cannon balls were iron. (Some folk have erroneously thought that the cannon balls were lead, like pistol and musket shot. But those weapons were intended for use against people, and cannons attacked oaken ships and stone forts.)

A 6-pound brass cannon weighed approximately 1200 pounds, including the gun carriage, the four-wheeled wooden “cart” that the cannon sat on. Range could be up to 1500 yards, but the round shot quickly wandered in its trajectory, and was very hard to aim at extreme range.

On a small ship, like a pirate vessel, guns were typically kept on the open deck, not on a specialized gun deck with gun ports. There simply wasn’t room below. Cannons were typically protected by canvas covers. Care of the guns was the business of the Master Gunner and his assistant, the Gunner’s Mate. The weapons took some damage themselves every time they were fired, and an improperly maintained gun was a greater danger to its crew that to the enemy. (For example, Henry Avery’s great prize, the Ganj-in-sawi may have only fallen because one of her own cannons exploded on the deck, blowing a hole in the side of the ship and killing dozens of her crew.)

doc10.jpg

Cannons of the era were essentially long tubes made of brass, bronze or iron closed at one end. A small hole called a touch hole was drilled through the wall of the barrel near the closed end.

Loading and firing a cannon went as follows:

The powder had previously been carefully measured and packed into a canvas bag shaped to fit. These bags were stored in the powder room. During battle a crew member, carefully dressed in clothing and shoes that would not generate a static spark, stood in the powder room passing the bags to runners who carried them to the gun. This system minimized the chance of an accidental explosion. On navy ships these runners were often orphaned boys called “powder monkeys” who lived on the ship. Pirates almost never employed children, and used the less skilled members of their crews instead.

doc12.jpg

The load of gunpowder was shoved down the muzzle of the gun and pushed all the way in by a man with a tool called a rammer. Next a “wad” went in. This was a wad of cloth, oakum, cotton, or even old rags. Because of the unsophisticated manufacturing techniques of the time, the cannon balls did not fit tightly in the barrel of the gun. (Better to have the fit too loose than to make a cannon ball that was too big to fit.) The wad took up extra space, and guaranteed that the ball would leave the cannon with maximum pressure behind it.

doc7.jpg

The wad was also rammed into the cannon. The cannon ball went next. Our 6 pound cannon would take a ball of about 3 ½ inches diameter. This would probably roll to the back of the cannon, as the barrel of the gun was almost certainly elevated at an angle.

A pick was poked through the touch hole to rupture the bag full of powder, so fire could reach the contents.

Next the gun was run forward against the railing of the ship or poking out the gun port. It was aimed, usually by the gun captain, the leader of the gun crew, or group that serviced this particular cannon. Gun crews were assigned to a particular cannon, as each had its own peculiarities, and it was best for a crew to be as familiar as possible. Aiming had to take into account the pitch, roll and yaw of the ship, as well as wind, wave and the movement of the enemy vessel. It was one of the most difficult jobs on a ship. And yet gun crews, in practice, could achieve amazing accuracy.

doc4.jpg

At the right moment, the gun captain called to yet another man who was standing by holding a tool with a lighted fuse on the end of it. This fuse was made of a substance called “slow match” which, as the name says, burned very slowly, at the rate of about a foot an hour. This slow match was held on the end of a long stick. This was the original “fire in the hole.” The man using it could stand back, away from the rear of the cannon, and apply the burning match to the touch hole, where it met the gun powder.

doc6.jpg

Immediately two thing happened. The cannon ball and wadding shot out the barrel of the cannon, and the gun itself leaped backward. (For every action, there is an equal and opposite reaction.) Of course the gun was restrained, by heavy ropes so it could not go too far. But the recoil-driven movement was necessary, for it brought the cannon back away from the side of the ship, putting it into position to be loaded again.

There was one more thing, however. The last member of the gun crew, the sponger, needed to do his job. Dipping a sponge, on the end of a pole, into a nearby bucket of water, he would sponge out the inside of the gun, cleaning out any power char or burning wadding, making it safe to put powder back into the gun.

Repeating this process, over and over, on a crowded deck while taking fire from an enemy vessel, was dangerous, nerve wracking, and exhausting. The team needed to work together, and every man had to do his job. Many things could go wrong. If the gun was incorrectly sponged out, the fresh load of gunpowder might explode prematurely. Cannonballs might fall to the deck, rolling and becoming a hazard. The back might blow off the gun, if the area around the touch hole had become worn or corroded. Or the gun might break loose from the ropes holding it, becoming a 1200 pound wheeled death wagon.

The saying “loose cannon” comes from this. On the deck of a moving ship, the cannon might move in any direction, destroying everything around it, crushing men, breaking the feet of anyone it rolled over, and possibly even punching right out the side of the ship that held it. The only way to contain it was to re-rope it and tie it down, risking being run down.

All of this, of course, was why merchant ships usually gave up without a fight.

The most dangerous pirate ships were those with several mounted cannons - ideally, at least ten. Large pirate ships, such as Blackbeard's Queen Anne's Revenge or Bartholomew Roberts' Royal Fortune had as many as 40 cannons on board, making them a match for any Royal Navy warship of the time. Cannons were very useful but somewhat tricky to use and required the attention of a master gunner. They could be loaded with large cannonballs to damage hulls, grapeshot or canister shot to clear decks of enemy sailors or soldiers, or chain shot (two small cannonballs chained together) to damage enemy masts and rigging. In a pinch, just about anything could be (and was) loaded into a cannon and fired: nails, bits of glass, rocks, scrap metal, etc.

Accessories:

Shot:​

In addition to varying shot weights, different types of shot were employed for various situations:

Round shot: Solid spherical cast-iron shot, the standard fare in naval battles.

Canister shot: Cans filled with dozens of musket balls. The cans broke open on firing to turn the gun into a giant shotgun for use against enemy personnel.

Grapeshot: Canvas-wrapped stacks of smaller round shot which fitted in the barrel, typically three or more layers of three. Some grape shot was made with thin metal or wood disks between the layers, held together by a central bolt. The packages broke open when fired and the balls scattered with deadly effect. Grape was often used against the enemy quarterdeck to kill or injure the officers, or against enemy boarding parties.

Chain-shot: Two iron balls joined together with a chain. This type of shot was particularly effective against rigging, boarding netting, and sails, since the balls and chain would whirl like bolas when fired.

Bar shot: Two balls or hemispheres joined by a solid bar. Their effect was similar to chain shot.

Expanding bar shot: Bar shot connected by a telescoping bar which extended upon firing.

Link shot: A series of long chain links which unfolded and extended upon firing.

Langridge: Bags of any junk (scrap metal, bolts, rocks, gravel, old musket balls, etc.) fired to injure enemy crews.

Fire arrows: A thick dartlike incendiary projectile with a barbed point, wrapped with pitch-soaked canvas which took fire when the gun was fired. The point stuck in sails, hulls, or spars and set fire to the enemy ship.

Heated shot: Shore forts sometimes heated iron shot red-hot in a special furnace before loading it (with water-soaked wads to prevent it from setting off the powder charge prematurely). The hot shot lodging in a ship's dry timbers would set the ship afire. Because of the danger of fire aboard, heated shot were seldom used aboard ships.

Molten iron shell: A variation on heated shot, where molten metal from a furnace is poured into a hollowed out shell and then allowed to cool briefly to seal the molten metal in before firing. HMS Warrior (1860) was outfitted to fire molten shells.

Double shot: Two round shot or other projectiles loaded in one gun and fired at the same time. Double-shotting lowered the effective range and accuracy of the gun, but could be devastating within pistol shot range; that is, when ships drew close enough for a pistol shot to reach between the two ships. To avoid bursting the gun, reduced powder charges were used. Guns sometimes were double-shotted with canister or grape on top of ball, or even triple-shotted with very small powder charges which still were enough to cause horrible wounds at close range.

Exploding shell: Ammunition that worked like a grenade, exploding and sending shrapnel everywhere, either by a burning fuse which was cut to a calculated length depending on the range, or (after 1861) on contact with the target. Shells were often used in mortars, and specialized and reinforced "bomb vessels" (often ketch-rigged so that there was less rigging to obstruct the high-angle mortar shell) were adapted to fire huge mortars for shore bombardment. The "bombs bursting in air" over Fort McHenry in the American national anthem were this type of projectile.

Gun Crews:

Gun crews consisted of between a minimum of seven and a maximum of fourteen men around the gun. They consisted of the following:

Gun Captain: Fired the gun and assisted in its handling during combat.

Second Captain: Would normally act as a gun captain on the opposite side of the ship the gun captain was working on, if both sides of the ship were engaged.

Loader: stood to the left of the muzzle, and would load the gun with cartridges and shots, and wads.

Gun Crew
Gun Crew

Assistant Loader:Stood behind the loader, and would pass him wads and shots.

Sponger: Stood to the right of the gun muzzle, and rammed cartridges and shots down into the gun chamber with the rammer, as well as cleaned the gun vent with the worm, and sponged the inside of the gun down to extinguish stray sparks.

Assistant Sponger: Handed the sponger his tools in combat, standing directly behind him.

Handspike Man 1 and 2: These two stood behind the gun to the right and left. They elevate and depressed the gun using their handspikes, or giant wooden crowbars, and also levered the gun left or right.

Powder Carrier: Usually younger boys, they would hand the cartridge over to the loader, as well as run down to the magazine, retrieve a new cartridge, and bring it back up to the gun in order to keep the flow of powder moving in battle.

Auxiliaries: There were normally five auxiliaries, who stood on either side of the gun, and would haul on the side tackles to move the gun forward and point the muzzle out of the gun port.


Well mates, this info may not be specific to just a Pirate ship, but nonetheless, ship battle was not for the faint of heart! We will continue with Part ll in the not too distant future.

Ahoy all!
 

Attachments

  • 1623121995149.png
    1623121995149.png
    35.4 KB · Views: 10
  • 1623121995748.png
    1623121995748.png
    650.2 KB · Views: 10
Last edited:
Captain's Log ~~~ June 14, 2021
Build time today: 1 hours
Total build time: 190 hours

Construction for the Black Pearl (All-Scenario version)

Build guidelines: Hello mates! Well, another 20 hours of work has been completed since the last Captain's log on June 4th. Finally, I have reached a point that the gun deck can be completed this week and the main deck will be able to be assembled. First another shout-out to Jodie @MystRacing who tipped me off to cut out the rudder position in the hull before moving too far ahead of my current build. This particular step isn't mentioned until you reach Step 108 in the 2nd Pole book. To Jodie's point, if it was mentioned within the 1st Pole, you could complete this step within the 1st Pole book and not have to flip the ship upside down later in the build after the ship and all its deck fixtures are completed. So, I heeded Jodie's advice and prepared the rudder opening in the hull.

1.JPG
2.JPG
3.JPG
The top of the rudder requires you to trim out the notched cut-out. I also rounded off the top of the rudder to make sure it didn't interfere with the keel.
4.JPG

SIT BACK MATES....GET YOUR POPCORN and watch this 2 1/2 minute video from the History Channel on Pirate Cannons. You may have to endure an ad or two before the video starts but it gives some good history on ship guns and the video steered me in my direction of how I wanted to display my ship's guns.

HIT THE LINK BELOW:

I wanted my ship once displayed, to be able to tell a story. Since, the All-Scenario version is a cut-away model, I decided early on that I wanted to be able to flip the gun deck cut-out so that the view to the lower deck and all its accessories could be better viewed.

Here is the deck without any guns:
5.JPG
And here is the deck portion flipped up for viewing into the lower deck:
6.JPG
Obviously, to do this type of display the guns cannot be permanently glued in over that portion of the deck so I will drill little holes to position the guns so they can be placed and removed, depending how I want the ship to look. Now, what I am sharing here in this Captain's Log is not a totally completed look but maybe only a few hours away from final paint, lashings, etc...just to give you a better idea is my intent here.

7JPG.JPG

Step 243 of the 1st Pole is the base assembly and at this point I had to jump ahead and get the base completed so the eight guns could be positioned. I am using a 3v AC power adapter run from the back side of the coffin. I lined up the two poles atop the coffin with the ship's copper strips on the outside of the keel.

8.JPG
Here's another look at the base (not stained yet) above and eight guns placed into their holes. Below I used a toothpick behind the front wheel axle of each gun and glued it into a hole drilled into the gun base. Then, snipped the toothpicks about a 1/4" beyond the wheels to fit into the holes drilled into the deck. I'll likely drill two holes for each gun so I can show the guns in firing position or back from the gun port at rest.

9.JPG
Now, you might ask why would I do something like this....:):)
As the History Channel told us, most Pirate ships had various guns. Most likely stolen from captured ships or wherever they could make it feasible to move these heavy guns onto their ship. So, my Black Pearl will have various looking guns.

IMG_5211.JPG

The featured pieces above will be used to finish the gun deck.
I made 14 rams for the guns by trimming down two toothpicks to size. I read somewhere that 1:48-50 Scale is about 1/4" per foot. Since most Pirate ship cannons were using 4-8 lb shot, the rams for these guns were about 8' long. So, I made the rams a little more than two inches. Also, there were bars to lift and move the cannons for each gun crew. I used a finishing nail and hammered the end flat and ground it on the wheel for my crow bars. Most shot was 3 1/2-4" wide. I felt the shot provided in the kit were way too small...almost like sand granules. So, I went to the Admiral's pantry and swiped the mustard seeds from her cantina....painted them and glued them into the triangles.

Here's a few closer looks at a couple of guns.

17.JPG
18.JPG
19.JPG
I'll spread a few buckets around each gun and then pretty much call it a day.
Here's a look at my hammocks. Will likely place 5 of them.

IMG_5213.JPG
IMG_5218.JPG
IMG_5220.JPG

Well mates, that's about where we stand after 190 hours. Seems like a lot of time but it's less than 8 days of model building. We will reach the 3 month mark on June 27th....so, for my first build I feel that we have made good progress. As we seal up the gun deck, I'll likely take a break and slow it down some as we move into the next phase of the build.

Ahoy all,
Rick
 
Last edited:
Captain's Log ~~~ June 14, 2021
Build time today: 1 hours
Total build time: 190 hours

Construction for the Black Pearl (All-Scenario version)

Build guidelines: Hello mates! Well, another 20 hours of work has been completed since the last Captain's log on June 4th. Finally, I have reached a point that the gun deck can be completed this week and the main deck will be able to be assembled. First another shout-out to Jodie @MystRacing who tipped me off to cut out the rudder position in the hull before moving too far ahead of my current build. This particular step isn't mentioned until you reach Step 108 in the 2nd Pole book. To Jodie's point, if it was mentioned within the 1st Pole, you could complete this step within the 1st Pole book and not have to flip the ship upside down later in the build after the ship and all its deck fixtures are completed. So, I heeded Jodie's advice and prepared the rudder opening in the hull.

View attachment 238909
View attachment 238910
View attachment 238911
The top of the rudder requires you to trim out the notched cut-out. I also rounded off the top of the rudder to make sure it didn't interfere with the keel.
View attachment 238914

SIT BACK MATES....GET YOUR POPCORN and watch this 2 1/2 minute video from the History Channel on Pirate Cannons. You may have to endure an ad or two before the video starts but it gives some good history on ship guns and the video steered me in my direction of how I wanted to display my ship's guns.

HIT THE LINK BELOW:

I wanted my ship once displayed, to be able to tell a story. Since, the All-Scenario version is a cut-away model, I decided early on that I wanted to be able to flip the gun deck cut-out so that the view to the lower deck and all its accessories could be better viewed.

Here is the deck without any guns:
View attachment 238920
And here is the deck portion flipped up for viewing into the lower deck:
View attachment 238921
Obviously, to do this type of display the guns cannot be permanently glued in over that portion of the deck so I will drill little holes to position the guns so they can be placed and removed, depending how I want the ship to look. Now, what I am sharing here in this Captain's Log is not a totally completed look but maybe only a few hours away from final paint, lashings, etc...just to give you a better idea is my intent here.

View attachment 238922

Step 243 of the 1st Pole is the base assembly and at this point I had to jump ahead and get the base completed so the eight guns could be positioned. I am using a 3v AC power adapter run from the back side of the coffin. I lined up the two poles atop the coffin with the ship's copper strips on the outside of the keel.

View attachment 238923
Here's another look at the base (not stained yet) above and eight guns placed into their holes. Below I used a toothpick behind the front wheel axle of each gun and glued it into a hole drilled into the gun base. Then, snipped the toothpicks about a 1/4" beyond the wheels to fit into the holes drilled into the deck. I'll likely drill two holes for each gun so I can show the guns in firing position or back from the gun port at rest.

View attachment 238924
Now, you might ask why would I do something like this....:):)
As the History Channel told us, most Pirate ships had various guns. Most likely stolen from captured ships or wherever they could make it feasible to move these heavy guns onto their ship. So, my Black Pearl will have various looking guns.

View attachment 238925

The various pieces above will be used to finish the gun deck.
I made 14 rams for the guns by trimming down two toothpicks to size. I read somewhere that 1:48-50 Scale is about 1/4" per foot. Since most Pirate ship cannons were using 4-8 lb shot, the rams for these guns were about 8' long. So, I made the rams a little more than two inches. Also, there were bars to lift and move the cannons for each gun crew. I used a finishing nail and hammered the end flat and ground it on the wheel for my crow bars. Most shot was 3 1/2-4" wide. I felt the shot provided in the kit were way too small...almost like sand granules. So, I went to the Admiral's pantry and swiped the mustard seeds from her cantina....painted them and glued them into the triangles.

Here's a few closer looks at a couple of guns.

View attachment 238926
View attachment 238927
View attachment 238928
I'll spread a few buckets around each gun and then pretty much call it a day.
Here's a look at my hammocks. Will likely place 5 of them.

View attachment 238929
View attachment 238930
View attachment 238931

Well mates, that's about where we stand after 190 hours. Seems like a lot of time but it's less than 8 days of model building. We will reach the 3 month mark on June 27th....so, for my first build I feel that we have made good progress. As we seal up the gun deck, I'll likely take a break and slow it down some as we move into the next phase of the build.

Ahoy all,
Rick
What happens if the mustard seed sprouts? ;)
 
Captain's Log ~~~ June 14, 2021
Build time today: 1 hours
Total build time: 190 hours

Construction for the Black Pearl (All-Scenario version)

Build guidelines: Hello mates! Well, another 20 hours of work has been completed since the last Captain's log on June 4th. Finally, I have reached a point that the gun deck can be completed this week and the main deck will be able to be assembled. First another shout-out to Jodie @MystRacing who tipped me off to cut out the rudder position in the hull before moving too far ahead of my current build. This particular step isn't mentioned until you reach Step 108 in the 2nd Pole book. To Jodie's point, if it was mentioned within the 1st Pole, you could complete this step within the 1st Pole book and not have to flip the ship upside down later in the build after the ship and all its deck fixtures are completed. So, I heeded Jodie's advice and prepared the rudder opening in the hull.

View attachment 238909
View attachment 238910
View attachment 238911
The top of the rudder requires you to trim out the notched cut-out. I also rounded off the top of the rudder to make sure it didn't interfere with the keel.
View attachment 238914

SIT BACK MATES....GET YOUR POPCORN and watch this 2 1/2 minute video from the History Channel on Pirate Cannons. You may have to endure an ad or two before the video starts but it gives some good history on ship guns and the video steered me in my direction of how I wanted to display my ship's guns.

HIT THE LINK BELOW:

I wanted my ship once displayed, to be able to tell a story. Since, the All-Scenario version is a cut-away model, I decided early on that I wanted to be able to flip the gun deck cut-out so that the view to the lower deck and all its accessories could be better viewed.

Here is the deck without any guns:
View attachment 238920
And here is the deck portion flipped up for viewing into the lower deck:
View attachment 238921
Obviously, to do this type of display the guns cannot be permanently glued in over that portion of the deck so I will drill little holes to position the guns so they can be placed and removed, depending how I want the ship to look. Now, what I am sharing here in this Captain's Log is not a totally completed look but maybe only a few hours away from final paint, lashings, etc...just to give you a better idea is my intent here.

View attachment 238922

Step 243 of the 1st Pole is the base assembly and at this point I had to jump ahead and get the base completed so the eight guns could be positioned. I am using a 3v AC power adapter run from the back side of the coffin. I lined up the two poles atop the coffin with the ship's copper strips on the outside of the keel.

View attachment 238923
Here's another look at the base (not stained yet) above and eight guns placed into their holes. Below I used a toothpick behind the front wheel axle of each gun and glued it into a hole drilled into the gun base. Then, snipped the toothpicks about a 1/4" beyond the wheels to fit into the holes drilled into the deck. I'll likely drill two holes for each gun so I can show the guns in firing position or back from the gun port at rest.

View attachment 238924
Now, you might ask why would I do something like this....:):)
As the History Channel told us, most Pirate ships had various guns. Most likely stolen from captured ships or wherever they could make it feasible to move these heavy guns onto their ship. So, my Black Pearl will have various looking guns.

View attachment 238925

The featured pieces above will be used to finish the gun deck.
I made 14 rams for the guns by trimming down two toothpicks to size. I read somewhere that 1:48-50 Scale is about 1/4" per foot. Since most Pirate ship cannons were using 4-8 lb shot, the rams for these guns were about 8' long. So, I made the rams a little more than two inches. Also, there were bars to lift and move the cannons for each gun crew. I used a finishing nail and hammered the end flat and ground it on the wheel for my crow bars. Most shot was 3 1/2-4" wide. I felt the shot provided in the kit were way too small...almost like sand granules. So, I went to the Admiral's pantry and swiped the mustard seeds from her cantina....painted them and glued them into the triangles.

Here's a few closer looks at a couple of guns.

View attachment 238926
View attachment 238927
View attachment 238928
I'll spread a few buckets around each gun and then pretty much call it a day.
Here's a look at my hammocks. Will likely place 5 of them.

View attachment 238929
View attachment 238930
View attachment 238931

Well mates, that's about where we stand after 190 hours. Seems like a lot of time but it's less than 8 days of model building. We will reach the 3 month mark on June 27th....so, for my first build I feel that we have made good progress. As we seal up the gun deck, I'll likely take a break and slow it down some as we move into the next phase of the build.

Ahoy all,
Rick
Well-dressed pirates, matey! All dressed up to go to sleep. I enjoy reading your log, Rick.
 
Well-dressed pirates, matey! All dressed up to go to sleep. I enjoy reading your log, Rick.
Vic, you deserve credit for getting me motivated to give the Pearl a go! Your ship appealed to me a lot and your rigging and sail work will be a guide for me! I’ll be calling on you to help me through,:)
 
Back
Top